Oh, there’s just something so utterly delightful about a perfectly made tart, isn’t there? That moment when you take a bite, and you get that crisp, buttery pastry giving way to a smooth, creamy filling, topped with fresh, vibrant fruit… pure heaven! I’ve always loved a good tart, and these Mary Berry Inspired Mini Fruit Tarts Recipe are just *perfection* for any gathering. They’re just the right size, a little bit elegant, and honestly, they taste like they came straight out of a professional bakery. I remember the first time I made them for a summer garden party; everyone was raving! It’s that combination of textures and the hint of lemon zest that really makes them sing.
Why You’ll Love This Mary Berry Inspired Mini Fruit Tarts Recipe
- Effortlessly Elegant: They look like they took hours, but they’re surprisingly straightforward to whip up – perfect for impressing without the stress!
- Perfect Portion Size: These mini tarts are just the right size for parties, afternoon tea, or a delightful little treat. No need for slicing!
- That Classic Flavour Combo: Buttery pastry, silky vanilla custard, a hint of lemon, and fresh fruit – it’s a timeless taste sensation.
- So Customisable: While the fruit topping is gorgeous, feel free to swap in your favourite seasonal fruits!
- A True Taste of Home Baking: Channel your inner Mary Berry with these charming, traditional little delights.
Ingredients for Your Mary Berry Inspired Mini Fruit Tarts
Gathering your ingredients is half the fun, isn’t it? It’s like getting all your ducks in a row before a lovely baking session. For these little beauties, we’ll break it down into a few parts: the luscious pastry cream, the crumbly tartlet pastry, a little glaze to make them shine, and of course, the fresh fruit topping. Don’t worry if some things seem a bit specific, like caster sugar – it just makes for a smoother mix!
- Pastry Cream Filling
- 1 ½ cups whole milk
- 1 strip lemon peel
- 3 large egg yolks
- ⅓ cup caster sugar
- ¼ cup plain flour
- 1 teaspoon vanilla paste
- Tartlet Pastry
- ½ cup unsalted butter, softened
- ⅓ cup caster sugar
- 1 teaspoon finely grated lemon zest
- 1 large egg
- 2 cups plain flour
- Pinch of salt
- Fruit Glaze
- 1 tablespoon apricot jam
- 1 teaspoon warm water
- Fruit Topping
- 4 ounces blueberries
- 4 ounces raspberries
- 2 kiwi fruits, peeled and sliced
Step-by-Step Instructions for Perfect Mini Fruit Tarts
Right then, let’s get our hands floury! Making these little tartlets is a bit of a process, but honestly, each step is straightforward and incredibly rewarding. I always like to think of it like building something beautiful. We’ll start with that lovely custard, then the pastry, get them baked, and finally, the pretty fruit topping. Don’t rush it; enjoy the process!
- First up, that gorgeous pastry cream! Pour your milk into a saucepan – I like to pop in a strip of lemon peel for extra fragrance while it heats. Warm it gently over medium heat until it’s steaming but definitely not boiling, you don’t want it to scald. While that’s happening, grab a bowland whisk together your egg yolks, caster sugar, and flour until it’s super smooth. It should look like a lovely pale yellow paste. Now, *slowly* pour the hot milk into your egg mixture, whisking constantly. This is important – keep whisking so you don’t end up with scrambled eggs! Remove the lemon peel from the milk mixture and stir in that lovely vanilla paste.
- Pour this whole lot back into the saucepan. Cook it over medium heat, whisking *all the time*, until it thickens up beautifully and starts to bubble. Keep whisking and cooking for just one more minute – this ensures it’s properly cooked through. Pop it into a bowl, press some baking paper right onto the surface to stop a skin forming, and let it chill in the fridge for about an hour. It needs to be nice and cold.
- Now for the star of the show: the pastry! In a clean bowl, beat your softened butter and caster sugar together. You just want to combine them nicely, no need for super creaming here. Stir in your lemon zest and the egg next. Then, add the plain flour and a pinch of salt. Mix it gently until it just comes together into a soft dough.
- Shape the dough into a nice flat disc, wrap it up well in cling film, and pop it in the fridge for at least 30 minutes. This resting time is key for a good pastry; it makes it easier to roll and stops it shrinking too much in the oven. While the pastry chills, preheat your oven to 350°F (175°C).
- Lightly flour your work surface and roll out the chilled dough to about ¼ inch thick. It should be even all the way through. Then, use a round cutter – I use one that’s about 3 inches for mini tins – to cut out 16 circles. Gently press these circles into your mini tart tins, making sure they fit snugly into the base and up the sides. Trim off any excess pastry neatly from the edges. Prick the bases all over with a fork; this stops them puffing up too much.
- Pop the filled tart tins into the freezer for about 20 minutes. Trust me, this step is a game-changer for preventing shrinkage! Then, bake them for 12 to 14 minutes, or until they’re a lovely light golden colour. Let them cool completely on a wire rack before you even think about filling them.
- Time for the glaze! In a very small bowl, stir the apricot jam with the warm water until it’s smooth and brushable.
- Once your tart shells are completely cool, spoon the chilled pastry cream into each one. Spread it out evenly right to the edges.
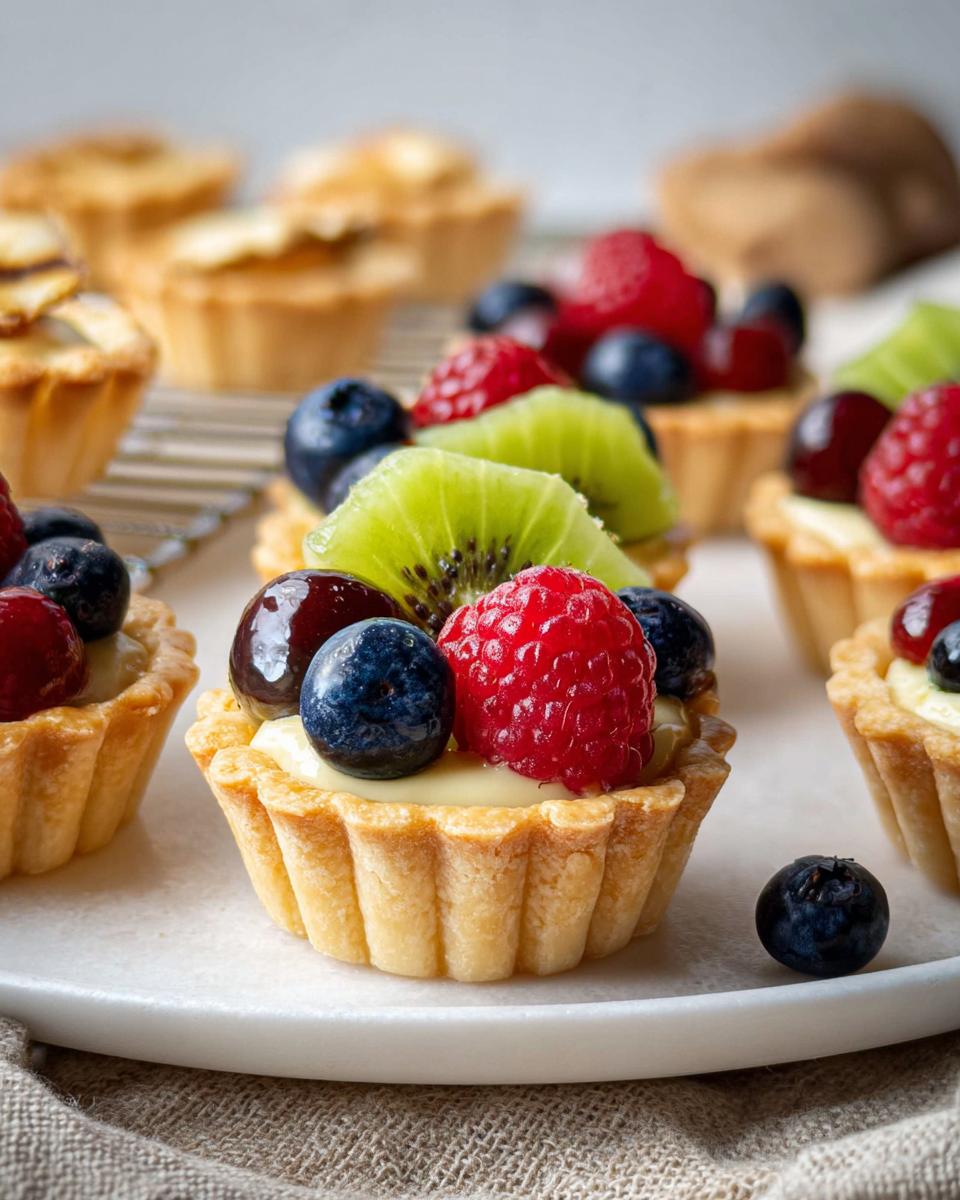
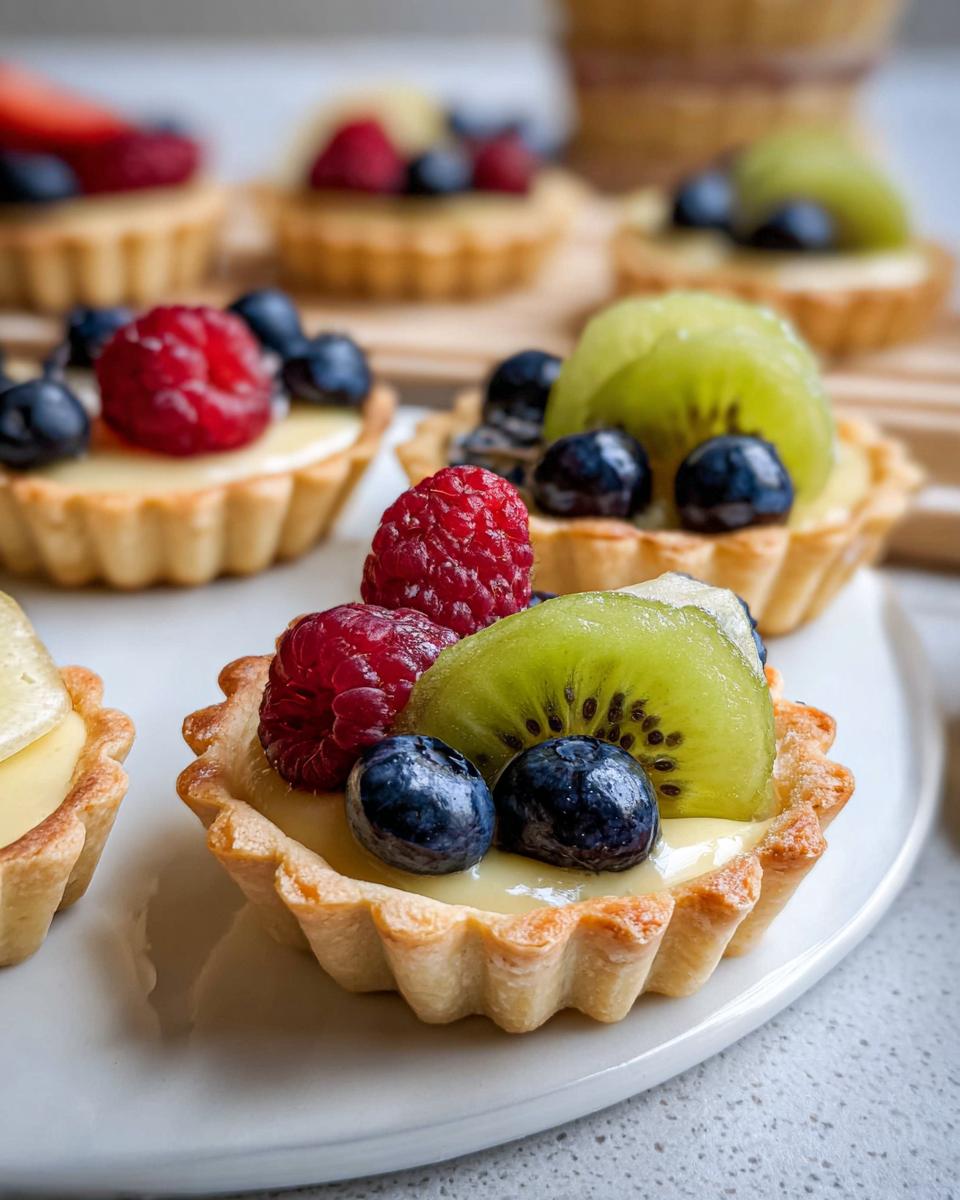
- Now for the fun, colourful part! Arrange your lovely blueberries, raspberries, and those pretty kiwi slices over the cream. Finish by brushing them *very lightly* with the apricot glaze for that beautiful, glossy shine.
- Pop the finished mini fruit tarts back in the fridge for at least 20 minutes to let everything set before serving. They’re just divine when they’re nicely chilled! For best results, like with these scones or mini scones, chilling is key!
Serving Suggestions for Your Mary Berry Inspired Mini Fruit Tarts
These little beauties are quite spectacular on their own, of course, but if you’re really going all out, here are a few ideas to make your dessert table sing:
A Silky Coffee or Chocolate Mousse: For a touch of decadence that complements the fruit perfectly, a light coffee mousse or a rich chocolate mousse would be absolutely divine alongside these tarts.
Light Vanilla Cupcakes: If you want something a bit more substantial but still sweet and delicate, some simple vanilla cupcakes offer a lovely contrast in texture.
Fresh Mint Sprigs: Sometimes, all you need is a little flourish! A few fresh mint leaves scattered around the tart platter add a pop of colour and a lovely fresh aroma.
Storing and Reheating Your Mini Fruit Tarts
Now, how to keep these little darlings fresh? It’s all about storing them smartly so you can enjoy them at their best. Honestly, these tarts are most delicious served chilled and at their freshest, but knowing how to store them is key, especially if you’re doing a bit of advance prep or just have a few leftover (which is unlikely, trust me!).
The best way to store your Mary Berry Inspired Mini Fruit Tarts is to keep the components separate if you can. Once baked and completely cooled, the tart shells can be stored in an airtight container at room temperature for up to 2 days, though they are at their crispiest on day one. The pastry cream is best stored in a bowl, covered with cling film pressed directly onto the surface to prevent a skin, in the fridge for up to 3 days. Once assembled, the tarts are best eaten the same day, but they will keep in an airtight container in the fridge for up to 2 days. Just be aware the pastry might soften a little the longer they’re filled.
Reheating isn’t really recommended for these! They’re designed to be a lovely, chilled treat. If your pastry cream has been chilled and the shells are fresh, you can assemble them just before serving. If you’ve made the shells ahead, and they’ve lost a bit of their crispness, you *could* pop them back in a cool oven (around 300°F/150°C) for 5 minutes, but I usually find they’re perfect just as they are when served cold. These are definitely more of a ‘make and serve’ kind of treat rather than a ‘make ahead and reheat’ situation.
Frequently Asked Questions About Mary Berry Inspired Mini Fruit Tarts
Can I make the tart shells ahead of time?
Oh, absolutely! Making the tart shells ahead is a brilliant idea for saving time. Once they’re baked and completely cool, you can store them in an airtight container at room temperature for up to 2 days. They’ll be at their crispiest on the first day, but still lovely for a couple of days after. Just make sure they’re fully cooled before storing!
What other fruits can I use for the topping?
You’re only limited by your imagination here! While the blueberries, raspberries, and kiwi are gorgeous, feel free to get creative. Beautiful seasonal fruits like strawberries, sliced peaches, nectarines, or even some lovely glazed cherries would be delightful. Just try to use fruits that aren’t too watery, and if you’re using something like strawberries, slice them nicely. A bit like with a berry fruit tart, the fruit is the star!
How do I prevent the pastry from shrinking when baking?
Shrinking pastry is the bane of my life sometimes, but there are a few tricks! The most important one, which we do in the recipe, is to chill the pastry shells in the freezer for about 20 minutes *before* baking. This really helps them hold their shape. Also, don’t roll the pastry too thin, and make sure you prick the base all over with a fork before baking. It really makes a difference, just like when I make my chocolate fruit tart!
Before You Go
I really hope you have as much fun baking these Mary Berry Inspired Mini Fruit Tarts Recipe as I do! They’re such a treat to make and even better to share. Do give them a try, and please let me know how you get on in the comments below – I’d love to hear your thoughts or see your creations! Maybe even share a snap over on Pinterest!
Print
Mary Berry Inspired Mini Fruit Tarts Recipe
- Total Time: 1 hour 50 minutes
- Yield: 16 mini tartlets
- Diet: Vegetarian
Description
These mini fruit tarts feature buttery pastry, silky vanilla custard and fresh fruit toppings for an elegant dessert perfect for parties.
Ingredients
- Pastry Cream Filling
- 1 ½ cups whole milk
- 1 strip lemon peel
- 3 egg yolks
- ⅓ cup caster sugar
- ¼ cup plain flour
- 1 teaspoon vanilla paste
- Tartlet Pastry
- ½ cup unsalted butter, softened
- ⅓ cup caster sugar
- 1 teaspoon finely grated lemon zest
- 1 large egg
- 2 cups plain flour
- Pinch of salt
- Fruit Glaze
- 1 tablespoon apricot jam
- 1 teaspoon warm water
- Fruit Topping
- 4 ounces blueberries
- 4 ounces raspberries
- 2 kiwi fruits, peeled and sliced
Instructions
- Pour the milk into a saucepan with the lemon peel and warm over medium heat until steaming but not boiling.
- In a mixing bowl, whisk the egg yolks, caster sugar and flour until smooth. Slowly pour the hot milk into the bowl while whisking continuously. Remove the lemon peel and stir in the vanilla paste.
- Return the mixture to the saucepan and cook over medium heat, whisking constantly, until thickened and bubbling. Continue cooking for 1 minute. Transfer to a bowl, press baking paper directly onto the surface and chill for 1 hour.
- For the pastry, beat the butter and caster sugar until just combined. Mix in the lemon zest and egg. Add the flour and salt, stirring until a soft dough forms.
- Shape the dough into a disc, wrap and chill for 30 minutes. Preheat the oven to 350°F.
- Roll the dough to about ¼ inch thick on a lightly floured surface. Cut 16 circles and press into mini tart tins. Trim the edges neatly and prick the bases with a fork.
- Freeze the tart shells for 20 minutes. Bake for 12 to 14 minutes until lightly golden. Cool completely on a wire rack.
- Stir the apricot jam with warm water until smooth.
- Spoon the chilled pastry cream into the cooled tart shells and spread evenly.
- Arrange the blueberries, raspberries and kiwi slices over the filling. Brush lightly with the apricot glaze for a glossy finish.
- Chill the mini fruit tarts for at least 20 minutes before serving.
Notes
- Chilling the pastry before baking helps the tart shells keep their shape and creates a crisp texture.
- Dry the fruit thoroughly before decorating so the filling stays smooth and creamy.
- Prep Time: 1 hour 20 minutes
- Cook Time: 30 minutes
- Category: Dessert
- Method: Baking
- Cuisine: British