

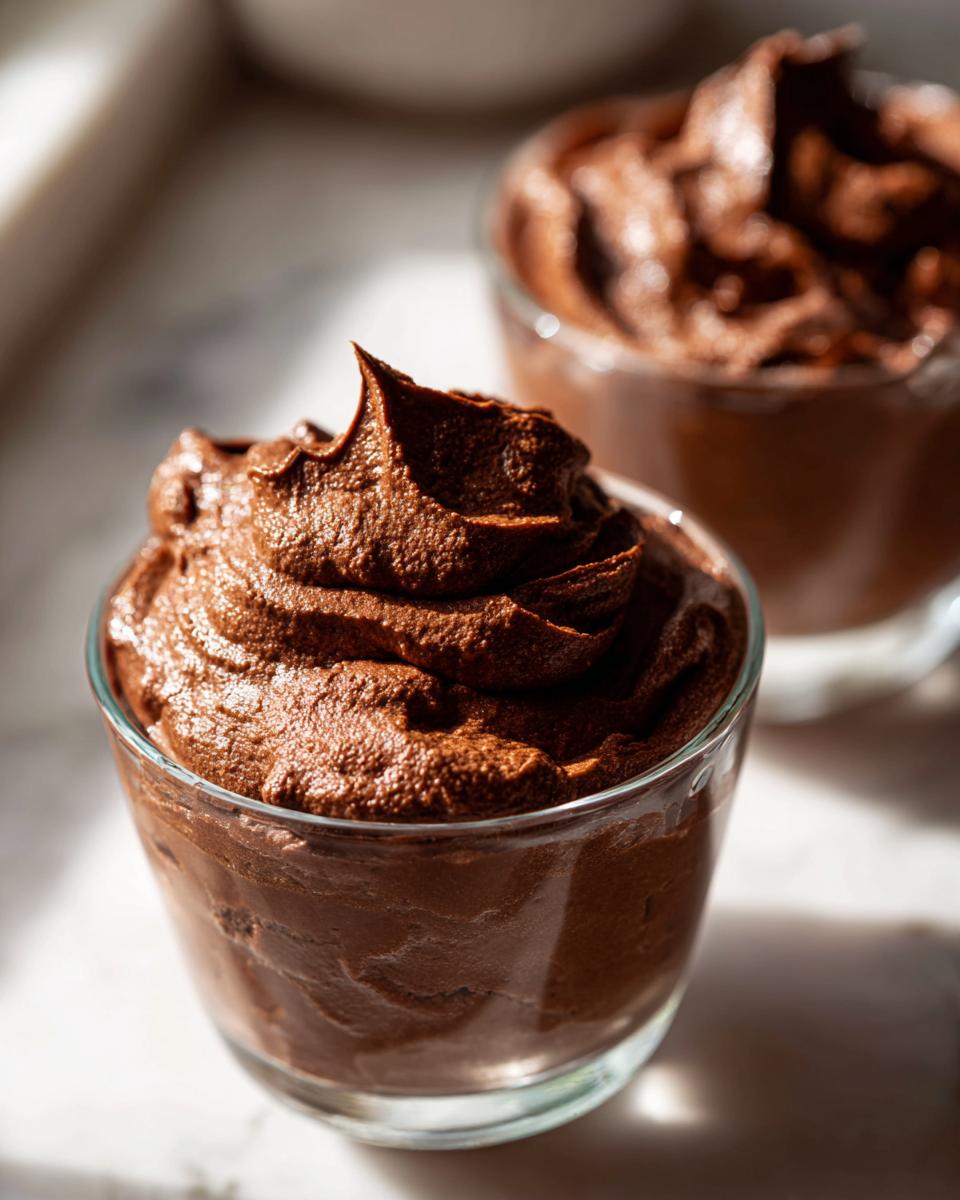
Oh, chocolate mousse! Just saying the words conjures up images of decadent, melt-in-your-mouth indulgence, doesn’t it? But what if I told you that you can achieve that luxurious, silky smooth texture and deep chocolate flavour with a dessert that’s unbelievably simple and, get this, requires absolutely no baking? Yep, this easy chocolate mousse is my go-to when I need something that feels fancy but I’m short on time or oven space. I remember making this for the first time when we had unexpected guests over, and they were absolutely stunned that I’d whipped it up so quickly. It’s the kind of dessert that makes you look like a kitchen whizz, even when you’ve barely broken a sweat. Trust me, the rich taste will have everyone asking for the recipe! It reminds me a bit of how simple yet satisfying my no-bake chocolate coconut energy bars are – simple ingredients, incredible results!
Why You’ll Love This Easy Chocolate Mousse
- It’s unbelievably quick – ready in just 20 minutes!
- Seriously simple ingredients mean you probably have most of them already.
- The texture is pure bliss: super smooth, light, and utterly decadent.
- It’s a no-bake wonder, perfect for when your oven is already full or it’s too hot to turn it on.
Ingredients for Your Easy Chocolate Mousse
Honestly, the beauty of this easy chocolate mousse lies in its minimal ingredients. You don’t need fancy stuff; just these few things will create pure chocolate magic!
- 1 cup heavy cream
- 1 cup good quality chocolate chips (I always go for dark or semi-sweet)
- 2 tablespoons granulated sugar
- 1 teaspoon vanilla flavoring
How to Make Easy Chocolate Mousse: Step-by-Step
Getting this easy chocolate mousse just right is all about patience and a little bit of gentle folding. It’s not complicated at all, but a few little tricks make all the difference between a good mousse and an absolutely *divine* one. Think of it as a culinary hug for your taste buds!
Step 1: First things first, get your chocolate ready. Pop those lovely chocolate chips into a heatproof bowl. I always opt for dark or good quality semi-sweet chocolate – it gives the mousse such a lovely depth of flavour. If you’re using a chocolate bar, chop it up into small bits so it melts evenly.
Step 2: Now, take about half of your heavy cream and pour it into a small saucepan. Gently heat it over medium heat. You want it to just start simmering around the edges – don’t let it come to a rolling boil, or it might scorch. Keep an eye on it!
Step 3: As soon as the cream is hot, pour it straight over your chocolate chips. Let it sit for about 2 minutes without touching it. This gives the hot cream time to start melting the chocolate all on its own. After those couple of minutes, grab a whisk or a spatula and stir it all together. Keep stirring gently until you have a gorgeously smooth, glossy chocolate mixture. It’s like melted chocolate magic!
Step 4: This bit is important: let that lovely chocolate mixture cool down to room temperature. You can give it a gentle stir now and then. If it’s too hot when you add the whipped cream later, it’ll melt the cream and you won’t get that lovely airy texture. Patience is key here – this is where you get that perfect consistency!
Step 5: While your chocolate is cooling, it’s time to whip the rest of the cream. In a separate, clean bowl, pour in the remaining heavy cream. Add your sugar and that teaspoon of vanilla flavouring. Using an electric mixer (or a whisk and some serious arm power!), whip the cream until it forms soft peaks. That means when you lift the whisk, the cream holds its shape gently but the tip curls over a bit. We don’t want stiff peaks here; soft is perfect for folding!
Step 6: Now for the delicate part: folding! Take about a third of your whipped cream and gently fold it into the cooled chocolate mixture. Use a spatula and a sweeping motion from the bottom up, turning the bowl as you go. The aim is to lighten the chocolate mixture. Once that’s incorporated, gently fold in the remaining whipped cream in two more additions. Be gentle! You want to keep all that lovely air you’ve whipped in. Stop as soon as it’s smooth and airy – overmixing will make it dense. It’s a bit like making Mary Berry’s scones – handle the dough with care!
Step 7: Spoon your gorgeous mousse into your serving glasses or ramekins. I like to use little glasses; it makes them feel extra special!
You can make a big batch and serve it from a nice serving dish too, just like a chocolate chocolate chip bundt cake.
Step 8: Pop those beauties into the fridge for at least 2 hours. This is where the mousse really sets and firms up beautifully. Honestly, the longer it chills, the better the texture, so if you can leave it for 3-4 hours, even better. If you’re making it for a dinner party, you can easily make it the day before, just like you might prep Mary Berry’s shortbread biscuits.
Serving Suggestions for Your Easy Chocolate Mousse
This easy chocolate mousse is divine on its own, but here are a few little extras that I love to add to make it even more special!
Fresh Berries: A handful of fresh raspberries or sliced strawberries cuts through the richness beautifully. Their slight tartness is the perfect counterpoint to the deep chocolate flavour, much like the tang you get from caramel apples.
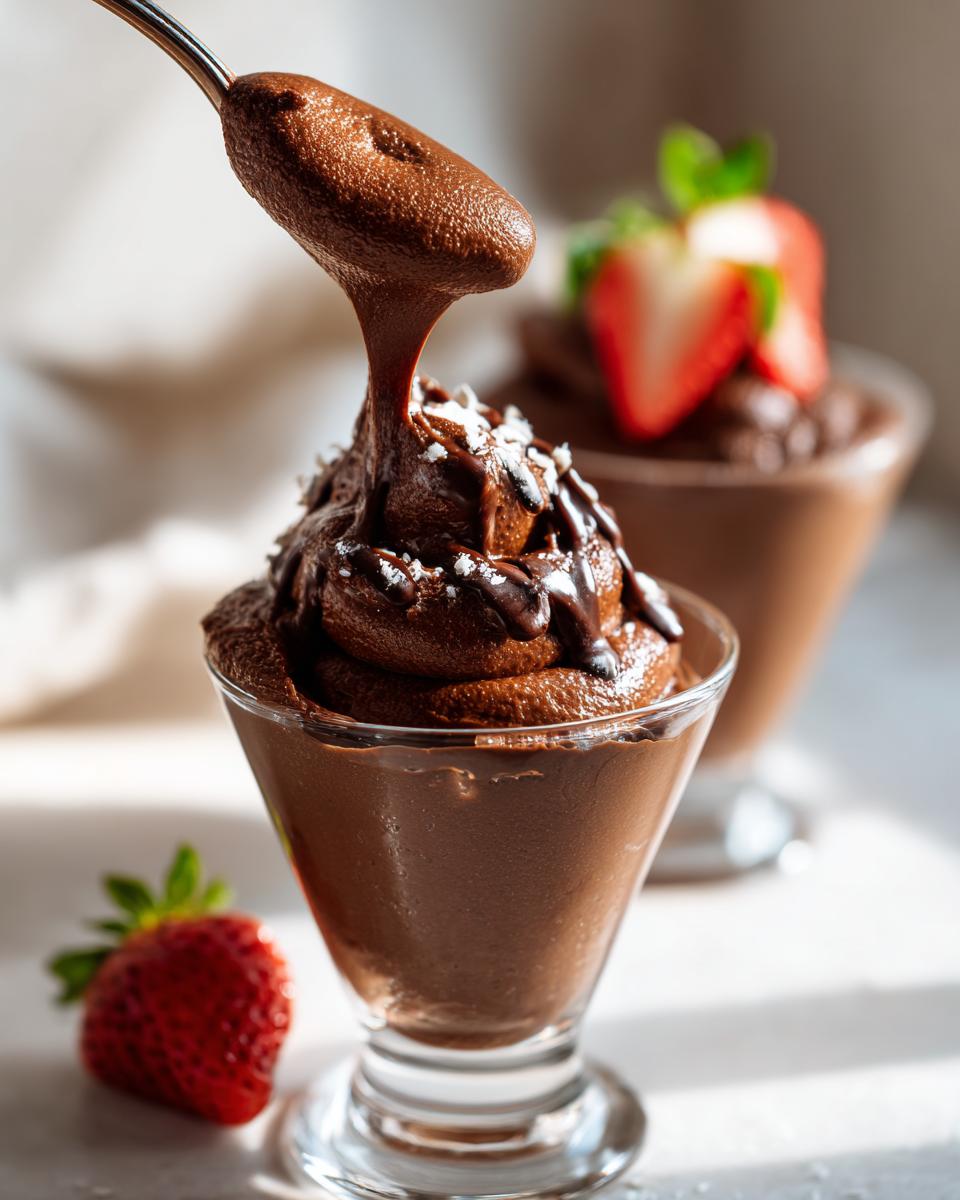
Whipped Cream Swirl: For an extra touch of indulgence, a dollop of lightly sweetened whipped cream on top is always a winner. It adds another layer of creamy texture.
Chocolate Shavings: A sprinkle of finely grated dark chocolate adds a final flourish and a little bit of extra crunch. It really highlights the chocolatey goodness.
Storing and Reheating Your Easy Chocolate Mousse
This easy chocolate mousse is a brilliant make-ahead dessert, which is why I love it for entertaining. It basically gets better with a bit of chilling time, so you can totally get it sorted!
To store your gorgeous mousse, just pop it back into its serving glasses or cover them tightly with cling film. You can keep it in the fridge for up to 3 days. Honestly, it’s at its absolute best on day two, after it’s had a good chance to firm up properly. Because it’s a no-bake recipe, there’s no reheating needed at all, which makes it super convenient. Just pull it out of the fridge when you’re ready to serve. It’s perfect for meal prepping ahead of a busy week, much like my healthy chicken meal prep bowls; knowing dessert is sorted is such a relief!
Frequently Asked Questions About Easy Chocolate Mousse
Got a question buzzing around your head about this easy chocolate mousse? I’ve popped a few common ones here that might just help you out!
Can I use different types of chocolate?
Absolutely! While I love dark or semi-sweet for that rich flavour, you can definitely experiment. Milk chocolate will give you a sweeter, creamier mousse but won’t be quite as intensely chocolatey. White chocolate is trickier though, as it has a lot more cocoa butter and sugar, so it can make the mousse very sweet and a bit softer. If you do go with milk or white, you might want to reduce the sugar slightly!
How do I get a smoother texture?
The key to a super smooth texture is twofold. First, ensure your chocolate base is completely smooth and glossy *before* it cools too much – that smooth melt is essential. Second, when you fold in the whipped cream, do it gently! Overmixing can break down the air bubbles and make the mousse a bit grainy or dense. Think of it like gently combining ingredients for a chocolate mug cake; you want to keep it airy.
Can I make this ahead of time?
Yes, you absolutely can! This easy chocolate mousse is brilliant for making ahead. In fact, I often find it tastes even better after a night in the fridge, as the flavours meld together and the texture firms up perfectly. Just cover your serving dishes tightly or pop the mousse into an airtight container once it’s been folded. It’ll keep well for up to 3 days, making it perfect for entertaining or when you just want dessert sorted! It’s almost as convenient as making a quick vanilla mug cake when a dessert craving hits!
Nutritional Information (Estimated)
Just a little heads-up, these figures are estimates, you know! They can wobble a bit depending on exactly what chocolate you use and how generous you are with your cream. But it gives you a good idea!
Per serving:
- Calories: 310
- Fat: 24g
- Protein: 3g
- Carbohydrates: 22g
Before You Go
I really hope you give this wonderfully easy chocolate mousse a whirl! It’s such a treat, and anyone can whip it up. Let me know in the comments how yours turned out or if you added any special twists – I adore hearing from you! Sharing is caring, so feel free to pin it or share it with your friends! If you enjoyed this, you might also love my Mary Berry chocolate chip cookies recipe. Don’t forget to follow us on Pinterest!

Easy Chocolate Mousse
- Total Time: 20 min
- Yield: 4 servings
- Diet: Vegetarian
Description
A simple no-bake dessert with a rich, creamy texture and deep chocolate flavour, perfect for elegant serving.
Ingredients
- 1 cup heavy cream
- 1 cup chocolate chips
- 2 tablespoons granulated sugar
- 1 teaspoon vanilla flavoring
Instructions
- Place the chocolate chips in a heatproof bowl.
- Heat half of the heavy cream in a saucepan over medium heat until just starting to simmer.
- Pour the hot cream over the chocolate chips and let sit for 2 minutes, then stir until smooth and glossy.
- Allow the chocolate mixture to cool to room temperature.
- In a separate bowl, whip the remaining heavy cream with sugar and vanilla flavoring until soft peaks form.
- Gently fold the whipped cream into the cooled chocolate mixture in two additions until smooth and airy.
- Spoon the mousse into serving glasses.
- Refrigerate for at least 2 hours until set.
- Serve chilled for the best texture.
Notes
- Fold gently to keep the mousse light and airy rather than dense.
- Prep Time: 15 min
- Cook Time: 5 min
- Category: Dessert
- Method: No Bake
- Cuisine: British


