

Oh, there’s just something utterly magical about a perfectly made pavlova, isn’t there? That delicate crunch on the outside, giving way to a marshmallowy centre… it’s pure heaven. I’m thrilled to share my recipe for Mini Strawberry Pavlova Nests, truly Mary Berry inspired, because it captures all that delicate elegance but in a perfectly bite-sized package. I still remember the first time I managed to get that crisp-yet-chewy texture just right – it felt like a proper baking triumph, the kind you dream about! These little nests are just the thing for making any occasion feel a bit special, whether it’s an afternoon tea party or just a sunny weekend treat. They’re surprisingly simple to make, too, proving that impressive desserts don’t have to be complicated. Trust me, you’ll be whipping these up again and again!

Why You’ll Love These Mini Strawberry Pavlova Nests
- They’re surprisingly simple to whip up, even if you’re new to meringue!
- That incredible combination of crisp shell, soft centre, creamy filling, and fresh strawberries is just divine.
- They look absolutely stunning – perfect for impressing guests or making a simple dessert feel fancy.
- Ideal for summer gatherings, afternoon tea, or when you just fancy a little treat that isn’t too heavy.
- The mini size means you can enjoy more than one (oops!).
Ingredients for Your Mini Strawberry Pavlova Nests
Honestly, the magic is in the simplicity here. Using good quality ingredients really makes a difference, especially the vanilla bean paste – it has such a richer flavour than extract. And make sure your egg whites are at room temperature; they whisk up into a much more stable meringue that way!
- 6 large egg whites, room temperature
- 2 cups caster sugar
- 2 ½ teaspoons cornflour
- 1 teaspoon fresh lemon juice
- 1 teaspoon vanilla bean paste
- 1 ½ cups double cream, chilled
- 2 tablespoons granulated sugar
- ½ cup strawberry jam
- 8 fresh strawberries, halved
- Icing sugar for dusting
Crafting Perfect Mini Strawberry Pavlova Nests: Step-by-Step
Step 1: Right then, let’s get these beauties started! Pop your oven on to a gentle 225°F (107°C). It’s a low temperature, which is key for getting that lovely crisp exterior without browning them too much. Get two big baking trays and line them with baking paper. Doing this ensures they won’t stick later! You could even try making some classic flapjacks to go with these if you’re feeling ambitious!
Step 2: Now, for the meringue. Find a really clean mixing bowl – any grease will stop your egg whites from whisking up properly, so make sure it’s spotless! Tip in your 6 large egg whites. Give them a good whisk on high speed for about a minute or two. You’re looking for soft peaks to form, like gentle little waves.
Step 3: This is where the magic happens. Start adding your caster sugar, just a spoonful at a time, while the whisk is still going on high. Don’t rush this bit! You want to beat it all for a good 7 to 8 minutes. You’ll know it’s ready when the mixture is super thick, glossy, and holds stiff peaks – meaning when you lift the whisk, the mixture stands straight up without flopping over. This is crucial for a stable meringue!
Step 4: Gently, gently now. Fold in your cornflour, lemon juice, and vanilla bean paste. You don’t want to knock all that lovely air out you’ve just beaten in, so be nice and gentle with your spatula or large spoon. Just mix until everything is combined. That little bit of lemon juice helps stabilise the meringue and the vanilla bean paste gives it that gorgeous flavour. Thinking of other classic bakes? Maybe some shortbread fingers for later?
Step 5: Time to shape them! Spoon your glorious meringue into a large piping bag fitted with a wide star nozzle. If you don’t have a piping bag, don’t worry! You can just spoon dollops onto the trays, but piping gives you that lovely nest shape. Pipe out about 12 to 14 little nests, roughly 3 inches across. Once they’re piped, use the back of your spoon to press a little well in the centre of each one – this is where your lovely cream and jam will sit!
Step 6: Into the oven they go! Bake them for 1 hour. They should feel dry to the touch and lift off the baking paper really easily. If they’re still a bit sticky, give them another 5-10 minutes. Remember, low and slow is the way to go here.
Step 7: Once baked, turn the oven off completely and leave the pavlovas inside with the door shut for another 30 minutes. This gentle cooling process is my secret for fewer cracks – it lets them settle down slowly. Honestly, a few little cracks add character, but this helps keep them looking extra pretty!
Step 8: While your nests are cooling, let’s whip the cream. Get your chilled double cream and the granulated sugar into a bowl. Whisk them together for about 2 to 3 minutes until you have lovely, thick peaks. Don’t overdo it, or you’ll end up with butter!
Step 9: Now for the fun bit! Spoon a tablespoon of your sweet strawberry jam right into the little well you made in the centre of each pavlova nest. It’s the perfect sweet and tart base.
Step 10: Dollop or pipe your beautifully whipped cream over the jam on each nest. Make it look pretty! Then, top with those gorgeous fresh strawberry halves. They just look so cheerful!
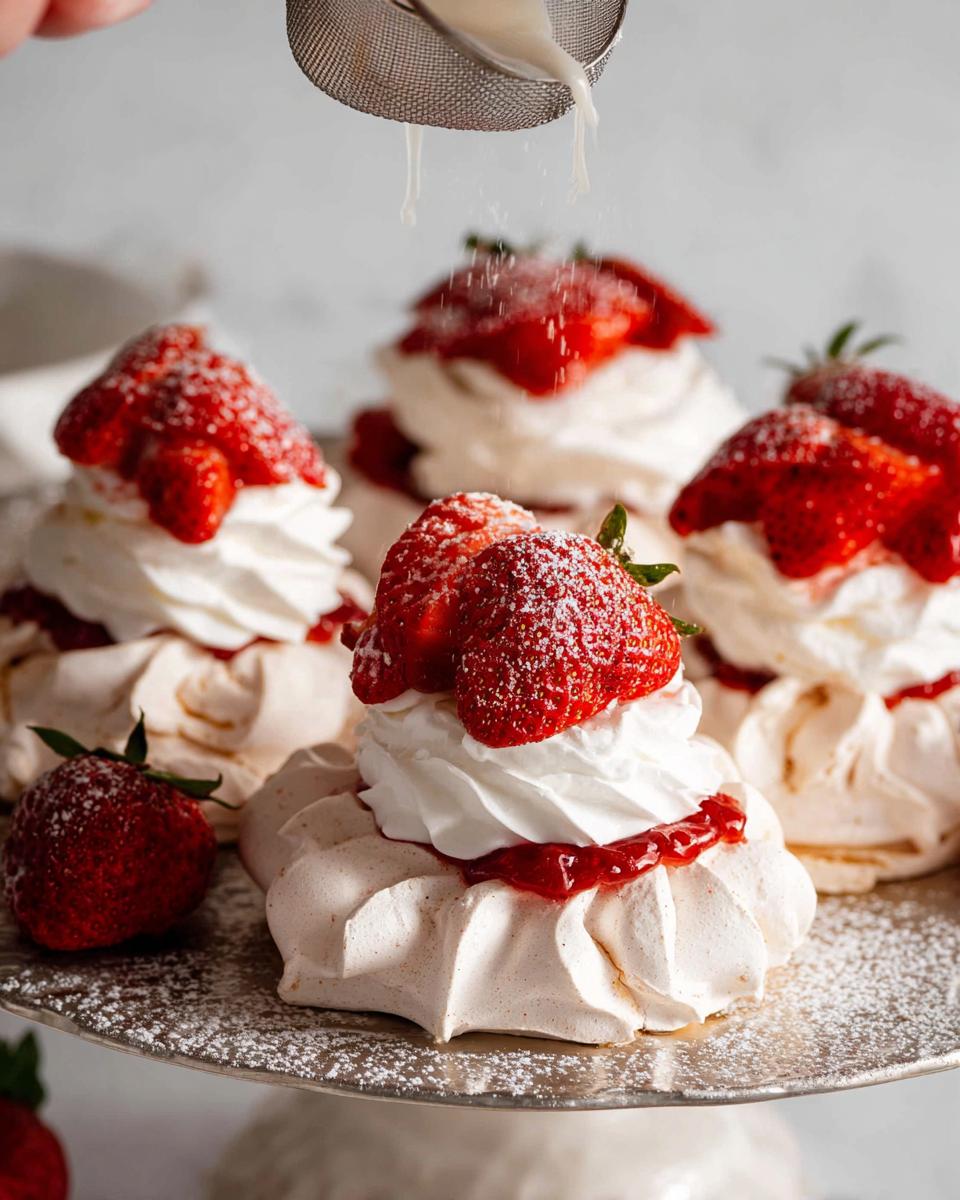
Step 11: A final flourish! Give them a very light dusting of icing sugar. They’re ready to be devoured!
Serving Suggestions for Your Mini Strawberry Pavlova Nests
These little nests are pretty perfect on their own, but if you fancy going the extra mile, here are a few ideas. A burst of extra fruity goodness always goes down well!
Fresh Berry Medley: Pile on a mix of raspberries, blueberries, or even some passionfruit pulp alongside the strawberries for an extra pop of colour and flavour. It makes them look even more spectacular!
A Spoonful of Lemon Curd: If you love a bit of zing, a small dollop of tangy lemon curd tucked in with the cream is an absolute dream. It cuts through the sweetness beautifully.
Chocolate Drizzle: For a touch of indulgence, a light drizzle of melted dark chocolate over the top adds a lovely contrast. It sounds fancy, but it’s just a quick way to elevate them even further. If you’re a chocolate fan, you might also enjoy this berry fruit tart or perhaps a slice of strawberry Victoria sponge next time!
Storing and Reheating Your Mini Strawberry Pavlova Nests
Right, here’s the trick to keeping these little beauties just perfect: store any unfilled pavlova nests in a really good airtight container. They’ll stay wonderfully crisp for up to 3 days! Honestly, I wouldn’t try reheating them, as that tends to make them go a bit chewy. The absolute best way is to assemble them right before you plan to eat them. That way, you get that dreamy crispness with the soft cream and fresh strawberries.
Frequently Asked Questions About Mini Strawberry Pavlova Nests
Can I make the pavlova nests ahead of time?
Absolutely! The beauty of these mini pavlova nests is that you can bake them up to 3 days in advance. Just make sure to store them in a completely airtight container at room temperature. I wouldn’t put them in the fridge, as that can make them go a bit soft. Keep them unfilled until you’re ready to serve!
Why did my pavlova nests crack?
Oh, a few little cracks are totally normal and actually add character! But if you’re getting big, dramatic splits, it’s usually because the oven was too hot, or they cooled down too quickly. That’s why I recommend turning the oven off and leaving them to cool slowly inside for about 30 minutes – it really helps them settle. Don’t worry though, even cracked pavlovas taste just as delicious!
Can I use a different fruit instead of strawberries?
Of course! While strawberries are fabulous with pavlova, you can absolutely use other fruits. Raspberries, blueberries, or even a mix of summer berries work a treat. You could also try a sharp lemon curd with a few raspberries or even some poached pears if you’re feeling adventurous. It’s all about what you love! If you’re a fan of other classic bakes, you might enjoy my classic treacle tart recipe too.
Before You Go
These Mini Strawberry Pavlova Nests are such a joy to make and even more of a joy to eat! Give them a whirl this weekend, and I’d absolutely love to hear how you get on. Tag me in your creations, or pop a little rating below – it’d make my day! And don’t forget to follow along on Pinterest for more baking inspiration!
Print
Mini Strawberry Pavlova Nests
- Total Time: 2 hours
- Yield: 14 mini pavlova nests
- Diet: Vegetarian
Description
Crisp mini strawberry pavlova nests with soft centres, whipped cream, jam, and fresh berries. A light and elegant dessert.
Ingredients
- 6 large egg whites, room temperature
- 2 cups caster sugar
- 2 ½ teaspoons cornflour
- 1 teaspoon fresh lemon juice
- 1 teaspoon vanilla bean paste
- 1 ½ cups double cream, chilled
- 2 tablespoons granulated sugar
- ½ cup strawberry jam
- 8 fresh strawberries, halved
- Icing sugar for dusting
Instructions
- Preheat your oven to 225°F (107°C). Line two large baking trays with baking paper.
- Place the egg whites in a clean mixing bowl. Whisk on high speed for 1 to 2 minutes until soft peaks form.
- Gradually add the caster sugar, one spoonful at a time, while continuing to whisk. Beat for 7 to 8 minutes until the mixture is thick, glossy, and holds stiff peaks.
- Gently fold in the cornflour, lemon juice, and vanilla bean paste until fully combined.
- Spoon the meringue into a large piping bag fitted with a wide star nozzle. Pipe 12 to 14 small nests, about 3 inches wide, onto the prepared trays. Use the back of a spoon to create a shallow well in the centre of each nest.
- Bake for 1 hour until the pavlovas are dry to the touch and lift easily from the paper.
- Turn the oven off and leave the pavlovas inside with the door closed for 30 minutes to cool slowly. This helps prevent cracking.
- While the pavlovas cool, whisk the double cream and granulated sugar for 2 to 3 minutes until thick peaks form.
- Spoon 1 tablespoon of strawberry jam into the centre of each pavlova nest.
- Pipe or spoon the whipped cream over the jam. Top with fresh strawberry halves.
- Dust lightly with icing sugar before serving.
Notes
- Store unfilled pavlova nests in an airtight container for up to 3 days.
- Add the cream and strawberries just before serving for the best texture.
- Prep Time: 30 minutes
- Cook Time: 1 hour 30 minutes
- Category: Dessert
- Method: Baking
- Cuisine: British


