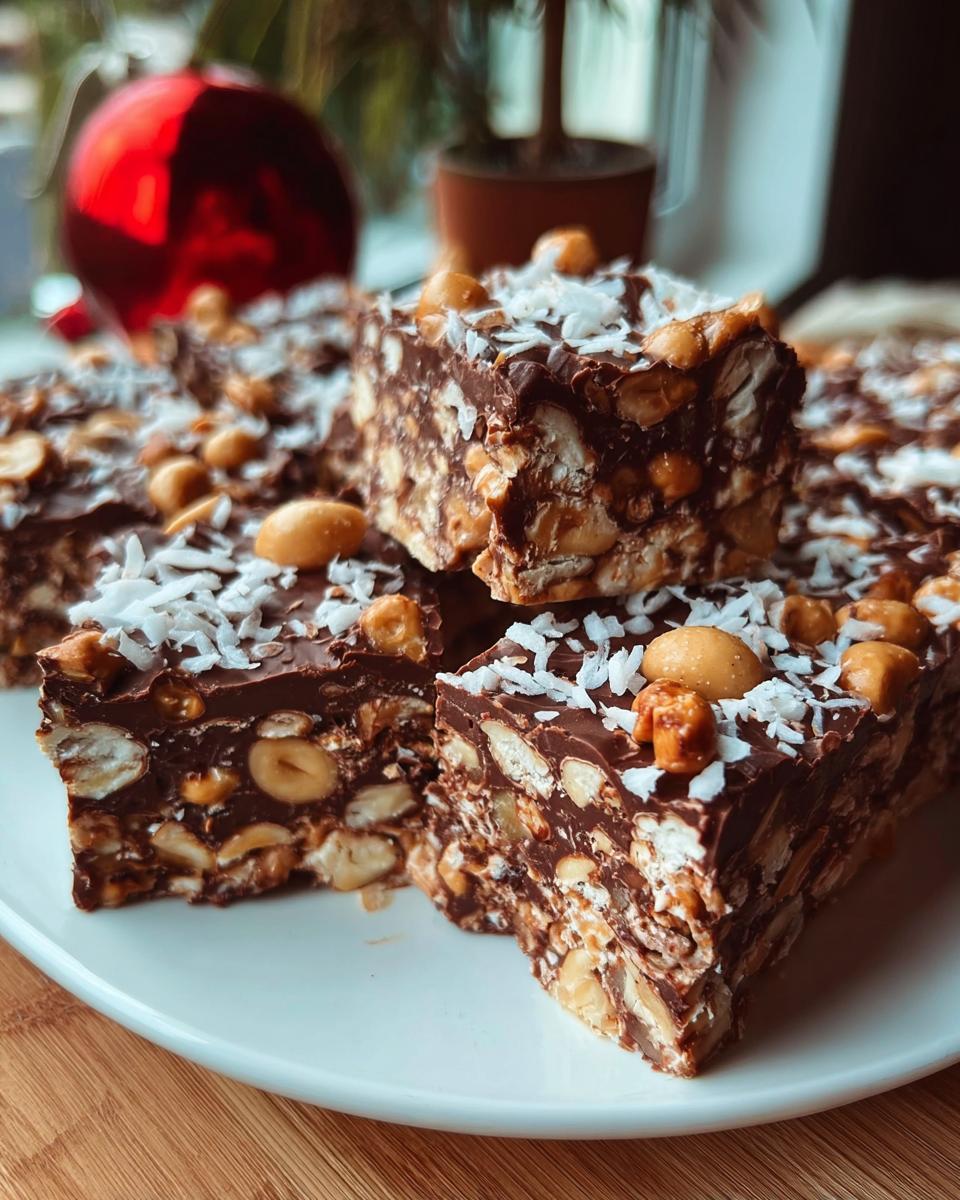
Oh, I just love a good no-bake treat, don’t you? There’s something so wonderfully satisfying about whipping up something utterly delicious without even switching on the oven. That’s exactly why I’m so excited to share these Mary Berry Inspired Peanut Butter Rocky Road Bars with you. They’re ridiculously easy, wonderfully crowd-pleasing, and that hint of peanut butter just takes the classic rocky road to a whole new level. I made a batch last week when some friends popped over unexpectedly, and they were gone in about ten minutes flat!
Why You’ll Love These Mary Berry Inspired Peanut Butter Rocky Road Bars
- They’re incredibly easy to make – no baking required at all!
- You get that wonderfully rich, chewy, and utterly delicious texture.
- They’re perfect for parties, bake sales, or just a simple afternoon treat.
- It’s a delightful twist on the classic rocky road, with creamy peanut butter adding a lovely depth of flavour.
Ingredients for Your Mary Berry Inspired Peanut Butter Rocky Road Bars
- 3/4 cup smooth peanut butter (I swear by the smooth kind for that silky texture)
- 1/3 cup butter (unsalted is best, but salted works too if that’s what you have!)
- 2 cups milk chocolate chips (or dark if you prefer a less sweet bar)
- 10 ounces mini marshmallows (plus a few extra for good luck!)
- 1 cup roasted salted peanuts (for that lovely crunch and salty contrast)
- 1/2 cup desiccated coconut (this is my little Mary Berry nudge – it adds a subtle flavour and texture)
Step-by-Step Guide to Making Mary Berry Inspired Peanut Butter Rocky Road Bars
Step 1: Right, first things first, let’s get our tin ready. You’ll want to grab a 9×9-inch square tin and give it a light grease. Then, line it with baking paper, making sure there’s a good bit hanging over the sides. This is my top tip for easily lifting the whole thing out later – no struggling, promise!
Step 2: Now, take about a quarter of your desiccated coconut and sprinkle it evenly all over the bottom of that prepared tin. This little layer adds such a subtle flavour and stops anything from sticking too much, a bit like getting a head start on the ingredients! If you’re a big coconut fan, you might even find yourself drawn to these sticky coconut bars too.
Step 3: Grab a medium saucepan and pop in your butter and peanut butter. Put it on a low heat – we don’t want to scorch anything! Just stir it gently until it’s all beautifully melted and wonderfully smooth. It should look like a glossy, creamy dream. If you love peanut butter in your bakes, you should definitely try our easy peanut butter flapjacks!
Step 4: Next, add your milk chocolate chips to the pan with the melted peanut butter mixture. Keep stirring very gently until everything is just melted and combined. The trick here, and it’s a crucial one, is to take the pan off the heat as soon as it’s smooth. We’re aiming for that lovely glossy finish, not chocolate that’s been boiled! It’s the same principle we use for other no-bake treats like our easy no-bake Oreo dessert.
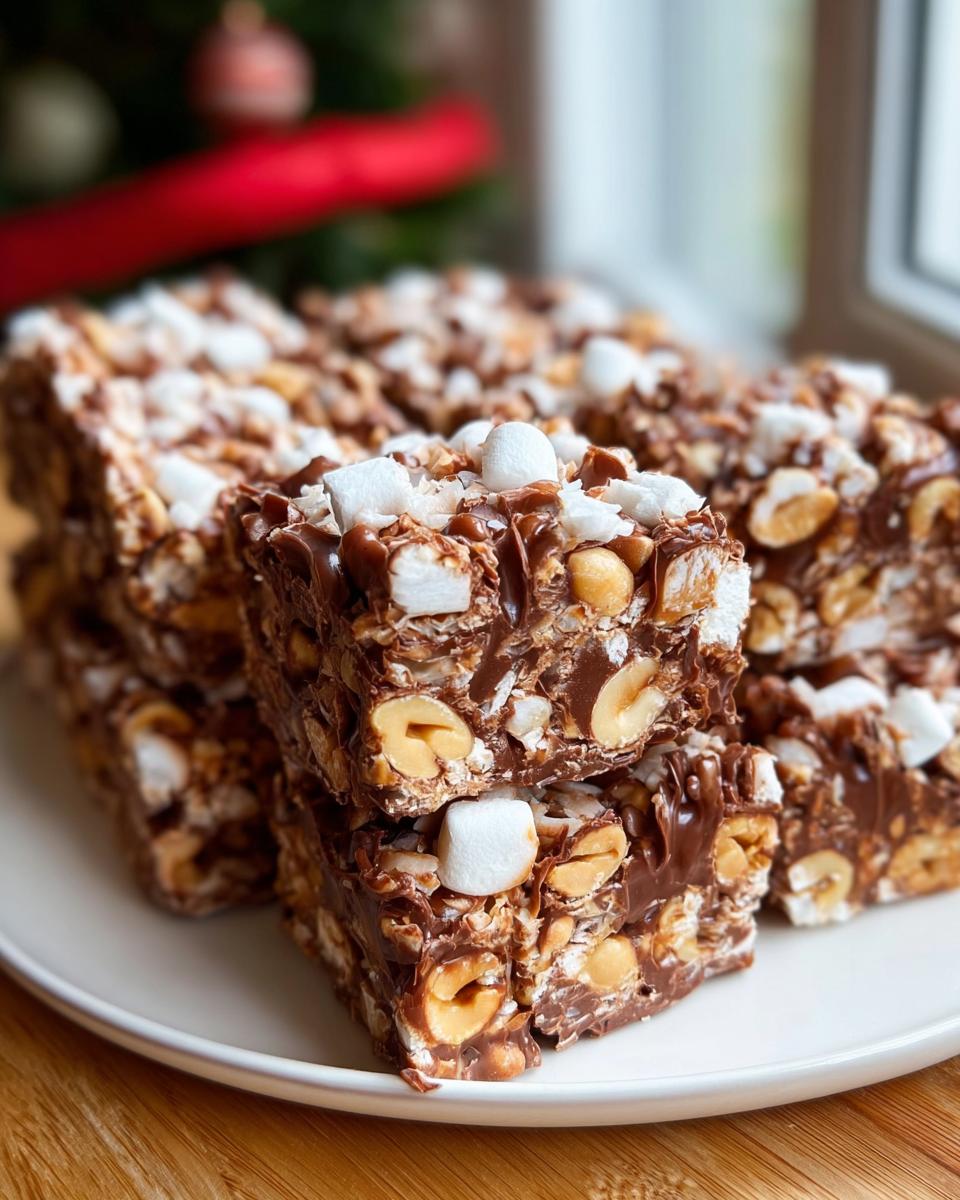
Step 5: While your chocolatey goodness is cooling just a tiny bit, get a large mixing bowl ready. Throw in your mini marshmallows and those gorgeous roasted salted peanuts. They’re going to give us that classic rocky road texture we all love. For something a bit different with marshmallows, our easy Oreo dessert bars are also a winner!
Step 6: Now for the fun part! Pour that warm, melted chocolate and peanut butter mixture over the marshmallows and peanuts in the big bowl. Grab your spatula and fold everything together gently. You want to coat everything evenly without squishing the marshmallows too much. Think of it as tucking everything in for a lovely chocolatey nap! If you wanted to make a vegan version, you could adapt something like our easy vegan flapjacks and swap out ingredients.
Step 7: Spoon this delightful mixture into your prepared tin. Use your spatula to spread it out into a nice, even layer. Make sure you get into all the corners so you don’t have any odd gaps. If you’re looking for more fruity, traybake style recipes, you might like our easy fruit flapjacks!
Step 8: Sprinkle the remaining quarter cup of desiccated coconut all over the top of the mixture. Give it a gentle press down with your fingertips or the back of your spatula so it sticks in properly. This is what gives you that lovely finish and bit of texture on top. So pretty!
Step 9: This is where patience comes in! Pop the tin into the refrigerator and let it chill for a good 3 to 4 hours, or until it’s completely firm. You want it solid enough to cut neat slices. Honestly, the hardest part is waiting!
Step 10: Once it’s chilled and firm, carefully lift the whole slab out of the tin using those handy baking paper edges. Now, for super clean cuts, I find a sharp serrated knife works a treat. Gently saw through the rocky road to get about 24 lovely bars. If you’re making these for a party, you might want to cut them slightly smaller. Enjoy!
Serving Suggestions for Your Peanut Butter Rocky Road Bars
These bars are pretty much perfect on their own, but here are a few ideas to make them even more special!
With a Cup of Tea or Coffee: Honestly, a warm cuppa is the ultimate partner for these sweet treats. The slight bitterness of coffee or the warmth of tea just cuts through the richness beautifully. Fancy a bit of decadence? Try one of our easy coffee mousses or some easy chocolate mousse alongside them!
As Part of a Dessert Platter: If you’re entertaining, these bars are brilliant alongside other goodies. Imagine them piled next to some fresh berries or a slice of a lighter cake like our easy coffee icebox cake. They add that lovely chewy, chocolatey element without being too heavy on their own.
Storing and Reheating Your Mary Berry Inspired Peanut Butter Rocky Road Bars
Oh, keeping these little beauties fresh is a doddle! For the best texture, I always store my Mary Berry Inspired Peanut Butter Rocky Road Bars in an airtight container in the fridge. They’ll happily keep for up to a week like this, which is brilliant if you’re making them for a party a few days in advance. And guess what? They freeze like an absolute dream too! Pop them in a freezer-safe container for up to two months – perfect for stashing away for a sudden sweet craving or unexpected guests. You can even portion them out before freezing for super easy grab-and-go treats later on.
Frequently Asked Questions About Mary Berry Inspired Peanut Butter Rocky Road Bars
Got a question about these delightful Mary Berry Inspired Peanut Butter Rocky Road Bars? I’ve tried to cover the most common ones here!
Can I use different types of chocolate?
Absolutely! Milk chocolate is what I’ve used here for that classic, sweet flavour, but dark chocolate gives extra richness if that’s more your style. White chocolate can work too, but it tends to be sweeter, so you might want to balance that with slightly more salty peanuts if you go that route. For serious chocolate lovers, check out our chocolate peanut butter cupcakes – divine!
What can I substitute for the peanuts?
If peanuts aren’t your thing, or you need to avoid them, you’ve got options! Try using chopped almonds, hazelnuts, or even pecans for a lovely crunch. You could also add some extra marshmallows or even some crunchy cereal like cornflakes if you want to keep that texture but swap the flavour. For a no-bake bar with a different nutty vibe, our no-bake peanut butter chocolate protein bars might be up your street.
How do I get clean cuts on the bars?
This is key to that lovely presentation! Make sure your bars are properly chilled and firm – that’s half the battle. The real trick is to use a sharp serrated knife. Give it a quick dip in hot water and then dry it thoroughly before each cut. This helps the knife glide through the chocolate and marshmallows without dragging them, giving you those super clean squares!
Before You Go
I really do hope you give these Mary Berry Inspired Peanut Butter Rocky Road Bars a go! They’re such a simple joy. Pop over to Pinterest and give us a follow @easydetoxrecipes, and let me know in the comments how you get on. Happy baking (well, no-baking!)!
Print
Mary Berry Inspired Peanut Butter Rocky Road Bars
- Total Time: 20 minutes plus chilling time
- Yield: 24 bars
- Diet: Vegetarian
Description
Rich, chewy, and easy-to-make Peanut Butter Rocky Road Bars with chocolate, marshmallows, and peanuts for a crowd-pleasing treat.
Ingredients
- 1/3 cup butter
- 3/4 cup smooth peanut butter
- 2 cups milk chocolate chips
- 10 ounces mini marshmallows
- 1 cup roasted salted peanuts
- 1/2 cup desiccated coconut
Instructions
- Lightly grease a 9×9-inch square tin and line it with baking paper, leaving extra paper hanging over the sides for easy lifting.
- Sprinkle 1/4 cup of the desiccated coconut evenly over the bottom of the prepared tin.
- Add the butter and peanut butter to a medium saucepan over low heat. Stir until fully melted and smooth.
- Add the chocolate chips and stir gently until melted. Remove the pan from the heat as soon as the mixture is smooth to prevent the chocolate from overheating.
- Place the mini marshmallows and roasted peanuts in a large mixing bowl.
- Pour the melted chocolate mixture over the marshmallows and peanuts. Fold gently with a spatula until everything is evenly coated.
- Spoon the mixture into the prepared tin and spread it into an even layer.
- Sprinkle the remaining 1/4 cup of desiccated coconut over the top and press lightly so it sticks.
- Chill the bars in the refrigerator for 3 to 4 hours until firm.
- Lift the rocky road from the tin using the baking paper and cut into 24 bars with a sharp serrated knife.
Notes
- Store the bars in an airtight container in the refrigerator for up to 1 week.
- These bars freeze well for up to 2 months.
- Prep Time: 5 minutes
- Cook Time: 15 minutes
- Category: Dessert
- Method: No-bake
- Cuisine: British