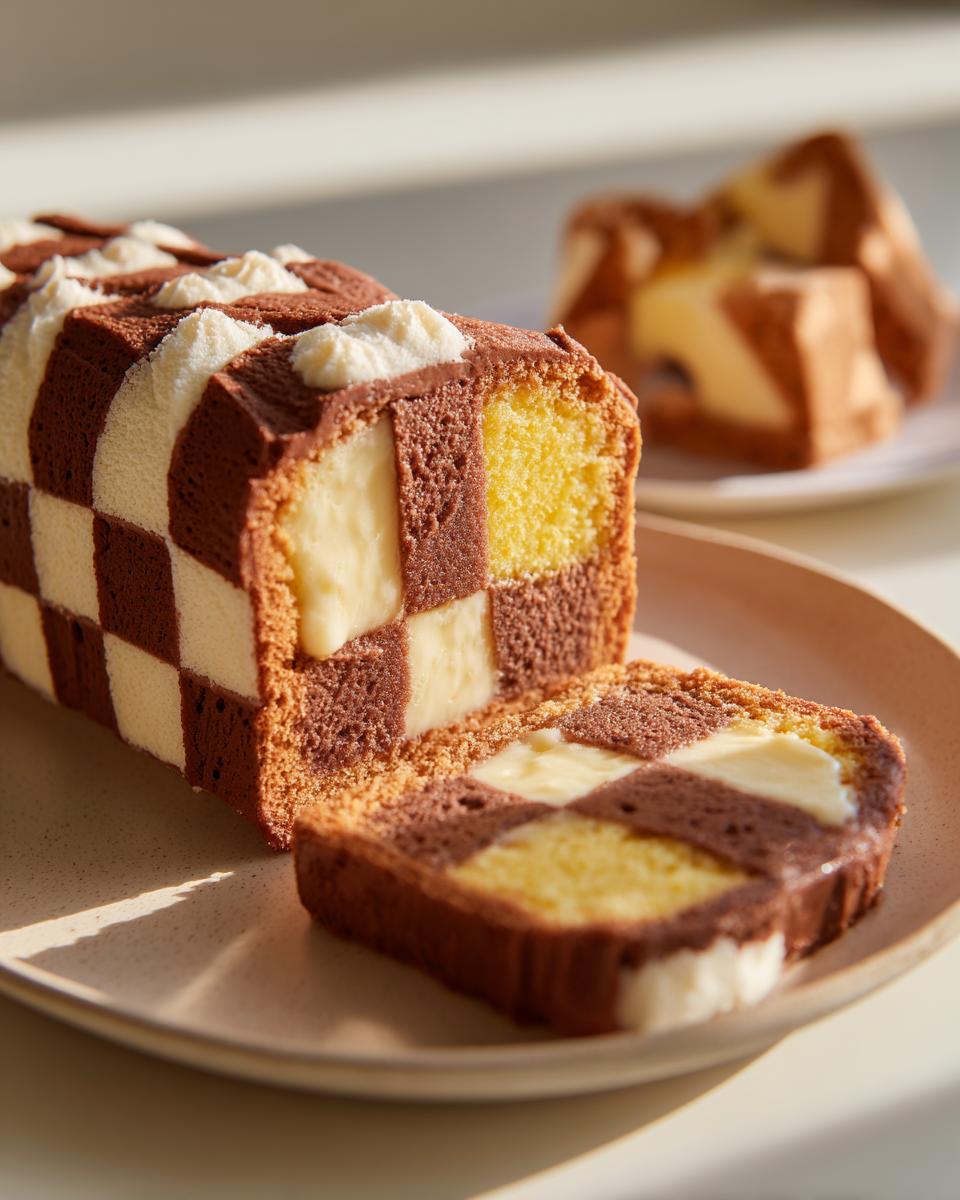
Right, who else gets that sudden, overwhelming urge for a classic Battenberg cake, but then remembers the faff? I know I do! That distinctive checkerboard pattern and sweet marzipan are just divine, aren’t they? Well, I’ve been tinkering away in my kitchen, and I’ve finally cracked it – an easy chocolate Battenberg recipe that’s genuinely simple to make at home, even if you’re not a seasoned pro. It’s got all the charm of the original, and it’s a bit like the joy you get from a proper Victoria sponge, but with a lovely little chocolatey surprise baked right in. Trust me, this version is going to become your new go-to when that craving strikes. It tastes absolutely spot on, and it’s much less intimidating than you might think!
Why You’ll Love This Easy Chocolate Battenberg
This easy chocolate Battenberg has a few tricks up its sleeve that make it a real winner:
- It’s surprisingly simple to make, perfect for a relaxed afternoon bake!
- You get that gorgeous, classic Battenberg look with less fuss.
- The combination of soft chocolate and vanilla sponge with sweet marzipan is just divine.
- It’s a total showstopper that’ll impress everyone at tea time.
Ingredients for Your Easy Chocolate Battenberg
Whenever I bake, I always try to use good quality ingredients, and it really does make a difference. For this easy chocolate Battenberg, I find using room temperature butter and eggs helps everything combine so beautifully. And for the marzipan, while you can get it ready-made, some people even make their own – but for ease, the shop-bought stuff is perfect!
- 1 cup unsalted butter, softened
- 3/4 cup granulated sugar
- 3 large eggs
- 1 1/2 cups all-purpose flour
- 1 teaspoon baking powder
- 1/4 teaspoon salt
- 2 tablespoons milk
- 2 tablespoons cocoa powder
- 1/2 cup apricot jam
- 7 ounces marzipan
Crafting Your Easy Chocolate Battenberg: Step-by-Step
Now for the fun part! Don’t be intimidated by the checkerboard; the real secret to making this easy chocolate Battenberg work is to keep things organised. I find getting all your bowls and ingredients ready first, just like you would for a classic Victoria sponge, makes the whole process so much smoother. Trust me, it’s much less stressful than trying to find things halfway through!
Step 1: First things first, get that oven preheating to 175°C (that’s 160°C fan or 350°F for your friends across the pond!). Now, grab your 8-inch square cake tin. Line it with parchment paper, making sure it comes up the sides a bit. The clever bit here is to use another folded strip of parchment paper to divide the tin right down the middle into two equal halves. This is going to help us keep our vanilla and chocolate batters separate.
Step 2: In a nice big bowl, cream together your softened butter and granulated sugar. You want to beat them until they’re really light and fluffy. It should look pale and feel airy – that’s what gives the cake that lovely light texture. Then, one by one, crack in your large eggs, giving it a good mix after each one. Don’t rush this bit; it’s important for getting a smooth batter.
Step 3: In a separate bowl, whisk together your all-purpose flour, baking powder, and salt. This makes sure the baking powder and salt are evenly distributed, so you don’t get any pockets of saltiness or flat bits in your cake. Now, gently fold these dry ingredients into your creamy butter and egg mixture. Once that’s mostly combined, stir in your milk to make a lovely, smooth batter.
Step 4: This is where the magic happens! You need to divide your batter evenly between two *separate* bowls. It’s best to use kitchen scales for this, just to be sure. To one of the bowls, add your cocoa powder. Mix it in really well until you have a smooth, rich chocolate batter. Make sure there are no streaks of plain batter left!
Step 5: Spoon each batter into its designated half of the prepared tin. So, vanilla in one side, chocolate in the other. Gently smooth the tops with your spatula. Try not to let the batters mix too much where they meet. Pop it into your preheated oven and bake for about 20 to 25 minutes. You’ll know it’s ready when the cakes are set and a toothpick you poke into the centre comes out clean. Let them cool in the tin for a few minutes before turning them out onto a wire rack to cool completely. Patience here is key!
Step 6: Once your cakes are totally cool – and I mean *completely* cool, or the marzipan will get melty – it’s time to get them ready for assembly. Trim off any slightly crispy edges to make them neat. You want two uniform rectangles. Then, slice each rectangle *lengthwise* so you end up with four long, skinny strips in total. You should have two vanilla and two chocolate strips.
Step 7: Warm up your apricot jam just slightly. You don’t want it boiling hot, just enough so it’s easy to brush. Use a pastry brush to coat the sides of each cake strip with a thin layer of jam. This is what’s going to act like glue! Now, arrange them in a checkerboard pattern, alternating vanilla and chocolate strips. Stick them together using a little more jam between each strip. It’s like a delicious jigsaw puzzle!
Step 8: Lightly flour your work surface and roll out your marzipan into a rectangle. It needs to be big enough to completely wrap around your assembled cake. Don’t worry if it’s not perfectly neat; we’ll trim it later. Carefully place your jam-stick-together cake strips onto the marzipan. Then, wrap the marzipan around the cake snugly, pressing gently. Seal the edges underneath the cake. Trim off any excess marzipan from the ends, and there you have it! Slice it up, and admire your handiwork. It’s almost as satisfying asMaking chocolate flapjacks!
Serving Suggestions for Your Easy Chocolate Battenberg
This lovely easy chocolate Battenberg is fantastic all on its own, but here are a few ideas to make your afternoon tea even more special:
A Pot of Strong Tea: You can’t beat a classic! A good brew is the perfect partner for sweet cake.
Fresh Berries: A little handful of fresh raspberries or strawberries adds a burst of freshness and colour.
Clotted Cream: If you’re feeling really indulgent, a tiny dollop of clotted cream takes it to another level!
Storing and Reheating Your Easy Chocolate Battenberg
Right, so you’ve made this gorgeous easy chocolate Battenberg, and you’ve got some left (which is a miracle if you ask me!). The best way to keep it is definitely at room temperature. Just pop it in an airtight container. It should stay lovely and fresh for about 3-4 days like that. Honestly, it rarely lasts that long in my house! If you *do* need to pop it in the fridge, say it’s a really warm day, just remember to let it come back to room temp for about 20 minutes before slicing for the best texture and flavour.
Frequently Asked Questions About Easy Chocolate Battenberg
Got a question about whipping up your own easy chocolate Battenberg? I’ve tried to cover all the bases!
Can I make this easy chocolate Battenberg cake ahead of time?
Yes, absolutely! This is one of my favourite things about this recipe. You can bake the cakes and assemble the Battenberg a day or two in advance. I actually think it tastes even better after a day, as the flavours have a chance to meld together nicely. Just store it in an airtight container at room temperature until you’re ready to serve. It’s perfect for getting a head start!
What if my marzipan starts to crack when I wrap it?
Oh, that can be a bit annoying, can’t it? Don’t panic! If you see small cracks appearing in your marzipan, just dampen your fingertip with a tiny bit of water and gently smooth over the crack. You can also use a little extra apricot jam to help ‘glue’ any small splits together. Rolling the marzipan to an even thickness is key, and making sure your cake isn’t too bulky for it will help loads!
Can I use a different type of jam instead of apricot?
You certainly can! While apricot jam is traditional and its subtle flavour doesn’t overpower the chocolate and vanilla, feel free to get creative. A good quality raspberry or strawberry jam would also be delicious, especially if you fancy a fruitier kick. Just make sure whichever jam you choose isn’t too runny. A thicker, conserve-style jam often works best for sticking everything together beautifully, just like in my vanilla mug cake!
Before You Go
I really hope you give this easy chocolate Battenberg a whirl! It’s such a rewarding bake. Let me know in the comments how yours turns out, or even better, share a picture! I love seeing your creations.
Print
Easy Chocolate Battenberg Cake
- Total Time: 55 minutes
- Yield: 8 servings
- Diet: Vegetarian
Description
A simple chocolate Battenberg cake featuring a soft sponge and a classic checkerboard design, ideal for afternoon tea.
Ingredients
- 1 cup unsalted butter, softened
- 3/4 cup granulated sugar
- 3 large eggs
- 1 1/2 cups all-purpose flour
- 1 teaspoon baking powder
- 1/4 teaspoon salt
- 2 tablespoons milk
- 2 tablespoons cocoa powder
- 1/2 cup apricot jam
- 7 ounces marzipan
Instructions
- Preheat your oven to 175°C (350°F). Line an 8-inch square cake tin with parchment paper. Divide the tin into two equal sections using a folded strip of parchment.
- In a bowl, cream the butter and sugar until light and fluffy.
- Add the eggs one at a time, mixing well after each addition.
- In another bowl, whisk together the flour, baking powder, and salt.
- Fold the dry ingredients into the butter mixture, then stir in the milk to create a smooth batter.
- Divide the batter evenly into two bowls. Mix the cocoa powder into one half until fully combined.
- Spoon each batter into separate sides of the prepared tin and smooth the tops.
- Bake for 20 to 25 minutes, or until the cakes are set and a toothpick inserted into the centre comes out clean. Cool completely.
- Trim the cakes into equal-sized strips, then cut each strip lengthwise to create four long pieces.
- Warm the apricot jam slightly and use it to brush the sides of each strip. Arrange the strips in a checkerboard pattern, sticking them together with jam.
- Roll out the marzipan into a rectangle large enough to wrap the cake. Place the cake on top and wrap it neatly, sealing the edges underneath.
- Trim the ends and slice to serve.
Notes
- Chill the assembled cake for 20 minutes before slicing to help keep the checkerboard pattern neat.
- Prep Time: 30 minutes
- Cook Time: 25 minutes
- Category: Cakes
- Method: Baking
- Cuisine: British