Right, let’s talk about desserts that don’t have you sweating over a hot oven, shall we? Sometimes you just need that sweet fix, and you need it *now*, without a fuss. That’s where these easy Oreo dessert bars come in. Honestly, they’ve been my secret weapon for unexpected guests and those “I need something sweet *immediately*” cravings. They’re just so ridiculously simple to throw together, but taste so decadent. My lot go absolutely bonkers for them, and the best part? No baking required!
Why You’ll Love These Easy Oreo Dessert Bars
- Super Speedy: Honestly, you can whip these up in about 15 minutes flat.
- No Oven Needed!: Perfect for those hot days or when your oven is already busy.
- Minimal Fuss: Just a handful of ingredients you probably already have lurking in the cupboard.
- Family Favourite: Everyone loves Oreos, right? These are always a guaranteed hit.
- Make Ahead Magic: Great for parties or just having a treat ready for when that craving strikes!
Ingredients for Your Easy Oreo Dessert Bars
Honestly, the beauty of these bars is how few ingredients they need. You can probably make them right now with what’s already in your kitchen. I always go for proper Oreos for that classic flavour, but if you can find those fancy thin ones, they’d work too!
- 48 chocolate sandwich cookies (that’s about 2 packs!), crushed finely
- 6 tablespoons unsalted butter, melted (make sure it’s properly melted, not just warm!)
- 8 ounces cream cheese, softened (leave it out for a good hour or so before you start)
- 1/2 cup powdered sugar
- 1 teaspoon vanilla extract (or vanilla flavouring, whatever you have!)
- 1 1/2 cups whipped topping, like Cool Whip, thawed if frozen
- 12 chocolate sandwich cookies, roughly chopped for a bit of texture on top
Crafting Your Easy Oreo Dessert Bars: Step-by-Step
I always think the base is super important for a no-bake bar. You want it firm enough to hold everything else, but still have that lovely buttery Oreo crunch. Pressing it down really well is key!
Step 1: First, line an 8-inch square baking pan with parchment paper, making sure there’s a bit of an overhang on the sides. This little trick makes lifting the bars out so much easier later on, much like when I make my key lime pie bars.
Step 2: In a bowl, mix your crushed chocolate sandwich cookies with the melted butter until it’s all evenly combined. It should look like damp sand. Press this mixture down firmly into the bottom of the pan to create an even base. Get it nice and flat – no one wants a lumpy bottom!
Step 3: Pop that pan into the fridge for about 15 minutes to let the base set up and firm up a bit. While it’s chilling, we can get started on that dreamy filling!
Step 4: In a separate bowl, beat the softened cream cheese until it’s really smooth and creamy. Then, add in your powdered sugar and vanilla flavouring. Beat again until everything is well combined and there are no lumps.
Step 5: Now, gently fold in the whipped topping. You want to do this carefully to keep the filling light and airy, kind of like how I prepare the filling for my strawberry cheesecake bars. Spread this lovely filling evenly over the chilled Oreo base.
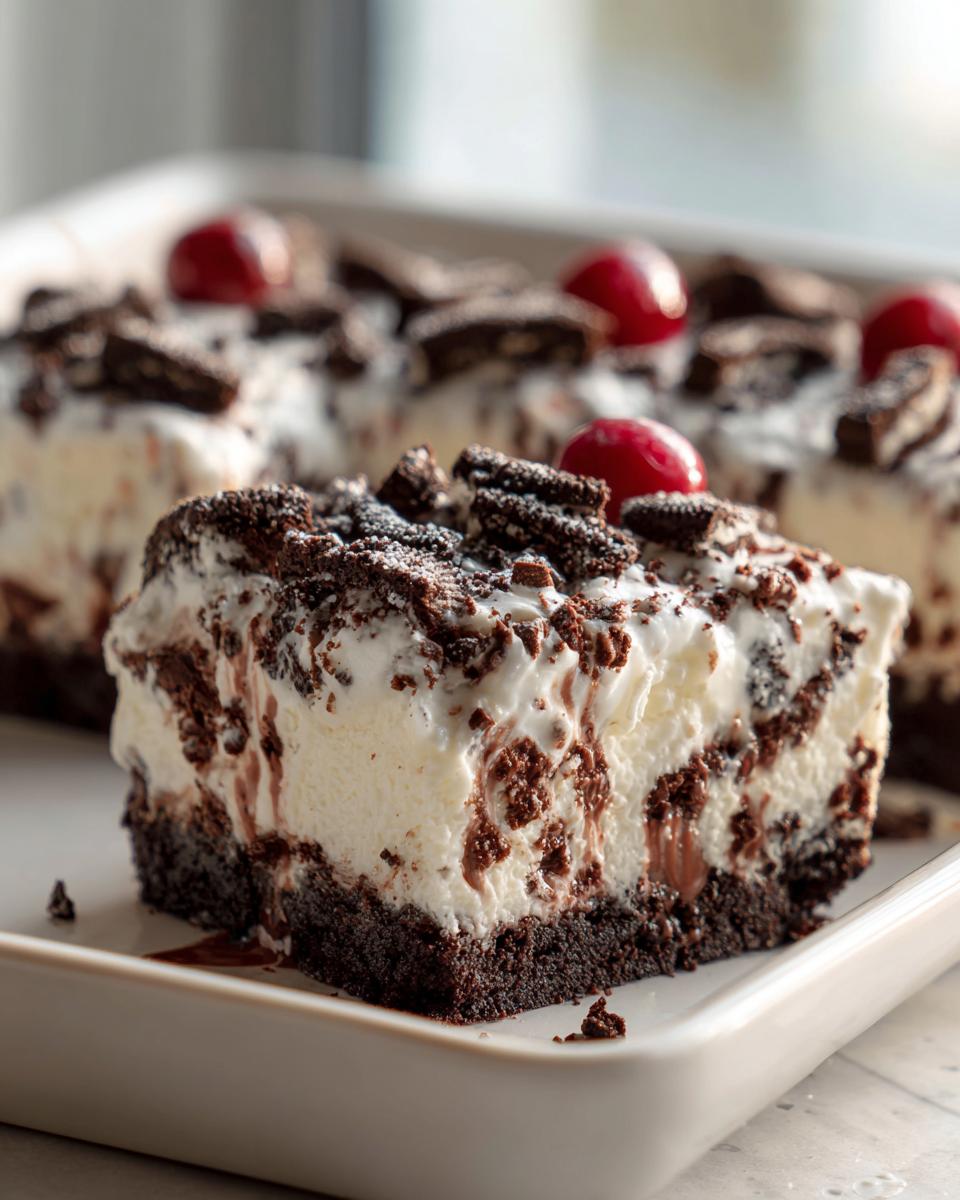
Step 6: Sprinkle the roughly chopped chocolate sandwich cookies over the top of the filling. This gives you a lovely bit of extra texture and chocolatey goodness in every bite. Cover the pan and refrigerate for at least 2 hours, or until the bars are firm enough to slice. For really clean cuts, chill them thoroughly and wipe your knife between slices!
Serving Suggestions for Your Easy Oreo Dessert Bars
A little extra chocolate: Drizzle with melted chocolate for an extra decadent finish that really takes these bars to the next level.

Fresh Berries: A few fresh raspberries or strawberries on the side offer a lovely tart contrast to the sweet cookie and creaminess.
Simple Ice Cream: Try serving a small scoop of vanilla or cookies ‘n’ cream ice cream alongside for a truly indulgent treat.
Storing and Reheating Your Easy Oreo Dessert Bars
These bars are brilliant for making ahead, which is always a winner in my book! Just a few little things to keep in mind to make sure they stay delicious.
You’ll want to store these beauties in an airtight container in the fridge. They’ll keep perfectly for about 3-4 days, although frankly, they rarely last that long in my house! The base and the creamy filling are quite happy together, so no need to separate them. Just make sure the container is well-sealed to keep them fresh. If you’ve got any leftover, which is a big “if” I know, just pop them back in the fridge. They don’t really need reheating, they’re best served chilled!
Frequently Asked Questions About Easy Oreo Dessert Bars
Can I use a different kind of cookie for the base?
Oh, absolutely! While Oreos give these bars their signature flavour, you could totally switch it up. Digestive biscuits, chocolate chip cookies, or even graham crackers would make a delicious base. Just crush ’em up and mix with the melted butter as usual!
How do I get really clean cuts for my bars?
This is my top tip for no-bake goodies! Make sure your bars are properly chilled – at least 2 hours, but longer is better. Then, use a really sharp knife, and wipe the blade clean with a damp cloth between each cut. It sounds fiddly, but trust me, it makes all the difference for a neat slice!
Can I make these bars vegan?
You know, it’s tricky with the cream cheese and whipped topping. You’d need to find vegan versions of all those ingredients, and the texture might be a little different. It’s definitely more of a challenge than a simple no-bake vegan dessert, but with the right swaps, it could be done!
Before You Go
Honestly, I hope you get a chance to whip up these easy Oreo dessert bars soon! They’re just so satisfyingly simple and always a massive hit. Let me know in the comments below if you give them a go – I’d absolutely love to hear what you think!
Print
Easy Oreo Dessert Bars
- Total Time: 2 hours 15 min
- Yield: 9 bars
- Diet: Vegetarian
Description
Easy Oreo dessert bars with a creamy layered filling and chocolate base. A simple sweet treat perfect for parties and sharing.
Ingredients
- 24 chocolate sandwich cookies crushed
- 5 tablespoons unsalted butter melted
- 8 ounces cream cheese softened
- 1/2 cup powdered sugar
- 1 teaspoon vanilla flavoring
- 1 1/2 cups whipped topping
- 12 chocolate sandwich cookies roughly chopped
Instructions
- Line an 8 inch square pan with parchment paper.
- Mix the crushed chocolate sandwich cookies with melted butter until evenly combined.
- Press the mixture firmly into the bottom of the pan to form an even base.
- Chill in the refrigerator for 15 minutes to set.
- Beat the cream cheese until smooth.
- Add powdered sugar and vanilla flavoring, mixing until fully combined.
- Fold in the whipped topping until light and creamy.
- Spread the filling evenly over the chilled base.
- Sprinkle the chopped chocolate sandwich cookies over the top.
- Refrigerate for at least 2 hours until firm, then slice into bars and serve.
Notes
- For cleaner slices, chill thoroughly and wipe the knife between cuts.
- Prep Time: 15 min
- Cook Time: 0 min
- Category: Dessert
- Method: No Bake
- Cuisine: British