Honestly, who doesn’t love a good no-bake dessert? Especially when it’s something as utterly delightful and ridiculously easy as these Oreo No Bake Cheesecake Cups! I first whipped these up for a last-minute garden party when I realised I’d forgotten a sweet treat. My guests were absolutely raving, and nobody could believe they weren’t bought from a fancy bakery. They’re just so creamy, dreamy, and packed with that classic Oreo crunch. Plus, they use everyday ingredients you probably already have lurking in your cupboard – winner!
Why You’ll Love These Oreo No Bake Cheesecake Cups
- Super Speedy: Ready in just 15 minutes of prep – perfect for when you need a dessert in a jiffy!
- Effortlessly Easy: Seriously, no oven required. Just mix, layer, and chill. Anyone can make these!
- Crowd-Pleaser Guaranteed: Who can resist that creamy cheesecake and crunchy Oreo combo? They’re always a hit!
- Perfectly Portable: These little cups are ideal for parties, picnics, or just a sweet treat anytime.
Ingredients for Your Oreo No Bake Cheesecake Cups
Right then, let’s get down to what you’ll need for these beauties. It’s honestly a doddle, and I always keep a packet of Oreos stashed away just in case a dessert emergency strikes! Trust me, you’ll want these to hand after you’ve tried this recipe.
- 225g full-fat cream cheese, make sure it’s nice and soft (I usually leave mine out on the counter for an hour or so)
- 225g whipped topping (like the ready-made stuff, you know the one)
- 80g icing sugar, for that lovely smooth sweetness
- 1 tsp vanilla extract, for that classic cheesecake magic
- 24 Oreo biscuits, plus a few extra if you fancy a bit more crunch on top
- Whipped cream, for serving (optional, but personally, I never skip it!)
Step-by-Step Guide to Making Oreo No Bake Cheesecake Cups
Right then, let’s get down to what you’ll need for these beauties. It’s honestly a doddle, and I always keep a packet of Oreos stashed away just in case a dessert emergency strikes! Trust me, you’ll want these to hand after you’ve tried this recipe. For more simple no-bake ideas, check out this easy no-bake Oreo dessert – it’s another winner!
Step 1: First things first, grab your Oreos! Pop about 24 of them into a sturdy plastic food bag. Seal it up tight and give it a good whack with a rolling pin until you’ve got lovely, fine crumbs. It’s a bit of a stress reliever, this bit! Then, spoon about 2 tablespoons of these glorious crumbs into the bottom of each of your 6 serving glasses or small bowls. Press them down gently to form a nice little base for our cheesecake.
Step 2: Now for the creamy part! In a decent-sized mixing bowl, bung in your softened cream cheese and the icing sugar. Whisk them together until they’re all smooth and lump-free. You want it super creamy, no grainy bits at all! Then, stir in the vanilla extract. That little bit of vanilla really makes all the difference, giving it that proper classic cheesecake flavour.
Step 3: Gently fold the whipped topping into your cream cheese mixture. Don’t go mad with the whisking here; you want to keep it nice and airy and fluffy. Now for the best bit – take that reserved 2 tablespoons of crushed Oreos (remember that bit from Step 1?) and fold them into the filling. This gives you those gorgeous little pockets of Oreo goodness throughout the cheesecake. It really makes these Oreo No Bake Cheesecake Cups extra special!
Step 4: Spoon that lovely, fluffy cheesecake mixture evenly over the Oreo bases in your glasses. Smooth the tops off gently with the back of a spoon so they look all neat and tidy. Pop these into the fridge for at least 30 minutes. This is crucial, honestly! You need them to chill and set properly, otherwise, they’ll be a bit too sloppy. Go on, give them a good chill.
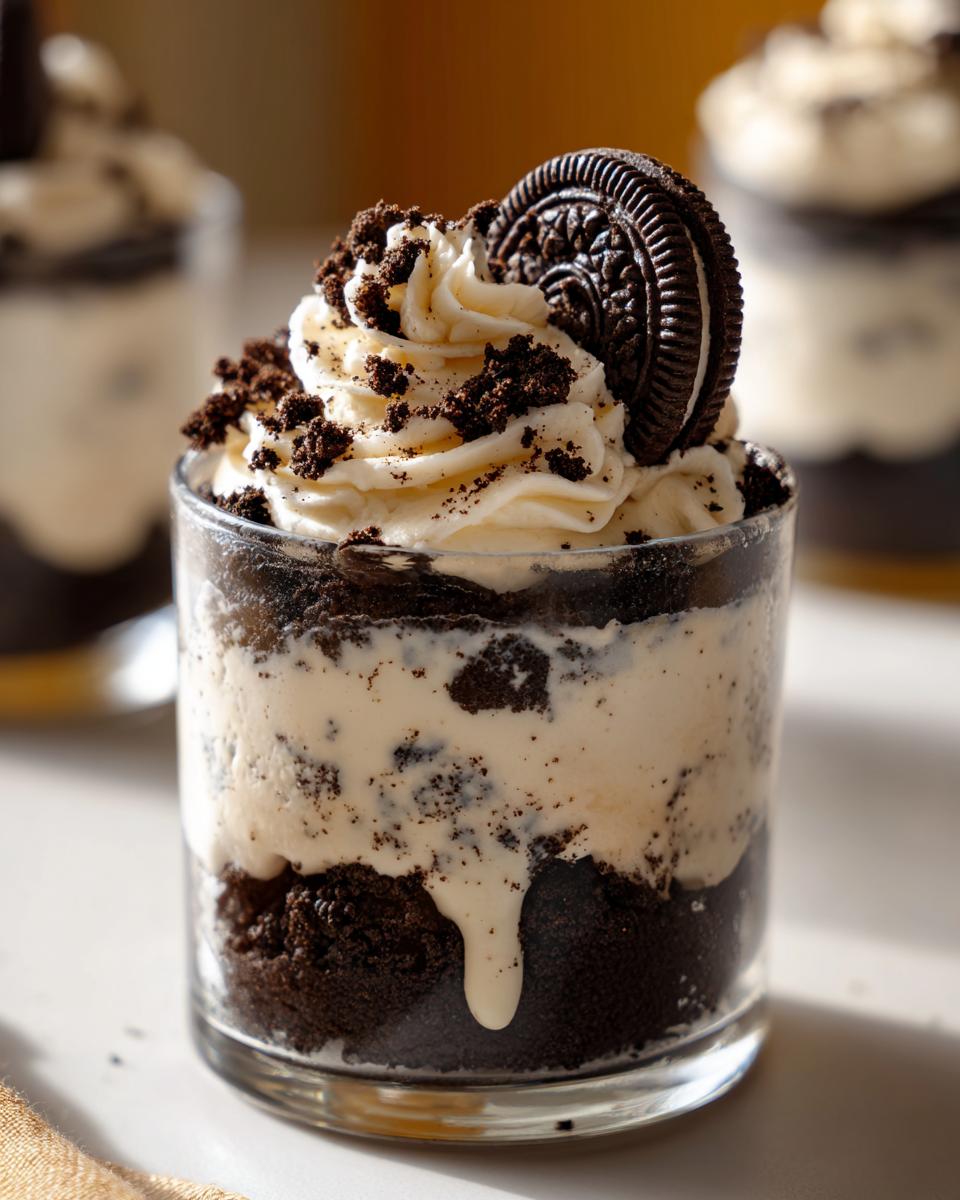
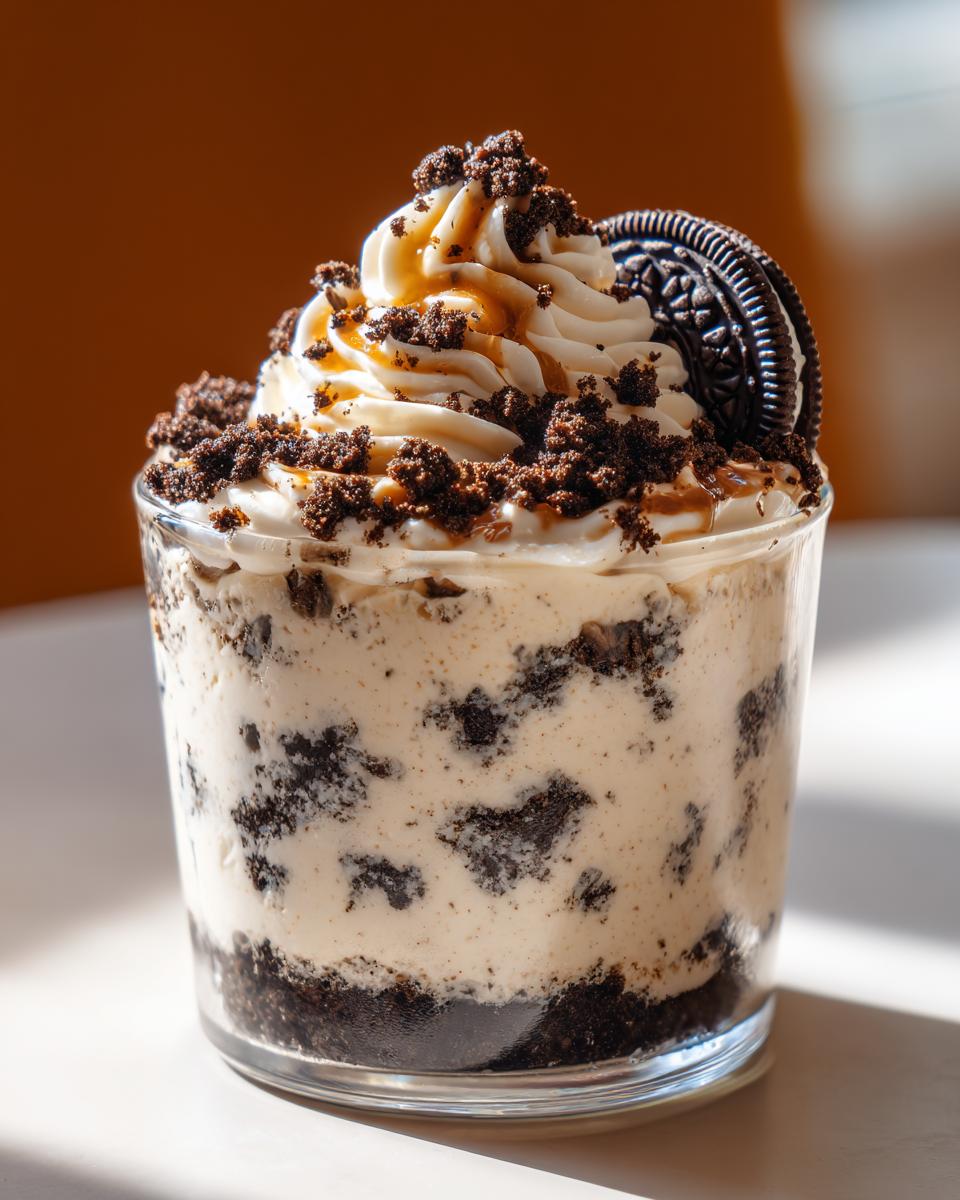
Step 5: Right, they should be nice and set now! Before you serve your fabulous Oreo No Bake Cheesecake Cups, dollop on a good swirl of whipped cream. Then, sprinkle over some of those extra crushed Oreos you saved. Fancy making them extra special? Pop a whole Oreo biscuit on top of each one. They look amazing and add that extra bit of indulgence!
Serving Suggestions for Your Oreo No Bake Cheesecake Cups
These little cups are fab on their own, but here are a few extra ideas to make them even more of a showstopper:
A Sprinkle of Chocolate Shavings: For a touch of elegance, a light dusting of dark or milk chocolate shavings really makes them pop. It adds a hint of sophisticated flavour without being too much.
A Drizzle of Chocolate Sauce: If you’re feeling particularly indulgent, a little swirl of your favourite chocolate sauce over the top takes them to a whole new level of decadence. It’s also lovely paired with something like my easy chocolate mousse for a triple chocolate treat!
Fresh Berries: A few fresh raspberries or strawberries add a lovely tartness and a bright splash of colour that contrasts beautifully with the rich chocolate and cream. It’s a bit like my easy vanilla cupcakes; a bit of fruit just lifts everything!
Mini Chocolate Chips: Sprinkle a few mini chocolate chips over the top for an extra bit of texture and intense chocolate hit. It’s a simple addition that makes a big difference!
Storage and Reheating Instructions for Oreo No Bake Cheesecake Cups
These Oreo No Bake Cheesecake Cups are brilliant for making ahead! Because they’re no-bake, they keep their lovely texture perfectly in the fridge. I often make a batch on a Friday for a weekend treat, and they’re still absolutely delicious.
To store your gorgeous Oreo No Bake Cheesecake Cups, just pop them into an airtight container or cover them snugly with cling film. They’ll stay fabulous in the fridge for up to 2 days. Honestly, they rarely last that long in our house, but it’s good to know you’ve got that flexibility! They don’t need reheating at all, in fact, they’re best served chilled straight from the fridge to keep that lovely, firm cheesecake texture.
Frequently Asked Questions About Oreo No Bake Cheesecake Cups
Got a few questions buzzing around your head about these brilliant Oreo No Bake Cheesecake Cups? I get it! Here are some common ones I hear, with my best answers.
Can I use different biscuits for the base?
Absolutely! While Oreos are the star of the show here, you could swap the base for digestive biscuits or even chocolate chip cookies if you fancy. Just crush them the same way and press them into the bottom of your glasses!
My cheesecake mixture is a bit too soft. What went wrong?
No worries! This often happens if the cream cheese wasn’t softened enough or if you didn’t chill them for long enough. Make sure your cream cheese is at room temperature. If it’s still a little soft, carefully fold in an extra tablespoon of crushed Oreos (this helps absorb moisture) and pop them back in the fridge for another 30 minutes. They’ll firm up!
Can I make larger Oreo No Bake Cheesecake Cups?
Yes, you definitely can! If you want to make a big, impressive Oreo cheesecake instead of individual cups, just double or triple the recipe and pour it all into a springform tin. You’ll need to increase the chilling time to at least 4 hours, or even overnight, to make sure it sets properly.
Enjoy Your Delicious Oreo No Bake Cheesecake Cups!
I really hope you have as much fun making and eating these gorgeous Oreo No Bake Cheesecake Cups as I do! Give them a whirl and let me know what you think in the comments below – I absolutely love hearing from you all. You can also share your creations over on Pinterest, or check out our latest posts for more sweet inspiration!
Print
Oreo No Bake Cheesecake Cups
- Total Time: 45 min
- Yield: 6 servings
- Diet: Vegetarian
Description
Creamy Oreo No Bake Cheesecake Cups layered with crushed biscuits and fluffy cheesecake filling. A quick chilled dessert perfect for parties and summer treats.
Ingredients
- 225g full-fat cream cheese, softened
- 225g whipped topping
- 80g icing sugar
- 1 tsp vanilla extract
- 24 Oreo biscuits plus extra for topping
- Whipped cream for serving
Instructions
- Place the Oreo biscuits into a sealed food bag and crush them into small crumbs using a rolling pin.
- Spoon about 2 tablespoons of crushed Oreo crumbs into the base of 6 dessert glasses or small bowls.
- In a large mixing bowl, beat the cream cheese and icing sugar together until smooth and creamy.
- Add the vanilla extract and mix until combined.
- Fold the whipped topping gently into the cream cheese mixture until light and fluffy.
- Reserve 2 tablespoons of crushed Oreos for decoration, then fold the remaining crushed biscuits into the cheesecake filling.
- Divide the cheesecake mixture evenly between the dessert glasses and smooth the tops.
- Chill the cheesecake cups in the fridge for at least 30 minutes until set.
- Before serving, top with whipped cream, extra crushed Oreos, and a whole Oreo biscuit if desired.
Notes
- These cheesecake cups can be made up to 2 days ahead and stored covered in the fridge until ready to serve.
- Prep Time: 15 min
- Cook Time: 0 min
- Category: Dessert
- Method: No Bake
- Cuisine: British