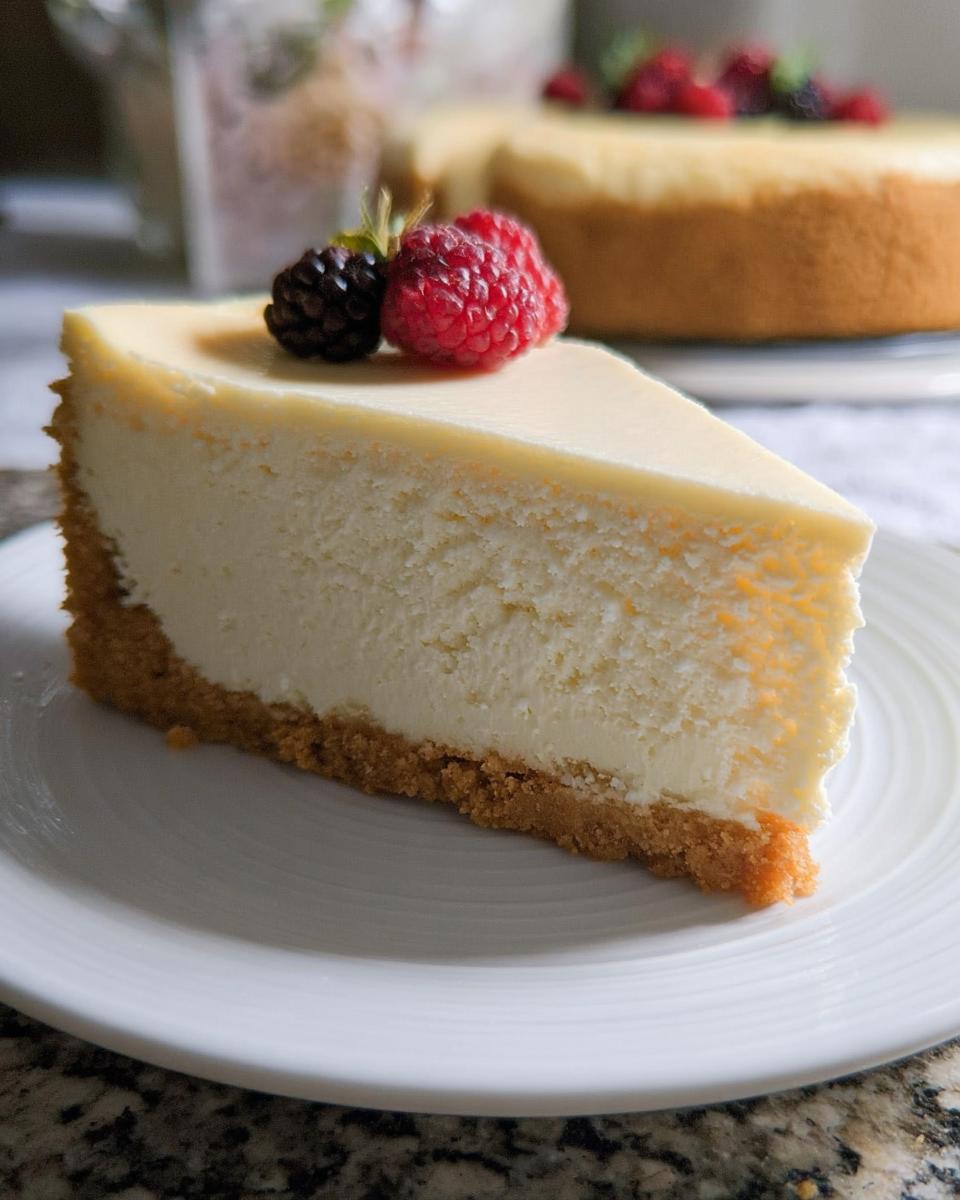
Oh, the quest for the perfect cheesecake! There’s something so deeply satisfying about slicing into a tall, creamy, impossibly smooth cheesecake that sets just right. This Mary Berry best cheesecake recipe is my absolute go-to for when I need a showstopper that never, ever fails. It’s a classic baked beauty with that signature Mary Berry touch—simple, reliable, and utterly delicious. The magic is in the method. I learned the hard way years ago, after a disastrously lumpy filling, that room-temperature ingredients are non-negotiable. A lovely baker I used to work with at a café told me, “Patience, dear. Let everything come to room temp, and you’ll be rewarded.” She was right. And that gentle wobble in the centre when it comes out of the oven? That’s the secret handshake of a perfectly set, creamy dream. It’s a technique that’s served me brilliantly ever since.
Why You’ll Love This Mary Berry Best Cheesecake Recipe
Honestly, this is the cheesecake recipe I reach for when I want zero stress and maximum praise. It’s so straightforward, yet it feels like a proper, impressive treat every single time.
This Mary Berry best cheesecake recipe is my absolute fail-safe. It gives you that classic, luxurious flavour with a texture that’s incredibly smooth and creamy, not dense or heavy. I love that it uses a simple no-bake biscuit base—which is basically foolproof—but then bakes the filling. That gentle bake is the secret to a cheesecake that slices beautifully and holds its shape, so you get clean, gorgeous wedges every time.
Here’s why I think you’ll adore it as much as I do:
- It’s wonderfully reliable: The instructions are clear and follow that trusted Mary Berry style—no fuss, just great results. If you’re new to baking cheesecakes, this is the perfect place to start.
- The texture is dreamy: Because you bake it slowly and cool it gently, the filling sets to a perfect, velvety creaminess. No cracks, no sinking, just pure bliss.
- It feels special: Bringing this to the table always gets a “wow.” It looks like you spent hours on something complicated, when really, the method is beautifully simple.
- Endlessly customisable: Once you’ve mastered the base recipe, the topping is your playground. You can keep it classic or get creative with different sauces and fruits.
It’s also a brilliant base recipe to have in your repertoire. Once you’re comfortable with this classic version, you might fancy trying other no-bake treats, like my favourite no-bake key lime cheesecake for a zingy twist, or explore some other healthy protein dessert recipes when you want something a bit lighter. But trust me, for a timeless crowd-pleaser, this one’s hard to beat.
Ingredients for Your Mary Berry Best Cheesecake
The single most important tip for this recipe? Get your filling ingredients out of the fridge at least an hour before you start. Room temperature cream cheese, sour cream, and eggs are the secret to a completely smooth, lump-free filling that bakes evenly. Trust me on this one—it makes all the difference.
For the Base:
- 1 ½ cups digestive biscuit crumbs (about 200g)
- 2 tablespoons granulated sugar
- 1 tablespoon light brown sugar, packed
- 7 tablespoons unsalted butter, melted
For the Filling:
- 32 ounces (900g) full-fat cream cheese, at room temperature
- 1 cup granulated sugar
- ⅔ cup sour cream, at room temperature
- 1 ½ teaspoons vanilla extract
- ⅛ teaspoon salt
- 4 large eggs, lightly beaten, at room temperature
How to Make the Mary Berry Best Cheesecake: Step-by-Step
Right, let’s get baking! The key here is a calm, steady pace. Don’t rush the mixing, and please, please trust the wobble test. It feels a bit scary the first time, but it’s the golden rule for perfect creaminess.
Step 1: First things first, get your oven on to 160°C (that’s about 325°F for my friends using Fahrenheit). Lightly grease the bottom and sides of a 9-inch springform tin. There’s nothing worse than a beautiful cheesecake stuck in the tin!
Step 2: Make your base. In a medium bowl, mix your digestive biscuit crumbs with both the granulated and light brown sugar. Pour in the melted butter and stir it all together with a fork until every crumb is coated and the mixture holds together when you pinch it—it should look like wet sand. Tip it into your prepared tin and press it down firmly and evenly with the back of a spoon or a flat-bottomed glass. You want a nice, compact layer. Pop this in the fridge to set a little while you make the filling.
Step 3: Now for the main event—the filling. In a large bowl, beat your room-temperature cream cheese with an electric mixer on medium speed until it’s completely smooth and creamy. This takes a good minute or two. Scrape down the sides of the bowl, then beat in the granulated sugar until it’s fully blended and no longer grainy.
Step 4: Add the room-temperature sour cream, vanilla extract, and that tiny but mighty pinch of salt. Beat again just until everything is beautifully combined, scraping the bowl down once more.
Step 5: Here’s the crucial bit for a smooth texture. With the mixer on its lowest speed, add your lightly beaten eggs one at a time. Mix only until each egg is just incorporated before adding the next. Overbeating at this stage incorporates too much air, which can lead to cracking in the oven. Once the last egg is mixed in, stop! Give the bowl a final scrape and fold by hand to make sure everything is even.
Step 6: Take your tin with the chilled base out of the fridge. Pour the creamy filling over the top, then gently tap the tin on the counter a few times to release any big air bubbles. Smooth the top with a spatula. For extra insurance against cracks and an even creamier texture, you can place the springform tin inside a larger roasting tray and pour hot water into the tray to come halfway up the sides—this is a water bath and it’s a brilliant trick.
Step 7: Carefully place the tin (on a baking tray if you’re not using a water bath) into the preheated oven. Bake for 55 to 70 minutes. It’s done when the edges are set and look slightly puffed, but the centre—about a 3-inch circle in the middle—still has a definite, gentle wobble when you lightly shake the tin. It should not be liquid, just a delicate jiggle. This is the ‘slight wobble’ you’re aiming for!
Step 8: When it’s perfectly wobbly, turn the oven off. Crack the oven door open with a wooden spoon and let the cheesecake cool slowly inside for a full hour. This gradual cooling is what helps prevent sinking and cracking.
Step 9: After its oven nap, take the cheesecake out and let it cool completely at room temperature for another hour or two. Then, and this is the test of patience, cover it loosely and refrigerate it for at least 6 hours, but preferably overnight. This final chill is what sets the filling to that perfect, sliceable creaminess. Running a hot knife under water and drying it between slices gives you those gorgeous, clean wedges. For more no-fuss dessert inspiration, have a peek at my other favourite healthy no-bake dessert recipes when you’re in the mood for something different!

What to Serve with Your Cheesecake
This cheesecake is stunning all on its own, but I love adding a little something extra on the side. It’s a brilliant way to make it feel fresh and new each time. Here are my favourite simple pairings.
Fresh Berries: A handful of raspberries, strawberries, or blueberries adds a gorgeous pop of colour and a lovely tartness that cuts right through the rich creaminess.
A Quick Fruit Compote: Simmer some frozen berries with a spoonful of sugar and a squeeze of lemon juice for five minutes. Spooning this warm over the cold cheesecake is just divine.
Lightly Whipped Cream: A dollop of softly whipped cream with a drop of vanilla is pure classic indulgence. It makes every slice feel extra special.
A Dusting of Icing Sugar: For the simplest, prettiest finish, a light sprinkle of icing sugar through a fine sieve right before serving looks beautifully elegant.
Storage and Reheating for Your Mary Berry Best Cheesecake
Good news: this cheesecake actually gets better after a day in the fridge, and it’s a dream for making ahead. Just remember, it’s always served chilled—no reheating needed!
Once your Mary Berry best cheesecake is fully set, you can keep it in the fridge, covered loosely with cling film, for up to 5 days. I find the flavour mellows and the texture becomes even more perfect by day two. If you’ve already cut into it, press a piece of baking parchment against the cut edge to help keep it fresh.
Freezing is totally doable, too. For the neatest results, I freeze individual slices. Wrap each slice tightly in cling film, then pop them into a freezer bag. They’ll keep beautifully for up to 2 months. When you get a craving, just transfer a slice to the fridge and let it thaw overnight. It’s my secret for having a proper dessert ready anytime.
This recipe is my top choice for meal prep when I’m hosting. You can bake it completely 1-2 days before your event, and it’ll be perfectly rested and ready to impress. Just add your fresh berries or compote right before serving. Honestly, taking the pressure off the day-of is the best baking hack I know.
Mary Berry Best Cheesecake Recipe FAQs
I get a few of the same questions every time I share this recipe, so let’s clear up the most common worries right here. Don’t stress—most issues have a simple fix!
Can I use a different biscuit for the base?
Absolutely! Digestives are classic for a reason—that slightly malty, buttery flavour is perfect—but you can definitely swap them. I’ve used gingernuts for a spiced kick, and plain digestive alternatives like rich tea biscuits work well too. Just make sure you have about 200g of crumbs. The key is sticking to the same butter-to-crumb ratio so your base holds together nicely.
Why is my cheesecake cracked?
Oh, I’ve been there! Cracks usually happen from overmixing the eggs (which adds too much air) or from the cheesecake cooling too quickly. That’s why I’m such a stickler for mixing the eggs on low and letting it cool slowly in the turned-off oven. If you’re really worried, the water bath trick I mentioned is a fantastic insurance policy for the creamiest, crack-free top.
Can I make this ahead of time?
You can, and you should! This Mary Berry best cheesecake recipe is actually better made a day ahead. That long, slow chill in the fridge lets the flavours settle and the texture become perfectly firm for slicing. It’s my go-ahead-of-time dessert for dinners. Just add any fresh toppings right before you serve. For more recipe ideas and tips, you can always find me saving my favourite bakes over on Pinterest too.
Nutritional Information
I’m a cook, not a scientist! Just a quick, friendly reminder that these numbers can vary depending on the exact brands you use.
Please note that the nutritional content for this Mary Berry best cheesecake recipe is an estimate. The exact values for calories, sugar, and fat can change based on your specific ingredients, like the brand of cream cheese or biscuits you choose.
I really hope you give this Mary Berry best cheesecake recipe a go. It’s brought so much joy to my kitchen, and I’d love to hear if it becomes a favourite in yours too. If you make it, please let me know how you get on in the comments, and don’t forget to rate the recipe. Happy baking!
Print
Mary Berry Best Cheesecake
- Total Time: 7 hours 35 min
- Yield: 12 servings
- Diet: Vegetarian
Description
A creamy, no-bake cheesecake with a digestive biscuit base, inspired by Mary Berry’s style.
Ingredients
- 1 1/2 cups digestive biscuit crumbs
- 2 tablespoons granulated sugar
- 1 tablespoon light brown sugar
- 7 tablespoons unsalted butter, melted
- 32 ounces full-fat cream cheese
- 1 cup granulated sugar
- 2/3 cup sour cream
- 1 1/2 teaspoons vanilla extract
- 1/8 teaspoon salt
- 4 large eggs, lightly beaten
Instructions
- Preheat your oven to 160°C and grease a 9-inch springform tin.
- Mix the biscuit crumbs, granulated sugar, and brown sugar in a bowl. Stir in the melted butter until the mixture resembles wet sand.
- Press the mixture firmly into the base and slightly up the sides of the tin. Set it aside.
- In a large bowl, beat the cream cheese until it is smooth and creamy.
- Add the sugar and mix until fully incorporated.
- Blend in the sour cream, vanilla extract, and salt, scraping down the bowl to mix evenly.
- Add the eggs one at a time on low speed, mixing just until combined after each addition.
- Pour the filling over the prepared base and smooth the top. Place the tin on a baking tray.
- Bake for 55 to 70 minutes until the edges are set and the centre has a slight wobble when gently shaken.
- Turn off the oven, crack the door slightly, and let the cheesecake cool inside for 1 hour.
- Remove it and cool at room temperature for another hour, then refrigerate for at least 6 hours until fully set.
- Remove from the tin, slice, and serve chilled.
Notes
- For a smooth finish, avoid overmixing the batter and ensure all ingredients are at room temperature before starting.
- Prep Time: 20 min
- Cook Time: 1 hour 15 min
- Category: Dessert
- Method: Baking
- Cuisine: British