

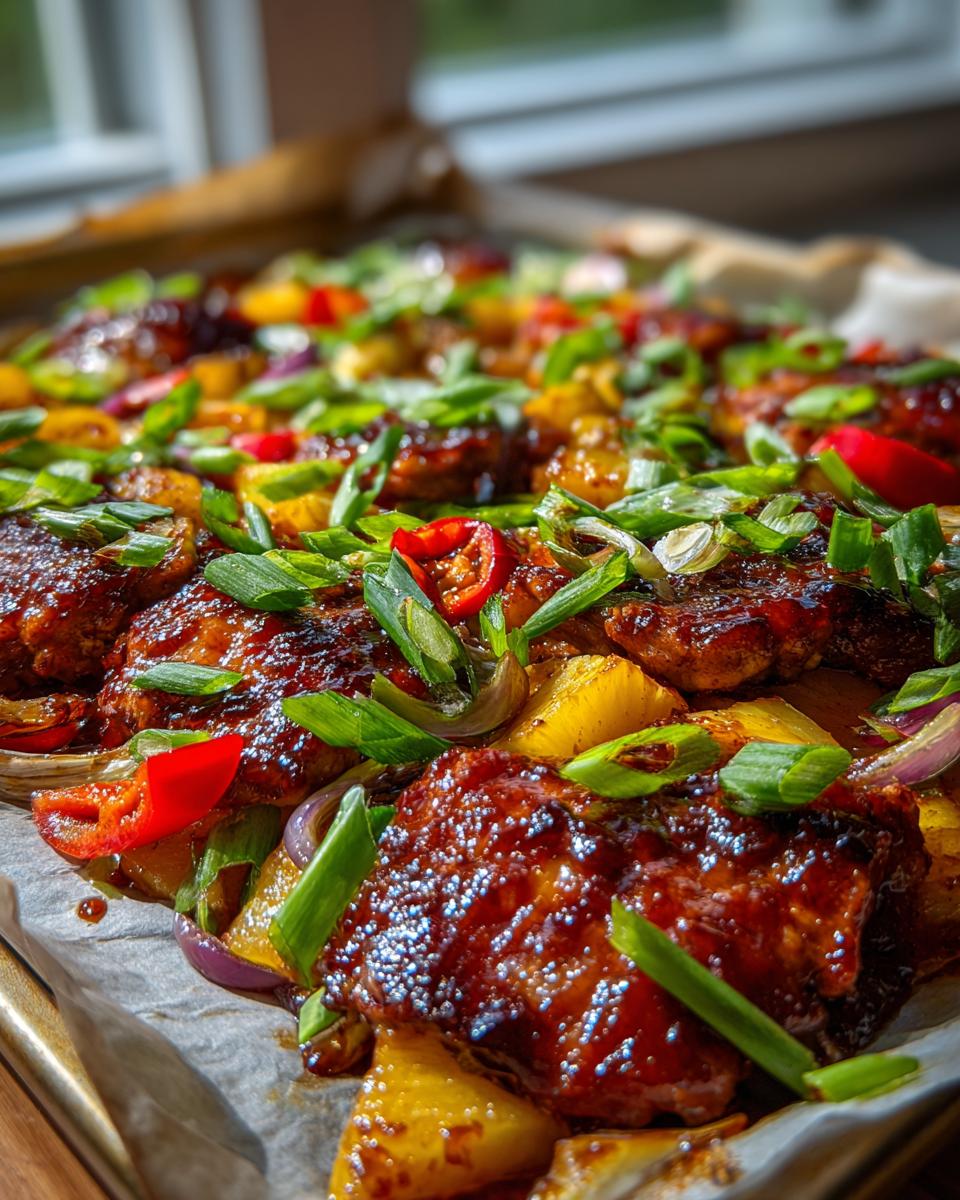
Oh, you guys, let me tell you about my absolute go-to for those busy weeknights when you want something that tastes like a luau but feels like zero effort: my One Pan Hawaiian BBQ Chicken with Pineapple! Seriously, this dish is a lifesaver. I first threw this together on a sweltering summer evening, desperate for a meal that wouldn’t keep me chained to the stove. The smell of that sweet, smoky barbecue glaze mingling with juicy pineapple and tender chicken? Pure magic. It’s the perfect way to get that delicious hawaiian bbq chicken flavor without all the fuss. Trust me, it’s about to become your family’s new favorite too!
Why You’ll Love This Hawaiian BBQ Chicken
You’re going to be obsessed with this recipe for so many reasons! It’s unbelievably easy, tastes like a tropical vacation, and cleanup is a breeze.
- Super Simple One-Pan Wonder: Seriously, toss it all on a sheet pan and let the oven do the work. Less dishes mean more time for you!
- Incredible Flavor Combo: The sweet pineapple, tangy BBQ sauce, and savory chicken are a match made in heaven. It’s that perfect balance of flavors we all crave.
- Weeknight Warrior: Ready in under an hour, this dish is a total lifesaver for busy evenings or when you just don’t want to fuss.
- Family-Friendly Crowd-Pleaser: Even the pickiest eaters tend to love this one, making it perfect for family dinners or casual get-togethers.
Ingredients for Your Delicious Hawaiian BBQ Chicken
This recipe is all about simple, fresh ingredients that come together to make something truly special. I love using chicken thighs because they stay so juicy and tender, even with the sweet glaze. And of course, you can’t have Hawaiian without pineapple!
- 1.5 pounds boneless, skinless chicken thighs, cut into 1-inch chunks
- 1 tablespoon olive oil
- 2 cups pineapple chunks, fresh or canned and drained (canned works just fine here!)
- 1 red bell pepper, chopped
- 1 green bell pepper, chopped
- 1 small red onion, sliced into thin half-moons
- 0.75 cup barbecue sauce (your favorite kind!)
- 2 tablespoons low sodium soy sauce
- 1 tablespoon honey
- 1 teaspoon garlic powder
- 0.5 teaspoon black pepper
- 2 green onions, thinly sliced, for garnish
Step-by-Step Instructions for Perfect Hawaiian BBQ Chicken
You’re going to love how simple this is! My secret weapon for minimal cleanup is a good old-fashioned sheet pan. It really lets everything bake together beautifully.
Step 1: First things first, preheat your oven to 425°F. I like to line a big baking sheet with parchment paper – it’s a total game-changer for cleanup. Seriously, don’t skip this if you hate scrubbing pans!
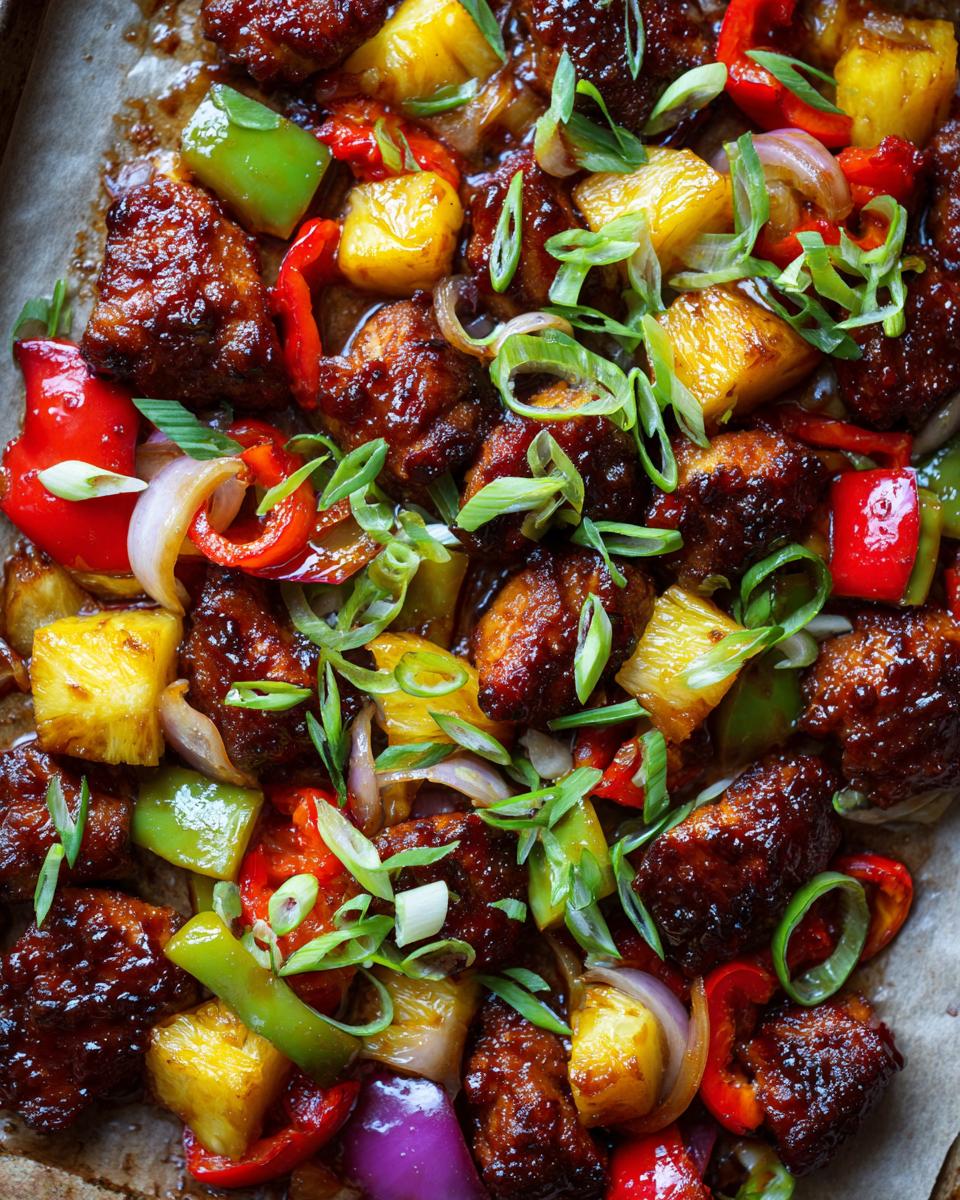
Step 2: In a big bowl, toss together your chicken chunks, pineapple, those colorful bell peppers, and the red onion slices. Give it a good drizzle of olive oil and toss everything around until it’s all nicely coated. Then, spread it all out in a single layer on your prepared sheet pan. This is important so everything cooks evenly and gets a nice little char.
Step 3: Now for the good stuff! In a small bowl, whisk together the barbecue sauce, soy sauce, honey, garlic powder, and black pepper until it’s all smooth and delicious. This is where all that sticky, sweet, tangy goodness comes from!
Step 4: Pour that yummy sauce all over the chicken and veggie mixture on the pan. Give it a gentle toss right there on the pan to make sure everything is coated. I usually just use tongs or two forks for this part.
Step 5: Pop that pan into your hot oven and bake for about 20 minutes. The chicken will start to cook, and the veggies will soften up.
Step 6: Carefully pull the pan out of the oven. Give everything a good stir to make sure the sauce redistributes and to help everything caramelize evenly on the other side.
Step 7: Back into the oven it goes for another 10 to 15 minutes. You’re looking for the chicken to be cooked all the way through (an internal temperature of 165°F is perfect, if you have a thermometer!) and that sauce should be thick, sticky, and beautifully caramelized. Watch it closely towards the end so it doesn’t burn!
Step 8: Once it’s done, take it out of the oven and let it rest for just a few minutes. This helps the juices in the chicken redistribute, making it extra tender.
Step 9: Before serving, sprinkle all that fresh, sliced green onion over the top. It adds a lovely little bite and a pop of color. You might also like to check out my Grilled Hawaiian Chicken Teriyaki Bowls or even Instant Pot Chicken Teriyaki Bowls for more tropical chicken goodness!
What to Serve with Your Hawaiian BBQ Chicken
This Hawaiian BBQ chicken is fantastic on its own, but it plays *so* well with others! Here are a few things my family loves to have alongside it that just make the whole meal sing.
Fluffy Steamed Rice: A bed of plain white rice is the perfect canvas for soaking up all that sweet and sticky barbecue glaze. It’s also great for making the meal a bit more substantial! If you’re feeling adventurous, you could even try some Mexican rice for a fun twist!
Fresh Fruit Salad: Since we’ve got pineapple in the dish, a simple fruit salad with melon, berries, and maybe some kiwi really doubles down on the tropical vibe and adds a refreshing coolness that you’ll love.
Classic Potato Salad: For something a bit more classic and comforting, a creamy potato salad is always a winner. It’s the perfect contrast to the tender, glazed chicken, and you can find a great version here.
Storing and Reheating Your Hawaiian BBQ Chicken
Lucky for us, this Hawaiian BBQ Chicken reheats like a dream! If you find yourself with leftovers (which usually doesn’t happen in my house, but hey!), just pop them into an airtight container. I keep them in the fridge for up to 3-4 days. When you’re ready to enjoy it again, try to avoid the microwave if you can – it can make the chicken a little less tender. Your best bet is to gently reheat it in a skillet over medium-low heat, stirring occasionally until it’s warm all the way through. Or, pop it back on a baking sheet in a moderate oven (around 350°F) for about 10-15 minutes, just until heated. It really helps bring back that sticky glaze!
This recipe is also a fantastic candidate for meal prep! You can make a big batch on Sunday and portion it out for lunches throughout the week. Check out my Healthy Chicken Meal Prep Bowls for more ideas on how to make your weeknights even easier!
Frequently Asked Questions About Hawaiian BBQ Chicken
Got questions about whipping up this tropical delight? I’ve got you covered!
Can I use chicken breast instead of thighs?
You totally can, but here’s a little heads-up: chicken thighs are my go-to because they stay incredibly moist and tender, especially with that sweet glaze. Chicken breast can dry out more easily. If you do use breast, just keep a super close eye on it during the last few minutes of baking and try not to overcook it. You might even want to reduce the final baking time slightly.
What if I don’t have pineapple?
Oh no! Pineapple is pretty key to that classic Hawaiian vibe, but don’t worry, you can still make a fantastic dish! If you can’t find fresh or canned pineapple, you could try adding extra bell peppers or even some chunks of sweet potato. Another idea is to add a tablespoon or two of brown sugar or a splash of pineapple juice to your sauce for a bit more sweetness, though it won’t be quite the same tropical party. You could also make my Grilled Hawaiian Chicken Teriyaki Bowls which have a similar vibe!
How spicy is this dish?
This specific hawaiian bbq chicken recipe is more sweet and tangy than spicy! The heat level really depends on the barbecue sauce you use. Most standard BBQ sauces have a very mild peppery kick, but aren’t made to be hot. If you like a little heat, you can always add a pinch of red pepper flakes to the sauce mixture or even a finely minced jalapeño when you add the bell peppers. Easy peasy to customize!
Before You Go
Alright, I really hope you give this One Pan Hawaiian BBQ Chicken a try soon! It’s such a fun, easy meal that packs a ton of flavor. Let me know in the comments below how it turns out for you, and if you snap any pics, be sure to tag me! You can also find tons more inspiration on my Pinterest page!
Print
One Pan Hawaiian BBQ Chicken with Pineapple
- Total Time: 40 min
- Yield: 4 servings
- Diet: Vegetarian
Description
A simple and flavorful summer dinner featuring juicy chicken, sweet pineapple, and a rich barbecue glaze, all cooked in one pan for a sticky, caramelized finish.
Ingredients
- 1.5 pounds boneless skinless chicken thighs, cut into chunks
- 1 tablespoon olive oil
- 2 cups pineapple chunks, fresh or canned and drained
- 1 red bell pepper, chopped
- 1 green bell pepper, chopped
- 1 small red onion, sliced
- 0.75 cup barbecue sauce
- 2 tablespoons low sodium soy sauce
- 1 tablespoon honey
- 1 teaspoon garlic powder
- 0.5 teaspoon black pepper
- 2 green onions, sliced
Instructions
- Preheat your oven to 425 degrees Fahrenheit and line a large sheet pan with parchment paper.
- In a large bowl, combine chicken, pineapple, bell peppers, and red onion. Drizzle with olive oil and toss to coat. Spread evenly on the sheet pan.
- In a small bowl, whisk together barbecue sauce, soy sauce, honey, garlic powder, and black pepper.
- Pour the sauce over the chicken and vegetables, tossing lightly to coat.
- Bake for 20 minutes.
- Remove from the oven and stir to redistribute the sauce.
- Return to the oven and bake for another 10 to 15 minutes, until the chicken is cooked through and the sauce is thick and caramelized.
- Remove from the oven and let rest for a few minutes.
- Sprinkle with sliced green onions before serving.
Notes
- Cook chicken to an internal temperature of 165 degrees Fahrenheit for food safety.
- Prep Time: 10 min
- Cook Time: 30 min
- Category: Dinner
- Method: Baking
- Cuisine: American


