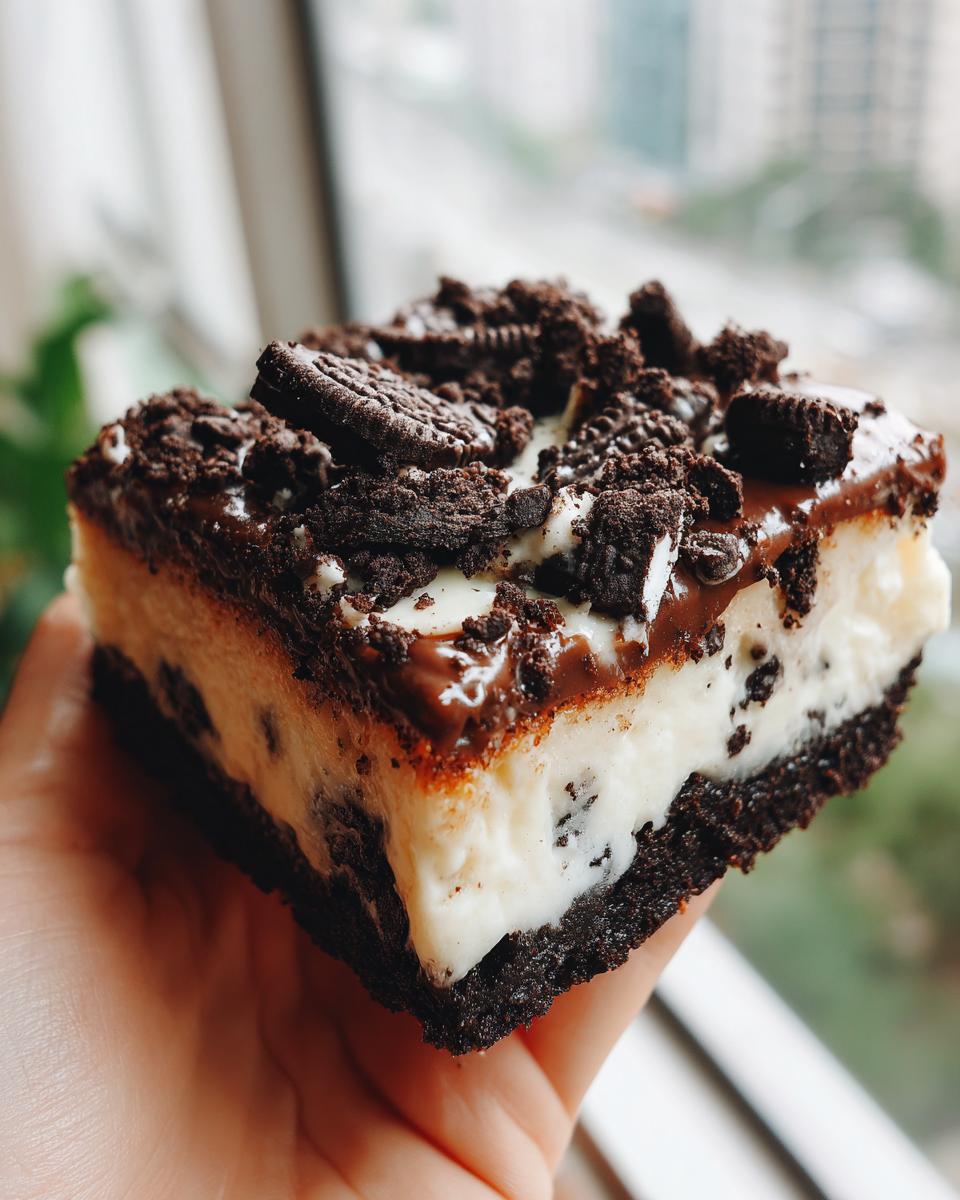
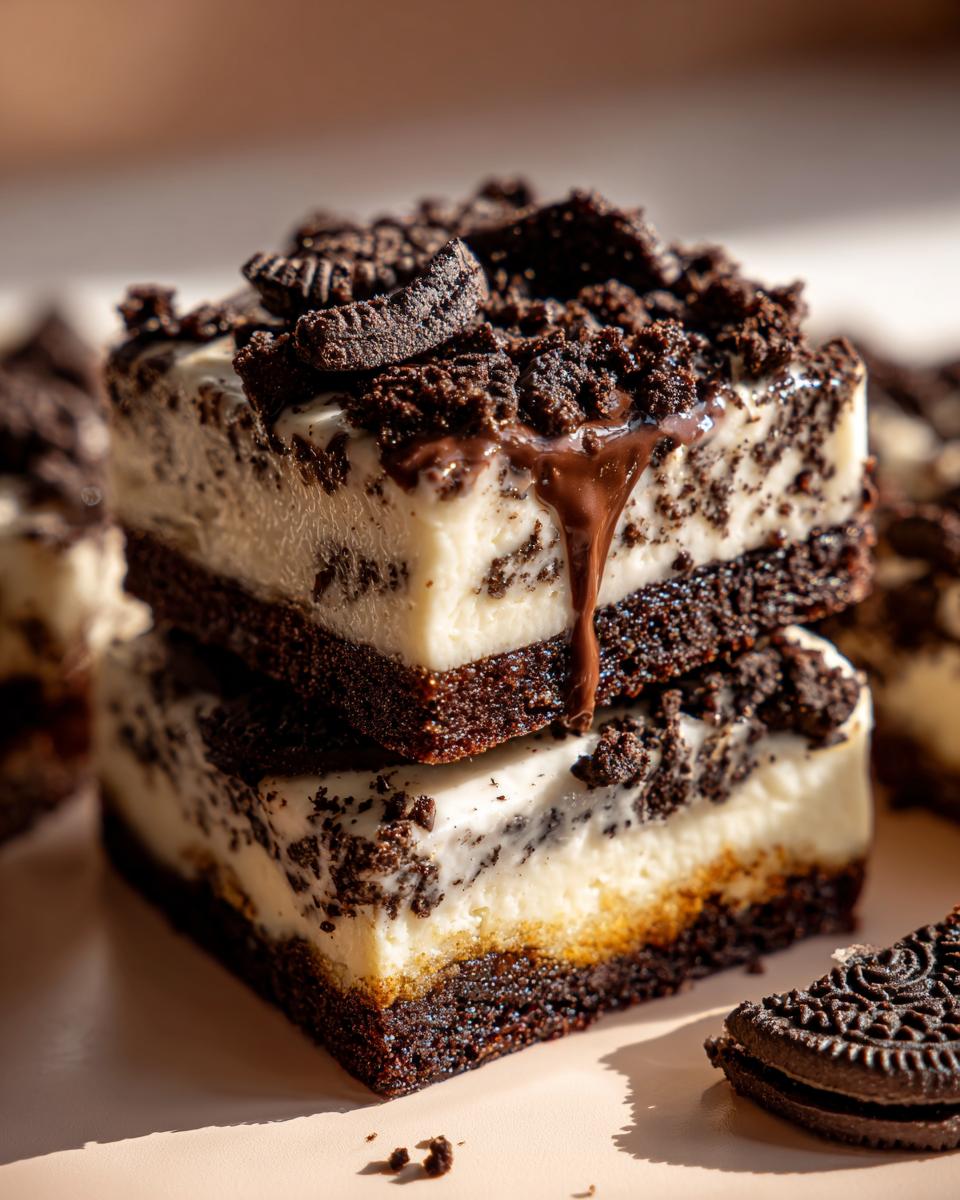
Right, so you know how sometimes you just *need* chocolate, but you’re completely knackered or the thought of turning the oven on is just too much? That’s exactly when this easy layered Oreo dessert swoops in to save the day! I whipped this up for a last-minute get-together last week, and honestly, the compliments were off the charts. It’s just got that perfect combo of crunchy Oreo base, a dreamy, creamy middle, and more crunchy Oreos on top. Plus, it’s a no-bake wonder, which means more time for chilling and less time stressing. Everyone devoured it, and the best part? It barely took any effort.
Why You’ll Love This Easy Layered Oreo Dessert
- Super Speedy: Seriously, prep is a breeze. No oven required!
- Irresistibly Creamy: That smooth cream cheese filling is just divine.
- Oreo Lover’s Dream: You get that classic chocolatey cookie crunch in every bite.
- Crowd-Pleaser: Perfect for parties, potlucks, or just a Tuesday night treat.
- Effortlessly Elegant: Looks fancy, but it’s ridiculously easy to make.
Ingredients for Your Easy Layered Oreo Dessert
Honestly, the beauty of this dessert is how simple the ingredient list is. You probably already have half of this stuff in your pantry! My one tip is to make sure your cream cheese is properly softened – it makes all the difference for that super smooth filling.
- 24 chocolate sandwich cookies, crushed (that’s about 2 sleeves worth!)
- 5 tablespoons unsalted butter, melted
- 8 ounces cream cheese, softened (leave it out on the counter for a good hour!)
- 1/2 cup powdered sugar
- 1 teaspoon vanilla flavoring
- 1 1/2 cups whipped topping (like Cool Whip, thawed if frozen)
- 12 chocolate sandwich cookies, roughly chopped (for that lovely crunchy topping)
Step-by-Step Guide to Making Your Easy Layered Oreo Dessert
Step 1: Right then, grab an 8-inch square pan. I like to line mine with parchment paper, leaving a little bit hanging over the sides. This makes lifting the whole thing out so much easier later on, trust me! Get your 24 Oreos crushed up – a food processor is quickest, but a good old ziplock bag and a rolling pin works a treat too. Mix these crumbs with your melted butter until it all looks like lovely, damp sand.
Step 2: Now, press that buttery crumb mixture down *firmly* into the bottom of your prepared pan. You really want to get it packed in there to create a solid base. I usually use the bottom of a glass or a flat measuring cup to get it nice and even. Pop this in the fridge for about 15 minutes to let it firm up while you get on with the filling. This chilling step is key, so don’t skip it! It’s similar to how you’d start strawberry cheesecake bars.
Step 3: Into a bowl, get your softened cream cheese. Beat it with an electric mixer until it’s all smooth and creamy. Then, add your powdered sugar and that lovely vanilla flavoring. Whizz it all up again until there are no lumps and it’s beautifully combined. It should look like a very smooth, thick frosting.
Step 4: Gently fold in your whipped topping. Be careful not to overmix here; you want to keep it light and fluffy. Once it’s all incorporated, spread this glorious cream mixture evenly over your chilled Oreo base. Smooth the top off so it looks neat and tidy, ready for its final layer of deliciousness.
Step 5: Sprinkle those roughly chopped Oreos all over the top of your cream layer. This is the final flourish! Then, pop the whole thing back into the fridge for at least 2 hours. Honestly, longer is better if you can wait! It needs to chill properly so you can slice it into neat squares without it all falling apart. Perfect for a bit of no-bake goodness when you’re short on time.
What to Serve with Your Easy Layered Oreo Dessert
This dessert is pretty spectacular on its own, but if you’re looking to jazz things up a bit, here are a couple of ideas that go perfectly:
A Scoop of Vanilla Bean Ice Cream: You really can’t go wrong with the classic combo of chocolate and vanilla. The cold, creamy ice cream melts just a little into the dessert, making every bite utterly decadent. It’s like a little bit of heaven!
Fresh Berries: For a touch of freshness and a bit of colour, a small bowl of fresh raspberries or sliced strawberries on the side is lovely. They cut through the sweetness beautifully and add a nice tartness.
Mini Mug Cakes: If you’re feeling extra indulgent, why not serve up a mini chocolate mug cake or a tiny vanilla mug cake alongside? It’s DOUBLE dessert, and who doesn’t love that?
Storing and Reheating Your Easy Layered Oreo Dessert
Because this is such a lovely no-bake treat, you’ll be storing it in the fridge. Keep it covered tightly in its pan, or transfer it to an airtight container. It’ll stay perfectly delicious for about 3 to 4 days. Honestly, though, it rarely lasts that long in my house! It’s fantastic for meal prep if you’re planning a party or just want a sweet treat ready and waiting. Just slice it up once it’s fully chilled and pack individual portions. You won’t need to reheat it at all, which is part of its charm!
Frequently Asked Questions About This Easy Layered Oreo Dessert
Got questions about this delicious treat? I’ve got you covered!
Can I use a different type of cookie for the base?
You absolutely can! While Oreos are the classic choice, feel free to experiment. Chocolate chip cookies or even graham crackers would give it a different, but still lovely, flavour profile. Just adjust the butter slightly if the crumbs are different in texture. It’s a bit like making key lime pie bars – the crust is so forgiving!
How do I get really clean slices?
Ah, the million-dollar question for layered desserts! Make sure you chill it thoroughly for at least 2 hours, or even longer if you can. For the cleanest cuts, use a large, sharp knife. A tip that works wonders is to dip the knife in hot water and wipe it dry between each cut. It really helps the knife glide through the layers without smushing them.
Can I make this nut-free?
Yes, this recipe is naturally nut-free, assuming your Oreos and other ingredients don’t have any ‘may contain’ warnings for nuts. It’s a fantastic option for parties where you need to be mindful of allergies. It’s just pure, creamy, chocolatey goodness!
Before You Go: Enjoy Your Easy Layered Oreo Dessert!
Right then, I really hope you give this super simple, incredibly delicious easy layered Oreo dessert a go! It’s a lifesaver of a recipe for when you need something sweet and impressive without all the fuss. Let me know in the comments if you try it – I’d absolutely love to hear what you think! You can also find more yummy ideas over on Pinterest, or check out what we’re sharing on Medium!
Print
Easy Layered Oreo Dessert
- Total Time: 2 hours 15 min
- Yield: 9 servings
- Diet: Vegetarian
Description
An easy no-bake layered Oreo dessert with a creamy filling and chocolate cookie layers, perfect for parties.
Ingredients
- 24 chocolate sandwich cookies crushed
- 5 tablespoons unsalted butter melted
- 8 ounces cream cheese softened
- 1/2 cup powdered sugar
- 1 teaspoon vanilla flavoring
- 1 1/2 cups whipped topping
- 12 chocolate sandwich cookies roughly chopped
Instructions
- Line an 8 inch square pan with parchment paper.
- Mix the crushed chocolate sandwich cookies with melted butter until evenly combined.
- Press the mixture firmly into the bottom of the pan to form a solid base.
- Chill in the refrigerator for 15 minutes to set.
- Beat the cream cheese until smooth and creamy.
- Add powdered sugar and vanilla flavoring, mixing until fully combined.
- Fold in the whipped topping until light and fluffy.
- Spread the cream mixture evenly over the chilled base and smooth the top.
- Sprinkle the chopped chocolate sandwich cookies over the top.
- Refrigerate for at least 2 hours until firm, then slice into squares and serve.
Notes
- Chill thoroughly for clean layers and the best texture when slicing.
- Prep Time: 15 min
- Cook Time: 0 min
- Category: Dessert
- Method: No Bake
- Cuisine: American