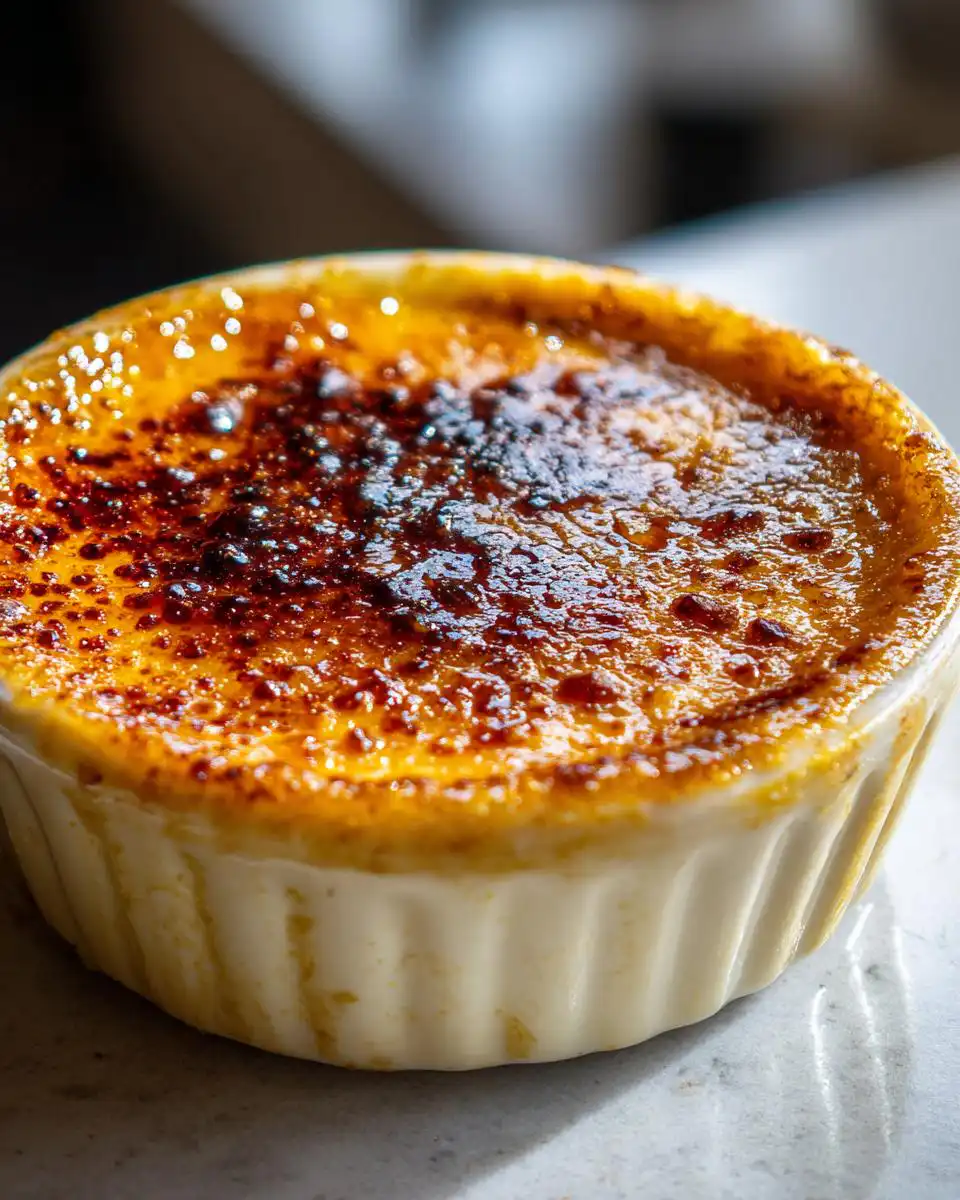
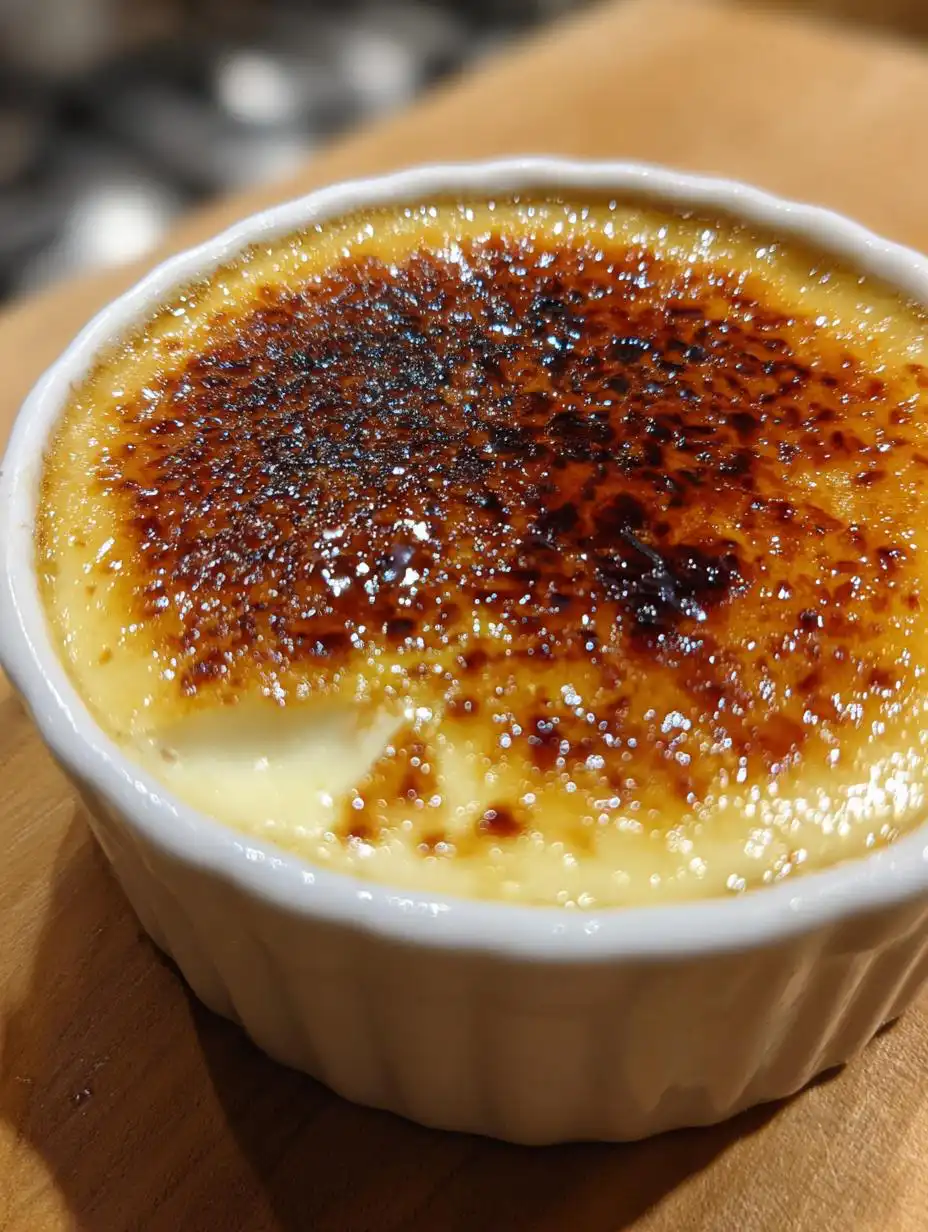
When I first told people I was making dessert without any heavy cream or eggs, I got a lot of skeptical looks. Seriously, crème brûlée? Dairy-free? Yes! Trust me when I say this recipe for vegan crème brûlée is pure magic. It’s rich, it’s impossibly creamy, and that crackle on top? Unbelievable.
The secret to getting that luxurious, silky texture everyone expects from a great crème brûlée—without any dairy—is all about the coconut fat and a little cornstarch magic. I spent three attempts just perfecting the whisking technique so there wouldn’t be a single lump. That smooth result is what sets this recipe apart from the watery versions you sometimes find online. You want the custard to look like melted velvet before it even hits the fridge. We’re going to use simple pantry ingredients to trick your taste buds into thinking you’re eating something incredibly decadent.
Essential Ingredients for Your Vegan Creme Brulee
Getting the ingredients right is half the battle for a successful vegan crème brûlée. Don’t try to substitute the main liquids here; they are what give us that signature richness without using actual cream. Preparation is key, especially for the coconut milk. You have to plan ahead! If you want to see more dessert inspiration, check out our desserts section.
The most important thing you need to do is chill the full-fat coconut milk overnight—and I mean overnight. You want the can to be rock solid in the fridge so the thick cream separates from the water underneath. If you try to rush this step, your custard will be too watery, and that’s a disaster for a classic dessert like this.
Measuring the Dairy-Free Base
We use a combination of one can of that chilled, full-fat coconut milk cream (scoop out only the solid part!) and one cup of unsweetened almond milk. The almond milk thins it out just enough so it doesn’t turn into coconut pudding. The fat content from the coconut cream is absolutely non-negotiable; it provides the mouthfeel that dairy cream usually gives us. Don’t skimp here!
Sweeteners and Thickeners for Vegan Creme Brulee
For the custard itself, we use granulated sugar, which dissolves beautifully, and cornstarch. Cornstarch is our powerhouse thickener in this vegan crème brûlée. It creates that perfect, jiggly but firm texture when cooked on the stovetop. You need the right ratio, so measure that cornstarch precisely—too little and it won’t set, too much and it gets gummy, which we absolutely do not want! For more tips on ingredient ratios, follow us on Medium.
Flavorings and Topping Requirements
Next up are the flavor notes that make this taste gourmet. Pure vanilla extract is a must; none of that imitation stuff if you can help it. A tiny pinch of fine sea salt is crucial because it wakes up the sweetness and makes the coconut flavor really shine. Finally, for the top, we need four tablespoons of extra granulated sugar, kept separate, reserved just for that glorious, crisp, caramelized crust.
Equipment Needed to Make Vegan Creme Brulee
The best part about this vegan crème brûlée is that you don’t even need an oven! This is a stovetop wonder, which is such a relief on hot days. You’ll need a few specific pieces of gear to get that professional look, though. Don’t worry, most of this is probably already in your kitchen.
First, grab four 6-ounce ramekins. These little ceramic dishes are essential because they hold the heat well when you torch them later. You’ll also need a medium saucepan for cooking the custard—make sure it has a good, heavy bottom so your mixture doesn’t scorch while you’re whisking. And the star of the show? A kitchen torch. If you don’t have one, grab one! It’s the only way to get that textbook hard, glassy sugar crust. Seriously, skip the broiler; the torch gives you much better control for this dessert.
Step-by-Step Instructions for the Vegan Creme Brulee Custard
Okay, now for the fun part! We are making this gorgeous vegan crème brûlée right on the stovetop. Seriously, it comes together faster than you’d think, but you have to stay right there and pay attention while it cooks. Constant stirring is your mantra here—it prevents lumps and scorching.
First things first, get those four little ramekins lined up on a small tray. This makes moving them later so much easier, and trust me, you don’t want to be juggling hot custard later on. Set those aside while we build the base.
Combining the Custard Base
Grab your medium saucepan. We start by combining all the dry stuff—the sugar and the cornstarch—with the almond milk. Whisk this together really well until it looks completely smooth. I mean, make sure there are zero clumps of cornstarch hiding in there. This is critical! If you have dry pockets now, they will turn into thick, gummy spots later. Once that’s smooth, you can add the solid cream you scooped from the chilled coconut can, the vanilla extract, and that tiny bit of sea salt. Give it one last whisk until everything is incorporated. If you need more general cooking tips, check out our recipes index.
Cooking the Vegan Creme Brulee Until Thick
Time for the heat! Put the saucepan over medium heat. You need to whisk constantly—I’m not kidding, don’t walk away! For the first five to seven minutes, you’ll notice it starts getting warm and maybe a little foamy. Keep going! Slowly, the mixture will start to thicken up noticeably. Once it starts clinging to the whisk, you need to cook it for another two or three minutes, still stirring like crazy. The real test for this vegan crème brûlée is the back of a spoon. When you pull the whisk out, the custard should coat the back thickly, and if you run your finger through it, the line should hold without running back together.
Achieving Silky Smoothness and Chilling
Once it passes the spoon test, pull it off the heat immediately! Don’t let it boil aggressively, or you might break the structure. Now, here is my non-negotiable step for that truly luxurious texture: you have to strain it. Pour the hot custard through a fine-mesh strainer right into a clean bowl. This catches any tiny bits of cooked starch or stray coconut solids. It ensures your final vegan crème brûlée is absolutely silky. Divide that smooth mixture evenly into your waiting ramekins. Cover them loosely with plastic wrap—making sure the wrap isn’t touching the surface of the custard—and pop them into the fridge. They need at least two hours to fully set up and firm up. Patience is rewarded here!
The Final Touch: Caramelizing Your Vegan Creme Brulee
This is the moment we’ve all been waiting for! You’ve chilled your custard until it’s firm, and now it’s time to give your vegan crème brûlée that signature shatteringly crisp top. This step takes about two minutes total, but it transforms the dessert completely. Remember, you want to do this right before you serve it, otherwise that beautiful crust will start to melt back into the cold custard underneath.
If you skip this part, you just have a lovely coconut custard, but with the torch, you have crème brûlée! It’s quick, it’s dramatic, and honestly, watching the sugar melt is just so satisfying. Get your torch ready and make sure you have good ventilation! For more recipe ideas, see our Pinterest page.
Applying the Sugar Topping
Take your chilled ramekins out of the fridge. You need to sprinkle exactly one tablespoon of granulated sugar evenly over the surface of each custard. Don’t dump it all in the middle; try to get a thin, even layer covering the whole surface, edge to edge. This ensures that when you torch it, you get an even caramel layer across the entire top of your vegan crème brûlée. If you use too much sugar in one spot, it will just burn before the rest melts.
Mastering the Torch Technique
Hold your kitchen torch a few inches above the sugar. Start moving the flame constantly in small, steady circles over the sugar. You’ll see it start to turn amber, then golden brown. Keep moving! You are looking for a rich, deep golden color, not black—black means bitter! Once the entire surface is glistening and caramelized, stop. The best part? You have to let it sit for just one minute. This allows the molten sugar to cool down rapidly and harden into that perfect, crisp crust. Listen for that little ‘tink’ sound as it sets. Then, dig in!
Frequently Asked Questions About Vegan Creme Brulee
I get so many questions about this dessert because it seems tricky, but honestly, once you know the secrets, this vegan crème brûlée is a breeze! Here are the things I hear most often from folks trying this recipe for the first time.
Can I Make Vegan Creme Brulee Ahead of Time?
Absolutely, and I highly recommend it! You need that chilling time anyway, so making the custard base the day before is perfect. Once the custard is set in the ramekins, cover them tightly and keep them in the fridge for up to three days. Just don’t sprinkle the sugar on top until right before you serve it. If you put the sugar on too early and store it, that sugar will start to dissolve into the custard, and you won’t get that satisfying crack when you torch it!
Why Is My Vegan Creme Brulee Not Setting?
If your vegan crème brûlée is still soupy after the minimum two hours, it’s usually one of two things. First, did you chill your coconut milk long enough? If the cream wasn’t fully separated and cold, you added too much liquid, which messes up the ratio. Second, check your cornstarch—did you measure it correctly? Cornstarch is the setting agent here, so if you skimped even a little, it won’t firm up properly. Give it another hour in the fridge, and if it’s still soft, you might need to cook the remaining batch a little longer next time. For other troubleshooting tips, check out our disclaimer page.
Best Sugar Alternative for the Topping
This is a tough one because granulated sugar caramelizes beautifully due to its structure. If you absolutely must substitute, maple syrup or agave are not good options for the top because they burn too fast or just stay sticky. If you want to avoid refined sugar, some folks have had success with coconut sugar, but be warned: coconut sugar gives you a much darker, almost burnt-looking crust right away, and the flavor is a bit more molasses-y. For that classic light golden crack, stick to white sugar for the torching step.
Storing and Serving Your Dairy-Free Dessert
Once you’ve mastered the stovetop method, keeping your vegan crème brûlée perfect until serving time is simple. These dairy-free treats are actually quite sturdy in the fridge, which is great for dinner parties! Remember, the best presentation is always achieved when you torch the sugar right before your guests are seated. That crisp crust is fleeting, so don’t torch them all hours in advance.
If you are making these ahead, store the custards plain—no sugar topping—in the refrigerator. They hold up really well this way. When you’re ready to serve, just pull them out, top them, torch them, let them rest for that crucial minute, and present them immediately. It makes you look like a genius with zero last-minute stress! If you are looking for other great dinner ideas, try our dinner recipes.
Storage Table for Vegan Creme Brulee
| Item | Storage Duration | Condition |
|---|---|---|
| Un-torched Custard | Up to 3 Days | Covered tightly in the refrigerator |
| Torched Dessert | Immediate Serving | Best eaten within 10 minutes of torching |
| Leftover Torched | 1-2 Hours Max | Refrigerate uncovered; crust will soften significantly |
Nutritional Estimate for This Vegan Creme Brulee
Now, I know we aren’t making this dessert for the low-calorie count—it’s rich for a reason! But for those of you tracking things, I wanted to give you a rough idea of what one serving of this wonderful vegan crème brûlée looks like nutritionally. Please remember, this is just an estimate based on the ingredients listed. Different brands of coconut milk, for example, can change the fat content quite a bit!
Since we aren’t using eggs or butter, the cholesterol is zero, which is fantastic. The bulk of the calories comes from the full-fat coconut cream and the sugar, which is expected in any great custard dessert. It’s a delightful treat, not an everyday snack, so enjoy it guilt-free!
| Nutrient | Amount Per Serving |
|---|---|
| Calories | 305 calories |
| Fat | 20g |
| Carbohydrates | 30g |
| Protein | 3g |
| Cholesterol | 0mg |

3 Amazing vegan creme brulee Secrets
- Total Time: 2 hours 30 minutes
- Yield: 4 servings
- Diet: Vegan
Description
Easy vegan crème brûlée made with coconut milk and almond milk. Creamy, rich, and perfectly caramelized with no baking required. This dairy-free dessert is silky and impresses guests.
Ingredients
- 1 cup unsweetened almond milk
- 1 can full-fat coconut milk, chilled overnight (13.5 oz)
- 1/3 cup granulated sugar
- 1/3 cup cornstarch
- 2 teaspoons pure vanilla extract
- 1/4 teaspoon fine sea salt
- 4 tablespoons granulated sugar, for topping
Instructions
- Place 4 ramekins, about 6 ounces each, on a small tray and set aside.
- In a medium saucepan, whisk almond milk, sugar, and cornstarch until smooth.
- Add chilled coconut milk cream, vanilla extract, and sea salt. Whisk until combined.
- Cook over medium heat, whisking constantly, until the mixture begins to thicken, about 5 to 7 minutes.
- Continue stirring for another 2 to 3 minutes until the custard coats the back of a spoon. Remove from heat.
- Pour the custard through a fine-mesh strainer into a bowl to ensure a silky texture.
- Divide evenly among the ramekins, cover lightly, and refrigerate for at least 2 hours or until fully set.
- Just before serving, sprinkle 1 tablespoon sugar evenly over each custard.
- Use a kitchen torch to melt and caramelize the sugar until golden brown. Allow the surface to harden for one minute before serving.
Notes
- Chill the full-fat coconut milk overnight to separate the cream.
- Use a fine-mesh strainer for the smoothest custard texture.
- Refrigerate the custard for a minimum of 2 hours until firm.
- Prep Time: 20 minutes
- Cook Time: 10 minutes
- Category: Dessert
- Method: Stovetop Cooking
- Cuisine: American