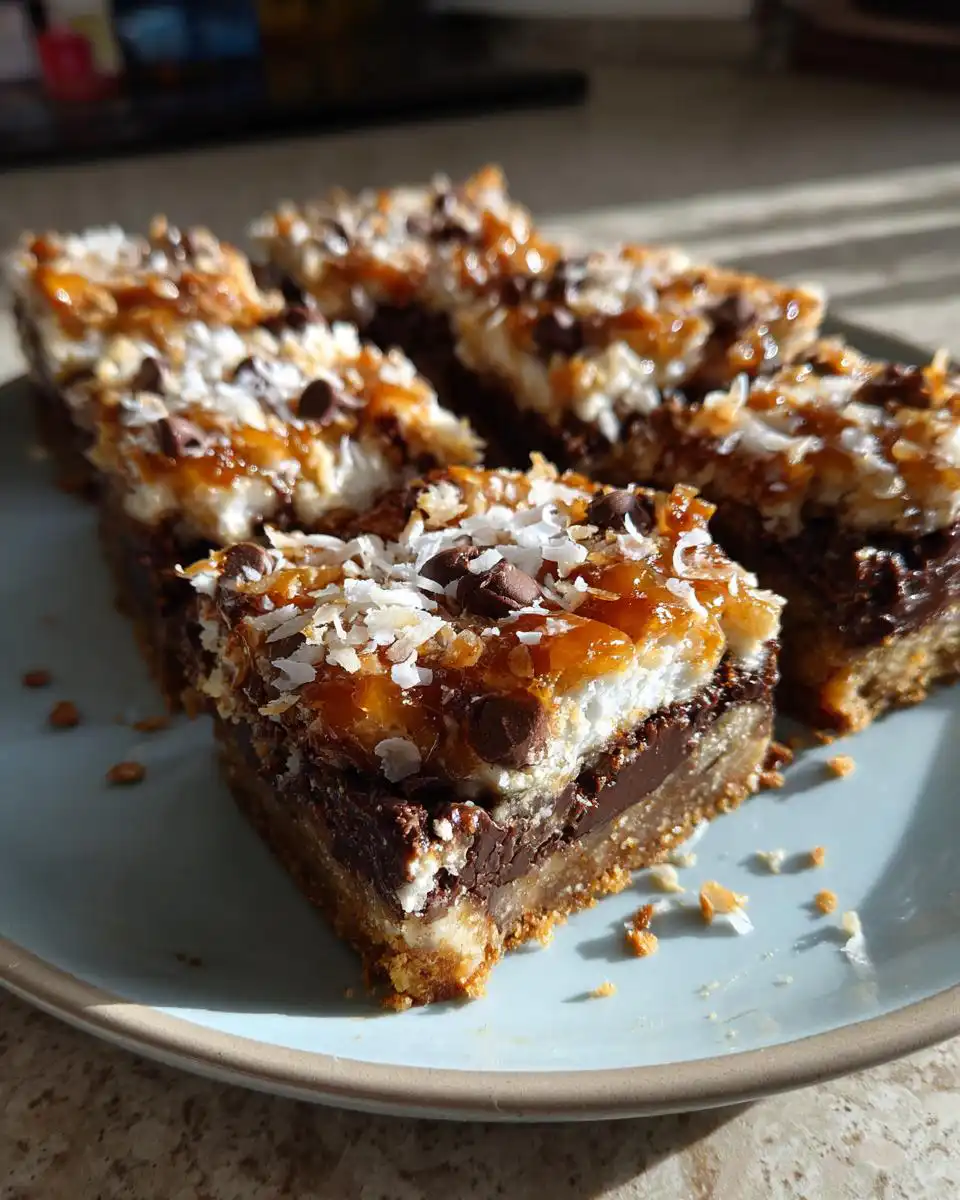
Okay, I have to tell you about my absolute go-to dessert when I need something SO delicious but don’t have a ton of time or energy. We’re talking about Magic Bars, specifically this amazing Magic Bars recipe that I’ve perfected over the years. Seriously, forget complicated layer cakes; these bars pack so much flavor into one easy graham cracker crust. My kids devour them, my husband requests them for *every* potluck, and honestly, I could eat the whole pan myself. They’re just that good!
These bars are like a party in your mouth, and the best part? You barely have to do anything! They’re technically not even baked in the traditional sense – more like brought together in the oven. I first made them for a neighborhood barbecue years ago, and they were gone in minutes. Now, they’re my secret weapon for holidays, birthdays, or just a Tuesday when I need a little sweet pick-me-up.
Why You’ll Love This Magic Bars Recipe
-
Seriously Easy to Make: This Magic Bars recipe is almost embarrassingly simple. You just press a crumb crust, sprinkle on the goodies, pour over the condensed milk, and bake. No fancy techniques required, I promise!
-
A Flavor Explosion: Every bite is a symphony of textures and tastes. You get the buttery graham cracker crunch, the melty chocolate and butterscotch, a little chew from the coconut, and the satisfying crunch of nuts. It’s almost too much goodness!
-
Crowd-Pleaser Guaranteed: Whether it’s a holiday bake sale, a neighborhood get-together, or just family movie night, these are always a hit. My kids practically inhale them, and I’ve never seen them last long at any party I bring them to.
-
Super Versatile: While this recipe is perfect as-is, you can totally play around with the toppings! Feel free to swap out nut types, add some dried cranberries, or even use different kinds of chocolate chips. They’re pretty forgiving!
-
Quick Prep Time: You can whip up the batter in about 10 minutes, which is amazing for those times you need a quick dessert fix. The oven does most of the work!
-
Perfectly Portable: These bars hold their shape so well, making them ideal for taking to school events, office parties, or just packing for a picnic. No messy frosting or delicate structures to worry about!
Ingredients for Your Magic Bar Recipe
-
1 1/2 cups graham cracker crumbs (I usually just crush up a sleeve of graham crackers in my food processor, but pre-crushed works too!).
-
6 tablespoons unsalted butter, melted (Don’t use margarine here, trust me, butter makes all the difference!).
-
1 cup semi-sweet chocolate chips (My go-to is regular semi-sweet, but milk chocolate would be yummy too!).
-
1/2 cup butterscotch chips (These add this amazing caramel-y depth; don’t skip them!).
-
1 cup toffee bits (Heath bits are my favorite, they give the best crunch!).
-
1 cup shredded sweetened coconut (I like the sweetened kind for a little extra sweetness, but you can use unsweetened if you prefer!).
-
1 cup chopped walnuts or pecans (Or a mix of both! Whatever you have on hand works great).
-
1 can (14 ounces) sweetened condensed milk (Make sure it’s sweetened condensed milk, NOT evaporated milk; it’s super important for the right texture!).
Crafting the Perfect 7 Layer Magic Bars: Step-by-Step
Alright, let’s get these amazing Magic Bars put together! It’s so simple, you’ll wonder why you haven’t made them before. First thing’s first, crank your oven up to 350°F and give an 8-inch square baking dish a little grease so nothing sticks.
Now, in a bowl, mix up those graham cracker crumbs and melted butter. You want it to look like wet sand. Press this mixture down really, really firmly into the bottom of your baking dish. This is your base, so make it solid!

Next comes the fun part – the layers! Sprinkle your chocolate chips, butterscotch chips, toffee bits, coconut, and nuts evenly over that crust. Don’t be shy; get them all over the place. Then comes the magic drizzle: slowly and carefully pour the sweetened condensed milk over the entire thing, making sure it seeps down into all those yummy layers.
Pop that pan into the preheated oven and bake for about 30 to 35 minutes. You’re looking for that gorgeous golden-brown color around the edges, and the center will still be a little wiggly – that’s perfect! Once they’re out, you *have* to let them cool completely. I usually pop mine in the fridge for at least an hour so they set up nicely. This is key for clean cuts, trust me! If you hurry this part, you’ll end up with a gooey mess, which is delicious, but not as pretty. For tips on other bar recipes, check out my chewy brownie bars too!
Serving Suggestions for Your Magic Bar Dessert
These Magic Bars are pretty spectacular on their own, but if you want to elevate your dessert game just a little bit more, here are a few ideas that pair perfectly. They just complement that sweet, rich flavor without competing!
A Small Scoop of Vanilla Bean Ice Cream: You can’t go wrong with classic vanilla! The cold creaminess of the ice cream is the perfect contrast to the warm, chewy, crunchy textures of the Magic Bar. It’s simple, elegant, and just makes everything better.
Fresh Berries on the Side: A handful of fresh raspberries or sliced strawberries adds a lovely tartness that cuts through the sweetness of the bars beautifully. It adds a pop of color and a refreshing little zing. It’s like a little palate cleanser between bites! Plus, if you’re feeling adventurous, a side of something like fresh scones could be fun too.
A Cup of Coffee or Tea: Honestly, the best accompaniment for these bars is a warm drink. Whether it’s a rich coffee or a soothing cup of tea, it just feels like the perfect way to finish off a slice of pure decadence. Sometimes, I’ll even have this with a fluffy stack of pancakes, sort of like a breakfast-for-dessert situation!
Storing and Reheating Your Recipe For Magic Bars
So, you’ve made these incredible Magic Bars and *gasp* you have leftovers! Don’t even worry about it. The best way to keep these beauties fresh is to store them in an airtight container in the fridge. They’ll be perfectly delicious for up to 3 days that way. Trust me, they might not last that long though!
Reheating isn’t really necessary because they’re so good at room temp or cold, but if you *really* want them a little warm and gooey again, you can pop a piece in the microwave for about 10-15 seconds. Just be careful not to overheat them, you don’t want them to melt into a puddle! For ideas on other delicious bars that store well, check out my blueberry oatmeal bars!
Frequently Asked Questions About Magic Bars
Got questions about these yummy Magic Bars? I get it! They’re so popular that people always seem to have a few things they want to know. Let me clear some things up for you right here.
Q: Can I make these Magic Bars recipe without nuts?
Absolutely! If you have allergies or just aren’t a fan of nuts, you can totally skip them. You might want to add an extra bit of chocolate chips, toffee bits, or even some extra coconut to fill in those gaps. The bars will still be wonderfully chewy and delicious!
Q: What’s the difference between sweetened condensed milk and evaporated milk for these 7 Layer Magic Bars?
This is a super important one! Sweetened condensed milk is thick, creamy, and loaded with sugar. It’s what gives these bars their signature gooey texture and sweet caramel-like flavor. Evaporated milk is just milk that’s had some water removed; it’s not sweet and won’t give you that classic Magic Bar result. Always grab the sweetened condensed milk, or your bars might turn out a little… sad.
Q: Can I make these Magic Bars ahead of time for a party?
Yes! These party dessert bars are actually *better* when made ahead. As I mentioned in the storage section, chilling them really helps them set up, making them easier to slice cleanly. Just make sure they’re stored in an airtight container in the fridge. They’re perfect for prepping on a Friday for a Saturday gathering!
Before You Go
Seriously, you have to try this Magic Bars recipe! It’s one of those sweet treats that just makes everyone happy, and it’s so easy to make. Let me know in the comments if you give them a whirl and what you think!
And hey, if you loved these bars, you’ll definitely want to follow me over on Pinterest for more easy dessert ideas!
Print
Magic Bars
- Total Time: 40 min
- Yield: 16 bars
Description
Easy layered dessert bars with a graham cracker crust, chocolate, butterscotch, toffee, coconut, and nuts.
Ingredients
- 1 1/2 cups graham cracker crumbs
- 6 tablespoons unsalted butter, melted
- 1 cup semi-sweet chocolate chips
- 1/2 cup butterscotch chips
- 1 cup toffee bits
- 1 cup shredded sweetened coconut
- 1 cup chopped walnuts or pecans
- 1 can sweetened condensed milk
Instructions
- Preheat your oven to 350°F. Lightly grease an 8-inch square baking dish.
- Mix graham cracker crumbs and melted butter in a bowl. Press the mixture firmly into the dish to form a crust.
- Layer chocolate chips, butterscotch chips, toffee bits, chopped nuts, and shredded coconut over the crust.
- Pour the sweetened condensed milk slowly over the top, covering all layers.
- Bake for 30 to 35 minutes until the top is golden and edges are set. The center will be slightly soft.
- Cool the bars completely at room temperature. Refrigerate for at least 1 hour before slicing.
Notes
- Store covered in the refrigerator for up to 3 days.
- You can freeze the bars for up to 2 months.
- Chilling before slicing helps keep the layers neat.
- Prep Time: 10 min
- Cook Time: 30 min