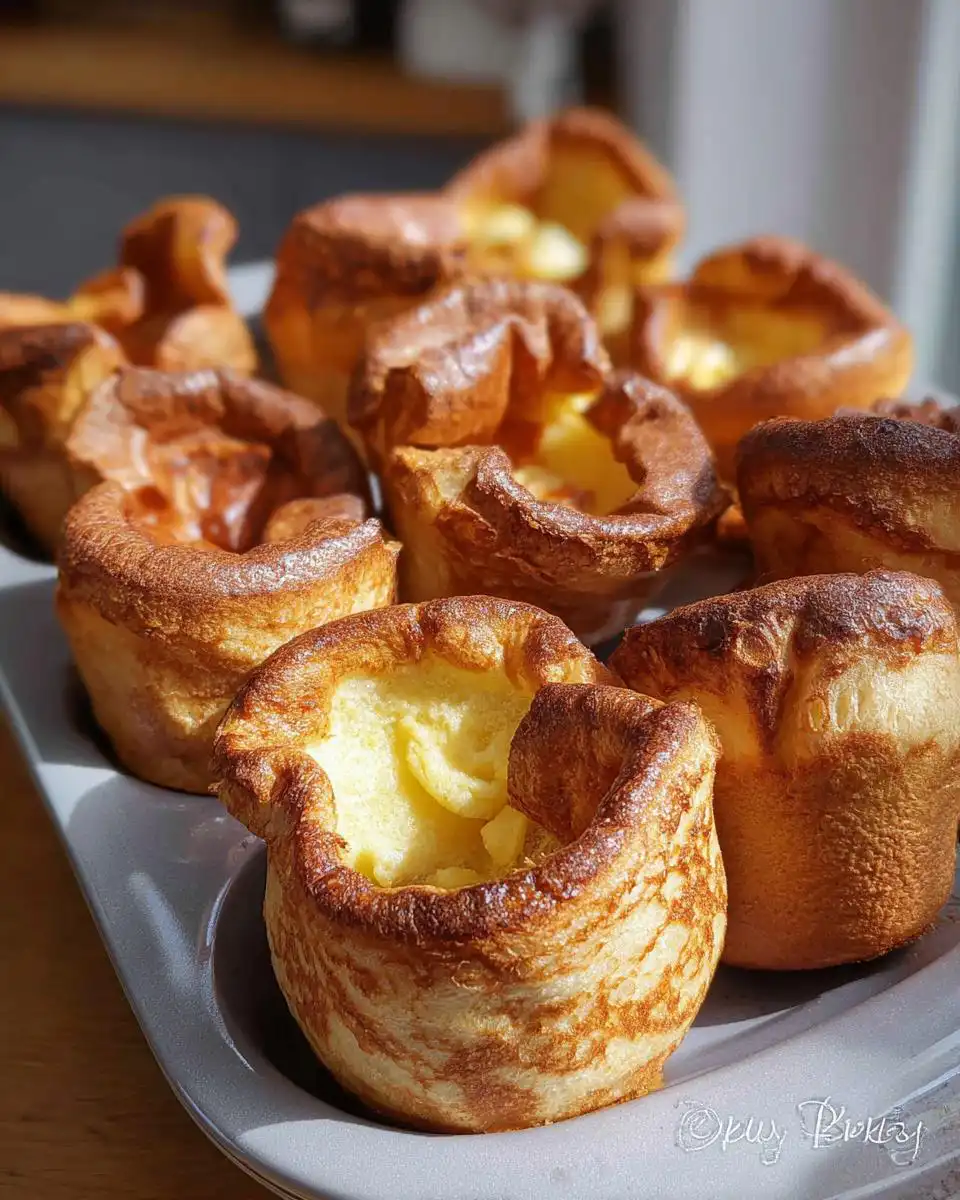
You know that feeling when a classic roast dinner is on the table, but you or someone you love is gluten free? There’s that gap on the plate where the Yorkshire pudding should be. It’s the centrepiece! For years, my attempts at a Mary Berry gluten free Yorkshire pudding were… well, let’s be honest, a bit tragic. They’d be flat, dense, or weirdly gummy. I nearly gave up until I found the secret – swapping plain flour for one simple, starchy swap. This version rises like a dream, with that all-important tall, crisp shell and a perfectly soft, fluffy centre. It’s honestly the only recipe I trust now for family Sunday lunches, and it’s made with just four ingredients you probably already have. No more missing out – this solves the gluten-free roast dinner dilemma for good.
Why You’ll Love This Mary Berry Gluten Free Yorkshire Pudding
Honestly, this recipe changed our Sunday roasts. After so many flat, disappointing attempts, this one just works every single time.
- It gives you a guaranteed, impressive rise every time, with tall, golden walls that are the envy of any dinner table.
- You only need four simple ingredients – cornflour, eggs, milk, and oil – that you likely have in your kitchen right now.
- From bowl to table in just 30 minutes, it’s the quickest way to make your roast dinner feel special.
- It’s naturally gluten-free, making it perfect for sharing with friends and family who have dietary needs.
- You get that perfect contrast of textures: a shatteringly crisp exterior with a soft, almost custardy centre.
Ingredients for Mary Berry Gluten Free Yorkshire Pudding
The magic of this recipe is its simplicity. Just four things! But trust me, measure them properly – it makes all the difference for that perfect rise.
- 1 1/2 cups cornflour (this is cornstarch in the UK – don’t confuse it with cornmeal!)
- 6 large eggs
- 1 1/4 cups milk (I use semi-skimmed or whole for the best richness)
- 3 tablespoons vegetable oil (just for greasing the tin)
How to Make Mary Berry Gluten Free Yorkshire Pudding: Step-by-Step
Right, the secret to that perfect rise is all in the hot oil and a thin batter. Don’t be nervous – just follow the steps and you’ll be amazed. I like to get everything measured and ready before I even turn the oven on.
Step 1: Start by getting your oven seriously hot. Preheat it to 220°C (that’s 200°C for a fan oven). While it’s warming up, pour about a teaspoon of vegetable oil into each cup of a 12 or 14-hole muffin tin. You want a good slick of oil in the bottom – this is what’s going to make them super crisp.
Step 2: Pop that oiled tin straight into the hot oven. Let it heat up for a good 10 to 15 minutes. You’ll know it’s ready when you open the door (carefully!) and the oil is shimmering and looks almost wavy. It needs to be spitting hot. If you drip a tiny bit of batter in and it sizzles instantly, you’re golden.
Step 3: While the oil heats, make your batter. Grab a large bowl and crack in your 6 eggs. Add the cornflour and whisk like your life depends on it. You want it completely smooth and lump-free before you add any milk. It’ll look thick and paste-like at first, but that’s okay.
Step 4: Now, slowly pour in your milk while whisking constantly. I do this in about three additions. Keep whisking until you have a batter that’s as thin as single cream. Seriously, it should pour easily. If it’s too thick, your puddings will be stodgy. Once it’s perfect, pour it into a jug. This makes the next step so much easier and less messy!
Step 5: This is the fun, slightly dramatic bit! Carefully pull the blazing hot tin from the oven. Working quickly but safely, pour the batter into each hot oil-filled cup, filling each one about two-thirds full. You should hear a fantastic sizzle. Don’t dawdle – you need that oil to stay piping hot.

Step 6: Immediately get the tin back into the oven and shut the door. Now, the most important rule: do NOT open that door for at least 15 minutes. No peeking! The rush of cold air will make them collapse. They need the steady, fierce heat to climb up the sides of the tin.
Step 7: Bake for 15 to 20 minutes until they are towering, deep golden brown, and look crisp all over. When they’re ready, take them out and serve them straight away. That’s when they are at their absolute best – crisp, light, and glorious with your roast. Honestly, it’s that simple! The same batter principles work for other treats too, like these light gluten free pancakes or even gluten free banana bread cookies.

What to Serve with Your Gluten Free Yorkshire Puddings
These puddings are so versatile! They’re not just for Sunday roast – they’re a brilliant vehicle for all sorts of delicious, cosy meals.
A Classic British Roast Dinner: This is the obvious one, but it’s a classic for a reason. Serve them alongside roast beef with plenty of gravy, crispy roast potatoes, and some steamed greens. The puddings are perfect for mopping up every last bit of juice on the plate.
Hearty Stews and Rich Gravies: On a chilly evening, there’s nothing better than using a warm Yorkshire to scoop up a beef stew or a rich onion gravy. It turns a simple bowl of stew into a proper, comforting feast.
Gluten-Free Sausages for Toad-in-the-Hole: Pop a good quality gluten-free sausage into each batter-filled cup before baking, and you’ve got the easiest, most satisfying toad-in-the-hole. It’s a complete meal that everyone loves. For another family-friendly gluten-free idea, you have to try these healthy turkey Swedish meatballs.
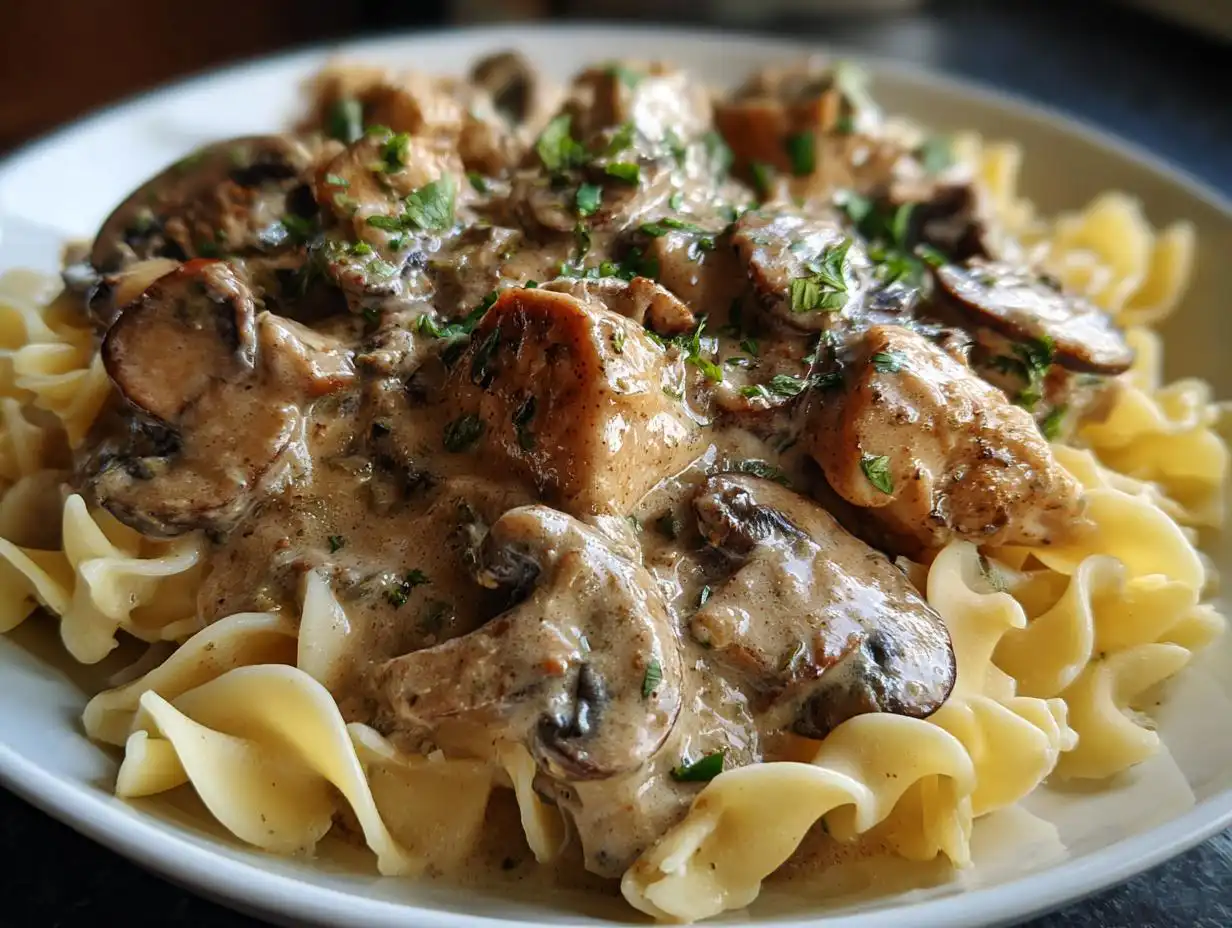
A Creamy Chicken or Mushroom Dish: For something a bit different, try them with a creamy casserole. The crisp puddings are fantastic for soaking up all that delicious sauce. My lot goes mad for them with this creamy chicken, mushroom, and zucchini casserole.
Storage and Reheating Tips for Mary Berry Gluten Free Yorkshire Pudding
Let’s be honest, they’re best fresh, but if you do have leftovers, a little know-how gets them back to their crisp, glorious selves.
To store, let any leftover puddings cool completely on a wire rack. Then, pop them into an airtight container. They’ll keep in the fridge for 1 to 2 days.
Now, reheating is key. Never, ever use the microwave – it turns them into sad, rubbery sponges. To bring back that magic crispness, use your oven or air fryer. I reheat mine at 200°C for 3-4 minutes until they’re hot and crisp again. It works a treat for all sorts of leftovers, just like when I’m crisping up healthy air fryer cauliflower.
Here’s a great time-saver: you can make the batter up to a day ahead! Just whisk it, cover the bowl, and keep it in the fridge. Give it a good stir before you pour. It’s one less thing to do when you’re juggling the whole roast dinner.
Mary Berry Gluten Free Yorkshire Pudding FAQs
I get a few questions about this recipe all the time, so let me clear up the most common ones. It’s all about understanding how the simple ingredients work their magic!
Can I use a different gluten-free flour?
I really don’t recommend it. Cornflour (cornstarch) is the secret weapon here. It’s a pure starch, which gives you that incredible crisp shell and light interior. Most gluten-free flour blends contain gums and other flours that can make the batter too heavy or gummy. Trust me, I’ve tried – the cornflour version is the only one that gives that classic, airy rise we all want.
Why is the oil temperature so important?
Oh, it’s everything! That blistering hot oil is what makes the batter instantly sizzle and climb up the sides of the tin, creating the tall, crispy walls. If the oil is just warm, the batter will soak in and you’ll get a flat, oily pudding. You want it shimmering and almost smoking. That initial heat shock is non-negotiable for the perfect rise.
Can I make this dairy-free?
Absolutely! Just swap the regular milk for an unsweetened dairy-free alternative. I’ve had great success with oat milk or almond milk. The batter might be a tiny bit thinner, but it works perfectly. It’s a brilliant option for making sure everyone at the table can enjoy one. For more gluten-free and dairy-free inspiration, I’m always pinning ideas over on my Pinterest boards.
Nutritional Information
I know many of us are curious about what’s in our food, so here’s a helpful guide. Just remember, this is based on the exact ingredients I use.
These values are per Yorkshire pudding and are an estimate based on using large eggs, semi-skimmed milk, and standard cornflour. A typical serving gives you roughly: 140 calories, 7g of fat (1.5g saturated), 14g of carbohydrates, 1g of sugar, and 5g of protein, with about 60mg of sodium. Please note, this is just a guide – actual numbers can vary depending on your specific brand of milk or oil.
Before You Go
I really hope you give these a go. There’s nothing quite like the feeling of pulling a tray of tall, golden puddings from the oven, knowing everyone gets to join in.
Please let me know how you get on! I’d love it if you left a rating below or shared a photo of your glorious, crisp creations in the comments. Happy baking
Print
Mary Berry Gluten Free Yorkshire Pudding
- Total Time: 30 min
- Yield: 14 Yorkshire puddings
- Diet: Gluten Free
Description
A gluten free Yorkshire pudding that rises tall and crisp with a soft centre. Simple ingredients make it perfect for any roast dinner.
Ingredients
- 1 1/2 cups cornflour
- 6 large eggs
- 1 1/4 cups milk
- 3 tablespoons vegetable oil
Instructions
- Preheat your oven to 220°C (200°C fan).
- Add about 1 teaspoon of vegetable oil into each cup of a 12 to 14 hole muffin tin.
- Place the tin in the oven for 10 to 15 minutes until the oil is very hot and shimmering.
- In a large bowl, whisk the eggs and cornflour until smooth and lump free.
- Gradually pour in the milk while whisking continuously to create a thin, smooth batter.
- Transfer the batter into a jug for easy pouring.
- Carefully remove the hot tin from the oven and quickly fill each cup about two thirds full with batter.</>li>
- Return the tin to the oven immediately and bake for 15 to 20 minutes until well risen and deep golden brown.
- Do not open the oven door during baking.
- Remove from the oven and serve immediately while hot and crisp.
Notes
- For the best rise, make sure the oil is extremely hot before adding the batter.
- Serve straight away for maximum crispness.
- Prep Time: 10 min
- Cook Time: 20 min
- Category: Side Dish
- Method: Baking
- Cuisine: British