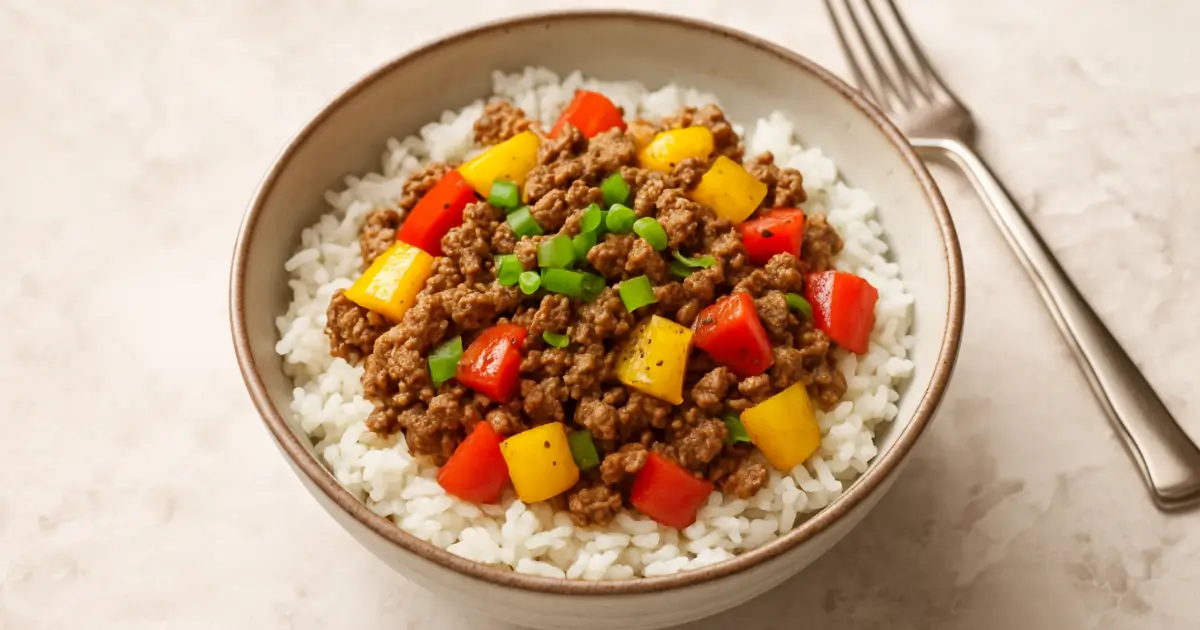
If you are craving that glossy, craveable takeout flavor but want to keep things clean and focused on your health goals, then **Sticky Sesame Chicken Rice Bowls** are about to become your weeknight hero! I’m Jordan Bell, beaming in from Asheville, NC, where I’ve spent the last few years completely transforming my relationship with food. Losing 80 pounds taught me that you never have to sacrifice flavor, especially when it comes to comfort food classics. That’s why my blog, Easy Detox Recipes, focuses on taking those heavy Southern favorites and making them vibrant and light. Read more about my journey here.
When I first started cleaning up my diet, I missed that sweet, sticky glaze more than anything. It felt like a necessary indulgence. But trust me, this recipe proves you can have it all! We’re getting that incredible, clingy sauce coating perfectly seared chicken and pairing it with crisp veggies. It’s fast, it’s fresh, and it tastes like you just picked it up from your favorite spot, only better because you control every perfect ingredient.
Why You’ll Love This Sticky Sesame Chicken Rice Bowls Recipe
You need this recipe in your rotation. Forget waiting for delivery or dealing with questionable ingredients. These **Sticky Sesame Chicken Rice Bowls** deliver big flavor fast. They hit that sweet spot between satisfying comfort food and quick weeknight fuel.
- Total time is only 40 minutes, start to finish.
- It’s packed with fresh, bright vegetables that stay crunchy.
- The whole meal comes together right on the stovetop—no complicated steps!
Quick Prep and Cook Times
Prep takes about 20 minutes. Cooking takes another 20 minutes, tops. That’s dinner done in under an hour. You won’t believe how fast this comes together. Seriously, set a timer!
Better Than Takeout Flavor Profile
That sauce is the star, hands down. It’s glossy, thick, and clings perfectly to the seared chicken. You get the sweet honey and brown sugar balanced by the sharp rice vinegar and sesame. It’s the perfect sticky coating you dream about.
Essential Ingredients for Sticky Sesame Chicken Rice Bowls
To make these **Sticky Sesame Chicken Rice Bowls** truly shine, don’t skimp on the quality of your core components. Having everything prepped before you turn on the heat is key to the speed of this recipe. We need sturdy chicken pieces, a few pantry staples for that amazing sauce, and some vibrant vegetables to keep things light and crunchy.
I want you to look closely at the ingredient list. We aren’t using weak stuff here; we need things that will hold up to high heat and that beautiful glaze. If you’re organized, this whole shopping trip or pantry raid will be simple! Check out my Pinterest board for more organization tips.
Chicken and Coating Components
You’ll need 1 and a half pounds of boneless, skinless chicken thighs—trust me, thighs stay juicier than breasts here! They get tossed with 2 tablespoons of cornstarch, 1 teaspoon of salt, and half a teaspoon of pepper. That cornstarch coating is what gives the chicken its initial crispness before it hits the sauce. For cooking, grab 2 tablespoons of neutral oil, like avocado or canola. You want something that won’t smoke too fast.
The Glossy Sesame Sauce Base
This is where the magic happens! For the sauce, we whisk together one-third cup of low-sodium soy sauce, 3 tablespoons of honey, 2 tablespoons of packed brown sugar, 2 tablespoons of rice vinegar, 1 tablespoon of toasted sesame oil, and one-half cup of water. Remember, we need a separate slurry too: 1 tablespoon of cornstarch mixed with 2 tablespoons of water to thicken it all up later!
Rice and Fresh Vegetable Additions
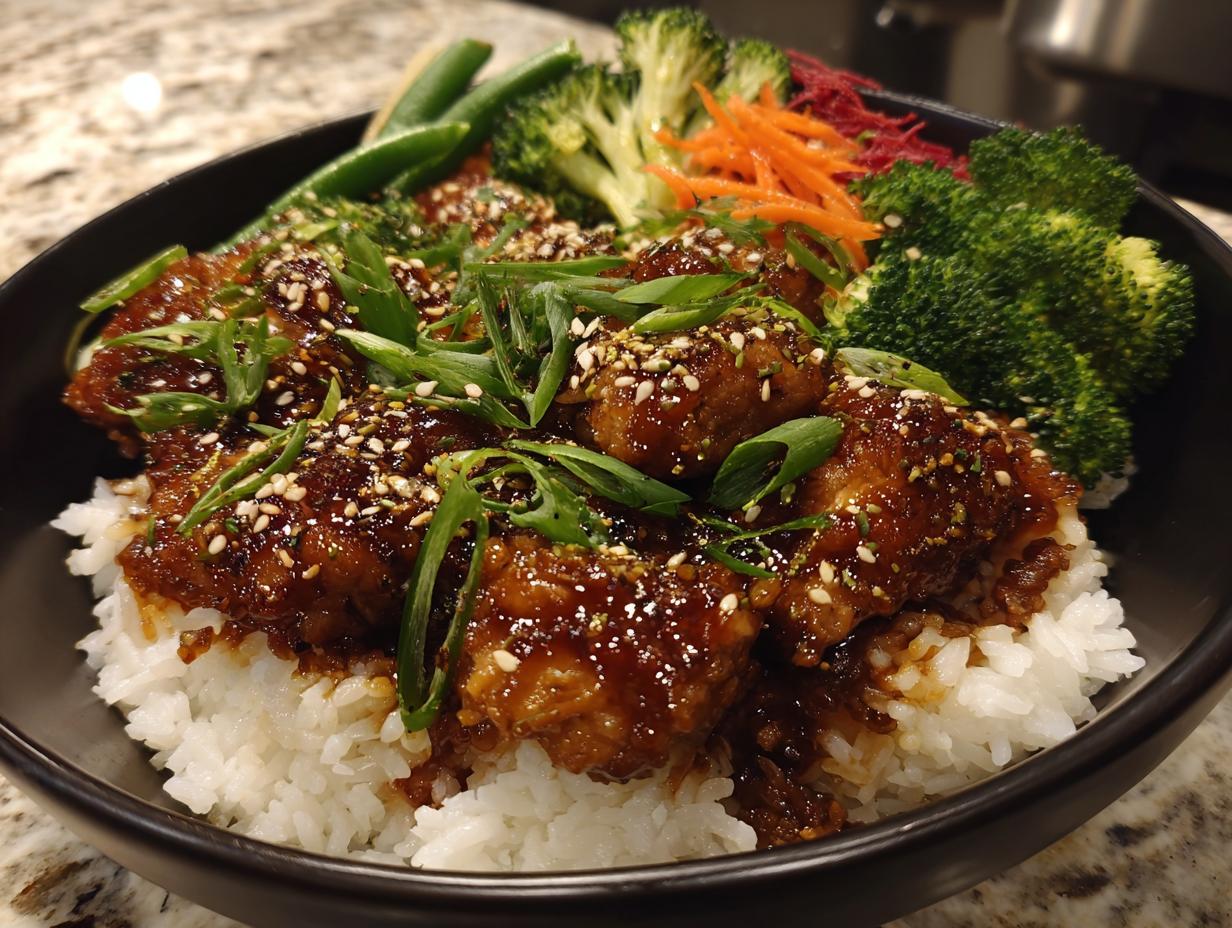
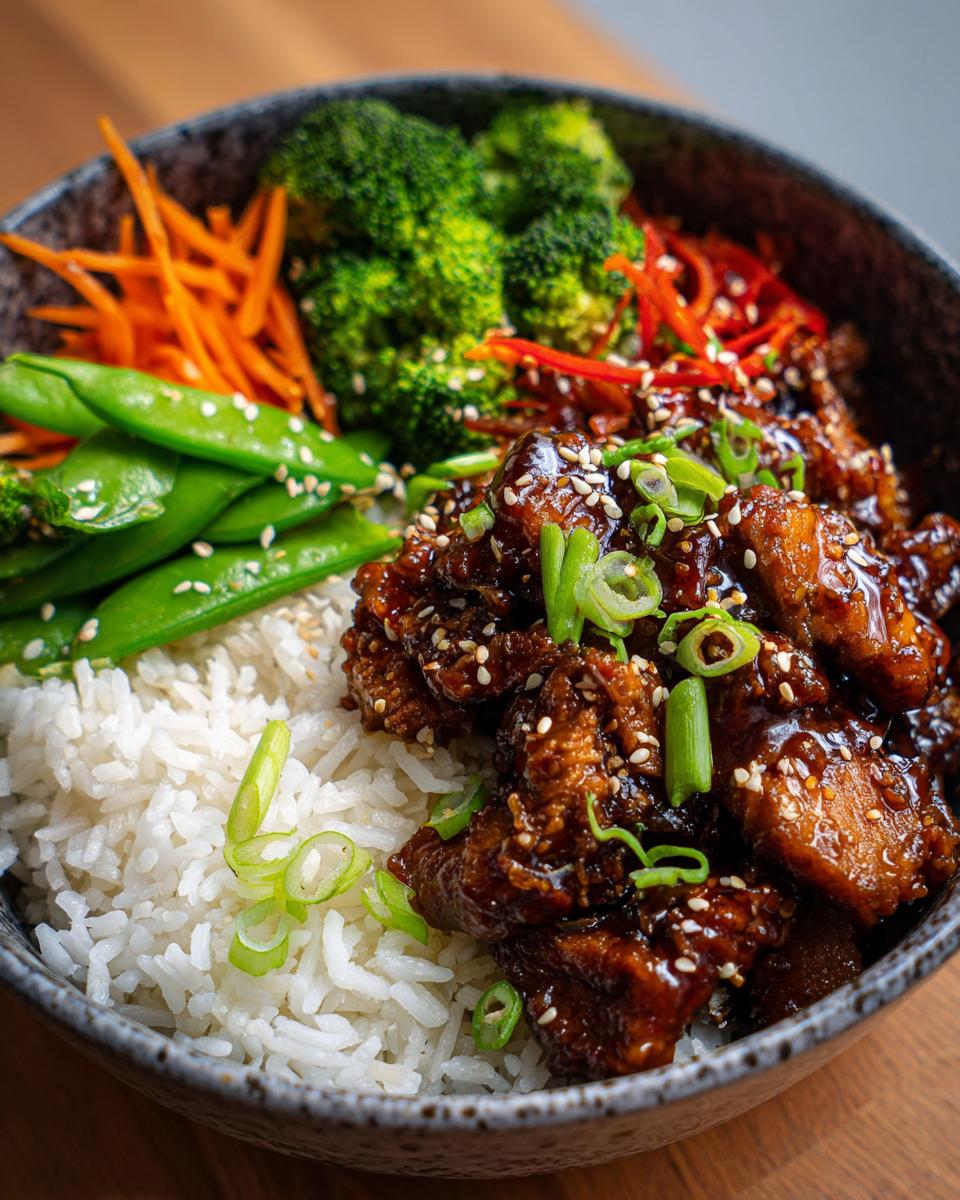
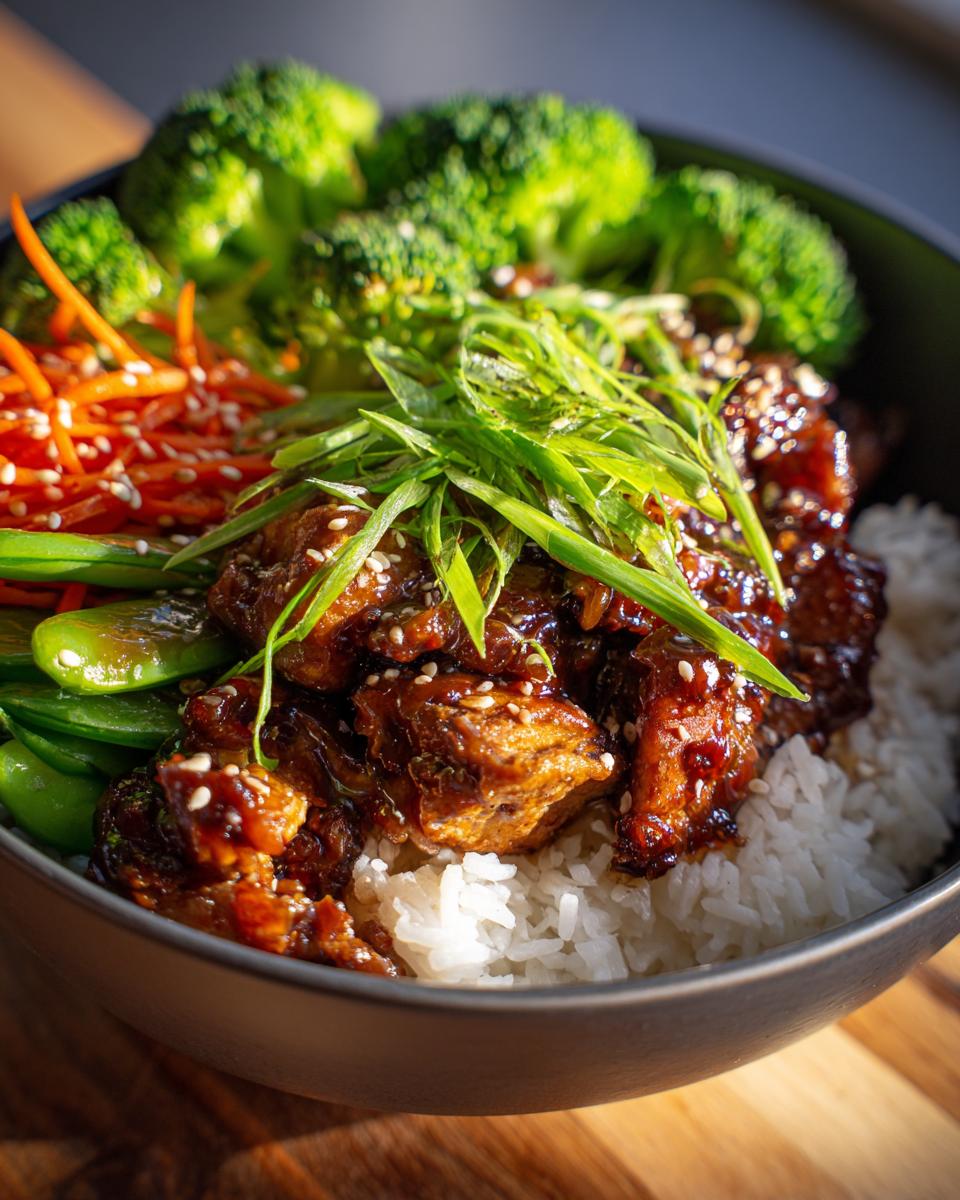
You need 1 and a half cups of long-grain white rice, rinsed really well. For the vegetables, aim for 2 cups of small broccoli florets, 1 large carrot cut into thin matchsticks, 1 cup of sugar snap peas (or frozen edamame if you prefer!), and 1 cup of shredded red cabbage for color. Don’t forget the green onions and sesame seeds for the final topping!
Necessary Equipment for Making Sticky Sesame Chicken Rice Bowls
You don’t need a ton of fancy gadgets for these bowls, which is exactly why I love them for busy nights. Having the right pans ready makes the 40-minute timeline totally realistic. Grab these three main items before you start rinsing that rice, and you’ll be set for success.
Stovetop and Steaming Tools
- A large, deep skillet for searing the chicken and building the sauce.
- A medium saucepan with a tight-fitting lid for cooking the rice perfectly.
- A steamer basket that fits over the saucepan or a small pot dedicated just for steaming your veggies.
Step-by-Step Instructions for Sticky Sesame Chicken Rice Bowls
Okay, let’s get cooking! Timing is everything here, so we start with the rice since it cooks mostly on its own. Then we move fast to get that beautiful chicken seared and glazed. Follow these steps closely, and you’ll have amazing **Sticky Sesame Chicken Rice Bowls** on the table in no time.
Preparing the Rice and Coating the Chicken
First things first, rinse your rice under cool water until it starts running mostly clear. Add that rinsed rice and 3 cups of water to your saucepan. Bring that up to a rolling boil, then immediately drop the heat way down to low, cover it tight, and let it cook for 15 minutes. Once the time is up, turn the heat off completely and just let it sit there, covered, steaming away. Don’t peek!
While the rice is doing its thing, take your bite-sized chicken pieces and toss them really well in a bowl with the 2 tablespoons of cornstarch, salt, and pepper. You want every single piece lightly coated. Don’t leave any dry spots! If you are looking for other quick chicken options, check out my recipe for Sheet Pan Sticky Ginger Sesame Chicken.
Searing the Chicken and Building the Sauce
Get your large, deep skillet screaming hot over medium-high heat and add your neutral oil. This is important: you want the oil hot so the chicken sears, not steams. Add the coated chicken in a single layer—don’t crowd the pan, or it *will* steam! Cook it for about 6 to 8 minutes, flipping it once or twice until it’s nicely browned all over and cooked through. Make sure that internal temperature hits 165 degrees F!
Once the chicken looks great, stir in your minced garlic and ginger. Cook those aromatics for just 30 seconds until you can really smell them—be careful not to let the garlic burn, or it gets bitter! Next, grab a small bowl and whisk together the soy sauce, honey, brown sugar, rice vinegar, sesame oil, and the first half cup of water. Pour this whole mixture right over the chicken and bring it to a gentle simmer.
Thickening the Sticky Sesame Sauce
Now for the sticky part! In a separate tiny bowl, mix the second tablespoon of cornstarch with 2 tablespoons of water until it’s totally smooth—this is your slurry. Drizzle that slurry slowly into your simmering sauce while you stir constantly. Keep stirring for 2 to 3 minutes. You’ll see the sauce magically transform, getting glossy and thick enough to coat that chicken beautifully. Sprinkle in those 2 tablespoons of toasted sesame seeds, toss everything gently, and drop the heat to low just to keep it warm while you tackle the veggies.
Steaming Vegetables to Crisp Perfection
We want our veggies bright and crunchy, not mushy! Get your steamer basket going over simmering water. Add the broccoli florets and carrot matchsticks first, cover them, and steam for about 3 to 4 minutes. If you’re using snap peas or edamame, toss those in for just the final minute of steaming. This keeps everything crisp-tender for your **Sticky Sesame Chicken Rice Bowls**.
Assembling Your Final Sticky Sesame Chicken Rice Bowls
Fluff up that perfectly rested rice with a fork and divide it between your serving bowls. Top the rice with a nice pile of your bright, steamed vegetables. Then, spoon over a generous helping of that sticky sesame chicken and make sure you get plenty of that glossy sauce drizzled over everything! Finish each bowl with a sprinkle of shredded red cabbage, some fresh sliced green onions, extra sesame seeds, and if you like a little kick, a tiny pinch of red pepper flakes.
Expert Tips for Perfect Sticky Sesame Chicken Rice Bowls
Getting these **Sticky Sesame Chicken Rice Bowls** right means paying attention to a few small details that make a huge difference in the final texture. I learned these tricks the hard way, so you don’t have to! A little care in the beginning pays off big time when you take that first bite.
Achieving Even Chicken Browning
This is crucial for flavor! Make sure your pan is genuinely hot—medium-high heat is your friend—before the oil even goes in. When you add the chicken, lay the pieces down so they aren’t touching much. If you cram too much chicken in there, the temperature drops instantly, and instead of searing, the chicken starts steaming in its own juices. We want sear marks! If you prefer a sheet pan version, try my Sticky Ginger Chicken Sheet Pan.
Sauce Consistency Management
When you mix that slurry—the cornstarch and water—do it right before you need it. If cornstarch sits too long, it sinks to the bottom and clumps up. When you drizzle it into the simmering sauce, stir the sauce constantly. If it looks too thin after a minute or two, you can always mix up a tiny bit more slurry and add it in slowly until you get that perfect clingy texture that makes the dish so delicious.
Ingredient Notes and Substitutions for Your Sticky Sesame Chicken Rice Bowls
When putting together your **Sticky Sesame Chicken Rice Bowls**, clarity on your ingredients really helps the flavor profile lock in. I always insist on using chicken thighs because they are much more forgiving than breasts, staying tender even if you accidentally cook them a minute too long. Whichever you choose, just make sure all the pieces are roughly the same size so they cook evenly in the skillet. Uniformity is your friend here!
The sauce components are pretty locked in, but I know sometimes you need to adjust the sweetness based on your taste or what you have on hand. Feel free to play with the honey and brown sugar ratio slightly. If your honey is really thick, maybe use a touch more water in the main sauce mixture to keep things flowing smoothly.
Chicken Cut and Consistency
If you absolutely must use chicken breast, just cut it a little smaller than you think you need to, and pull it off the heat slightly sooner. Breast meat dries out fast, so keep a close eye on that 165-degree mark. The cornstarch coating is non-negotiable; it’s what gives the chicken that initial shield against the heat and helps the sauce adhere later.
Sweetener Adjustments in the Sauce
I love the depth the brown sugar adds, but if you are short on it, you can lean more heavily on the honey. Alternatively, if you prefer a tangier sauce, you could reduce the honey slightly and add just a tiny splash more rice vinegar. Taste your sauce right before you add the slurry—that’s your last chance to tweak the flavor balance before it thickens up for good! For another sweet and savory option, try my Honey Sesame Chicken Recipe.
Storing and Reheating Leftover Sticky Sesame Chicken Rice Bowls
I always make extra because these **Sticky Sesame Chicken Rice Bowls** are fantastic as leftovers, but you have to handle them right to keep that texture perfect. Proper storage is key to enjoying them safely over the next few days. Remember, we want to keep that sauce from getting weird in the fridge!
Safe Storage Guidelines
Safety first, always! You must get those leftovers into the fridge within two hours of finishing dinner. Do not leave them sitting on the counter. I try to keep the rice, chicken, and veggies in separate airtight containers if I can manage it, but if you just toss the whole assembled bowl in there, that’s okay too. They should stay safe and delicious in the refrigerator for about three to four days.
Best Reheating Methods
When you reheat, the chicken can sometimes tighten up, and the rice can dry out. To combat that, when you reheat your portion in a skillet over medium-low heat, add just a tiny splash of water—maybe a teaspoon. This revives the sauce and gets the chicken steaming again gently. If you use the microwave, cover your bowl loosely and heat in short bursts, stirring halfway through to make sure everything heats evenly and avoids dry spots.
Questions About Your Sticky Sesame Chicken Rice Bowls
I know when you’re trying a new recipe, especially one that promises takeout flavor, you’re going to have questions! Don’t worry, that’s completely normal. I’ve gathered the most common things folks ask about when making these **Sticky Sesame Chicken Rice Bowls** so you can cook with total confidence!
Internal Chicken Temperature Check
This is the most important thing, honestly. You absolutely must ensure the chicken reaches 165 degrees F internally. I always tell people to use a food thermometer—it’s the only way to know for sure. Since we are using chicken thighs, they are pretty forgiving, but we still need to hit that mark to keep everyone safe before smothering it in that amazing **Sesame Sauce**.
Can I use Chicken Breast Instead?
Yes, you can swap the thighs for boneless, skinless chicken breast if that’s what you prefer. Just know that breast meat is leaner and it cooks much faster. When you sear it, pull it off the heat a little sooner than you would the thighs. If you overcook breast meat, it gets dry fast, and no amount of sauce can completely fix that!
Making the Sauce Ahead of Time
You can definitely prepare the main liquid part of the **Sesame Sauce**—the soy sauce, vinegar, honey, and water mixture—ahead of time and keep it in the fridge. That’s a great time-saver! However, you must make the cornstarch slurry and mix it in right before you are ready to coat the chicken. If you add the slurry too early, it settles and clumps up when you reheat it, and you won’t get that perfect glossy finish on your **Chicken Rice Bowls**.
Print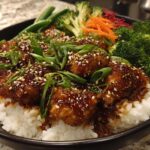
Divine Sticky Sesame Chicken Rice Bowls In 40 Min
- Total Time: 40 minutes
- Yield: 4 servings 1x
- Diet: N/A
Description
Make sticky sesame chicken rice bowls at home with pan seared chicken, steamed veggies, and a glossy garlic sesame sauce for easy takeout style dinners. These bowls deliver that glossy takeout style sauce with tender chicken, fluffy rice, and crisp tender veggies. Everything cooks quickly on the stove for a better than takeout dinner.
Ingredients
- 1 and 1 half pounds boneless skinless chicken thighs, trimmed and cut into bite size pieces
- 2 tablespoons cornstarch
- 1 teaspoon fine sea salt
- 1 half teaspoon black pepper
- 2 tablespoons neutral oil such as avocado or canola
- 3 garlic cloves, finely minced
- 1 tablespoon fresh ginger, finely minced
- 1 third cup low sodium soy sauce
- 3 tablespoons honey
- 2 tablespoons brown sugar, packed
- 2 tablespoons rice vinegar
- 1 tablespoon toasted sesame oil
- 1 half cup water
- 1 tablespoon cornstarch for slurry
- 2 tablespoons water for slurry
- 2 tablespoons toasted sesame seeds
- 1 and 1 half cups uncooked jasmine or long grain white rice, rinsed
- 3 cups water
- 2 cups small broccoli florets
- 1 large carrot, cut into thin matchsticks
- 1 cup sugar snap peas or frozen shelled edamame
- 1 cup shredded red cabbage
- 2 green onions, thinly sliced
- Extra toasted sesame seeds for serving
- Extra sliced green onions for serving
- Red pepper flakes for heat, optional for serving
Instructions
- Rinse the rice under cool water until it runs mostly clear, then add the rice and water to a medium saucepan, bring to a boil, reduce to low, cover, and cook for 15 minutes until tender, then turn off the heat and let it steam covered.
- While the rice cooks, toss the chicken pieces in a bowl with cornstarch, salt, and black pepper until every piece is lightly coated.
- Heat the neutral oil in a large deep skillet over medium high heat, add the chicken in a single layer, and cook for 6 to 8 minutes, turning once or twice, until browned on the outside and cooked through.
- Stir the minced garlic and ginger into the skillet with the chicken and cook for about 30 seconds until fragrant, being careful not to let the garlic brown too much.
- In a measuring jug or small bowl, whisk together soy sauce, honey, brown sugar, rice vinegar, sesame oil, and water until the sugar dissolves, then pour this mixture into the skillet and bring it to a gentle simmer.
- In a separate small bowl, stir together the cornstarch and water for the slurry until smooth, then drizzle it into the simmering sauce while stirring, and cook for 2 to 3 minutes until the sauce turns glossy and thick enough to coat the chicken.
- Sprinkle the toasted sesame seeds over the sticky chicken, toss to coat, then turn the heat to low to keep it warm while you finish the veggies.
- Add the broccoli florets and carrot matchsticks to a steamer basket over simmering water or to a saucepan with a thin layer of simmering water, cover, and steam for 3 to 4 minutes until bright and crisp tender, then add the snap peas or edamame for the final minute of steaming.
- Fluff the rice with a fork and divide it among bowls, then top each bowl with a handful of steamed veggies and a generous spoonful of sticky sesame chicken and sauce.
- Finish each bowl with shredded red cabbage, sliced green onions, extra sesame seeds, and a pinch of red pepper flakes if you like heat.
- Use a food thermometer to make sure the thickest pieces of chicken reach at least 165 degrees F before serving.
Notes
- Always cook chicken to at least 165 degrees F and refrigerate cooked chicken dishes within 2 hours, using them within 3 to 4 days for best safety.
- Cut the chicken into similar size pieces so they brown evenly and finish cooking at the same time.
- Let the pan get hot before adding the chicken so it sears and does not steam, which helps the sauce cling better.
- Mix the cornstarch slurry right before adding it so it does not settle and clump.
- Steam the veggies until just crisp tender so they keep color and crunch in the bowls.
- Garnish generously with sesame seeds and green onions to add texture and a fresh finish.
- Store leftover chicken, rice, and veggies in airtight containers in the refrigerator for 3 to 4 days, keeping the components in separate containers if possible for best texture.
- Refrigerate leftovers within 2 hours of cooking so they do not stay too long in the temperature danger zone.
- For longer storage, freeze portions of the chicken and rice for up to 3 to 4 months and thaw overnight in the refrigerator before reheating.
- Reheat in a skillet over medium low heat with a splash of water until the chicken and rice are hot and steaming all the way through.
- If using a microwave, cover the bowl, heat in short bursts, and stir between bursts to promote even heating and prevent dry spots.
- Prep Time: 20 minutes
- Cook Time: 20 minutes
- Category: Dinner
- Method: Stovetop/Steaming
- Cuisine: Asian Inspired
Nutrition
- Serving Size: 1 serving
- Calories: 560
- Sugar: Unknown
- Sodium: Unknown
- Fat: 17 grams
- Saturated Fat: Unknown
- Unsaturated Fat: Unknown
- Trans Fat: Unknown
- Carbohydrates: 66 grams
- Fiber: Unknown
- Protein: 36 grams
- Cholesterol: Unknown