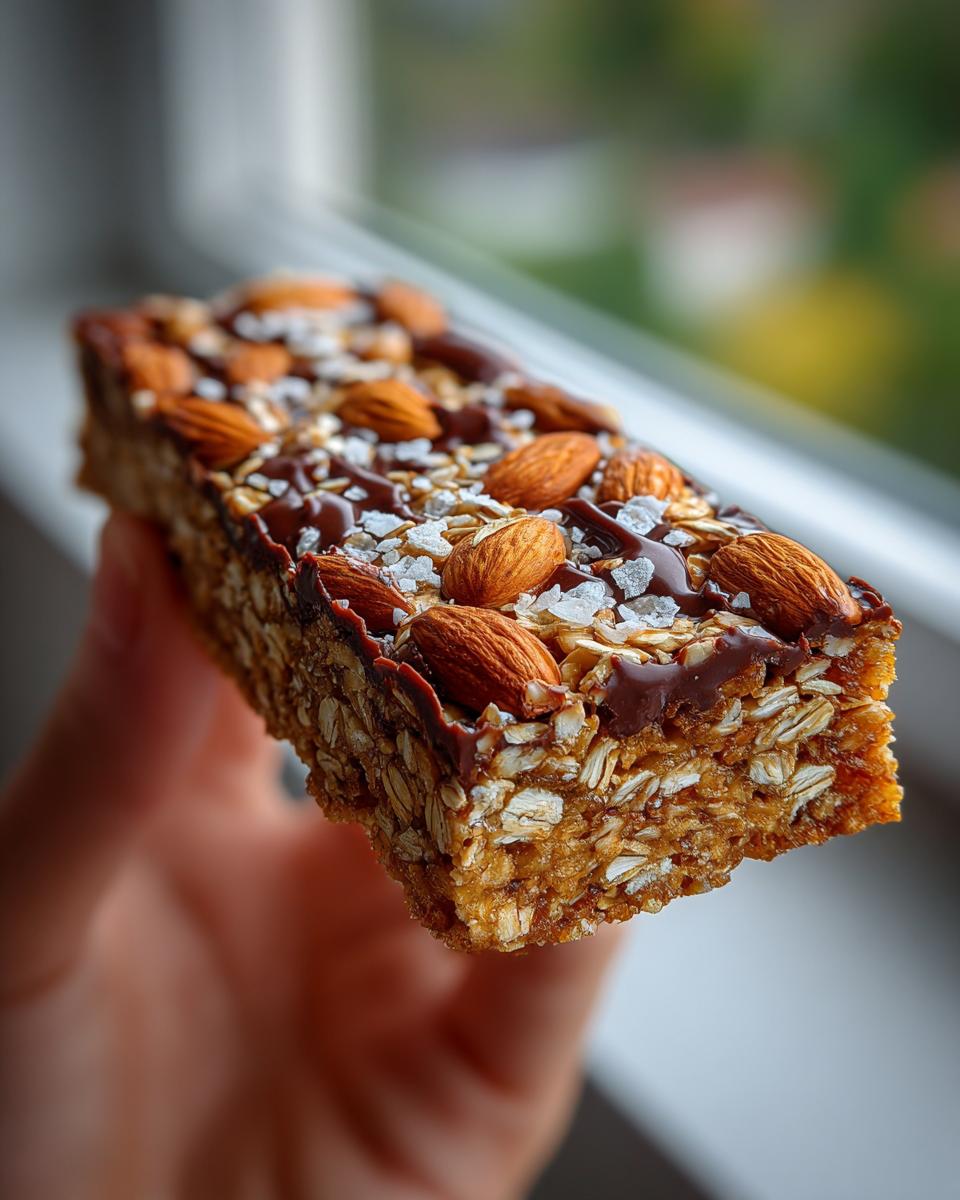
Okay, stop whatever you’re doing. If you need fuel, but the thought of turning on the oven makes you sweat, I have found the answer. These are, hands down, the best no bake peanut butter granola bars you will ever try. Seriously, forget those dry, crumbly things you buy at the store. Mine are chewy, deeply flavorful, and packed with good stuff like seeds and nuts.
I developed this recipe out of sheer desperation one summer when my AC broke. I needed a wholesome snack for the kids’ lunchboxes, but I couldn’t handle the heat. This recipe came together in about fifteen minutes of active work, and the results were spectacular. They set up perfectly in the fridge, giving you that satisfying, dense bite without ever needing to see the inside of an oven.
The secret is really in that warm peanut butter base—it coats everything beautifully. Trust me, once you try this simple formula, you’ll never go back to the fussy baked stuff again for a quick grab-and-go snack!
Gathering Your Ingredients for No Bake Peanut Butter Granola Bars
You don’t need a pantry stocked with weird specialty items for these, which is another reason I love them so much. We are keeping this simple, folks! The beauty of these no bake peanut butter granola bars is that they rely on sturdy pantry staples. You’ll need your oats, your favorite peanut butter, and a few binding liquids.
My one piece of advice? Use natural peanut butter if you can. It melts down much smoother than the shelf-stable stuff, which can get a little grainy when heated. We’re aiming for ultimate chewiness here!
Precise Ingredient List for No Bake Peanut Butter Granola Bars
I always lay everything out before I start melting anything. It makes the whole process go faster, since the setting time starts right after you add the dry stuff. Check out the exact amounts you’ll need below for the best batch of no bake peanut butter granola bars:
- ½ cup creamy natural peanut butter
- 3 tablespoons honey
- 1½ tablespoons coconut oil
- 1 teaspoon vanilla powder
- ½ teaspoon ground cinnamon
- ⅓ cup flaxseed meal
- 1 tablespoon chia seeds
- ¾ cup old fashioned rolled oats
- ⅓ cup chopped roasted almonds
- ¼ cup unsweetened shredded coconut
- ¼ cup dark chocolate chips
- 1 teaspoon coconut oil
Essential Equipment List
Since we aren’t baking, we skip the mixer! You just need a couple of simple things to get these bars mixed and set properly. Make sure your loaf pan is ready to go before you start melting your base.
- Small saucepan
- 8 by 4 inch loaf pan
- Parchment paper
- Heat-safe mixing bowl (for chocolate)
- Rubber spatula
Why You Will Love These No Bake Peanut Butter Granola Bars
Honestly, these bars are my secret weapon for busy weeks. I keep a batch in the fridge almost constantly because they are just so satisfying when you need a little something quick. They hit all the right notes without any fuss. You’re going to want to make them again and again!
Here’s why these no bake peanut butter granola bars earn a permanent spot in my snack rotation:
- They take less than fifteen minutes of actual work. Seriously, it’s that fast!
- No oven required means your kitchen stays cool, which is a huge win in the summer months.
- The texture is spot on—chewy from the oats and honey, but firm enough to hold its shape.
- They feel wholesome! Packed with fiber from the flax and chia seeds, plus healthy fats from the nuts.
- That little bit of cinnamon and the chocolate drizzle just make them feel like a treat, even though they are fueling you up!

Step-by-Step Instructions for Perfect No Bake Peanut Butter Granola Bars
Okay, ready to make magic with minimal effort? This is where we bring everything together. Since these are no bake peanut butter granola bars, timing is a little important once the heat comes on, but don’t stress! Just have your dry ingredients measured out and ready to go before you start melting the base.
Creating the Smooth Peanut Butter Base
First things first, line that loaf pan! You need parchment paper hanging over the sides—this is your handle later to lift the whole thing out cleanly. Trust me, you want that overhang!
Now, into a small saucepan go your peanut butter, honey, that tablespoon and a half of coconut oil, your vanilla powder, and that warm little pinch of cinnamon. Keep the heat low! We are just coaxing these ingredients to become friends, not boiling them into submission. Stir continuously for about two minutes until it’s completely glossy and you can’t see any separate lumps of oil or honey. It should look like smooth, liquid caramel.
Mixing the Dry Components and Binding
As soon as that base is smooth, pull the pan right off the heat—this is crucial. We don’t want to cook the oats! Immediately dump in your flaxseed meal, chia seeds, and the rolled oats. Now work fast with your spatula and stir everything together until every single dry piece is coated in that warm peanut butter mixture. It will start to look thick quickly, so keep folding until there are no dry patches left.
Next, gently fold in the chopped almonds and the shredded coconut. You don’t want to overmix this part, or you might break up your oats too much. You want texture, remember?
Pressing and Chilling the No Bake Peanut Butter Granola Bars
Time for the most important physical step for these no bake peanut butter granola bars: pressing! Scrape that thick mixture into your prepared pan. Now, this is where you put your muscles into it. Use the bottom of a glass or a sturdy spatula and press that mixture down as hard as you possibly can. You need a rock-solid, tightly packed layer for them to hold together when you slice them later. Don’t be gentle; press it firm!
Once it’s flat and dense, pop it straight into the fridge. We need it to chill and set for a solid 30 to 45 minutes. Don’t try to rush this, or they’ll just smear everywhere when you cut them.
Adding the Chocolate Finish
While the bars are chilling, let’s get that topping ready. Take your chocolate chips and that last teaspoon of coconut oil—that extra tiny bit of oil helps the chocolate stay smooth and drizzle-able. Microwave it in short 30-second bursts. Stop and stir thoroughly between each burst until it’s perfectly melted and looks shiny. Don’t overheat it, or the chocolate can seize up on you!
When the bars are completely firm from the fridge, take them out. Drizzle that melted chocolate all over the top. You can use a fork to make pretty zig-zags if you’re feeling fancy. Back into the fridge they go for about 10 more minutes just to set that chocolate layer before you lift the parchment paper handles and slice them into 8 perfect bars!
Tips for Making Your No Bake Peanut Butter Granola Bars Success
Even though these are “no bake,” there are definitely a few little tricks that separate a good batch of no bake peanut butter granola bars from a *great* batch. The main thing you need to remember revolves around making sure they actually stick together when you try to eat them!
First, let’s talk about that pressing step again. I know I mentioned it before, but I can’t stress this enough—you need to apply serious pressure when you pack the mixture into the pan. Use a flat-bottomed measuring cup or a piece of wax paper over your hands and press down hard on every square inch. If you leave air pockets, you’ll end up with loose crumbles instead of chewy bars.
Also, heating the wet ingredients gently is key to binding. If you boil the honey and peanut butter, you risk making them too hard once they cool down, which leads to brittle bars. We want that warm, gooey base to act like perfect edible glue for all the oats and seeds. If you follow that low heat rule and press firmly, your no bake peanut butter granola bars will be perfectly chewy every single time!
If you are looking for more quick, no-fuss snack ideas, check out my collection of 3 ingredient no bake treats.
Storing and Serving Your No Bake Peanut Butter Granola Bars
The best part about these bars is that they are made to be stored! Since they rely on coconut oil and peanut butter rather than eggs, they keep beautifully in the fridge, which keeps them firm and chewy. I always keep mine in an airtight container lined with parchment paper.
If you are making a big batch of these no bake peanut butter granola bars, the refrigerator is your best friend. They will stay perfectly fresh for about a week, maybe even ten days if you don’t touch them! If you need to keep them longer, you can definitely freeze them.
When serving, pull them out of the fridge about 15 minutes before you plan to eat them if you like them slightly softer. If you like that super-firm, almost candy-like texture, eat them straight from the cold! Here’s a quick breakdown:
| Storage Location | Approximate Freshness |
|---|---|
| Countertop (Airtight) | 1-2 Days |
| Refrigerator (Airtight) | Up to 10 Days |
| Freezer (Wrapped Individually) | Up to 2 Months |
Common Questions About No Bake Peanut Butter Granola Bars
I get so many questions about these bars because everyone wants that perfect, non-crumbly texture. Since they are so simple, sometimes people overthink the swaps! I’ve gathered the most common things folks ask me when they’re making their first batch of no bake peanut butter granola bars.
Don’t worry if your first attempt seems a little soft right out of the mixer—that’s why we chill them! The chilling process is what actually firms everything up into those perfect squares.
Can I make these No Bake Peanut Butter Granola Bars nut-free?
That’s a great question, especially for school lunches! If you need to avoid peanuts, you can absolutely swap the peanut butter for sunflower seed butter or tahini. Just know that sunflower seed butter has a stronger flavor, so it will change the profile a bit. For the almonds, skip them entirely and add an extra quarter cup of mixed seeds—like pumpkin seeds or sunflower seeds—or even some puffed rice cereal for crunch. You might need a tiny bit more honey to help bind everything if you remove the nuts!
How long do these bars stay fresh?
Because we aren’t using any eggs or dairy in the main mixture, they hold up really well! I keep mine in the fridge in an airtight container, and they stay perfectly chewy and fresh for about 8 to 10 days. If you have a large batch, you can wrap them individually in plastic wrap and freeze them. They thaw out beautifully in about 20 minutes on the counter, tasting almost freshly made!
What is the best way to cut the bars cleanly?
Cutting can be tricky if they are too soft or too cold! If you try to cut them straight out of the fridge, the chocolate topping might crack. Wait about 15 minutes after taking them out of the fridge, or run your sharp knife under very hot water, wipe it dry quickly, and then cut. That warm blade slides right through the peanut butter mixture and the set chocolate like butter. You get beautiful, clean edges every time!
For more visual inspiration on recipes like this, feel free to check out my Pinterest profile.
Understanding the Nutritional Profile of Your Snack
I always feel better about grabbing a snack when I know roughly what I’m putting into my body, especially when these no bake peanut butter granola bars are designed to be fuel! They are packed with healthy fats and protein to keep you going, which is why they feel so satisfying.
Now, keep in mind that this is just an estimate based on the ingredients I used—especially if you use a different brand of peanut butter or honey. But this gives you a good baseline for what one hearty bar provides. It’s amazing how much goodness we pack into something that takes zero time to bake!
Here’s a look at the general breakdown per bar. See that protein count? That’s the seeds and nuts doing their job!
| Nutrient | Estimate Per Bar (1 of 8) |
|---|---|
| Calories | 265 |
| Total Fat | 19 g |
| Carbohydrates | 18 g |
| Protein | 7 g |
If you are watching your sugar, remember that most of the sugar here is coming naturally from the honey and the small amount in the dark chocolate. It’s a much better choice than most store-bought options!
If you enjoy reading about quick, healthy recipes, you can find more of my thoughts on Medium.
Print
Best 8 No Bake Peanut Butter Granola Bars
- Total Time: 45 minutes
- Yield: 8 bars 1x
- Diet: Vegetarian
Description
These no bake peanut butter granola bars are chewy, wholesome, and easy to make with oats, seeds, and a rich peanut butter base. They are perfect for quick snacks, lunchboxes, and grab-and-go fuel.
Ingredients
- ½ cup creamy natural peanut butter
- 3 tablespoons honey
- 1½ tablespoons coconut oil
- 1 teaspoon vanilla powder
- ½ teaspoon ground cinnamon
- ⅓ cup flaxseed meal
- 1 tablespoon chia seeds
- ¾ cup old fashioned rolled oats
- ⅓ cup chopped roasted almonds
- ¼ cup unsweetened shredded coconut
- ¼ cup dark chocolate chips
- 1 teaspoon coconut oil
Instructions
- Line an 8 by 4 inch loaf pan with parchment paper, leaving overhang on the sides.
- Add peanut butter, honey, coconut oil, vanilla powder, and cinnamon to a small saucepan over low heat. Stir until smooth and fully combined, about 2 minutes.
- Remove from heat and immediately stir in flaxseed meal, chia seeds, and rolled oats until evenly coated.
- Fold in chopped almonds and shredded coconut.
- Transfer the mixture to the prepared pan and press very firmly into an even layer.
- In a microwave-safe bowl, melt chocolate chips and coconut oil in 30 second intervals, stirring until smooth.
- Drizzle chocolate evenly over the top of the bars.
- Refrigerate for 30 to 45 minutes until fully set.
- Lift out using parchment and slice into bars.
Notes
- Pressing the mixture firmly into the pan helps the bars hold together once sliced.
- Prep Time: 15 minutes
- Cook Time: 0 minutes
- Category: Snack
- Method: No Bake
- Cuisine: American
Nutrition
- Serving Size: 1 bar
- Calories: 265
- Sugar: Not specified
- Sodium: Not specified
- Fat: 19 g
- Saturated Fat: Not specified
- Unsaturated Fat: Not specified
- Trans Fat: Not specified
- Carbohydrates: 18 g
- Fiber: Not specified
- Protein: 7 g
- Cholesterol: Not specified