Oh, the sheer joy of a truly magnificent pavlova! That moment when you bite into a perfectly crisp meringue shell, only to find a soft, marshmallowy centre giving way to a cloud of luscious cream and the vibrant tang of fresh fruit… it’s pure bliss, isn’t it? This Mary Berry-Inspired Tropical Pavlova Recipe is my ode to that feeling, a beautiful symphony of classic British baking with a sun-kissed tropical twist. I remember the first time I attempted a pavlova myself, convinced it was a ‘fancy’ recipe, but honestly, it was simpler than I imagined. This version, with its juicy mango, sweet pineapple, and a hint of passion fruit, just screams summer holidays and good times, even if it’s just a Tuesday!
Why You’ll Love This Mary Berry-Inspired Tropical Pavlova Recipe
- It’s surprisingly easy to make, even for beginners!
- The crisp meringue and soft centre are utterly divine.
- Tropical fruits give it a vibrant, sunny flavour.
- It looks absolutely spectacular on any dessert table.
- Perfect for summer gatherings, birthdays, or just because!
Ingredients for Your Mary Berry-Inspired Tropical Pavlova Recipe
- 4 large egg whites
- 1 cup plus 2 tablespoons caster sugar
- 1 teaspoon white vinegar
- 1 teaspoon cornflour
- 1 teaspoon vanilla bean paste
- ½ cup double cream
- ¼ cup mascarpone
- 1 tablespoon icing sugar
- ½ cup diced mango
- ½ cup diced pineapple
- 2 passion fruit
- ½ cup diced dragon fruit
- Fresh mint leaves
Step-by-Step Instructions for the Mary Berry-Inspired Tropical Pavlova Recipe
Step 1: Right then, first things first, let’s get that oven preheated to a nice and gentle 210°F (100°C). While it’s warming up, grab a baking tray and pop a piece of baking parchment on it. You can draw a 7-inch circle on the parchment itself to give you a guide for shaping your pavlova later – trust me, it helps keep things neat!
Step 2: Into a squeaky-clean mixing bowl go your egg whites. Now, whisk them up, starting on medium speed. You’re looking for lovely soft peaks to form. This is the foundation of your meringue, so give it just enough time.
Step 3: Here comes the crucial bit: gradually add your caster sugar, just a tablespoon at a time. Whisk really well after *each* addition. You want to keep whisking until the meringue gets beautifully thick and glossy. It should hold its shape really well.
Step 4: Now for the magic ingredients! Add the white vinegar (this helps stabilise it), the cornflour, and that gorgeous vanilla bean paste. Give it another gentle whisk for about 30 seconds, just until everything is lovely and combined.
Step 5: Spoon your glorious meringue mixture onto the marked circle on your parchment paper. Use a spatula to shape it into a nest. You want those sides to be a bit taller, with a lovely shallow dip right in the middle, like a little edible nest ready to be filled.
Step 6: Into the preheated oven it goes! Bake for a good hour and 30 minutes. And here’s a vital tip from my own pavlova adventures: resist the urge to open the oven door! It can make your pavlova collapse, and nobody wants a deflated dream.
Step 7: Once the baking time is up, turn the oven OFF completely. Leave the pavlova inside for a good 2 hours, or even longer. This slow cooling process is key to getting that perfect crisp exterior and that wonderfully soft, marshmallow-y centre. Letting it dry out completely is what makes it that classic pavlova texture.
Step 8: While your pavlova is cooling (or once it’s completely cool), whip up the filling. In a bowl, combine your double cream, mascarpone, and icing sugar. Whisk it all together until it becomes lovely and thick and fluffy – I don’t like it too stiff, just a nice soft cloud!
Step 9: Gently spoon that creamy mascarpone mixture into the lovely hollow in the centre of your cooled pavlova nest. Don’t be shy!
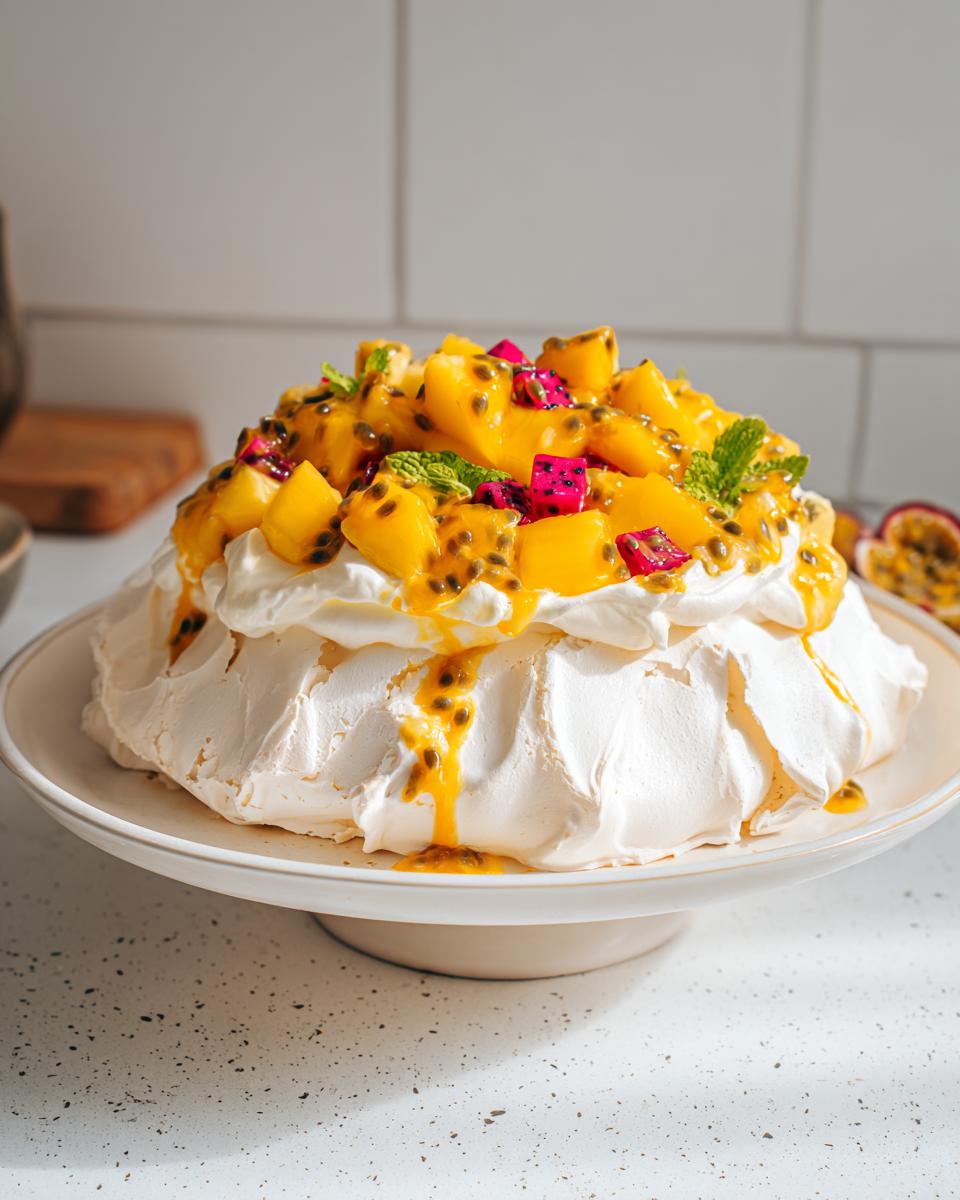
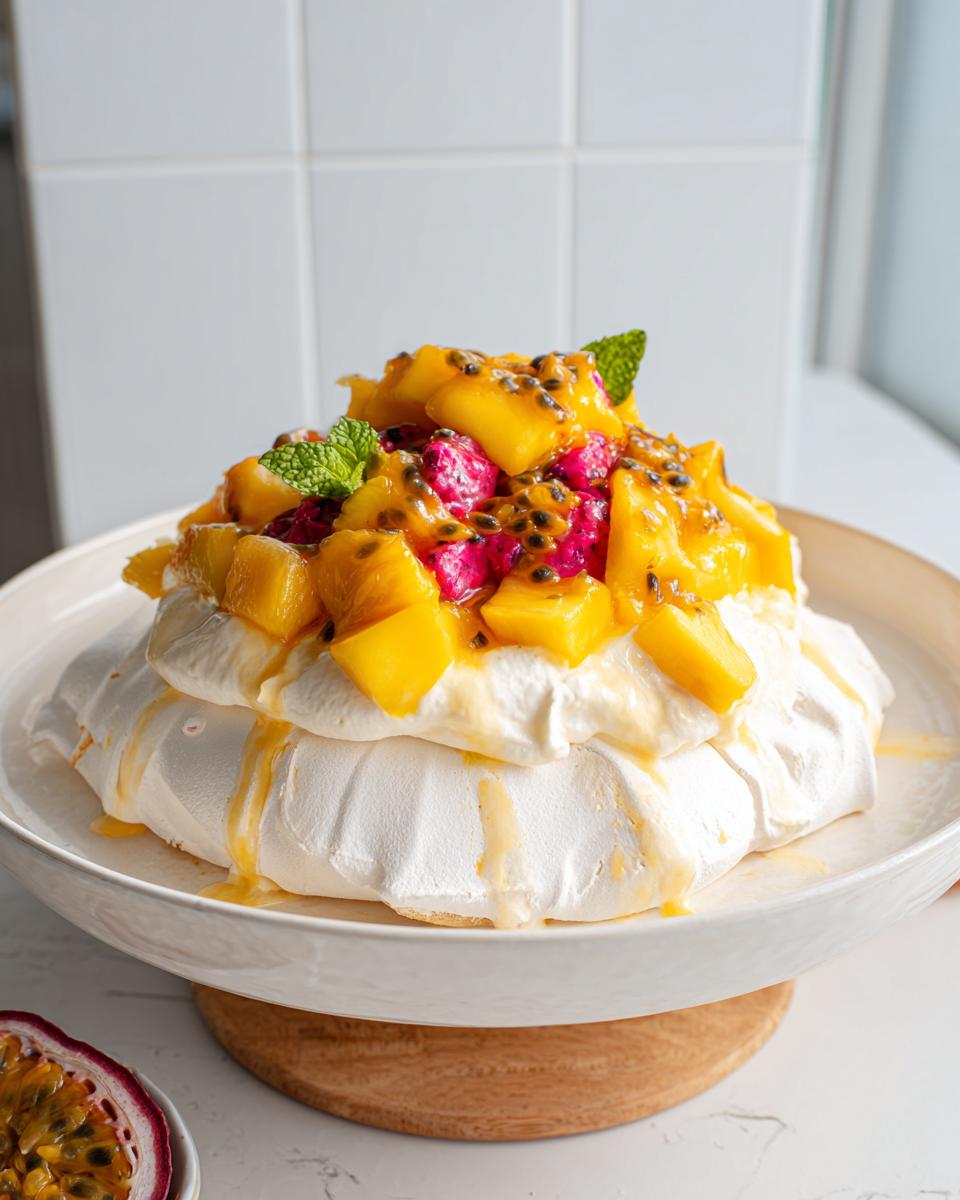
Step 10: Finally, the best bit! Pile all your gorgeous tropical fruits on top – the diced mango, pineapple, and dragon fruit. Scoop out the pulp from the passion fruit and drizzle it all over. A few fresh mint leaves scattered on top add such a lovely finishing touch. You could even try pairing this with a simple coffee mousse on the side if you’re feeling extra decadent!
Serving Suggestions for Your Tropical Pavlova
Fresh Tropical Fruit Salad: While you’ve got fruit on top, a little extra wouldn’t hurt! A simple, vibrant salad made with the same fruits, maybe with a squeeze of lime, really amps up that tropical vibe. Think of it like a refreshing sidekick to your pavlova.
Mango-Strawberry Cupcakes: If you’re hosting a party and want something to offer alongside, these little mango and strawberry cupcakes would be absolutely divine. They echo the fruit flavours but in a totally different, cute little package.
Thai Mango Salad: For something a bit unexpected and savoury, a light and zesty Thai mango salad could be a surprisingly brilliant contrast. The freshness cuts through the sweetness of the pavlova beautifully.
Storing and Reheating Your Mary Berry-Inspired Tropical Pavlova
Right then, the pavlova itself, once completely cooled and entirely unfilled, keeps like a dream! Pop it into an airtight container, and it’ll stay perfectly crisp for a good 4-5 days. This is brilliant if you want to get ahead. As for the leftover mascarpone cream and chopped fruit? Store those separately in little tubs in the fridge. I usually keep the cream and fruit separate until just before I’m ready to assemble, which helps everything stay as fresh as possible. Once you’ve topped it with cream and fruit, it’s best to enjoy it within 24 hours for that perfect contrast of crisp meringue and soft topping.
Frequently Asked Questions About Mary Berry-Inspired Tropical Pavlova
Can I make the meringue shell ahead of time?
Absolutely! The unfilled pavlova shell is quite happy to wait for you in an airtight container for up to 5 days. It’s a brilliant way to get a head start on your dessert prep, just make sure it’s completely cool before storing.
My pavlova cracked a bit, is it ruined?
Oh, don’t you worry about a little crack! Honestly, hardly any of mine come out perfectly smooth. Cracks are totally normal and actually add character! The important thing is that the inside is still soft and marshmallowy. The fruit and cream will hide any little imperfections beautifully. It’s exactly what you’d expect from a classic, a bit like Mary Berry’s famous scones often have little quirks too!
Can I use different fruits for my tropical pavlova?
Yes, definitely! While this combination is lovely, feel free to swap things around. Berries, kiwi, peaches, or even some lovely poached rhubarb would be gorgeous. Just make sure whatever fruit you choose is ripe and flavourful. You could even try a drizzle of raspberry coulis if you fancy something a bit different.
Before You Go
I really hope you give this Mary Berry-Inspired Tropical Pavlova Recipe a whirl! It’s such a showstopper and surprisingly simple to whip up. Let me know in the comments how yours turned out, or tag me on social media – I’d absolutely love to see it! You can also find lots more sweet ideas over on Pinterest!
Print
Mary Berry-Inspired Tropical Pavlova
- Total Time: 4 hours 10 minutes
- Yield: 6 servings
- Diet: Vegetarian
Description
A crisp meringue nest filled with whipped mascarpone cream and topped with fresh tropical fruits.
Ingredients
- 4 large egg whites
- 1 cup plus 2 tablespoons caster sugar
- 1 teaspoon white vinegar
- 1 teaspoon cornflour
- 1 teaspoon vanilla bean paste
- ½ cup double cream
- ¼ cup mascarpone
- 1 tablespoon icing sugar
- ½ cup diced mango
- ½ cup diced pineapple
- 2 passion fruit
- ½ cup diced dragon fruit
- Fresh mint leaves
Instructions
- Preheat your oven to 210°F (100°C). Line a baking tray with baking parchment. Draw a 7-inch circle on the parchment to use as a guide.
- Place the egg whites in a clean mixing bowl. Whisk on medium speed until soft peaks form.
- Gradually add the caster sugar, one tablespoon at a time. Whisk well after each addition until the meringue is thick and glossy.
- Add the white vinegar, cornflour, and vanilla bean paste. Whisk for 30 seconds until fully combined.
- Spoon the meringue onto the prepared circle. Shape it into a tall round nest with slightly raised edges and a shallow centre.
- Bake for 1 hour 30 minutes. Do not open the oven door during baking.
- Turn off the oven. Leave the pavlova inside for 2 hours to cool and dry completely.
- Once the pavlova is fully cool, whisk the double cream, mascarpone, and icing sugar together until thick and fluffy.
- Spoon the mascarpone cream into the centre of the pavlova.
- Top with mango, pineapple, dragon fruit, and passion fruit pulp. Finish with fresh mint leaves before serving.
Notes
- Store the unfilled pavlova in an airtight container for up to 5 days.
- Once topped with cream and fruit, refrigerate and serve within 24 hours for the best texture.
- Prep Time: 40 minutes
- Cook Time: 1 hour 30 minutes
- Category: Dessert
- Method: Baking
- Cuisine: British