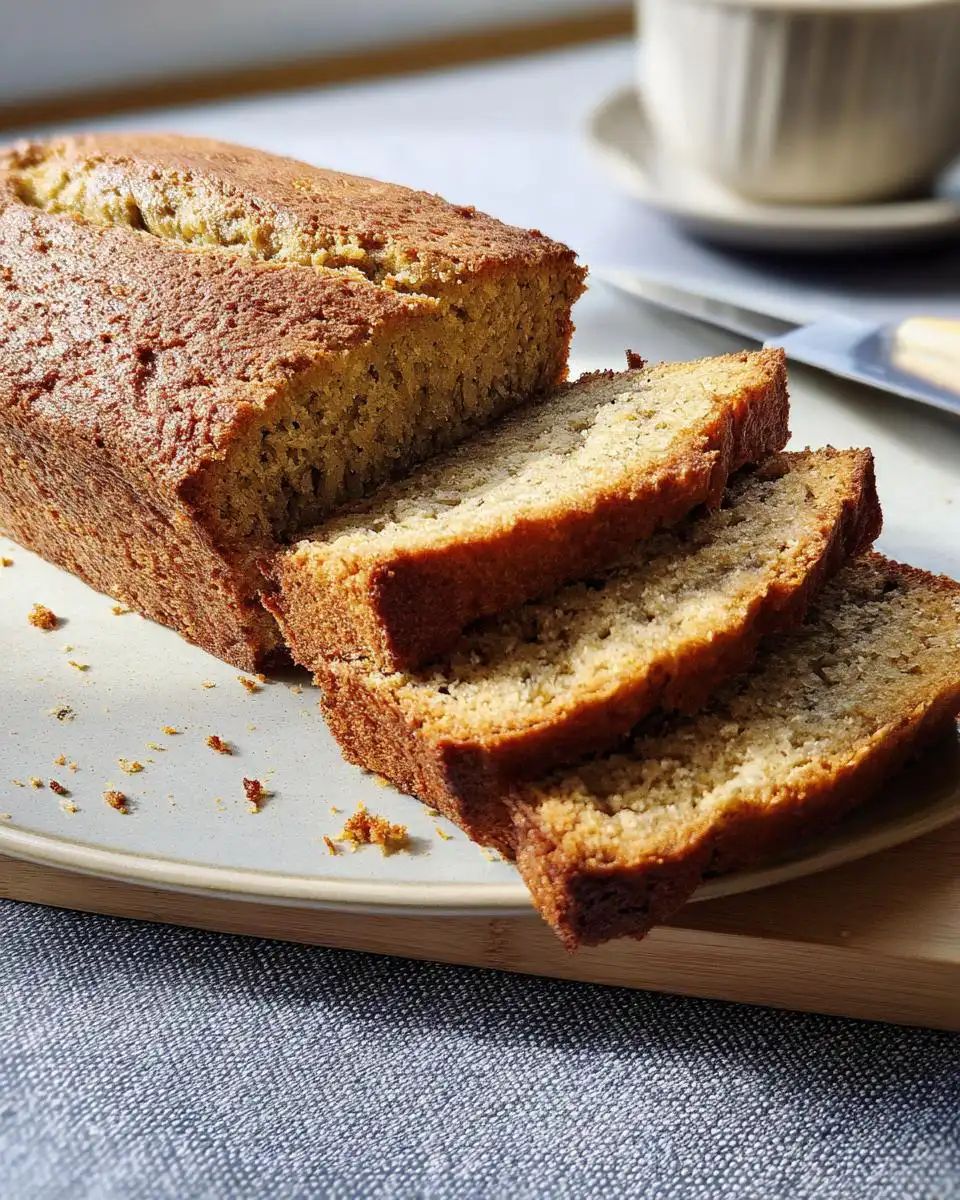
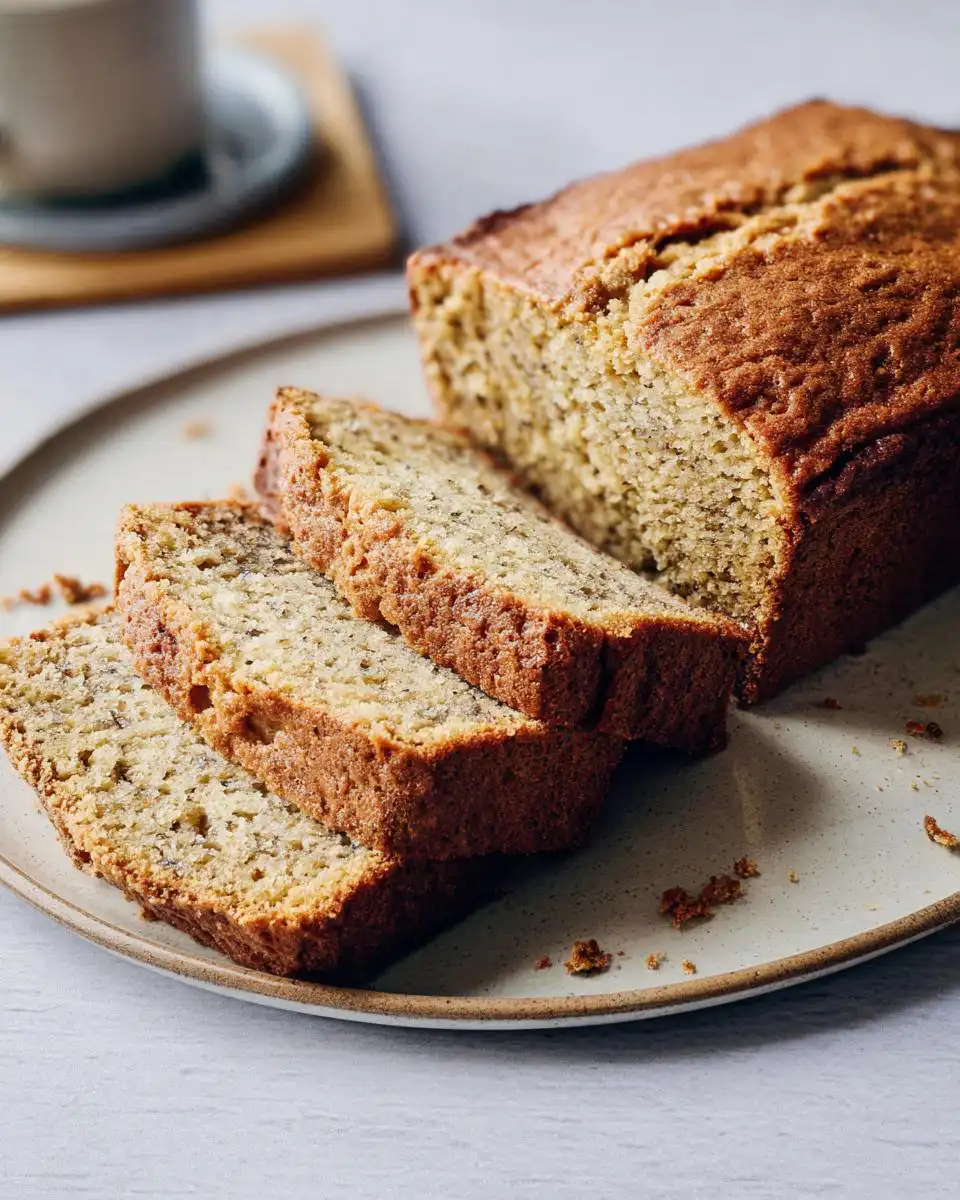
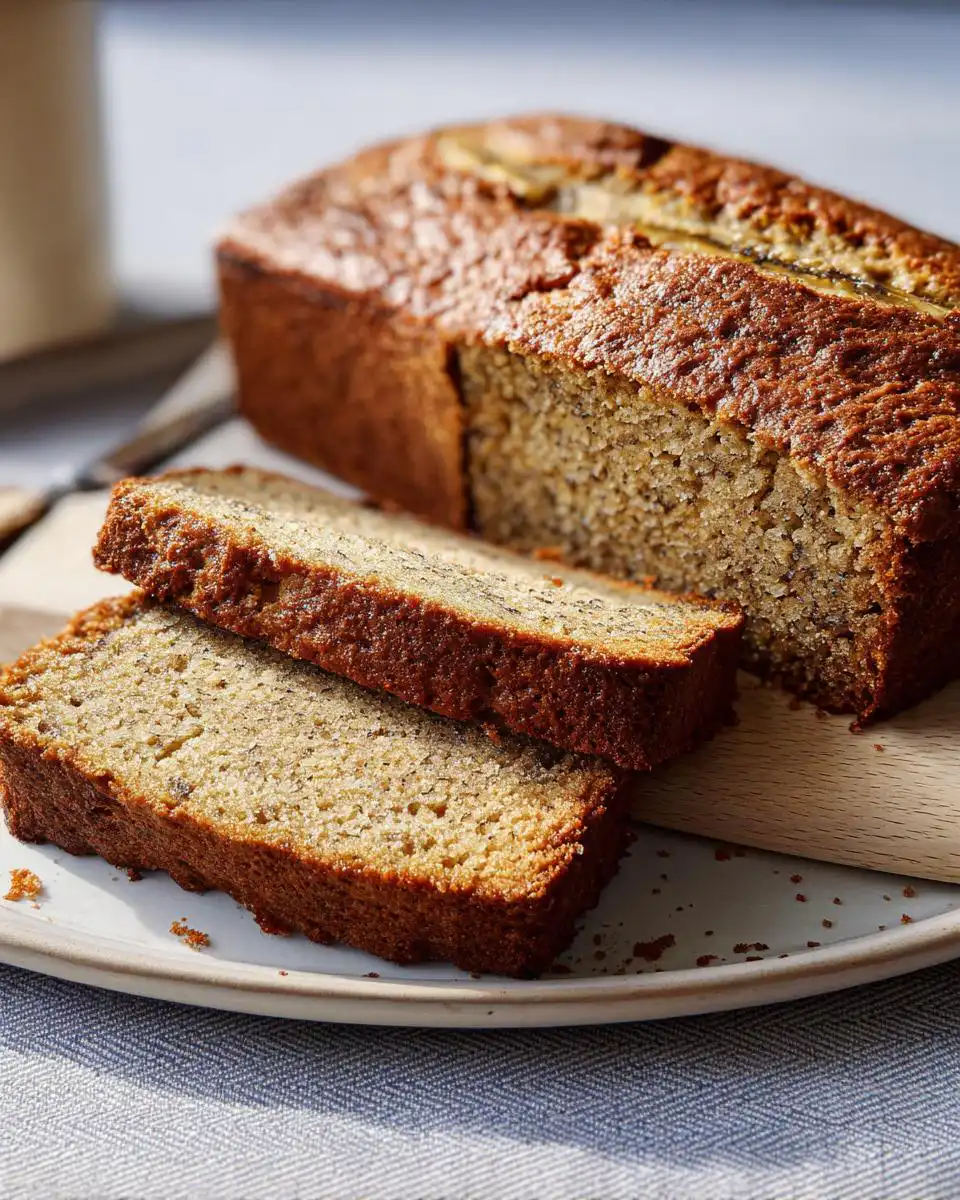
Honestly, is there anything more comforting than the smell of a banana loaf baking? It’s my ultimate Sunday afternoon ritual, especially when my fruit bowl is full of those spotty, almost-black bananas my husband keeps threatening to throw away. I remember my nan baking something similar, but this Mary Berry banana loaf has become my absolute go-to. It’s pure genius in its simplicity—a foolproof, one-bowl method that Mary herself would approve of, giving you a perfectly moist and tender crumb every single time. No fancy techniques, no stress, just a straightforward, utterly delicious bake that makes your kitchen smell like a hug. It’s the kind of recipe that never fails, whether you’re a baking novice or a seasoned pro looking for a reliable classic.
Why You’ll Love This Mary Berry Banana Loaf
I make this when I need a no-fuss, guaranteed win. It’s my secret weapon for using up bananas and putting a smile on everyone’s face with minimal effort.
It’s a one-bowl wonder. You literally chuck everything in a single bowl and mix. No creaming butter and sugar separately, no sifting flour into another dish. It saves on washing up and reduces the chance of forgetting an ingredient, which I’ve definitely done before!
It’s totally foolproof. Following Mary Berry’s simple all-in-one method means you can’t really go wrong. As long as your bananas are ripe, you’ll get a beautifully moist cake. I’ve even made it with my niece helping, and it still turned out perfectly.
The texture is spot on. The combination of those mashed ripe bananas and just the right amount of milk gives you the most tender, springy crumb. It’s never dry or dense.
It rescues your fruit bowl. Those brown, sad-looking bananas are the secret to the best flavour and natural sweetness. It feels so good not to waste them.
Ingredients for Your Mary Berry Banana Loaf
This is where the magic happens, and it’s so simple. I always use unsalted butter so I can control the saltiness myself, and trust me, the riper the bananas, the better your loaf will be!
- 1 cup unsalted butter, softened
- 3/4 cup caster sugar
- 2 large eggs
- 2 medium very ripe bananas, mashed
- 1 3/4 cups self-raising flour
- 1 teaspoon baking powder
- 2 tablespoons milk
See? That’s it! Just seven simple things you probably already have. If you ever want to mix it up, you can check out other ideas like these healthy banana bread recipes with a protein boost or get inspired by more healthy banana and oat recipes. But honestly, this classic list is perfection.
How to Make Mary Berry Banana Loaf: Step-by-Step
Right, let’s get baking! Trust me, the hardest part is waiting for it to cool. I like to get everything out on the counter first so there’s no frantic searching mid-mix.
Step 1: First things first, get your oven heating up properly. Preheat it to 180°C (or 160°C if you’re using a fan oven). Now, grab your loaf tin – a standard 23 x 13 cm one is perfect. Give it a good greasing with a little butter or cooking spray, then line it with a strip of baking paper that hangs over the long sides. This little handle makes it SO easy to lift the loaf out later. Don’t skip this!
Step 2: Here’s the brilliant one-bowl part. Take your largest mixing bowl and put EVERYTHING in it: the softened butter, caster sugar, eggs, mashed bananas, self-raising flour, baking powder, and the milk. Just dump it all in. It might look a bit odd, but don’t worry!
Step 3: Now, using an electric mixer (a hand-held one is fine), beat it all together on a medium speed. I time it for a good 2 minutes. You want to stop when the batter is completely smooth and beautifully blended, with no streaks of flour or lumps of butter. A good tip: scrape down the sides of the bowl with a spatula halfway through to make sure you get everything.
Step 4: Pour that lovely, thick batter into your prepared tin. Use a spatula to scrape out every last bit and to level the top nice and evenly. This helps it bake uniformly.
Step 5: Pop it in the centre of your preheated oven and bake for 55 to 60 minutes. Don’t be tempted to open the door before 50 minutes, or it might sink! It’s done when it’s a gorgeous golden brown all over and a skewer (or a clean knife) poked right into the centre comes out clean. If you see any wet batter, give it another 5 minutes and check again.
Step 6: This is the patience-testing part. Let the loaf cool in the tin for a full 10 minutes. This allows it to firm up a bit so it doesn’t break. Then, use those paper overhangs to carefully lift it out and place it on a wire rack to cool completely. I know it’s hard, but slicing into a warm loaf can make it gummy. Waiting ensures you get the perfect crumb!
And that’s truly it! If you ever fancy switching things up for a more filling snack, the method is similar to my favourite high-protein banana bread, but this classic Mary Berry version will always be my first love.
Perfect Pairings for Your Banana Loaf
This loaf is delicious on its own, but a little extra something turns it from a snack into a proper treat. Here are my favourite ways to serve it.
A Proper Cup of Tea: It’s a classic for a reason. A strong builders’ tea or a fragrant Earl Grey is the perfect partner to the sweet, moist crumb. It’s my go-to for a 3pm pick-me-up.
A Dollop of Crème Fraîche: I love this more than cream. Its slight tang cuts through the sweetness beautifully and feels a bit more special. A big spoonful on a warm slice is heaven.
A Drizzle of Runny Honey: For an extra touch of sweetness, a little local honey works wonders. It soaks in just enough and adds a lovely floral note. My kids always ask for this one.
Toasted with Butter: If you have any left the next day (a big if!), try a thick slice lightly toasted and slathered with good salted butter. The crispy edges and melty butter take it to a whole new level.
Storing and Freezing Your Mary Berry Banana Loaf
One of the best things about this loaf is how well it keeps. I often bake one on a Sunday to have treats sorted for the week ahead.
First, you absolutely must let it cool completely on the wire rack before you even think about storing it. Trapping any warmth will create steam and make the crust soggy, which is a real shame after all that effort to get it perfect.
Once cool, I wrap the whole loaf tightly in cling film or pop it into a large airtight container. It’ll stay beautifully moist on the counter for 3 to 4 days. If your kitchen is warm, you can keep it in the fridge for up to a week.
For longer storage, freezing is your friend. Wrap the cooled loaf tightly in cling film, then again in foil or a freezer bag. It’ll keep perfectly for up to 2 months. You can even slice it first and freeze the slices individually—that way you can grab just one piece for your tea!
To revive it, let a frozen loaf thaw overnight at room temperature. For that just-baked warmth, pop a slice in the toaster for a minute or warm individual slices in the microwave for about 15 seconds. It’s like having fresh banana loaf on demand.
Mary Berry Banana Loaf FAQ
I get asked these all the time, usually by friends who are convinced they’ll mess it up. Here are the answers to the most common banana loaf worries.
Can I use plain flour instead of self-raising? You can, but you’ll need to add a raising agent. For this recipe, swap the self-raising flour for plain flour and add 2 and a half teaspoons of baking powder. It’s not quite the same, but it works in a pinch! Self-raising is just easier and what Mary recommends for foolproof results.
How do I know when the loaf is done? The skewer test is your best friend! After about 55 minutes, poke a clean skewer or thin knife right into the centre of the loaf. If it comes out clean with just a few moist crumbs, it’s perfect. If you see any wet, gooey batter, pop it back in for another 5 minutes and test again.
Why are very ripe bananas so important? Oh, this is the secret! Those black-speckled, super-soft bananas are much sweeter and mash down into a lovely, wet puree. That natural sweetness means you don’t need as much sugar, and the extra moisture is what gives you that wonderfully moist, tender crumb. Using a firm, yellow banana just won’t give you the same flavour or texture, trust me.
Nutritional Information Disclaimer
Just a quick note on the nutrition info: the values I’ve shared are a rough estimate to give you an idea. Your actual slice might have slightly more or less depending on the exact size of your bananas, the brand of butter you use, or how finely you measure your flour. Think of it as a helpful guide, not a strict calculation. Always check specific product labels if you’re tracking things closely.
Before You Go
I really hope you give this classic Mary Berry banana loaf a try. It’s such a joyful, simple bake that never fails to please. Happy baking!
If you do make it, I’d love to hear how it turned out! Drop a comment below or share a picture of your bake over on Pinterest. Nothing makes me happier than seeing your kitchen triumphs.
Print
Mary Berry Banana Loaf
- Total Time: 1 hour 15 min
- Yield: 10 slices
- Diet: Vegetarian
Description
A moist and simple banana loaf using ripe bananas, perfect for tea time.
Ingredients
- 1 cup unsalted butter, softened
- 3/4 cup caster sugar
- 2 large eggs
- 2 medium very ripe bananas, mashed
- 1 3/4 cups self-raising flour
- 1 teaspoon baking powder
- 2 tablespoons milk
Instructions
- Preheat your oven to 180°C (160°C fan). Grease a 23 x 13 cm loaf tin and line it with baking paper.
- Put the softened butter, caster sugar, eggs, mashed bananas, self-raising flour, baking powder, and milk into a large mixing bowl.
- Beat the mixture with an electric mixer for about 2 minutes until smooth.
- Pour the batter into the prepared tin and level the top with a spatula.
- Bake for 55 to 60 minutes until the loaf is golden and a skewer inserted into the centre comes out clean.
- Let the loaf cool in the tin for 10 minutes, then transfer it to a wire rack to cool completely before slicing.
Notes
- Use very ripe bananas with dark skins for the best sweetness and moisture.
- This loaf freezes well. Wrap it tightly and store for up to 2 months.
- Prep Time: 15 min
- Cook Time: 1 hour
- Category: Dessert
- Method: Baking
- Cuisine: British