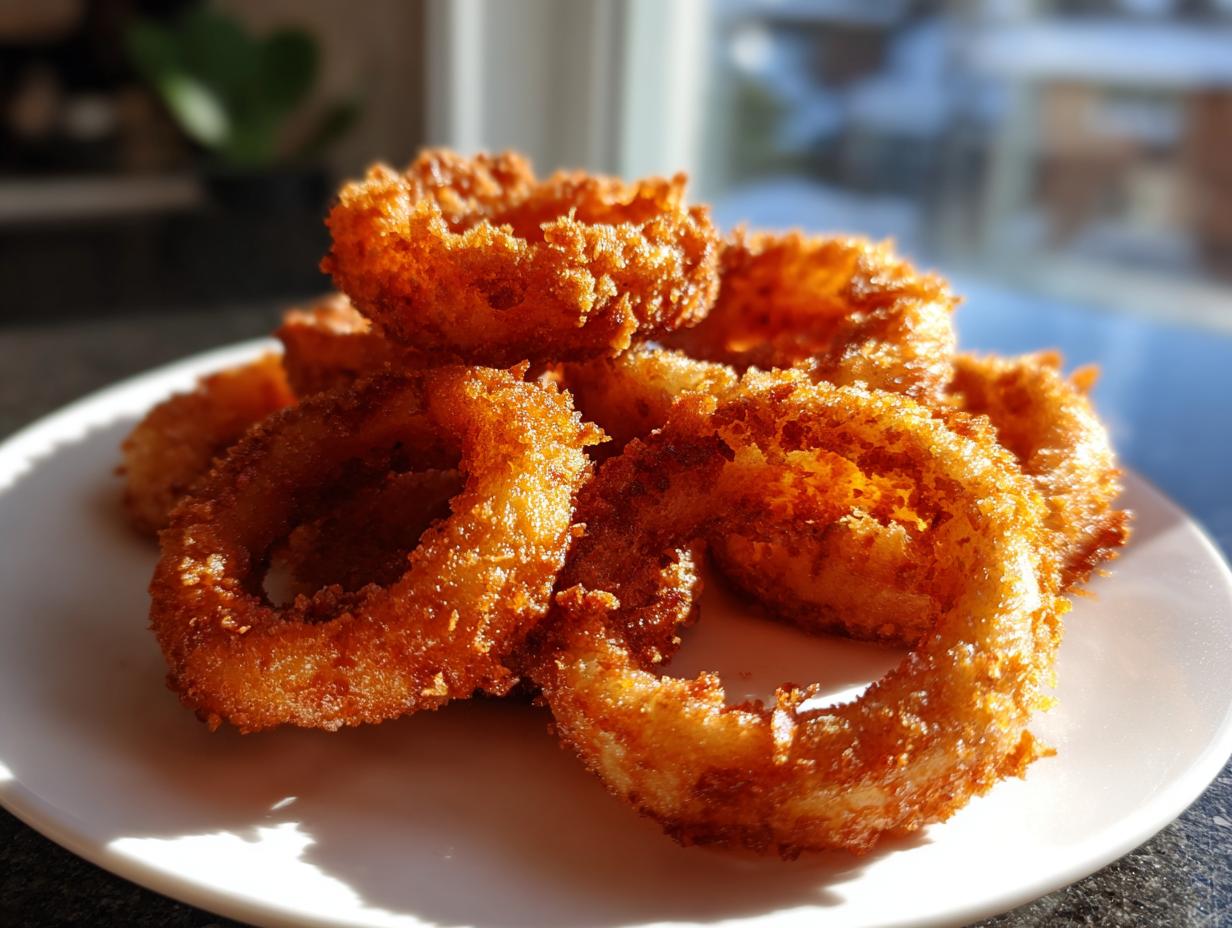
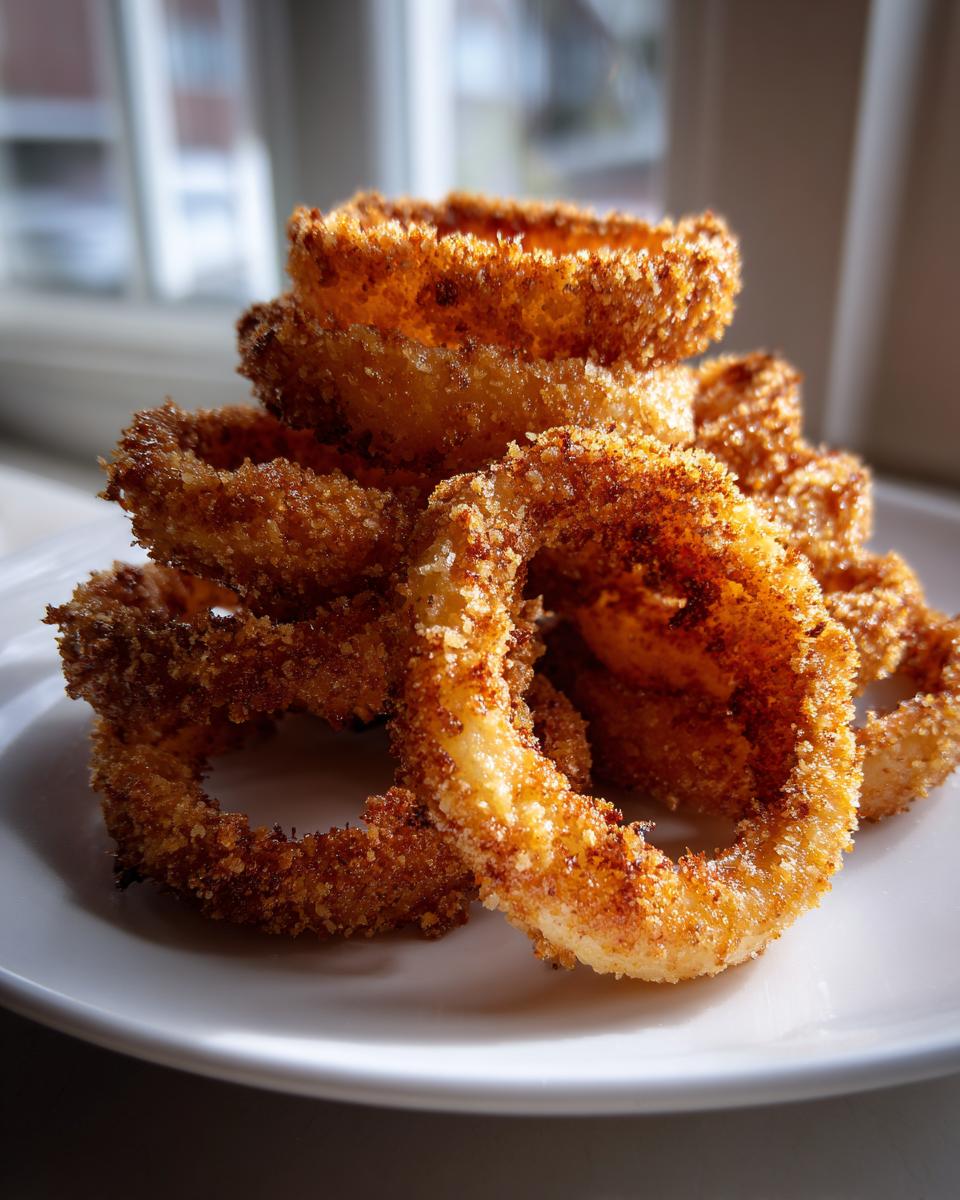
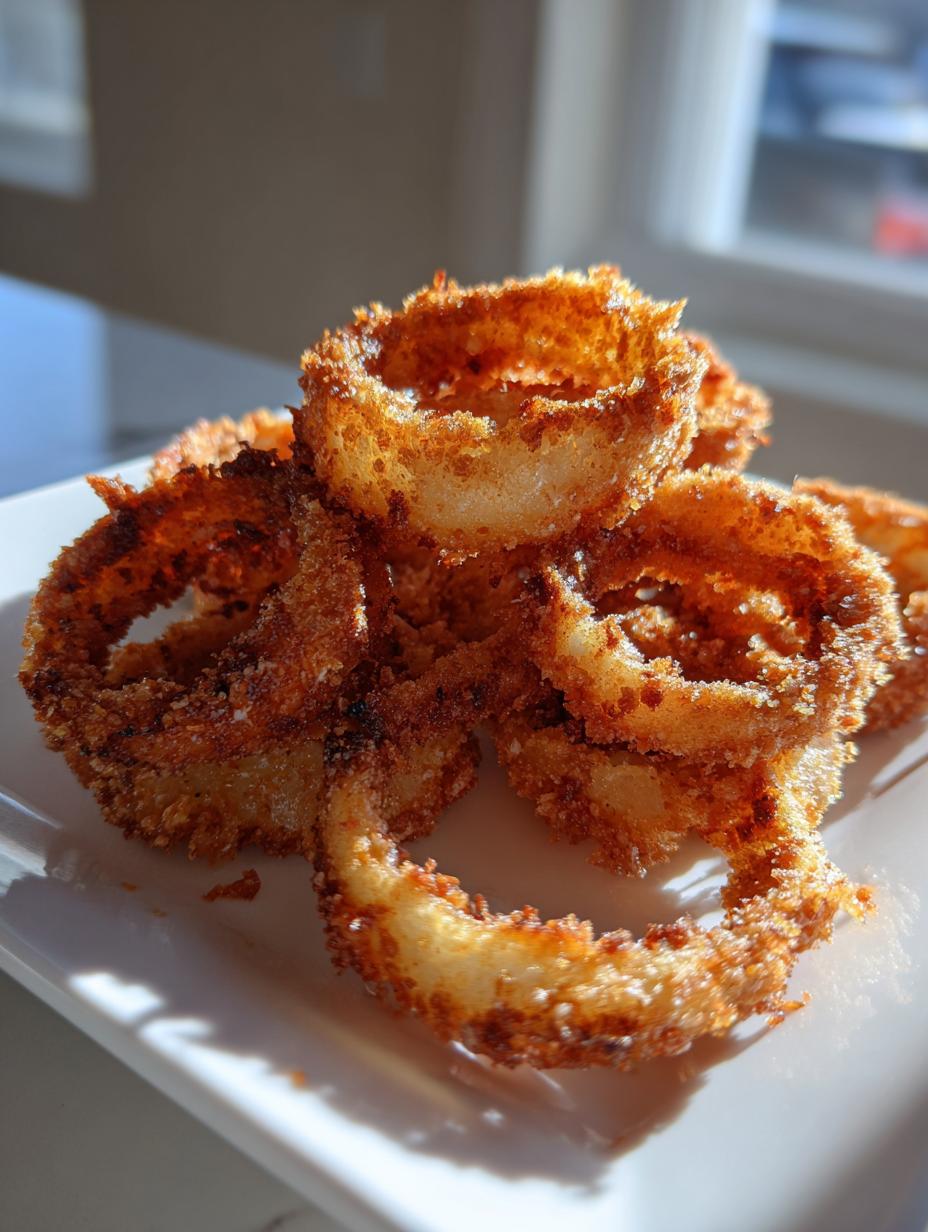
Listen, I know what you’re thinking. Making onion rings at home sounds like a recipe for sad, soggy circles swimming in grease. Wrong! I spent years trying to capture that unbelievable crunch you only get at the best diners, and finally, I nailed it. Forget those heavy, doughy versions; my goal here was light, airy, and ridiculously crunchy. That’s where the panko comes in—it’s our secret weapon for that perfect, shatteringly crisp coating.
The real magic, though, is in the batter. For my Homemade Onion Rings Extra Crispy and Golden, I tweaked the spices countless times. I remember the third time I tried, I added way too much cayenne, and my husband practically breathed fire for an hour! Oops. After that, I backed off slightly and found the perfect balance with smoked paprika and just a whisper of heat. Trust me, this batter is the foundation for truly restaurant-quality results right in your own kitchen.
Why You’ll Love These Homemade Onion Rings Extra Crispy and Golden
I honestly think these are the best onion rings you’ll ever make outside of a professional fryer. They hit every mark! You get that satisfying crunch without the heavy, oily feeling you sometimes get with store-bought versions. They’re just pure, savory joy.
- Incredible Texture: They are genuinely light, crunchy, and stay crisp longer than you’d expect.
- Flavor Punch: The seasoning blend is spot-on—it’s savory, slightly smoky, and has just the right little kick.
- Speedy Snack: Seriously, we can have these on the table faster than ordering takeout!
Quick Prep and Cook Times
You read that right—we’re looking at about 35 minutes total time from start to finish. That includes slicing the onions! This means they are perfect for a weeknight side dish or when you suddenly realize you desperately need a snack. No waiting around for hours; just quick assembly and frying.
Simple Seasoning for Maximum Flavor
Don’t skimp on the spices in the batter! That combination of onion powder and garlic powder gives you that deep, savory onion flavor, but the secret sauce for these Homemade Onion Rings Extra Crispy and Golden is the smoked paprika. It adds a warmth that regular paprika just can’t touch. And that tiny bit of cayenne? It’s just enough to make your tongue tingle without blowing your head off!
Equipment Needed for Perfect Homemade Onion Rings Extra Crispy and Golden
You don’t need a giant deep fryer to get these right, which is great news for small kitchens like mine! Having the right gear just makes the whole process smoother and, honestly, much safer. I always pull these items out before I even touch an onion.
Make sure you have a sturdy, wide skillet. You want enough surface area so you aren’t overcrowding the pot when you start frying. And please, please, have a good cooking thermometer ready to go. This is non-negotiable for that crispy coating we’re aiming for!
Essential Frying Setup
A reliable thermometer is your absolute best friend here. If the oil isn’t hot enough, the rings soak it up and get soggy. If it’s too hot, the coating burns before the onion softens. I always use a candy or deep-fry thermometer clipped right onto the side of my skillet.
- Wide, heavy-bottomed skillet (for even heat distribution).
- A reliable cooking thermometer (aiming for 350°F is key!).
- Three mixing bowls for your dredging station.
- Tongs for carefully turning the rings.
- A plate lined generously with paper towels for draining.
Ingredient Breakdown for Homemade Onion Rings Extra Crispy and Golden
I always lay out all my ingredients before I start slicing, just like a good chef learns to do. Getting the proportions right here is what separates a decent onion ring from the absolute best Homemade Onion Rings Extra Crispy and Golden you’ve ever tasted. Don’t worry if you don’t have every spice under the sun; most of them are pantry staples, but they make a huge difference!
Selecting Your Onions
You need sturdy onions that can hold up to the slicing and frying process. I swear by large yellow onions for this recipe. They have the perfect amount of sweetness and structure. The most important part? Slice them thick—I mean a solid half-inch ring. If you slice them too thin, they shrink down to nothing when fried, or worse, they fall apart when you try to coat them.
Once they are sliced, gently peel them apart into individual rings. It’s a little fiddly, but take your time. We need those defined layers to catch all that amazing batter!
The Dry Coating Components
We use a three-step coating process, so we need three separate bowls set up. The first bowl is just plain flour—this is for dredging. It helps the wet batter stick properly to the onion surface. The second bowl is our liquid batter, and the third bowl holds the real crunch factor: panko breadcrumbs. You absolutely must use panko here; regular breadcrumbs just don’t give you that light, spiky crispness we are after for these Homemade Onion Rings Extra Crispy and Golden.
Crafting the Flavorful Batter
This is where the flavor lives! Whisk your milk and egg first until they are nicely combined. Then, start adding the dry seasonings directly into the wet mixture. We need one teaspoon each of garlic powder and onion powder—that’s for the deep savory base. Then, the star spices: two teaspoons of smoked paprika for color and depth, and just a quarter teaspoon of cayenne pepper for that little background warmth. Mix it all until it’s smooth. You want it to be thick enough to cling to the onion, but thin enough to drip off slightly.
Step-by-Step Instructions for Homemade Onion Rings Extra Crispy and Golden
Okay, now that we have our ingredients ready and our station set up, it’s time for the fun part—getting them crispy! Don’t rush the coating process; that’s what locks in the crunch and keeps the oil out. We are aiming for beautiful, even coverage on every single ring.
Preparing the Onions and Dredging Station
First things first, make sure your onions are separated into individual rings. If you have any rings that are still stuck together, they won’t cook evenly, so gently pull them apart. Now, set up your dredging line. You need three bowls lined up in order: Bowl 1 has your dredging flour, Bowl 2 has that gorgeous seasoned batter, and Bowl 3 is full of your panko breadcrumbs.
I like to start with the onions right next to the flour bowl. Keep a separate plate handy for the finished, coated rings so they don’t contaminate your dry flour.
Mixing the Batter Smoothly
When you mix that batter, you might see a few tiny lumps at first, which is fine. Just whisk it until it looks mostly smooth. Remember, we aren’t making pancakes; we want it thick enough to coat, but not so thick that it ends up gloppy. If you overmix this, you can sometimes develop too much gluten, which makes the batter tough instead of light. Just whisk until the streaks of flour disappear, and then stop!
The Three-Step Coating Technique
This sequence is critical for the Homemade Onion Rings Extra Crispy and Golden. Take one onion ring at a time. First, dredge it completely in the plain flour. Shake off any excess—we only want a thin layer so the next step sticks. Second, dip that floured ring right into the batter, making sure it’s fully submerged. Let the excess drip off for just a second. Third and finally, drop it into the panko breadcrumbs. Press the panko onto the ring gently with your fingers to make sure it’s fully coated everywhere.
Place the fully coated ring on your waiting plate. Repeat this process until all your rings are breaded. Try not to let them sit around too long once breaded, or the moisture from the onion can start to soften the coating.
Frying to Golden Perfection
Heat your oil in the skillet until it hits exactly 350°F. This is the golden zone! If you drop the rings in and the oil starts bubbling furiously, it’s too hot. If it barely bubbles, it’s too cold. Work in small batches—I mean maybe 4 or 5 rings at a time. Overcrowding the pan drops the oil temperature instantly, and that’s how you get soggy rings!
Fry them for about 2 to 3 minutes on each side. You’re looking for a deep, rich golden brown color. Once they look perfect, use your tongs to carefully pull them out and place them immediately on the paper towel-lined plate. Give them a quick sprinkle of salt while they are still hot. Serve these beauties right away!
Expert Tips for Extra Crispy and Golden Results
I’ve burned more batches of onion rings than I care to admit before I figured out these little tricks. Frying seems simple, but it’s all about consistency. If you follow the basic steps, you’ll be great, but if you want that next-level crunch that makes people ask for your recipe, you need to pay attention to the heat!
Maintaining Oil Temperature Consistency
This is my biggest lesson learned: never fry too many rings at once! When you drop a bunch of cold onion rings into hot oil, the temperature plummets fast. If the oil drops below 325°F, the batter starts absorbing oil like a sponge instead of frying up crisp. It’s instant sogginess! That’s why I stick to small batches, allowing the oil to recover its heat between dips. It adds a minute or two, but trust me, it’s the difference between a snack and a masterpiece.
The Role of Panko in Achieving Extra Crispy Texture
If you try to substitute regular fine breadcrumbs for the panko, you’re just not going to get the same result for these Homemade Onion Rings Extra Crispy and Golden. Panko breadcrumbs are Japanese-style breadcrumbs, and they are flaky and airy, not dense like standard crumbs. They fry up lighter and create those fantastic little spiky edges that catch the light and provide that incredible shatter when you bite into them. Don’t skip the panko; it truly is the secret to that restaurant-quality crunch we all crave.
Storing and Reheating Your Homemade Onion Rings Extra Crispy and Golden
Now, I’m going to be honest with you: these onion rings are truly at their peak happiness right the second they come out of the oil. That glorious crunch fades fast! But hey, sometimes you just can’t eat four servings in one sitting, right? Don’t stress if you have leftovers. We just need to handle them gently so they don’t turn into sad, limp rings by the next day.
The key to storing them is keeping them away from any trapped moisture. Moisture is the enemy of crispiness, always has been!
Best Practices for Storage
If you absolutely must save some for later, make sure they are completely cooled down first. Do not put hot onion rings into a sealed container—that steam will condense and make them wet instantly. Once they are totally cool, layer them in an airtight container. I put a paper towel on the bottom, then a layer of rings, another paper towel, and then more rings. This helps absorb any lingering moisture.
They should be eaten within one day for the best results. If you try to push it to day three, you’re probably going to be disappointed, so try to plan ahead! You can find more tips on food storage on our blog.
| Storage Method | Time Limit | Tip |
|---|---|---|
| Airtight Container (Room Temp) | 1-2 Hours Max | Only if eating immediately after cooling. |
| Airtight Container (Refrigerated) | Up to 24 Hours | Use paper towels to wick away moisture. |
Reheating for Maximum Crunch
Forget the microwave! I’m serious, if you put these in the microwave, you might as well just throw them straight into the trash. The microwave heats the water molecules inside the batter, making them steaming hot and totally soggy. We need dry heat to bring back that crispness.
Your best bet is the oven or an air fryer. Preheat your oven to about 375°F (or 375°F in the air fryer). Spread the cooled onion rings out in a single layer on a baking sheet—don’t overlap them! Pop them in for about 8 to 10 minutes. You’ll see them firm right back up and get golden again. The air fryer does this even faster, usually in 5-7 minutes. Give them a taste test, and they’ll be almost as good as fresh! For more crispy snack ideas, check out our air fryer onion rings.
Frequently Asked Questions About Homemade Onion Rings Extra Crispy and Golden
I get so many questions after people try making these for the first time because they are just so different from the frozen stuff! Most of the confusion comes down to frying technique or coating mishaps. Don’t worry, we’ve all been there. Here are the questions I hear most often about achieving those perfect Homemade Onion Rings Extra Crispy and Golden results.
Can I Bake These Homemade Onion Rings Extra Crispy and Golden?
I know, I know, baking seems healthier, and you absolutely *can* bake them. However, I have to be upfront: you will not get the same results as frying. Frying creates that unique, light, airy crispness we worked so hard for with the panko and the specific batter. If you bake them, they will be fine—a decent fried snack substitute—but they will be denser and won’t have that signature *extra crispy* texture. If you must bake, spray them heavily with cooking spray and bake at 425°F until browned, flipping halfway through.
Why Are My Onion Rings Soggy?
Soggy rings are the absolute pits! This almost always boils down to one of two things, and I learned this the hard way. First, your oil temperature dropped too low. If you put too many rings in at once (overcrowding), the oil cools down, and the batter starts soaking up oil instead of sealing up crispy. Second, if you didn’t use the three-step coating properly, the batter might have slipped off, leaving bare spots that just turn greasy. Make sure that oil stays right around 350°F! If you need more inspiration for crispy sides, take a look at our oven baked potato wedges.
Can I substitute the Panko Breadcrumbs?
You can, but I strongly advise against it if you are chasing that “extra crispy” goal. Standard fine breadcrumbs are too dense and tend to absorb more oil, leading to a heavier mouthfeel. Panko is designed to be light and flaky. If you absolutely can’t find panko, try crushing up plain, dry corn flakes very finely—that’s the next best thing for texture, but really, stick with the panko for these Homemade Onion Rings Extra Crispy and Golden!
Nutritional Overview
Now, I’m not a nutritionist—far from it! I’m just focused on making sure these Homemade Onion Rings Extra Crispy and Golden taste amazing. Because these are deep-fried, they definitely fall into the “treat” category, not the “everyday side dish” category. I always try to keep track of what we’re eating, but remember that these figures are just estimates based on the ingredients I used.
When you make them, the exact amount of oil absorbed can change things slightly, so take this chart as a general guide rather than a strict rulebook. Everything in moderation, right? You can see more of our recipe breakdowns on Pinterest.
Estimated Nutritional Data Per Serving
| Nutrient | Amount |
|---|---|
| Calories | 410 |
| Total Fat | 21 g |
| Carbohydrates | 48 g |
| Protein | 9 g |
| Sugar | Unknown |
| Sodium | Unknown |
Disclaimer: The nutritional information provided above is an estimate based on the recipe ingredients and standard serving size. Values for sodium, sugar, and specific fat types were not available and are marked as Unknown.
Share Your Homemade Onion Rings Extra Crispy and Golden Experience
I truly hope you loved making these as much as I love eating them! Seriously, when you pull those golden, crunchy rings out of the oil, it’s such a satisfying moment. I’ve shared all my secrets for getting that perfect crunch and flavor profile, but now I want to hear from you!
Did you nail the 350°F frying temperature on your first try? Did the smoked paprika give your batter that gorgeous color I was talking about? Don’t keep all that success to yourself! If you’re looking for other quick sides, check out our recipe for ranch cucumber rounds.
Please leave a rating below—five stars if you think they’re the best Homemade Onion Rings Extra Crispy and Golden you’ve ever made! And if you ran into any hiccups or maybe even found a clever little trick of your own, drop a comment. Your feedback helps other home cooks succeed, and honestly, I just love hearing about your kitchen adventures!
Print
Foolproof 410 Calorie Homemade Onion Rings Extra Crispy
- Total Time: 35 minutes
- Yield: 4 servings 1x
- Diet: N/A
Description
These homemade onion rings are light, crunchy, and full of flavor with a seasoned batter and crisp coating, perfect as a snack or side dish.
Ingredients
- 2 large yellow onions sliced into 1/2 inch rings
- 1/2 cup all purpose flour for dredging
- 2 cups panko breadcrumbs
- 1 cup neutral frying oil such as canola or vegetable oil
- For the batter:
- 1/2 cup all purpose flour
- 1 cup milk
- 1 large egg
- 1/2 teaspoon brown sugar
- 1 teaspoon garlic powder
- 1 teaspoon onion powder
- 2 teaspoons smoked paprika
- 1/4 teaspoon cayenne pepper
- 1 teaspoon salt
- 1 teaspoon black pepper
Instructions
- Peel the onions and slice into 1/2 inch thick rings, then gently separate the rings and set aside.
- Set up three bowls with flour in the first, the prepared batter in the second, and panko breadcrumbs in the third.
- To make the batter, whisk together flour, milk, egg, brown sugar, garlic powder, onion powder, smoked paprika, cayenne, salt, and black pepper until smooth.
- Dredge each onion ring in flour, dip fully into the batter, then coat evenly with panko breadcrumbs.
- Heat the oil in a wide skillet over medium high heat until it reaches about 350°F.
- Fry the onion rings in batches for 2 to 3 minutes per side until golden brown and crisp.
- Transfer to a paper towel lined plate and season lightly with additional salt if desired.
- Serve hot for best texture and crunch.
Notes
- Serve immediately while hot and crisp for the best flavor and texture.
- Prep Time: 20 minutes
- Cook Time: 15 minutes
- Category: Side Dish
- Method: Frying
- Cuisine: American
Nutrition
- Serving Size: 1 serving
- Calories: 410
- Sugar: Unknown
- Sodium: Unknown
- Fat: 21 g
- Saturated Fat: Unknown
- Unsaturated Fat: Unknown
- Trans Fat: Unknown
- Carbohydrates: 48 g
- Fiber: Unknown
- Protein: 9 g
- Cholesterol: Unknown