homemade chicken pot pie. If you’re like me, Jordan Bell from Asheville, NC, and you’ve navigated the journey of losing 80 pounds, you know that sometimes you just need *real* food. Not diet food, but food that hugs you back! That’s why I started my Easy Detox Recipes blog—to show that clean eating doesn’t mean giving up the soul-soothing flavors of my Southern roots.
Now, I’m not saying this recipe is a detox, but I *am* saying it’s the absolute best version of Southern comfort food you can make quickly. Forget the sad, watery fillings you might remember. We’re making a flaky crust packed with tender chicken and vegetables swimming in the creamiest gravy, and guess what? It’s ready in about an hour! This recipe is designed for those weeknights when you need that familiar, warm hug in a dish without spending half the evening stirring a roux.
Trust me, once you try this, you won’t go back to the frozen stuff. Let’s get baking!
Why You’ll Love This homemade chicken pot pie Recipe
I put everything I know about quick, satisfying meals into this recipe. It’s the perfect answer to a long, tiring day when only classic comfort food will do. You get that rich, savory flavor you crave without any fuss. It really proves that simple ingredients can create something spectacular.
Here’s why this version is going straight into your regular rotation:
- It’s shockingly fast—we’re talking about a full, bubbling pot pie on the table in about an hour!
- The gravy is rich and creamy; it coats every single piece of chicken and vegetable perfectly.
- It’s the best way to use up that leftover chicken you always have sitting in the fridge.
Quick Comfort Food for Busy Nights
Seriously, the total time clocks in right around 65 minutes. That’s faster than most takeout these days! We use refrigerated crusts to save time, so you focus all your energy on making that incredible, thick filling. Preheat the oven, mix the gravy, fill the shell, and bake. It’s that straightforward.
Using Leftover Chicken Wisely
This recipe is built around efficiency. If you’ve got shredded chicken from a roast or a rotisserie bird, you’re already halfway there! It cuts down on prep time dramatically, and it means you’re reducing food waste. Why cook chicken twice when you don’t have to? Just shred it, stir it in, and move on to the gravy.
Gathering Your Ingredients for homemade chicken pot pie
Okay, let’s talk about what you need to pull this magic together. Because we are moving fast, having everything measured out before you start cooking the onions is crucial. When you’re making a roux for gravy, things happen quickly, and you don’t want to be scrambling for the pepper while your butter burns!
I’ve laid out the list below. Pay close attention to the frozen vegetables—you absolutely must thaw those first; otherwise, you end up with soup instead of a thick, creamy filling. Also, make sure your pie crusts are sitting out on the counter while you prep so they are perfectly pliable when it’s time to line the plate. It makes a difference!
Essential Ingredients List
| Ingredient | Amount | Notes |
|---|---|---|
| Refrigerated Pie Crusts | \u00bc cup | Use two crusts, brought to room temperature |
| Butter | \u00bc cup | For starting the gravy base |
| Onion | \u00bc cup | Chopped fine (or use 1.5 Tbsp dried onion) |
| All-Purpose Flour | \u00bc cup | This is the thickener! |
| Salt | \u00bd teaspoon | |
| Black Pepper | \u00bc teaspoon | Freshly ground is always best |
| Poultry Seasoning | 1 teaspoon | Don’t skip this—it adds that classic flavor |
| Chicken Broth or Stock | 1 \u00be cups | Low sodium is usually best |
| Milk (2%) | \u00bd cup | Half-and-half works if you want it richer |
| Cooked, Shredded Chicken | 2 \u00bd cups | Rotisserie chicken is my secret weapon here |
| Frozen Mixed Vegetables | 2 cups | Must be completely thawed before adding |
Equipment Needed for Your homemade chicken pot pie
Before we dive into the cooking, let’s make sure your kitchen is set up for success. Having the right tools ready means you won’t have to stop mid-roux to hunt for a spoon! This recipe is wonderfully simple, but having these specific items on hand makes everything flow smoothly, especially when dealing with that hot gravy.
Key Tools for Success
- A standard 9-inch pie plate for baking.
- A sturdy medium saucepan for building that creamy gravy base.
- A reliable whisk—this is essential for getting rid of lumps!
- A sharp knife for prepping your onions (if you aren’t using dried).
- A cutting board and a bowl for mixing your filling ingredients.
Step-by-Step Instructions for homemade chicken pot pie
This is where the magic happens! Since we’re using store-bought crusts, we get to dedicate all our attention to making that gravy taste like it simmered all day. Remember, timing is everything when you’re working with butter and flour, so stay near the stove once you start the roux.
Preparing the Crust and Oven
First things first, get your oven cranked up to 425\u00b0F. You want it nice and hot when this pie goes in. Now, take one of those refrigerated pie crusts and gently press it into your 9-inch pie plate. Don’t stretch it; just ease it into the corners. Set that plate aside while you focus on the filling. If you haven’t already, make sure that chicken is shredded and those mixed vegetables are completely thawed out. Seriously, no shortcuts on the thawing step!
Building the Creamy Gravy Base
Head to the stove and melt that butter in a medium saucepan over medium heat. Toss in your chopped onion—if you’re using dried onion, save it for the next step. Cook those onions for about two minutes until they just start to look soft and smell sweet. Now, here comes the thickening part! Whisk in your flour, salt, black pepper, and all that wonderful poultry seasoning. Keep whisking until that mixture looks thick; it’s forming a paste, which is perfect. Next, add your liquid slowly! Pour in the chicken broth gradually, followed by the milk, whisking constantly so you don’t get any lumps. Keep stirring until the gravy comes to a good boil and gets thick and bubbly. That’s your base, folks!
Combining Filling and Assembling the homemade chicken pot pie
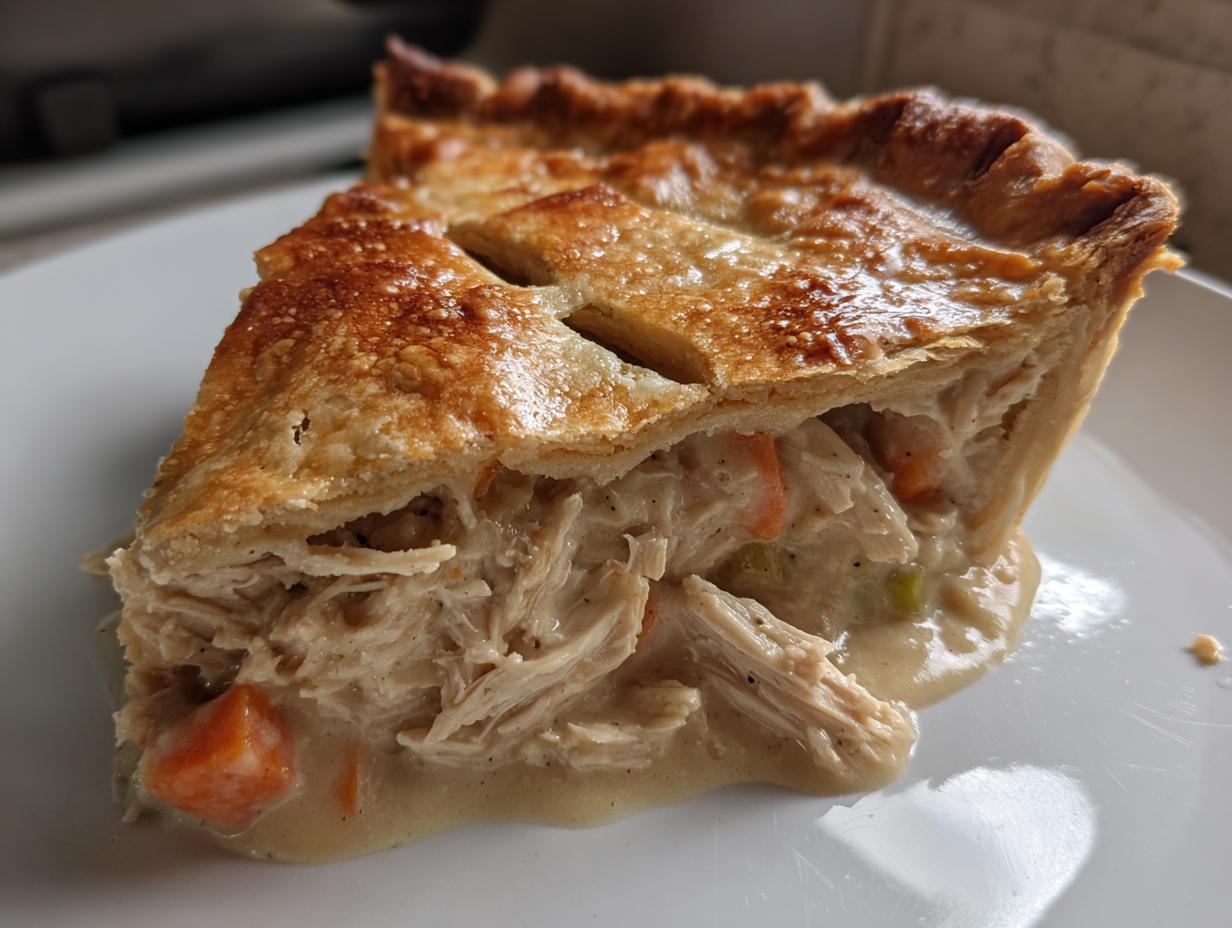
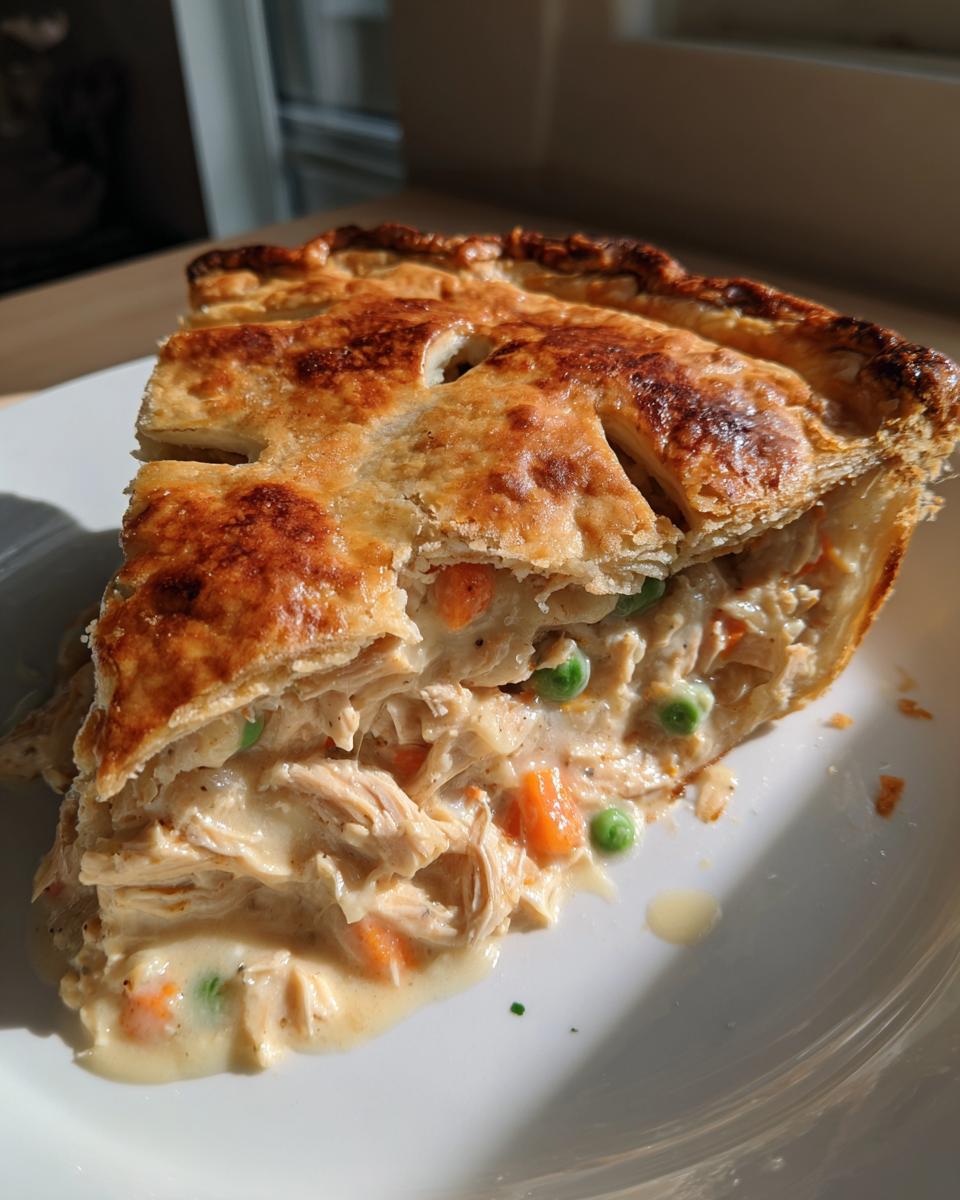
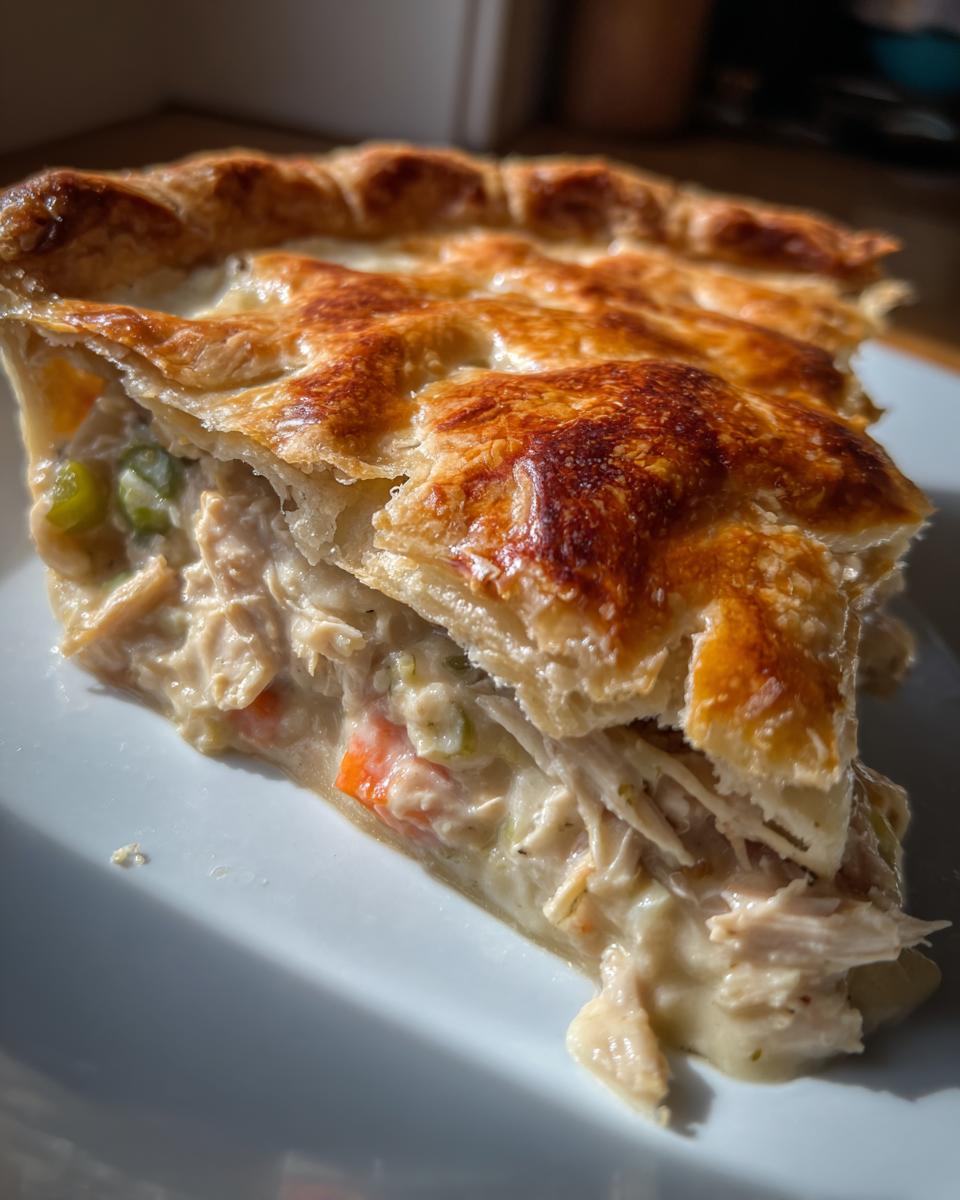
Take that beautiful gravy off the heat immediately. Now, stir in your 2 1/2 cups of shredded chicken and those 2 cups of thawed vegetables. Give it a good fold to make sure everything is coated evenly. Pour this warm, savory mixture right into your bottom crust. Time for the lid! Place that second pie crust over the top. Now, you need to seal the edges tightly—crimp them with a fork or your fingers to make sure no gravy escapes while it bakes. Finally, grab a knife and cut several slits right in the center of the top crust. These vents let the steam escape so your crust stays flaky, not soggy.
Baking and Resting for Perfect Slices
Slide that pie into the hot oven. You’ll bake it for 30 to 40 minutes total. But here’s a pro move: after about 15 or 20 minutes, check the edges. If they are starting to get too brown or look like they might burn, just take a small strip of aluminum foil and drape it loosely over the edges. This shields the crust while the center finishes baking. Once the crust is golden brown all over, pull it out. Don’t cut it right away! You absolutely must let it stand for 5 minutes before slicing. This resting time lets the gravy set up so it doesn’t run all over your plate when you cut into it.
Tips for Perfect homemade chicken pot pie Results
Even though this recipe is super straightforward, those little details are what separate a good pot pie from an *amazing* one. I’ve learned a few tricks over the years, mostly through trial and error (and one very soggy bottom crust incident!), that I want to make sure you avoid. A great homemade chicken pot pie should be sturdy, savory, and perfectly golden.
If you follow these few extra steps, I promise your pie will look and taste like you spent all day on it, even though we know you were done in about an hour!
Preventing a Watery Filling
This is the number one enemy of a great pot pie! You have to make sure those frozen mixed vegetables are absolutely, completely thawed before they go into your gravy. If they are even slightly icy, they release cold water when they hit the heat, which thins out your beautifully thickened roux. Take them out early, spread them on a plate, and let them come totally to room temperature. It’s a small step, but it keeps your gravy thick and luxurious.
Achieving Golden, Unburnt Edges
That beautiful golden brown crust is what everyone notices first, right? The edges always cook faster than the center, so you need to protect them. After the first 15 to 20 minutes of baking, watch those edges closely. If they start looking too dark, just fashion a little ring out of aluminum foil or use a dedicated pie shield and gently place it over the rim of the crust. This lets the center keep baking without turning your edges black. You can also crimp those edges really tightly—a tight seal helps keep everything contained and flaky.
Ensuring Proper Internal Temperature
Since we are using pre-cooked chicken, this is mostly a safety check, but it’s one I never skip. You want to make sure everything is piping hot all the way through. If you’re nervous, grab a quick-read thermometer and just stick it into one of those steam vents you cut. We need that chicken to hit a safe internal temperature of 165\u00b0F. It’s just one last little check for peace of mind!
Frequently Asked Questions about Your Chicken Pot Pie
I get so many questions about adapting this recipe, especially since everyone has different schedules and leftover situations! It’s flexible, but there are a few keys to keeping that homemade chicken pot pie tasting exactly how it should—rich and comforting. Don’t worry if you need to make it work for your schedule; that’s what I do too!
Can I make this homemade chicken pot pie ahead of time
You absolutely can! If you want to assemble the whole thing—crusts, filling, everything—you can cover it tightly with plastic wrap and stick it in the fridge for up to a day. When you’re ready to bake, pull it out about 30 minutes ahead of time to let it warm up slightly before putting it in the hot oven. For longer storage, you can freeze the whole assembled pie! Just make sure it’s wrapped really well in plastic wrap and then foil. You’ll need to add about 20 minutes to the bake time if going straight from the freezer.
What other cooked chicken can I use
This recipe thrives on cooked chicken, which is why I always push using leftovers! Rotisserie chicken is my go-to because it’s already seasoned and super tender. But don’t feel limited—if you have leftover roasted turkey from a holiday, that works just as beautifully in this savory filling. Just make sure whatever you use is already cooked and shredded into bite-sized pieces before you mix it in.
How do I ensure the bottom crust cooks through
This is a classic problem with deep-dish pies! If you notice your edges are golden but the bottom seems pale, try this trick: place your pie plate on a preheated baking sheet or even a pizza stone before you put it in the oven. The direct, intense heat from the bottom of the sheet helps cook the bottom crust faster. You can also try moving the pie to a lower rack in your oven for the last 10 minutes of baking, just watch those edges closely!
Storing and Reheating Leftover homemade chicken pot pie
When you manage to have leftovers of this amazing homemade chicken pot pie—which is a feat in itself!—you want to make sure you store it correctly so it tastes just as good the next day. I always make sure to let the slices cool down a bit before I cover them up. Nobody wants condensation turning their flaky crust soggy overnight!
It reheats beautifully, and honestly, sometimes I think the flavors meld together even better the second time around. Here are the quick guidelines for keeping your comfort food safe and delicious.
Storage Guidelines
When storing, make sure you cover the pie tightly. You can use plastic wrap or an airtight container, but make sure it’s sealed well to keep out any fridge smells. It stays great in the refrigerator for up to three days. If you have a lot left over, you can freeze the whole pie! Wrap it securely in plastic wrap first, then cover it again with heavy-duty aluminum foil. It freezes well for about three months, which is perfect for pulling out on a random Tuesday!
| Storage Method | Duration | Notes |
|---|---|---|
| Refrigerated (Covered) | Up to 3 days | Must be fully cooled before covering |
| Frozen (Well Wrapped) | Up to 3 months | Bake longer if reheating from frozen |
Reheating Instructions
When you’re ready to enjoy those leftovers, skip the microwave if you can—we worked hard for that flaky crust! Pop the slices onto a baking sheet or back into a pie plate. Reheat them in a moderate oven set to 350\u00b0F. Give it about 20 to 25 minutes, or until the filling is bubbling hot all the way through. If you’re reheating a whole frozen pie, you’ll need to add more time, maybe closer to 45 minutes, but always check that internal temperature!
Sharing Your homemade chicken pot pie Experience
Now that you’ve seen how simple it is to get this classic Southern dish on your table fast, I’d love to know what you think! Did you use leftover turkey instead of chicken? Did you sneak in extra carrots? Drop a note below and tell me how your homemade chicken pot pie turned out. Happy cooking, friends!
Print
5 Amazing homemade chicken pot pie Tips
- Total Time: 1 hour 5 minutes
- Yield: 6 servings 1x
- Diet: N/A
Description
Flaky crust homemade chicken pot pie with tender chicken, veggies, and creamy gravy—comfort food ready in 65 minutes using leftover chicken for busy weeknights. This recipe makes classic comfort food simple.
Ingredients
- 1 box refrigerated pie crusts (14.1 oz), at room temperature
- ¼ cup butter
- ¼ cup chopped onion (or 1.5 Tbsp dried onion)
- ¼ cup all-purpose flour
- ½ teaspoon salt
- ¼ teaspoon black pepper
- 1 teaspoon poultry seasoning
- 1 ¾ cups chicken broth or stock
- ½ cup milk (2%)
- 2 ½ cups cooked, shredded chicken
- 2 cups frozen mixed vegetables, thawed
Instructions
- Preheat oven to 425°F. Press one pie crust into a 9-inch pie plate; set aside.
- Cook and shred chicken if not already prepared.
- Melt butter in medium saucepan over medium heat. Add chopped onion; cook 2 minutes until tender, stirring often.
- Whisk in flour, salt, pepper, and poultry seasoning; mixture will thicken.
- Gradually whisk in milk and chicken broth; cook until thick and bubbly, stirring constantly.
- Stir in shredded chicken and thawed mixed vegetables; remove from heat.
- Pour filling into bottom crust. Top with second crust; seal edges and cut several slits in top.
- Bake 30-40 minutes until crust is golden brown. Cover crust edges with foil strips after 15-20 minutes to prevent burning.
- Let stand 5 minutes before slicing and serving.
- Ensure chicken is heated to safe internal temperature of 165°F.
Notes
- Use rotisserie chicken or leftover turkey for shredded chicken.
- Swap frozen mixed vegetables for peas and carrots only.
- Replace onion with 1.5 Tbsp dried minced onion.
- Use half-and-half instead of milk for richer gravy.
- Make mini pot pies in muffin tins for portions.
- Thaw vegetables completely to prevent watery filling.
- Crimp edges tightly for best seal and flakiness.
- Use pie shield or foil rings to protect crust edges.
- Let rest fully before cutting for clean slices.
- Store leftovers covered in fridge up to 3 days.
- Freeze whole pie up to 3 months.
- Reheat in 350°F oven 20-25 minutes until hot.
- Prep Time: 25 minutes
- Cook Time: 40 minutes
- Category: Dinner
- Method: Baking
- Cuisine: American
Nutrition
- Serving Size: 1 serving
- Calories: 480
- Sugar: N/A
- Sodium: N/A
- Fat: 25g
- Saturated Fat: N/A
- Unsaturated Fat: N/A
- Trans Fat: N/A
- Carbohydrates: 40g
- Fiber: N/A
- Protein: 25g
- Cholesterol: N/A