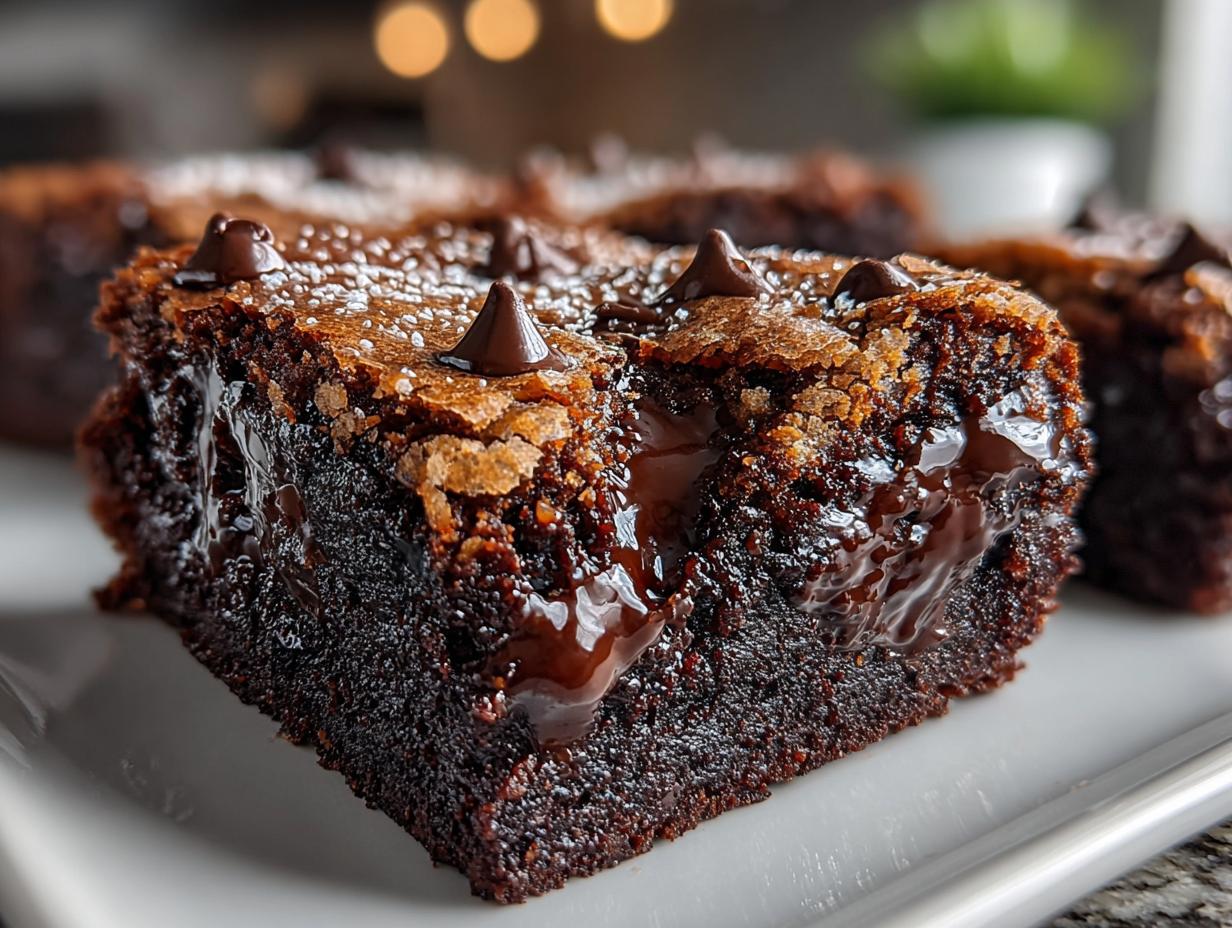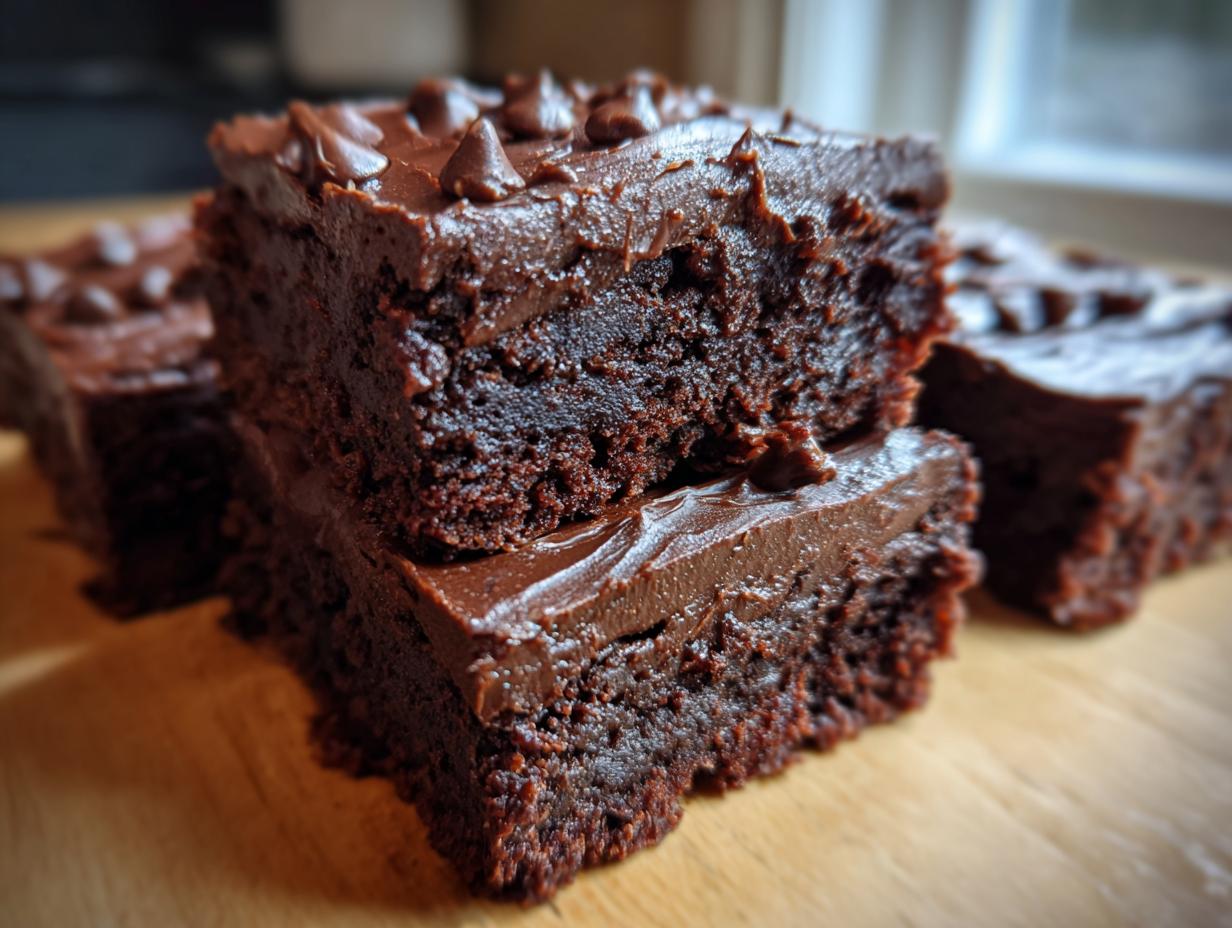
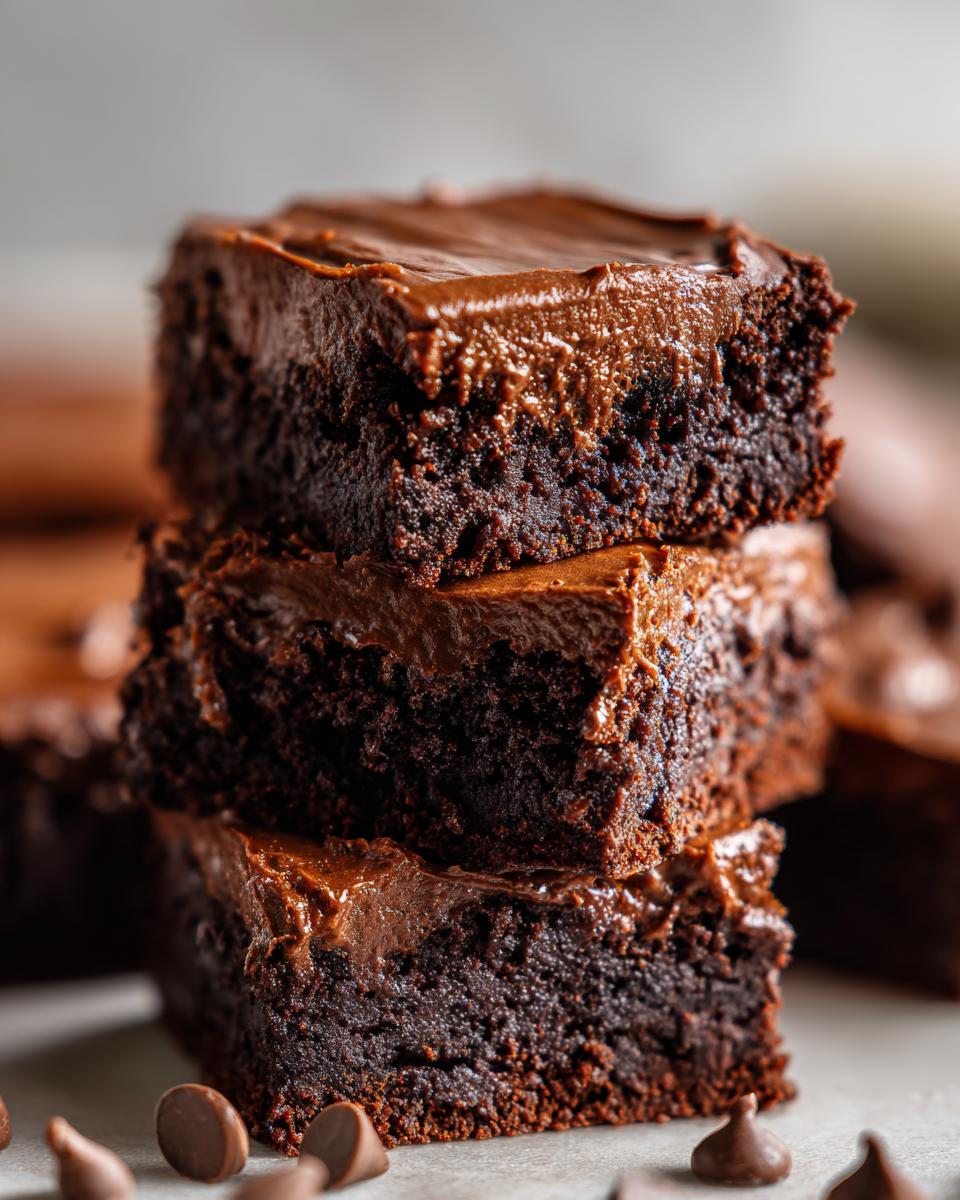
If you think going gluten free means sacrificing that deep, intensely chocolatey experience, you are completely wrong! I’m here to tell you that these gluten free fudge brownies are not just good for being gluten free—they are genuinely the fudgiest, chewiest brownies I have ever made, period. Seriously, the texture is almost unreal.
I spent years messing around with different rice flours and gums, trying to get that perfect density without that weird gritty texture that plagues so many gluten free baked goods. Oops! But with this recipe, using almond flour instead of traditional flour changes everything. It keeps the moisture locked right in. When you pull these out of the oven, they look dense, they smell incredible, and I promise you, they will become your new standard for what a perfect brownie should be.
The secret weapon, besides the almond flour, is definitely that smooth chocolate almond frosting we top them with. It sets up perfectly and adds that final, rich layer of decadence. Trust me on this one; you won’t miss the wheat one bit!
Essential Ingredients for Perfect Gluten Free Brownies
Okay, now that you’re convinced these are the best brownies ever, let’s talk about what actually goes into them. Because we’re skipping the wheat flour, the quality of our supporting cast—the almond flour, the chocolate, and the fats—becomes super important. If you skimp here, you won’t get that amazing, dense, fudgy result we’re aiming for. I always lay everything out before I start mixing; it saves so much hassle later!
You’ll notice we use coconut sugar instead of plain white sugar. It adds a deeper, almost caramel note that complements the dark chocolate beautifully. It’s these little choices that elevate a simple recipe into something special. Check out these dark chocolate nut bars for another rich treat!
| Component | Purpose |
|---|---|
| Almond Flour | Moisture and structure |
| Dark Chocolate (60-72%) | Deep, rich flavor base |
| Coconut Oil | Creates that signature chew |
| Eggs | Binding agent |
Understanding Your Dry Components for Gluten Free Brownies
The dryness comes from the almond flour, but don’t panic! Almond flour behaves totally differently than regular all-purpose flour. It doesn’t develop gluten, which is great for us, but it means we have to be precise with our ratios. We only use a little bit, mixed with the cocoa powder. Too much dry stuff, and you get a crumbly mess. Too little, and it won’t set right. The cocoa powder has to be good quality too; it’s doing a lot of the heavy lifting for that intense chocolate punch!
Selecting Chocolate and Fats
This is non-negotiable: use good dark chocolate. I prefer between 60% and 72% cacao. If you go too high, the brownies can taste bitter, and if you go too low (like standard milk chocolate), they just aren’t fudgy enough. And please, use real coconut oil! It melts beautifully with the chocolate, and when it cools, it helps give the brownie that perfect, slightly firm, chewy edge. Margarine just won’t cut it here; it changes the whole mouthfeel.
Required Equipment List
You don’t need a huge stand mixer for this recipe, which is a bonus! Make sure you have your 8×8-inch pan ready to go—lining it with parchment paper that hangs over the sides is a lifesaver for lifting the whole brick out later. I always grab two bowls: one small one for the dry stuff and a bigger one for melting the chocolate. A sturdy rubber spatula is also essential for gently folding everything together at the end without knocking out all the air.
Step-by-Step Instructions: Making Your Gluten Free Brownies
Alright, let’s get baking! This part goes fast, so make sure you have everything measured out before you turn the oven on. First things first: set your oven to 350 degrees Fahrenheit. Then, take that 8×8 pan and line it with parchment paper. I always leave two long strips hanging over the sides—this creates little handles so you can just lift the whole cooled brownie out later. Give the parchment a quick, light grease just to be safe; we don’t want any sticking!
Mixing the Base Batter
Time to tackle the dry ingredients. In a medium bowl, whisk together that almond flour, salt, and cocoa powder. You want it super uniform so you don’t get pockets of straight cocoa later. Set that aside.
Now for the magic—the chocolate melt! Take your 6 ounces of chopped dark chocolate and the coconut oil. I usually microwave this in 30-second bursts, stirring well between each one. It melts really fast, so watch it closely so it doesn’t seize up on you. Once it’s smooth as silk, whisk in the coconut sugar until everything is combined. Let this mixture cool down just a touch—we don’t want scrambled eggs!
Once slightly cooled, add your room temperature eggs, one at a time, whisking gently after each addition just until it blends in. Then, stir in your vanilla extract. Finally, grab your spatula and gently fold in the dry flour/cocoa mixture until you see no more white streaks. Don’t overmix! Seriously, folding is key here. Once it’s just combined, toss in those mini chocolate chips and fold them in a final time. Spread that gorgeous batter evenly into your prepared pan.
Baking the Gluten Free Brownies Correctly
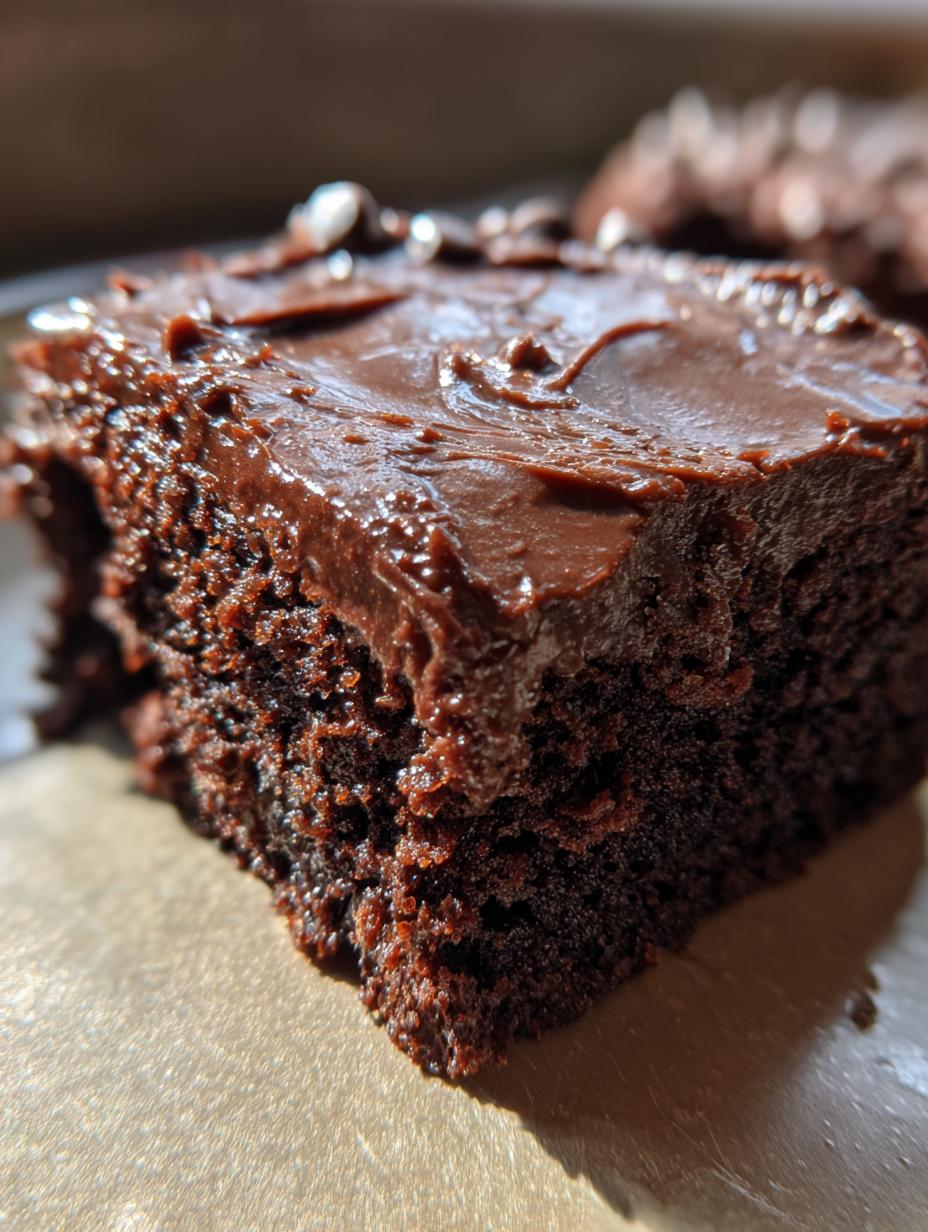
Pop the pan into the preheated oven. The recipe says 28 to 32 minutes, but you have to watch them closely. Gluten free baked goods can go from perfect to dry in about 60 seconds flat! You are looking for the toothpick test, but here’s my trick: stick a toothpick right in the center. You want it to come out with moist, sticky crumbs attached—not wet batter, but definitely not bone dry. If it’s totally clean, you’ve overbaked them, but don’t sweat it; they’ll still be tasty!
Once they pass the test, pull them out immediately and let them cool completely in the pan on a wire rack. This is the hardest part, but it’s crucial for that chewy texture. If you try to frost them warm, you’ll have chocolate soup!
Crafting the Smooth Chocolate Almond Frosting
While they are cooling, whip up the frosting. This is so easy. In a small saucepan over very low heat—I mean barely even simmering—melt the remaining 2 ounces of dark chocolate, the almond butter, and the last bit of coconut oil. Stir constantly until it’s totally smooth. Take it off the heat and quickly whisk in the almond milk and vanilla extract until it looks glossy. It thickens up fast, so work quickly!
Assembly and Setting Time
Once those brownies are totally cool—I mean stone cold—use those parchment handles to lift them out of the pan onto your cutting board. Spread that lovely chocolate almond frosting evenly over the top. It sets up nicely, but you need patience! Pop the whole thing into the fridge for about 20 minutes to let the frosting firm up. Then, use a really sharp knife—I sometimes dip it in hot water and wipe it dry between cuts—to slice them into 16 squares. That sharp knife prevents the frosting from cracking when you cut through!
Tips for Success with Gluten Free Brownies
Look, even the best recipes can go sideways if you rush the final steps, especially with gluten free baking where the structure relies so much on fat and binding agents. I’ve learned a few tricks over the years to make sure these turn out fudgy every single time, not dry or crumbly. The goal is chewy edges and a gooey center, right?
Don’t worry if your batter looks a little thick when you fold everything together; that’s normal! It should look dense, not runny like pancake batter. The key to success is respecting the cooling time—it’s just as important as the baking time itself. Follow more baking tips on Pinterest!
Avoiding Dryness in Your Gluten Free Brownies
This is my number one rule for any brownie, but especially for almond flour brownies: do not overmix once the dry ingredients hit the wet ones! As soon as you see those last streaks of almond flour disappear, stop mixing immediately. Overmixing develops whatever little structure there is and can make the almond flour feel heavy and dry out during baking. You’re just trying to incorporate, not beat air into it like you might with a standard cake batter. Be gentle; those chocolate chips need a soft landing!
Achieving Clean Cuts
Cutting these perfectly chilled brownies can be a battle if you use a dull knife! After they’ve set up in the fridge, grab your sharpest chef’s knife. Here’s the trick I learned from making fudge: dip the knife into a tall glass of very hot water, wipe it completely dry with a towel, and then make your first cut. Wipe it clean and reheat it for the next slice. That hot blade glides right through the chilled frosting and the dense brownie base without tearing or smearing. It makes such a difference in presentation!
Variations for Your Gluten Free Brownies
While I absolutely adore this base recipe exactly as written—it’s perfect!—I know home cooks love to customize things a little. Since we are using almond flour, we have to be careful not to add too much extra weight, but a few clean swaps work beautifully.
If you want a little crunch, try folding in half a cup of chopped walnuts or pecans right along with the chocolate chips. They toast up nicely in the oven. Another fun trick is changing up the extract. If you don’t have vanilla, a tiny dash of almond extract (maybe half a teaspoon) really enhances the almond flour flavor profile. Or, for a little coffee kick that deepens the chocolate, stir a teaspoon of instant espresso powder into the dry ingredients. It won’t taste like coffee, trust me, it just makes the chocolate taste more intense! You can see more recipe ideas on Medium.
Storing and Reheating Your Gluten Free Brownies
These brownies are so rich, and honestly, they taste even better the next day once the flavors have really settled in. Because we used coconut oil and no wheat, they stay wonderfully chewy for days. The key is treating them right immediately after you cut them!
You want to keep them airtight. If you plan on eating them within three days, room temperature storage in a sealed container works perfectly fine. If you need them to last longer, the fridge is your friend. They firm up a bit when chilled, which is great if you like a really dense bite, but don’t worry about reheating if you go that route.
A quick zap in the microwave brings the fudginess right back. Just put a square on a plate for about 10 to 15 seconds, and it will soften up beautifully. Here’s how I keep track of leftovers:
| Storage Location | Maximum Freshness |
|---|---|
| Airtight Container (Room Temp) | Up to 3 days |
| Airtight Container (Refrigerated) | Up to 1 week |
Frequently Asked Questions About Gluten Free Brownies
I get tons of emails asking about substitutions and timing, which is totally fine! Baking without gluten sometimes requires a little extra know-how. Here are the things I hear most often about making sure these gluten free fudge brownies turn out perfect every time.
Can I substitute the almond flour in this gluten free fudge brownies recipe?
That’s the big question, isn’t it? Honestly, the almond flour is essential here because it brings fat and protein, which keeps the brownies incredibly moist and dense. It acts like a natural binder. If you absolutely cannot use almond flour, you could try an equal amount of finely ground hazelnut flour, which behaves similarly due to its fat content. However, please skip oat flour or rice flour mixes; they don’t have the necessary fat and will result in a much drier, cakier texture. Stick to nut flours if you can! If you are looking for a keto option, check out these brownies.
How do I know when my brownies are fully baked?
This is where people go wrong and end up with dry brownies! Forget the clock; you must trust the toothpick test. When you insert a toothpick into the very center, you do not want it to come out clean. If it’s clean, they are overbaked! You are looking for a few moist, fudgy crumbs clinging to the toothpick. If you see wet batter, they need a few more minutes. It’s that delicate balance between set and gooey that makes these so good.
Is the chocolate almond frosting necessary?
Necessary? Well, you can certainly eat the brownies plain—they are delicious on their own! But the frosting really takes them to the next level. The base brownie is soft and chewy, and the frosting, once set, adds a slightly firmer, intensely smooth layer on top. It provides a lovely textural contrast. Plus, the almond butter in the frosting really deepens that nutty, chocolate flavor profile we worked so hard to achieve in the base batter! Try these Greek yogurt blueberry protein muffins for a different kind of treat.
Estimated Nutritional Data for Gluten Free Brownies
Nobody bakes for the nutrition facts, right? Especially when chocolate is involved! But just so you have a general idea, here is the breakdown based on the ingredients listed in this recipe. Remember, this is just an estimate since exact sugar content depends on the cacao percentage you choose for your dark chocolate. Treat these numbers as a fun guideline rather than strict dietary information.
| Nutrient | Amount (Per Brownie) |
|---|---|
| Calories | 250 |
| Fat | 18 g |
| Carbohydrates | 18 g |
| Protein | 5 g |
Share Your Gluten Free Brownies Experience
I really hope these rich, fudgy brownies become a staple in your kitchen like they are in mine! I’m so proud of how chewy and chocolatey they turned out without any wheat. Now I really want to know what you think!
Did you try the chocolate almond frosting? Did you add walnuts? Give these amazing gluten free fudge brownies a rating from one to five stars above, and please drop a comment below telling me how they turned out for you. Happy baking!
Print
Fudgy gluten free fudge brownies: 16 secrets
- Total Time: 40 minutes
- Yield: 16 brownies 1x
- Diet: Gluten Free
Description
Rich, fudgy gluten free brownies with a smooth chocolate almond frosting. Easy to make, deeply chocolaty, and perfectly chewy for any dessert lover.
Ingredients
- ⅜ cup blanched almond flour
- ½ teaspoon fine sea salt
- 2 tablespoons unsweetened cocoa powder
- 6 ounces dark chocolate, 60–72% cacao, chopped
- ½ cup coconut oil
- ¾ cup coconut sugar
- 2 large eggs, at room temperature
- 1 teaspoon pure vanilla extract
- ½ cup dairy-free mini chocolate chips
- 2 ounces dark chocolate, chopped (for frosting)
- 3 tablespoons almond butter (for frosting)
- 1 tablespoon coconut oil (for frosting)
- 2 tablespoons unsweetened almond milk (for frosting)
- 1 teaspoon pure vanilla extract (for frosting)
Instructions
- Preheat oven to 350°F. Line an 8×8-inch baking pan with parchment paper and lightly grease it.
- In a medium bowl, whisk almond flour, salt, and cocoa powder until evenly combined.
- In a large heat-safe bowl, melt chopped dark chocolate and coconut oil together using 30-second microwave bursts or a double boiler, stirring until smooth.
- Whisk in coconut sugar until fully incorporated and slightly cooled.
- Add eggs one at a time, whisking gently until just blended. Stir in vanilla extract.
- Fold the dry ingredients into the chocolate mixture using a rubber spatula until no streaks remain.
- Fold in mini chocolate chips. Spread the batter evenly in the prepared pan.
- Bake for 28–32 minutes or until a toothpick inserted in the center comes out with moist crumbs. Do not overbake.
- Cool brownies completely in the pan on a wire rack.
- For the frosting, melt dark chocolate, almond butter, and coconut oil in a small saucepan over low heat, stirring until smooth. Whisk in almond milk and vanilla until glossy.
- Spread frosting over cooled brownies. Refrigerate 20 minutes to set before cutting into 16 squares with a sharp knife.
- Store brownies in an airtight container at room temperature up to 3 days or refrigerate up to 1 week.
Notes
- Store brownies in an airtight container at room temperature up to 3 days or refrigerate up to 1 week.
- Prep Time: 10 minutes
- Cook Time: 30 minutes
- Category: Dessert
- Method: Baking
- Cuisine: American
Nutrition
- Serving Size: 1 brownie
- Calories: 250
- Sugar: Unknown
- Sodium: Unknown
- Fat: 18 g
- Saturated Fat: Unknown
- Unsaturated Fat: Unknown
- Trans Fat: Unknown
- Carbohydrates: 18 g
- Fiber: Unknown
- Protein: 5 g
- Cholesterol: Unknown