Oh my goodness, are you ready for the coziest dessert you can possibly make in under an hour? Seriously, forget fussy pies and complicated pastry work. When I need something truly comforting, something that smells like autumn exploded in my kitchen, I turn straight to my recipe for the Easy Gluten Free Apple Crisp with Oat Topping. I’ve been perfecting these simple baked fruit desserts for years, especially since my family started needing gluten-free options, and this one is an absolute winner.
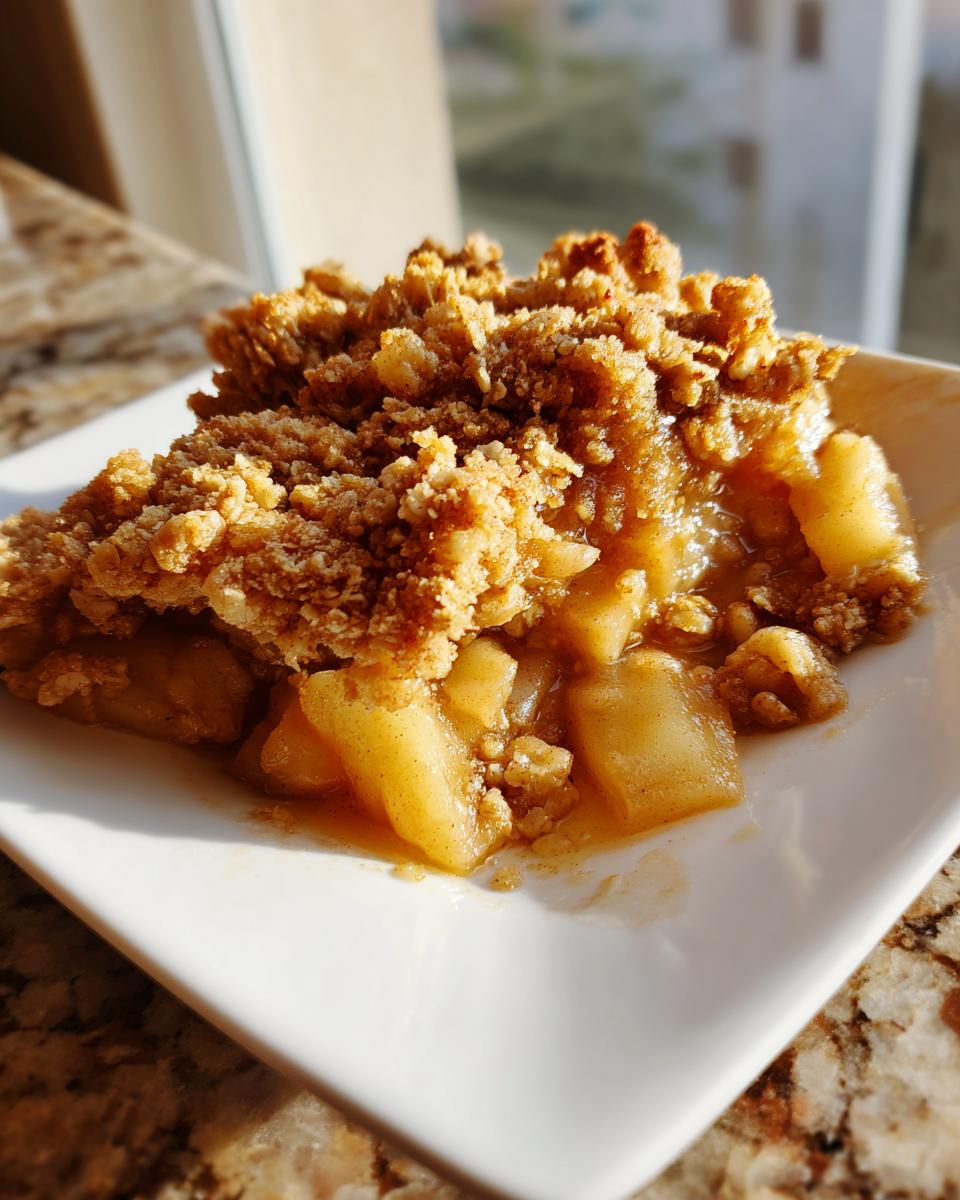
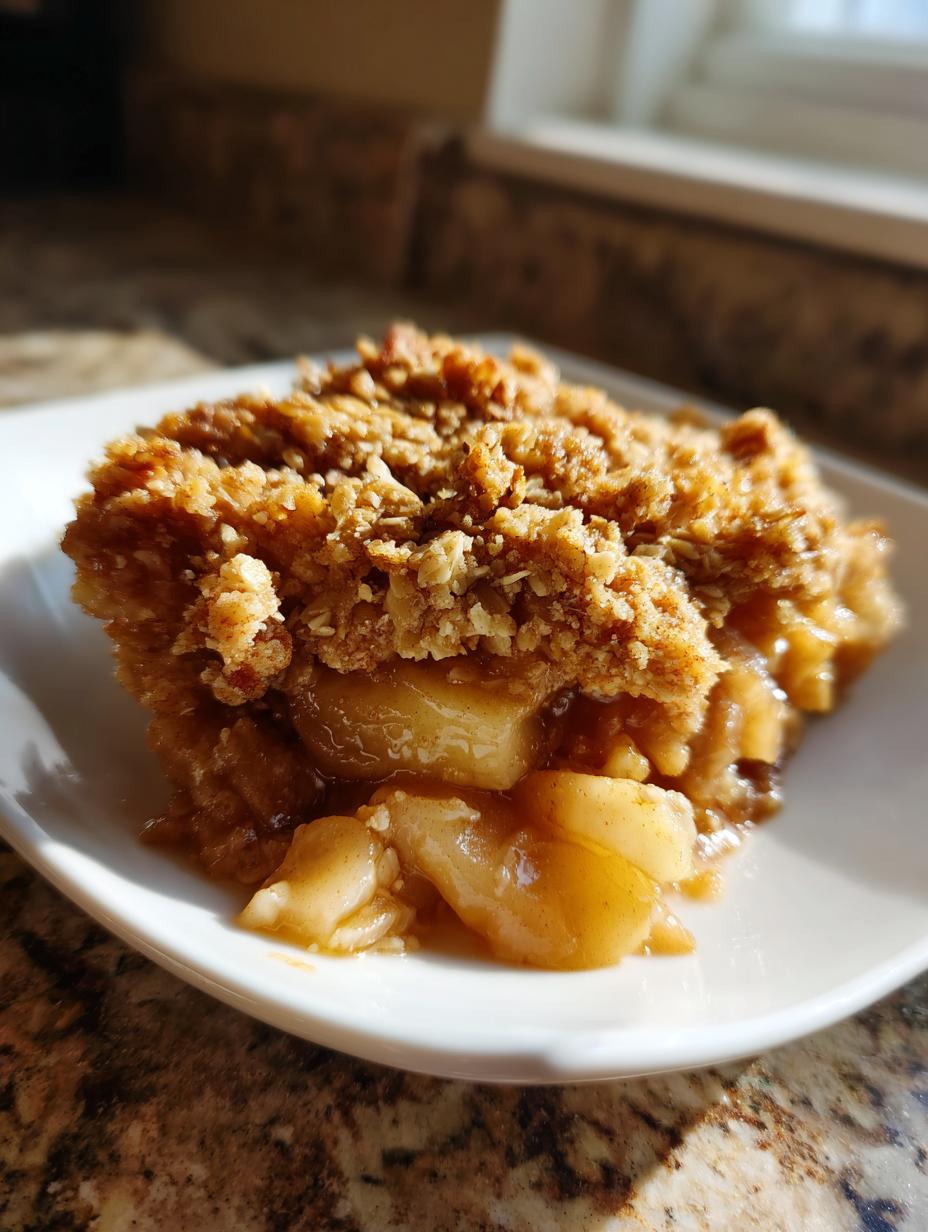
It bakes up beautifully—tender apples swimming in cinnamon sauce under this rich, buttery crunch. It’s proof that baking gluten-free doesn’t mean sacrificing texture or flavor. Trust me, you’re going to want to make this Easy Gluten Free Apple Crisp with Oat Topping every single week.
Gathering Your Ingredients for Easy Gluten Free Apple Crisp with Oat Topping
Alright, let’s talk ingredients! Because we are making this Easy Gluten Free Apple Crisp with Oat Topping, the quality of your gluten-free components really matters. Don’t just grab any ‘all-purpose’ flour; you absolutely need one that lists xanthan gum right there in the ingredients list. That little bit of gum is what gives our crisp that structure it needs, especially since we aren’t using traditional wheat flour.
Don’t stress about the measurements—they are all straightforward. We need a good balance of apples, rich butter, and just the right amount of sugar to make sure the filling caramelizes nicely without getting too runny. Keep everything measured out before you start mixing; it keeps the process smooth!
Apple Filling Components
For the apples, you want about four cups, peeled and chopped into chunks that aren’t too tiny. We melt that butter first, which helps coat the apples before we add the dry stuff. That gluten-free flour acts as a little thickener once things start bubbling up. And make sure you have your vanilla and lemon juice ready; those little additions really brighten up the cinnamon flavor!
Oat Topping Ingredients
This is where the magic lives! You need quick oats—the regular rolled ones can sometimes bake up too tough, but the quick ones soften just right. Again, make sure your GF flour blend is handy. The baking powder is my secret weapon here; it gives the topping just a tiny bit of lift so it’s crumbly and light, not dense like a brick. Remember, all your topping ingredients go into one bowl before we chill them!
Essential Equipment for Your Easy Gluten Free Apple Crisp with Oat Topping
You don’t need a million gadgets for this recipe, which is part of why I love it so much! For this Easy Gluten Free Apple Crisp with Oat Topping, you’ll need a couple of mixing bowls—one medium for the topping and a large one for the apples. A sturdy fork is essential for making those lovely, chunky crumbs for the topping.
The most important piece is your baking dish. I always use an 8 by 8 inch square dish. If you use something much deeper, like a casserole dish, the apples won’t cook through properly by the time the topping is golden brown. Make sure you grease it lightly before you do anything else!
Preparing the Oat Topping First
This is the step where I show off a little bit of my baking wisdom, so listen up! We always make the topping first, even though it goes on last. Why? Because that buttery oat mixture needs to get nice and cold in the fridge while we mess around with the apples. Chilling the topping is non-negotiable if you want that perfect, slightly sandy, chunky texture.
If you just sprinkle room-temperature topping on warm apples, the butter melts too fast in the oven, and you end up with one big, greasy oat sheet instead of a glorious crisp. A few minutes in the refrigerator firms everything up, ensuring we get those lovely pockets of crunch we are aiming for. It’s a pro move that takes zero extra effort!
Combining the Crisp Topping Mix
Grab your medium bowl and toss in all those dry topping ingredients: the GF flour, quick oats, brown sugar, baking powder, cinnamon, and salt. Give that a good whisk just to wake everything up. Then, cut in your cold, cubed butter. Use a fork or your fingertips—whatever you prefer—and work that butter into the dry mix until you see crumbs that look like coarse sand mixed with some pea-sized chunks of butter. That’s the texture you want! Pop that bowl into the fridge immediately.
Constructing the Apple Filling for Easy Gluten Free Apple Crisp with Oat Topping
Now that our topping is chilling out, we can focus on the star of the show: those lovely cinnamon apples! Grab your biggest mixing bowl for this part. Dump in all your chopped apples—make sure they are roughly the same size so they bake evenly. Next, drizzle over that melted butter. I like to toss the apples lightly in the butter first before adding the sugar and spices.
Here’s where you need to pay attention: add the brown sugar, the GF flour, cinnamon, salt, lemon juice, milk, and vanilla. Now, get in there and stir! You need to coat every single apple chunk thoroughly. Don’t be shy with the stirring, but you don’t want to mash the apples into applesauce either. You want to see that light brown sugar mixture clinging to every piece. This coating is what creates that gorgeous, thick sauce at the bottom of the dish when it bakes. This step really sets the foundation for a perfect Easy Gluten Free Apple Crisp with Oat Topping!
Assembling and Baking Your Easy Gluten Free Apple Crisp with Oat Topping
Okay, assembly time! First things first, make sure your oven is fully preheated to 375 degrees F. I always give my 8×8 dish a quick spray of cooking oil or a little smear of butter, just for extra insurance, even though we did coat it earlier. You don’t want your beautiful dessert sticking!
Take your apple mixture—which should look glossy and fragrant—and scrape it evenly into your prepared dish. Spread it out so it’s a nice, flat layer. Now, retrieve that chilled topping from the fridge. This is the most satisfying part! Sprinkle that cold, buttery oat mixture evenly over the top of the apples. Don’t press it down! You want it loose and chunky so it can bake up crisp.
Slide that dish right into the hot oven. The baking time is usually around 30 to 35 minutes, but honestly, you’ll know it’s done before the timer goes off. About twenty minutes in, the kitchen starts smelling incredible—that mix of warm cinnamon, baked oats, and sweet apples is my absolute favorite smell in the world. It’s the smell of home, really. That’s when you start watching closely for the signs that your Easy Gluten Free Apple Crisp with Oat Topping is ready.
Once it comes out, resist the urge to dive in immediately! It needs about five to ten minutes to cool down. If you cut it too soon, the filling will run everywhere, and you won’t get that sturdy, cozy spoonful you deserve.
Achieving the Perfect Bake Time and Look
You aren’t looking for a dry top; you are looking for color and movement! When you peek through the oven door, the topping should be a deep, rich golden brown—not pale, but not burnt either. More importantly, look at the edges of the dish. You should see the apple filling actively bubbling up around the sides. That bubbling means the apples are tender and the juices have thickened up nicely. If you see that thick, bubbly edge and that gorgeous golden crust, pull it out! That’s the visual cue that tells you this Easy Gluten Free Apple Crisp with Oat Topping is ready to serve warm.
Ingredient Notes and Substitution Clarity
I know dealing with gluten-free flours can feel like a guessing game, but for this recipe, we have to be specific. Please, please use a 1-to-1 GF blend that already includes xanthan gum. If your blend doesn’t have it, you’ll need to add about half a teaspoon yourself, or the topping and the filling will just fall apart because they lack that structure.
As for the apples, this is important: use firm, tart varieties. Granny Smith apples are my go-to choice because they hold their shape beautifully and their tartness cuts right through the sweetness of the brown sugar. Avoid overly soft apples like Red Delicious; they turn to mush way too fast in the oven, and we want tender chunks, not apple sauce!
Serving Suggestions for Your Easy Gluten Free Apple Crisp with Oat Topping
A dessert this comforting deserves the perfect companion, but honestly, this Easy Gluten Free Apple Crisp with Oat Topping is fantastic all by itself, especially when it’s still warm from the oven. That buttery oat crunch is just divine on its own. However, if you want to elevate it just a tiny bit—and who doesn’t?—I have a few simple suggestions that never fail.
The absolute classic pairing, and what my family demands, is a big scoop of high-quality vanilla bean ice cream. The cold creaminess hitting that warm, spiced apple filling is pure heaven. If you want something less sweet, try a dollop of plain Greek yogurt. It gives a nice tang that balances the brown sugar perfectly. For a truly luxurious finish, a drizzle of warm salted caramel sauce works wonders, but go easy on it; we don’t want to drown out that amazing oat topping!
Storing Leftovers of Easy Gluten Free Apple Crisp with Oat Topping
If you manage to have any leftovers of this amazing Easy Gluten Free Apple Crisp with Oat Topping—and trust me, that’s a feat in itself—storing it properly is key to keeping that topping crunchy. You absolutely must let the crisp cool down completely on the counter before you even think about covering it. Putting a lid on warm food traps steam, and steam is the enemy of a crispy oat topping!
Once it’s totally cool, cover the baking dish tightly with plastic wrap or foil. It keeps really well on the counter for the first day, but if you have more than a couple of servings left, the fridge is the safest bet. It stays delicious for days, ready for a quick warm-up whenever a craving hits.
| Location | Duration | Notes |
|---|---|---|
| Countertop | Up to 1 day | Ensure it’s tightly covered. |
| Refrigerator | Up to 4 days | Best kept covered to prevent drying. |
Reheating Tips for Best Flavor
The biggest challenge with leftovers is the topping getting soft, right? To fight that, never microwave it! Microwaves heat the moisture in the apples and steam the topping instantly. Instead, spread the leftovers out onto a small baking sheet or even just put the portioned amount back into a small oven-safe ramekin.
Pop it into a warm oven—about 300 degrees F—for about 8 to 10 minutes. This gentle heat warms the apples through and dries out that oat topping just enough to bring back some of that lovely crunch we worked so hard to achieve earlier. Serve it with an extra little splash of cold cream if you have it!
Answering Common Questions About This Recipe
I get so many notes from people who try simple baked apples recipes, and I totally understand why! Sometimes the texture just isn’t right, or they aren’t sure about swapping ingredients. Here are a few things I hear most often when folks are making their first batch of this Easy Gluten Free Apple Crisp with Oat Topping.
Q: My topping came out soggy, not crunchy. What did I do wrong?
That’s usually because the topping wasn’t cold enough when it went on the apples, or you covered it too soon after it came out of the oven. Remember, we chill that buttery mix first! Also, make sure you didn’t press the topping down at all; keep it loose and airy so the heat can circulate and crisp up those oats.
Q: Can I use regular all-purpose flour if I don’t have GF flour?
You absolutely can, but then it’s not a gluten-free dessert anymore! If you aren’t worried about gluten, you can use regular flour, but you might want to skip the baking powder in the topping since wheat flour has natural structure. For the filling, regular flour works fine as a thickener.
Q: What are the best apples to use for a good apple crumble?
Like I mentioned before, stick with firm apples! Granny Smith is my favorite because they hold their shape well. Honeycrisp or Gala work too, but you might want to chop them a tiny bit smaller since they soften faster. You want them tender, not mushy, when they come out of the oven.
Q: How do I make sure the apples aren’t too tart?
If you use all Granny Smiths and they taste too sharp, that’s easily fixed! Just add an extra tablespoon of light brown sugar to the apple filling mixture. That little bit of extra molasses flavor balances the tartness perfectly without making the whole crisp overly sweet.
Share Your Easy Gluten Free Apple Crisp with Oat Topping Experience
I truly hope this recipe brings as much warmth to your kitchen as it does to mine. Baking should always be fun, and seeing your results makes all the recipe testing worthwhile! Check out more of our baking inspiration!
When you try this Easy Gluten Free Apple Crisp with Oat Topping, please come back and tell me how it went! Leave a star rating below—it really helps other bakers know this simple dessert is a winner. I love seeing pictures of your warm, bubbling crisps! Read more about our kitchen adventures.
Print
Amazing 1 Step Easy Gluten Free Apple Crisp
- Total Time: 50 minutes
- Yield: 6 servings
- Diet: Gluten Free
Description
This gluten free apple crisp features tender cinnamon apples baked under a buttery oat crumble topping. It is warm, cozy, and simple to prepare, offering a comforting fruit dessert without the effort of pie.
Ingredients
- Apple filling: 4 cups apples peeled and chopped
- Apple filling: 3 tablespoons unsalted butter melted
- Apple filling: 2 tablespoons gluten free all-purpose flour with xanthan gum
- Apple filling: 1 tablespoon lemon juice
- Apple filling: 3 tablespoons milk
- Apple filling: 1 teaspoon vanilla extract
- Apple filling: 1/4 cup light brown sugar
- Apple filling: 1/2 teaspoon ground cinnamon
- Apple filling: 1/8 teaspoon salt
- Crisp topping: 1/2 cup gluten free all-purpose flour with xanthan gum
- Crisp topping: 1/2 cup gluten free quick oats
- Crisp topping: 1/2 cup light brown sugar
- Crisp topping: 1/2 teaspoon baking powder
- Crisp topping: 1/4 teaspoon ground cinnamon
- Crisp topping: 1/8 teaspoon salt
- Crisp topping: 1/3 cup unsalted butter softened and cubed
Instructions
- Preheat your oven to 375°F and lightly grease an 8 by 8 inch baking dish.
- In a medium bowl, combine all topping ingredients. Mix with a fork until chunky crumbs form. Refrigerate the topping while you prepare the filling.
- In a large bowl, combine the chopped apples, melted butter, gluten free flour, lemon juice, milk, vanilla extract, brown sugar, cinnamon, and salt. Stir until everything is evenly coated.
- Spread the apple mixture evenly into the prepared baking dish.
- Sprinkle the chilled crisp topping evenly over the apples.
- Bake for 30 to 35 minutes. The crisp is done when the topping is golden and the filling bubbles around the edges.
- Remove from the oven and cool for 5 to 10 minutes before serving.
Notes
- Serve warm for the best texture and flavor.
- Prep Time: 15 minutes
- Cook Time: 35 minutes
- Category: Dessert
- Method: Baking
- Cuisine: American
Nutrition
- Serving Size: 1 serving
- Calories: 360
- Sugar: Unknown
- Sodium: Unknown
- Fat: 17 g
- Saturated Fat: Unknown
- Unsaturated Fat: Unknown
- Trans Fat: Unknown
- Carbohydrates: 53 g
- Fiber: Unknown
- Protein: 3 g
- Cholesterol: Unknown