Oh, there’s just something so wonderfully comforting about a warm scone, isn’t there? Especially when they’re homemade! I remember the first time I *really* got them right – they were perfectly golden, impossibly light, and smelled divine. These Classic Scones are exactly like that memory. They’re my go-to for a lazy Sunday brunch or an impromptu afternoon tea with friends. Light, fluffy, and just begging for a dollop of jam and cream. Honestly, they’re a little bit of magic you can whip up in no time at all.
Why You’ll Love These Classic Scones
- They’re ridiculously easy to whip up, seriously!
- Ready in under 30 minutes, perfect for when a craving strikes.
- Super versatile – dress them up for afternoon tea or keep them simple.
- Just so wonderfully light and fluffy, you’ll be making them again and again!
Ingredients for Classic Scones
Honestly, the beauty of these Classic Scones is how simple the ingredient list is. You probably have most of it in your kitchen already! Just make sure your butter and milk are nice and cold – it really does make a difference.
- 450g self-raising flour, plus a bit extra for dusting
- 80g cold salted butter, cut into little cubes
- 250ml cold whole milk
- A splash more milk, just for brushing the tops
- For serving: A good dollop of strawberry jam (my favourite is homemade, of course!)
- For the cream:
- 250ml double cream
- 1 tbsp caster sugar
- 1/2 tsp vanilla extract
Making Your Classic Scones: Step-by-Step
Right then, let’s get baking! Making these Classic Scones is honestly really straightforward, and the smell that fills the kitchen is just heavenly. You’ll be digging into warm, fluffy goodness before you know it.
Step 1: First things first, get your oven preheating to 200°C (or 180°C if you’ve got a fan oven). Grab a big baking tray and pop some baking parchment on it – this stops any sticking and makes for super easy cleanup. Trust me, you’ll thank me later!
Step 2: Tip all that lovely self-raising flour into your biggest mixing bowl. Now, take your cold butter cubes and rub them into the flour with your fingertips. You want to keep going until the whole lot looks like fine breadcrumbs – like you’re making sandcastles, but tastier!
Step 3: Pour in the cold milk. I like to use a butter knife for this bit, just gently mixing everything together until the dough starts to form. Don’t overdo it, we’re not making playdough here!
Step 4: Tip your dough out onto a surface you’ve lightly floured. Give it a gentle knead, but honestly, no more than about 8 to 10 little pushes and folds until it’s smooth. The less you handle it, the lighter your Classic Scones will be. This is the real secret, so be gentle!
Step 5: Now, pat the dough into a round shape. Aim for about 3cm thick – not too flat, not too puffy. If it feels a bit sticky, just give the top a very light dusting of flour. You want it to be workable, but not tough.
Step 6: Get your favourite round cutter (mine’s about 5-6cm wide). Press it straight down into the dough to cut out your scones. Whatever you do, DON’T twist the cutter! Twisting seals the edges and stops them from rising up beautifully. Re-shape the leftover dough and cut out more scones until it’s all used up. You might get a few more from the second go.
Step 7: Carefully place your scones onto the prepared baking tray. Give them a little bit of breathing room; they need space to puff up. They look so cute lined up like that, don’t they?

Step 8: For that gorgeous golden finish everyone loves, lightly brush the tops of the scones with a little bit of milk. It makes all the difference!
Step 9: Pop them in the hot oven and bake for about 10 to 12 minutes. Keep an eye on them – you want them to be well risen and a lovely golden brown on top. They grow quite a bit!
Step 10: As soon as they’re out, transfer the warm scones onto a clean tea towel. Loosely wrap them up for about 10 minutes. This little trick keeps the tops lovely and soft, which is just perfect.
Step 11: While your scones are having their little steam bath, whip up the cream! Pour the double cream into a clean bowl, add the caster sugar and vanilla extract. Whisk it all together until you get soft peaks. Don’t go too mad, you want it lovely and light, not stiff.
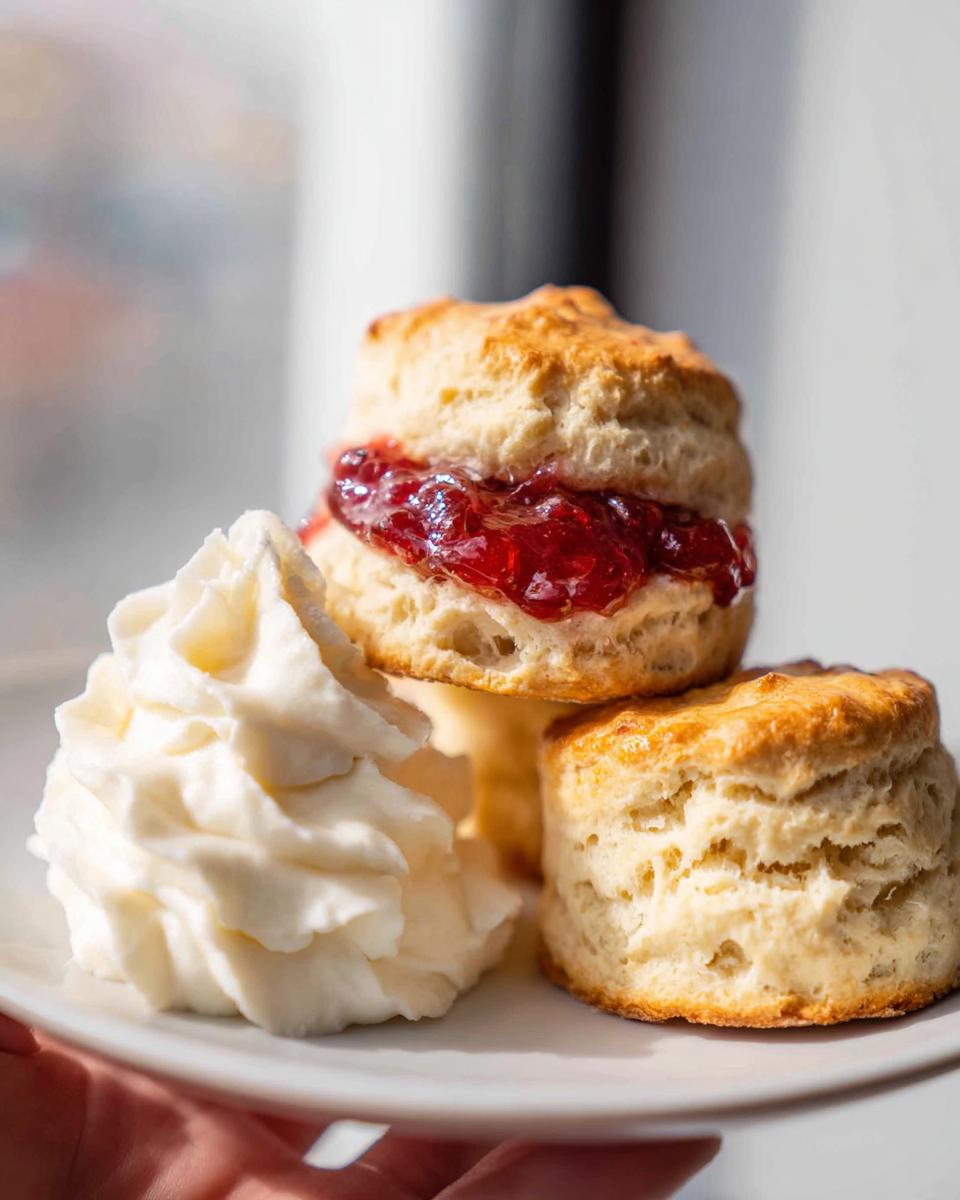
Step 12: Serve your warm Classic Scones straight away with your favourite strawberry jam and that dreamy whipped cream. It’s pure bliss!
Serving Your Classic Scones
Right, the best part! Once your glorious warm Classic Scones are ready, here’s how I love to serve them:
With Strawberry Jam: You absolutely can’t go wrong with a good strawberry jam. My homemade strawberry pineapple orange jam is particularly delightful, but any good quality one will do! It’s the classic pairing for a reason.
Generous Dollop of Cream: My recipe for whipped cream with a hint of vanilla is lovely, but good old double cream, softly whipped is perfect. Make sure it’s not too stiff!
A Pot of Tea: Of course, you need a lovely cuppa to go with it all! Earl Grey or a simple English Breakfast tea are always winners in my book.
Storing and Reheating Your Classic Scones
Now, I’ll be honest, Classic Scones are absolutely best enjoyed fresh and warm on the very same day they’re made. But if you do happen to have a few leftover (highly unlikely in my house!), don’t fret! Store any cooled scones in an airtight container at room temperature. They’ll usually keep for a day or two. To bring them back to their former glory, a quick zap in a not-too-hot oven for a few minutes, or even a few seconds in the microwave, will do the trick beautifully.
Frequently Asked Questions About Classic Scones
Got a burning question about these lovely Classic Scones? I’ve popped a few common queries below to help you out.
What is the secret to light and fluffy scones?
The magic really happens with cold ingredients and minimal handling! Don’t overwork the dough – just a gentle knead and a light touch will give you that beautiful, airy texture. It’s all about being delicate.
Can I make Classic Scones ahead of time?
You can prep the dough and cut out the scones a few hours ahead and keep them covered in the fridge. Just bake them when you’re ready. They’re definitely at their absolute best baked super fresh though!
What kind of flour is best for Classic Scones?
I always use self-raising flour for these Classic Scones. It’s got the raising agents already in it, making them delightfully light and easy to achieve. You can’t really beat it for a classic bake!
Before You Go
I really hope you give these Classic Scones a whirl this week! They’re such a simple joy to make and even better to eat. Let me know in the comments how you get on, or share a pic on social media – I’d absolutely love to see them! You can also find more baking inspiration over on Medium.
Print
Classic Scones
- Total Time: 22 min
- Yield: 10 scones
- Diet: Vegetarian
Description
Light and fluffy classic scones with golden tops and a soft centre, perfect served warm with jam and cream.
Ingredients
- 450g self-raising flour plus extra for dusting
- 80g cold salted butter, cubed
- 250ml whole milk, cold
- Extra milk for brushing
- For serving: Strawberry jam
- 250ml double cream
- 1 tbsp caster sugar
- 1/2 tsp vanilla extract
Instructions
- Preheat your oven to 200C or 180C fan. Line a large baking tray with baking parchment.
- Add the self-raising flour to a large mixing bowl. Rub in the cold butter using your fingertips until the mixture resembles fine breadcrumbs.
- Pour in the cold milk and gently mix with a butter knife until the dough starts to come together.
- Turn the dough onto a lightly floured surface and knead gently no more than 8 to 10 times until smooth.
- Pat the dough into a round about 3cm thick. Lightly dust the top with flour if needed.
- Use a round cutter to cut out the scones, pressing straight down without twisting. Re-shape leftover dough and continue cutting until all the dough is used.
- Place the scones onto the prepared tray, leaving a little space between each one.
- Brush the tops lightly with milk for a golden finish.
- Bake for 10 to 12 minutes until well risen and golden on top.
- Transfer the warm scones to a clean tea towel and loosely wrap for 10 minutes to keep the tops soft.
- Whip the double cream with the caster sugar and vanilla extract until soft peaks form.
- Serve the scones warm with strawberry jam and whipped cream.
Notes
- Scones are best enjoyed warm on the day they are baked. Reheat for a few seconds in the microwave or warm in the oven before serving.
- Prep Time: 10 min
- Cook Time: 12 min
- Category: Baking
- Method: Baking
- Cuisine: British