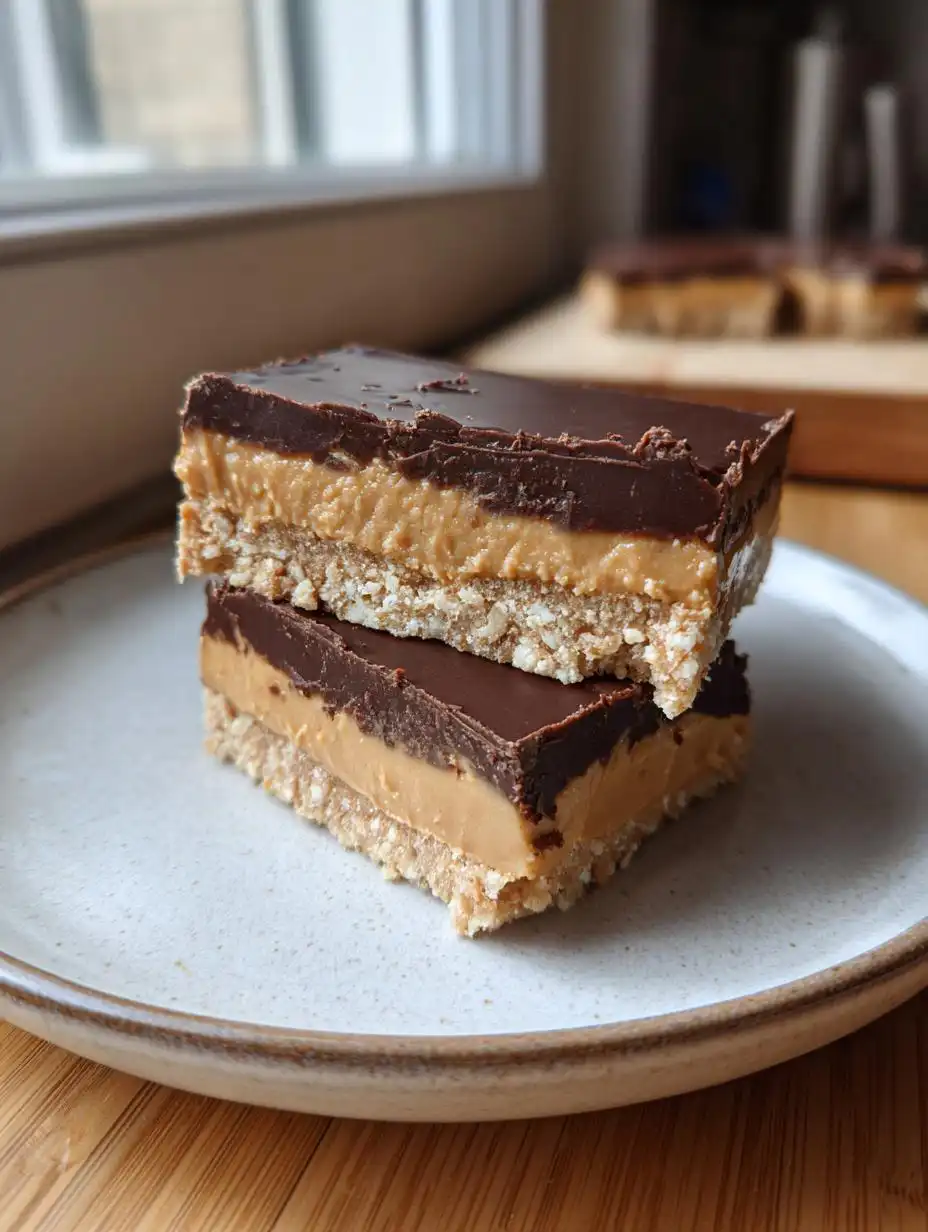
Okay, let’s talk about the ultimate sweet tooth craving that suddenly feels guilt-free. You know those famous caramel and chocolate candy bars? I’ve spent ages tweaking recipes to get that crunchy, creamy, chocolatey hit without all the refined stuff, and I finally cracked the code! Seriously, when I tell people I made Healthy Peanut Butter Twix Bars from scratch using simple, clean ingredients, they look at me like I’m crazy. But trust me, my kitchen experiments over the years have led me here.
This recipe is my absolute favorite because it uses almond flour for the base—no white flour drama here—and the filling is just pure, creamy peanut butter goodness mixed with natural sweetener. It’s a no-fuss three-layer wonder that sets up beautifully in the fridge. It really proves you don’t need complicated steps or long ingredient lists to make something genuinely satisfying. If you’re looking for a dessert that tastes like a treat but happens to be secretly good for you, stick right here with me!
Essential Ingredients for Healthy Peanut Butter Twix Bars
You know I’m all about keeping things simple, and that’s exactly what these Healthy Peanut Butter Twix Bars require! We aren’t bringing out the food processor for a million different things. We are focusing on quality over quantity here. The success of these bars hinges on using the right kind of base flour and making sure your peanut butter is the creamy, natural kind—none of those sugary, stabilized ones allowed!
I’ve laid out exactly what you need below. Trust me when I say that measuring these out correctly is half the battle won. Don’t try to substitute willy-nilly, especially in the base!
| Component | Ingredient | Amount |
| Crust | Fine Blanched Almond Flour | 1 ½ cups |
| Crust | Melted Coconut Oil | 3 Tablespoons |
| Crust/Filling Sweetener | Maple Syrup | 5 Tablespoons Total (2 for crust, ⅓ for filling) |
| Filling | Creamy Natural Peanut Butter | ¾ cup |
| Topping | Dark Chocolate Chips | ¾ cup |
Almond Flour Crust Components
For the base, you absolutely must use fine blanched almond flour. If you use almond meal, your crust will turn out gritty and heavy, and we want that delicate, shortbread-like texture! We are mixing that flour with just a tiny bit of maple syrup and melted coconut oil, plus salt and vanilla powder for flavor depth. It comes together almost instantly, which is just perfect for a quick weeknight dessert.
Creamy Peanut Butter Layer Necessities
This is where the magic happens, folks. For the best flavor and texture in the middle layer of your Healthy Peanut Butter Twix Bars, grab that creamy natural peanut butter. You know, the kind that separates and you have to stir before you use it? That’s the one! We gently warm it up with a bit more maple syrup—this acts as our binder and sweetener—and some coconut oil to keep it smooth when chilled. Don’t try to use honey here; the texture just isn’t the same when it sets up.
Rich Dark Chocolate Topping
For the final layer, we keep it dark and luxurious. I use dark chocolate chips because the slight bitterness cuts through the sweetness of the peanut butter layer perfectly. My secret here is adding just one tablespoon of coconut oil to the chips before melting. It sounds weird, but it makes the chocolate topping incredibly shiny and smooth, ensuring it pours like silk over the peanut butter layer without any lumps or seizing. It really elevates the final look!
Equipment Needed for Healthy Peanut Butter Twix Bars
You don’t need a huge kitchen setup for these amazing Healthy Peanut Butter Twix Bars, which is another reason I love them! Gather up a standard 8 by 8 inch baking pan—parchment paper is your best friend here, so make sure you have some. You’ll also want a medium mixing bowl for the crust, a small saucepan for gently warming the filling and topping, and a sturdy spatula for pressing and spreading. That’s it! Easy cleanup is always a win in my book.
Step-by-Step Instructions for Healthy Peanut Butter Twix Bars
Alright, time to get these delicious Healthy Peanut Butter Twix Bars assembled! The process is totally sequential, so don’t jump ahead, or the layers won’t set right. We are basically building a healthy, three-story tower of deliciousness, and each layer needs its foundation set before we move on. Pay close attention to the cooling times; that’s where most people rush and end up with a mess!
Preparing and Baking the Almond Crust
First things first, get your oven preheated to 350°F right away. While it heats up, line that 8×8 inch baking pan with parchment paper. I always leave a little overhang on two sides—that’s your built-in handle for lifting the whole thing out later, trust me on this one!
Now for the base: grab your bowl and toss in the fine almond flour, the melted coconut oil, the two tablespoons of maple syrup, the vanilla powder, and that pinch of salt. Mix it all up. It won’t look like dough; it should look crumbly, almost like wet sand. Once it’s mixed but still crumbly, dump it into your prepared pan. Now comes the elbow grease! You need to press this mixture down firmly and evenly across the bottom. Use the bottom of a flat glass or measuring cup to really compact it—you want a solid base so the filling doesn’t sink in. Bake this crust for exactly 10 minutes until you see just the slightest hint of golden color on the edges. Take it out and let it cool on the counter for a good 10 minutes while you make the next layer.
Setting the Creamy Peanut Butter Filling
While the crust is cooling, we make the middle layer. Grab a small saucepan—keep the heat on low! We are just warming things up, not cooking them hard. Add your creamy natural peanut butter, the remaining maple syrup (which is ⅓ cup), the ¼ cup of coconut oil, and the final pinch of salt to the pan. Stir this constantly over that low heat for about two minutes until everything melts together into a smooth, pourable liquid. You’ll know it’s ready when it looks glossy and uniform.
Pour that warm peanut butter mixture right over your slightly cooled crust. Use an offset spatula or the back of a spoon to spread it out perfectly evenly—no lumps allowed! This layer needs time to firm up so the chocolate doesn’t sink. Pop the whole pan into the refrigerator and let it chill for a solid 30 minutes. Resist the urge to touch it!
Finishing with the Chocolate Topping and Slicing
Once that peanut butter layer is firm to the touch, it’s time for the grand finale! In another small bowl, combine your dark chocolate chips and the last tablespoon of coconut oil. Melt this slowly—either in short 20-second bursts in the microwave, stirring in between each burst, or gently over a double boiler. You must stir until it’s completely smooth and liquid. If you overheat it, the chocolate will seize up, and we don’t want that for our Healthy Peanut Butter Twix Bars!
Pour the melted chocolate over the chilled peanut butter layer. Tilt the pan gently to let the chocolate flow right to the edges. Back into the fridge it goes for one more chill, about 20 minutes, until the chocolate is completely firm. Once it’s set, use those parchment paper handles to lift the entire block out onto a cutting board. Here’s the crucial part: let the bars sit on the counter for about five minutes before you slice. If they are rock hard and straight from the fridge, the chocolate will crack and shatter! Use a large, sharp knife, wiping it clean between cuts, and slice into 16 nice bars. Enjoy the fruits of your labor!
Tips for Perfect Healthy Peanut Butter Twix Bars
Look, even with the best intentions, sometimes these layered bars can be a little fussy. Since we are working with coconut oil and natural peanut butter, temperature control is everything if you want perfect Healthy Peanut Butter Twix Bars. I’ve learned a few tricks over the years to avoid common pitfalls like cracking or gooey layers.
Here are my top tips:
- Make sure your almond flour crust is *compacted* firmly before baking. If the base is too loose, the warm peanut butter filling will just seep down and make it soggy. Press it down with something heavy!
- When you heat the peanut butter filling, keep the heat super low. If you boil that mixture, the texture changes completely and it won’t set up right in the fridge. We just want it smooth and pourable, not hot!
- Always let the bars rest on the counter for at least five minutes before slicing. I know you’re excited, but slicing them straight from the fridge guarantees that beautiful chocolate top cracks right off. A little patience here makes for professional-looking Healthy Peanut Butter Twix Bars.
- If your dark chocolate topping seems too thick after melting, add just a tiny drop more coconut oil, not milk or water! That extra fat keeps the chocolate pliable for easier cutting later on.
Storing and Serving Your Healthy Peanut Butter Twix Bars
Now that you’ve made these incredible Healthy Peanut Butter Twix Bars, we need to talk about keeping them perfect! Because we used coconut oil instead of processed fats, these bars prefer the cold. They are best stored in an airtight container in the refrigerator. They hold up beautifully for about a week this way, and honestly, they taste better on day two once everything has really settled in.
If you want to make a big batch—and you totally should—the freezer works wonders too! Just make sure they are tightly wrapped, maybe separated by parchment squares so they don’t stick together during the deep chill. Here’s a quick rundown for keeping your stash fresh:
| Location | Approximate Time | Serving Note |
| Refrigerator | Up to 7 Days | Serve straight from the fridge or let sit 5 minutes. |
| Freezer | Up to 2 Months | Thaw in the fridge for a few hours before serving. |
Remember that little trick I mentioned about slicing? It applies to serving too! If they’ve been chilling for a while, let your Healthy Peanut Butter Twix Bars sit out for about five to ten minutes before you serve them. That slight warming takes the chill off the peanut butter filling just enough to make it perfectly creamy when you bite into it.
Frequently Asked Questions About Healthy Peanut Butter Twix Bars
I get so many questions about these bars because everyone wants that perfect, clean bite! It’s exciting seeing so many people jump on board with these Healthy Peanut Butter Twix Bars. Here are the most common things folks ask me when they try this recipe for the first time.
Can I substitute the almond flour in this recipe?
This is a big one! Since the almond flour crust is the star of our healthier base, I really urge you to stick with it. If you absolutely cannot use almond flour, you could try using fine oat flour, but you’ll definitely need to adjust the moisture a bit—maybe add an extra teaspoon of coconut oil. However, the texture won’t be the same shortbread feel; it will be softer. Coconut flour is a definite no-go here; it absorbs way too much liquid and will turn your crust into dry crumbs. We need that fat and structure from the almond flour for these Healthy Peanut Butter Twix Bars to hold up!
How long do these Healthy Peanut Butter Twix Bars keep?
Good news: they keep really well! Since there are no eggs or dairy in the main layers, they are quite stable. In the refrigerator, sealed tight in an airtight container, they stay perfectly fresh for up to seven days. If you make a huge batch, the freezer is your friend! Wrap individual bars tightly in plastic wrap, then foil, and they’ll be great for up to two months. Just let them thaw in the fridge for a few hours before you plan to eat them.
What is the best way to get clean cuts when slicing?
This ties back to my biggest tip above, but it’s worth repeating because cracked chocolate is so sad! The secret to slicing your Healthy Peanut Butter Twix Bars without shattering the top layer is temperature. You must let the bars chill completely—at least 20 minutes after the chocolate goes on. Then, before you cut, pull them out and let them sit on the counter for five to ten minutes. Seriously, just wait that extra few minutes! Use a long, sharp knife, and wipe the blade clean between every single cut. It makes all the difference!
Sharing Your Healthy Peanut Butter Twix Bars Experience
I truly hope you love making and eating these Healthy Peanut Butter Twix Bars as much as I do! They are such a great way to satisfy that candy bar craving without the guilt. Once you’ve made a batch and seen how easy they are, I’d absolutely love to hear about it! Snap a picture and tag me on social media, or better yet, come back here and leave a quick rating. Hearing how these turned out for you keeps me inspired to share more simple, clean dessert recipes!
If you want to see more behind-the-scenes looks at recipe testing, check out my Pinterest board for more inspiration!
Print
16 Amazing Healthy Peanut Butter Twix Bars
- Total Time: 30 minutes
- Yield: 16 bars
Description
These healthy peanut butter Twix bars feature a crunchy almond crust, creamy peanut butter layer, and rich chocolate topping. This is a satisfying, no-fuss dessert using simple ingredients.
Ingredients
- Shortbread base: 1½ cups fine blanched almond flour
- Shortbread base: 3 tablespoons melted coconut oil
- Shortbread base: 2 tablespoons maple syrup
- Shortbread base: 1 teaspoon vanilla powder
- Shortbread base: ¼ teaspoon salt
- Peanut butter layer: ⅔ cup creamy natural peanut butter
- Peanut butter layer: ⅓ cup maple syrup
- Peanut butter layer: ¼ cup coconut oil
- Peanut butter layer: ¼ teaspoon salt
- Chocolate topping: ¾ cup dark chocolate chips
- Chocolate topping: 1 tablespoon coconut oil
Instructions
- Preheat your oven to 350°F. Line an 8 by 8 inch baking pan with parchment paper.
- Mix almond flour, coconut oil, maple syrup, vanilla powder, and salt in a bowl until crumbly.
- Press the mixture firmly into the prepared pan. Bake for 10 minutes until lightly golden. Cool for 10 minutes.
- Stir peanut butter, maple syrup, coconut oil, and salt in a small saucepan over low heat until smooth and pourable, about 2 minutes.
- Spread the peanut butter mixture evenly over the cooled crust. Refrigerate for 30 minutes until set.
- Melt chocolate chips and coconut oil together until smooth.
- Pour chocolate over the peanut butter layer. Tilt the pan to spread evenly.
- Refrigerate for 20 minutes until firm, then slice into bars.
Notes
- Let the bars sit at room temperature for a few minutes before slicing to prevent cracking.
- Prep Time: 20 minutes
- Cook Time: 10 minutes