Oh my goodness, get ready because I am about to share the recipe for the best no-bake vegan cherry cheesecake you will ever, ever try. Forget everything you think you know about dairy-free desserts; this one changes the game completely. I’ve made this recipe dozens of times now, usually when I need a showstopper dessert that doesn’t require me to turn on my oven in the summer heat.
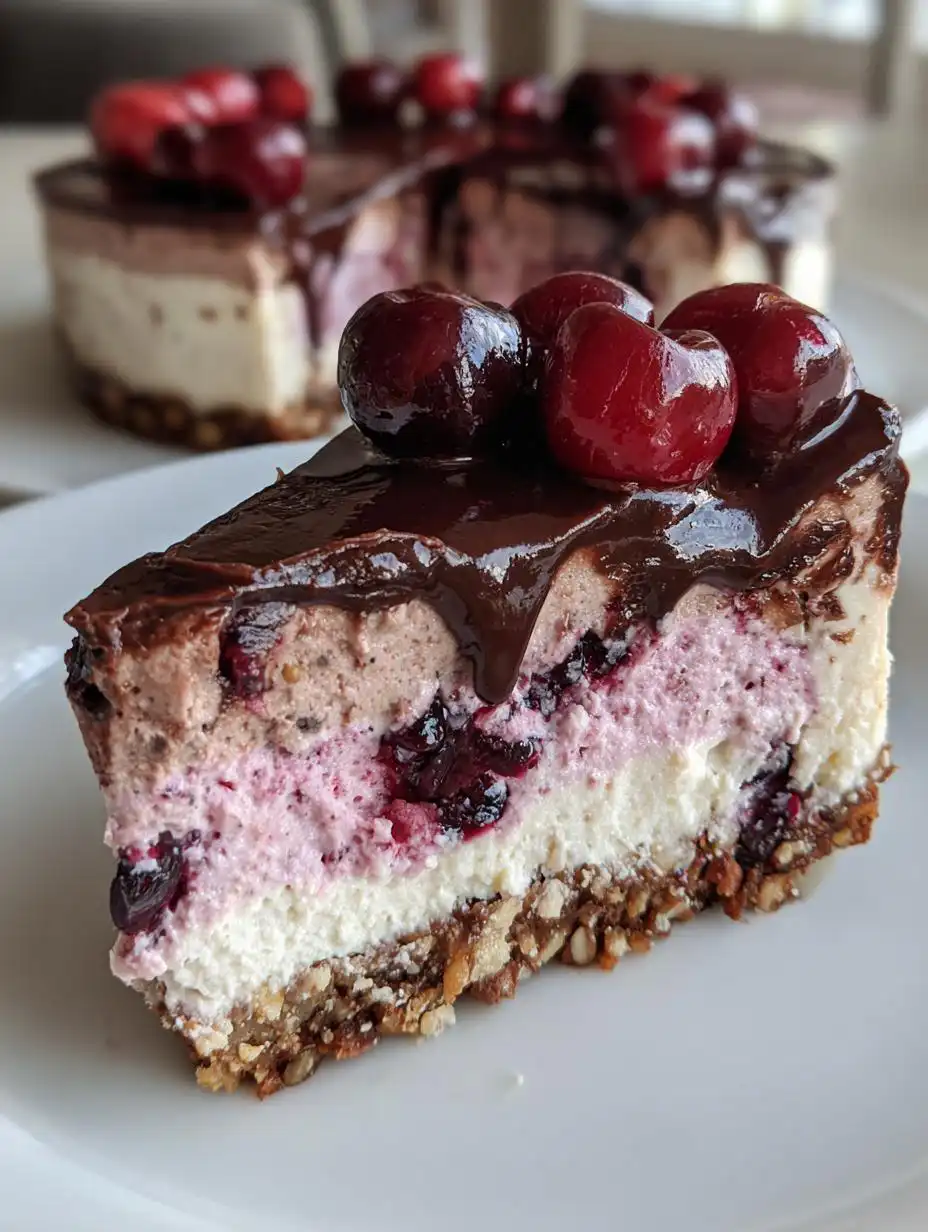
The magic, truly, is in the texture. That silky, rich cashew filling just melts in your mouth. It has this incredible density that feels indulgent, but because it’s all nuts and fruit, you don’t get that heavy feeling afterwards. We start with a nutty pecan crust that gets perfectly firm in the freezer, providing the best crunch against that smooth layer.
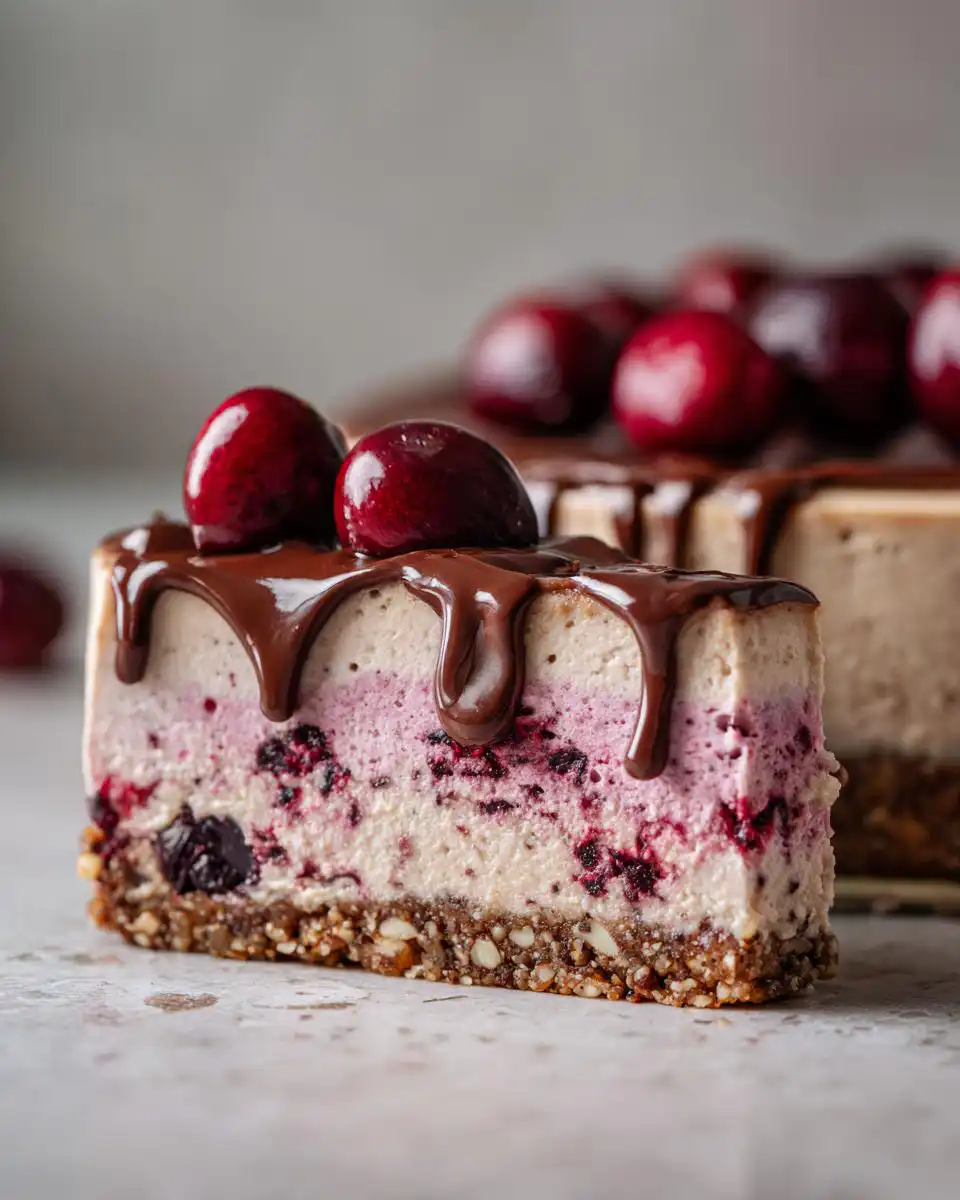
Then we layer on the bright, tangy cherry filling, and top it all off with a dark chocolate ganache that just oozes down the sides. Honestly, every time I pull this beauty out of the freezer, I feel like I’m unveiling a gourmet bakery item. You absolutely have to trust me on this one; the combination of chocolate, cherry, and that creamy cashew base is unbeatable!
Essential Ingredients for Your No-Bake Vegan Cherry Cheesecake
When you’re making a no-bake dessert, the quality of your ingredients really shines through. Since there’s no baking to mellow things out, we need to choose items that deliver maximum flavor and the perfect structure. I learned early on that using refined coconut oil, for instance, is key because it solidifies nicely without adding a strong coconut flavor to the filling. Trust me, you want that clean, creamy taste!
We rely on whole, natural ingredients here to achieve that incredible texture, which is why this recipe is such a favorite. Everything plays a specific role, from the base to the beautiful topping that finishes the look.
Creating the Pecan Date Crust
The crust is what holds everything together, and we skip the butter entirely! We use raw pecans for a deep, earthy flavor that pairs beautifully with the sweetness of the Medjool dates. Those dates are sticky, so they act as our natural binder. Don’t forget the flaked coconut in there; it adds a nice texture so the crust isn’t just a solid block of nut paste. A tiny pinch of sea salt just wakes up all those sweet, nutty flavors, so make sure you grab that!
Crafting the Silky Cashew Filling
This is where the magic happens, and it all starts with the soaking. You absolutely must soak those raw cashews for at least four hours—I usually leave mine overnight just to be safe. If you skip this, your blender will struggle, and the filling won’t be silky smooth; it’ll be gritty, and that’s just sad. We use full-fat coconut milk for richness, refined coconut oil to help it set up firm, maple syrup for sweetness, and fresh lemon juice to give it that classic cheesecake tang. Vanilla is a must, of course!
The Rich Chocolate Topping and Cherry Finish
For the gorgeous pink layer, we use freeze-dried cherries. They pack such an intense cherry punch without adding extra liquid to thin out our cashew base. For the topping, it’s a simple dark chocolate ganache. You need good quality dark chocolate, finely chopped, and a bit more full-fat coconut milk to melt it down. Finally, for presentation and that burst of freshness, you need halved fresh cherries right on top. They look stunning against the dark chocolate!
Equipment Needed for This No-Bake Vegan Cherry Cheesecake
You don’t need an oven, but you definitely need a couple of heavy hitters in the gadget department. First up is a good food processor for making that sticky crust—it handles the dates and nuts like a dream. Second, and this is crucial, grab your high-speed blender. You need that power to break down those soaked cashews completely smooth. A 6-inch springform pan is perfect for the size, and parchment paper is your best friend for easy removal!
Step-by-Step Instructions for No-Bake Vegan Cherry Cheesecake
Okay, deep breath! This is where we bring all those beautiful ingredients together. Don’t rush the freezing steps; they are just as important as the blending. I find putting on some good music helps keep me relaxed while working through these layers.
Preparing the Base and Initial Freeze
First things first, grab your 6-inch springform pan. I like to lightly grease the sides with a little coconut oil—just a thin swipe—and then cut a circle of parchment paper to fit snugly on the bottom. This makes life so much easier when it’s time to unmold the cheesecake! Now, toss your coconut, pecans, dates, and salt into the food processor. You want to blend this until it really starts sticking together, looking like a thick, slightly chunky dough. Don’t over-process it until it turns into butter, though; you want those little bits of pecan still visible for texture.
Take that crust mixture and press it down firmly and evenly into the bottom of your prepared pan. Use the bottom of a measuring cup or just your knuckles to really compact it. Once it’s flat and solid, pop that pan into the freezer while you work on the filling. That first 30-minute freeze helps lock that crust in place!
Blending the Creamy Layers
Time for the blender! Make sure those cashews are completely drained after soaking. Add them to the high-speed blender along with the coconut milk, melted coconut oil, maple syrup, lemon juice, and vanilla. You need to blend this on high until it is utterly smooth—I mean, like silk. It usually takes me a solid two or three minutes, stopping to scrape down the sides. If you see any graininess, keep blending! Pour exactly half of this gorgeous vanilla mixture over your chilled crust. Give the pan a couple of firm taps on the counter to coax out any big air bubbles, and back into the freezer it goes for 30 minutes to firm up slightly.
While that’s chilling, take the remaining cashew cream still in the blender. Now, add in your freeze-dried cherries. Blend this until it’s perfectly smooth and you have this vibrant, gorgeous pink color. Pour this cherry layer right on top of the semi-set vanilla layer. Smooth the top with an offset spatula and give it a few more good counter taps to settle everything evenly.
Freezing and Setting the Cheesecake Layers
This is the waiting game, but it’s worth it! You need to freeze the entire cheesecake for a minimum of three hours until it is totally firm. If your kitchen is really warm, aim for four hours just to be safe. You want it rock solid before you touch the ganache.
Making and Applying the Chocolate Ganache
Once the cheesecake is firm, you can make the topping. Heat up your 1/4 cup of coconut milk in a tiny saucepan until it just starts to simmer around the edges—don’t let it boil hard! Put your finely chopped dark chocolate in a heatproof bowl, pour that hot milk over the top, and just let it sit there, untouched, for three full minutes. After those three minutes, grab a whisk and gently stir until it transforms into a glossy, smooth ganache. Don’t rush this part either! Pour that chocolate mixture gently over the top of your chilled cheesecake, letting it drip artfully down the sides. Scatter those fresh, halved cherries on top right away. Pop it back into the refrigerator for just 30 minutes before slicing so the ganache can set up slightly.
Tips for Success with No-Bake Vegan Cherry Cheesecake
I’ve learned a few tricks over the years to make sure this cashew cheesecake comes out perfect every single time. First, please, please use a high-speed blender. If you don’t have one, you’ll need to soak your cashews longer—maybe even boil them for 15 minutes before soaking—to ensure that filling isn’t gritty. That smooth texture is non-negotiable!
Second, don’t skip the initial 30-minute freeze between the layers. It stops the vanilla layer from mixing into the cherry layer when you pour the second half on. That separation is what gives you those beautiful distinct colors!
My biggest pro tip? When it’s time to slice, take a sharp knife and run it under very hot water for about ten seconds, then dry it completely. Wipe the knife clean between every single slice. This trick guarantees you get those gorgeous, clean wedges you see in the photos, otherwise, the coconut oil and coconut milk cause sticking!
If you are looking for more dessert inspiration, check out my dark chocolate nut bars for another easy treat.
Storing and Serving Your No-Bake Vegan Cherry Cheesecake
Because this recipe relies on frozen elements to maintain its structure, storage is key. You can keep this beauty in the refrigerator, covered tightly, for about 3 to 4 days. It softens slightly, which some people prefer, so it’s easier to cut straight from the fridge. If you aren’t planning on finishing it within four days, the freezer is your best friend!
When frozen solid, it lasts beautifully for up to a month. If you serve it straight from the freezer, let it sit out on the counter for about 15 to 20 minutes before you try to slice it. This allows the filling to soften just enough to get that perfect creamy mouthfeel without turning soupy.
Storage and Reheating Guide
| Storage Location | Maximum Duration | Serving Note |
|---|---|---|
| Refrigerator | 3-4 Days | Slice easily after 5 minutes at room temperature. |
| Freezer | Up to 1 Month | Allow 15-20 minutes to soften before slicing cleanly. |
Frequently Asked Questions About No-Bake Vegan Cherry Cheesecake
Q1. Can I substitute the pecans in the crust with something else?
You absolutely can! If you have nut allergies or just prefer a different taste, almonds or walnuts work wonderfully in that pecan crust. Just make sure you use the same amount. The dates will still bind it together perfectly, even with a different nut!
Q2. What happens if I don’t soak the cashews?
Oh, don’t do it! If you skip soaking, your filling will be gritty, and you’ll end up with a cashew paste rather than that silky cashew cheesecake texture we are aiming for. If you’re in a huge rush, boiling them works, but soaking overnight is always best for the smoothest results.
Q3. Can I make this a full-sized cheesecake instead of a 6-inch one?
You can definitely scale this up! If you use a standard 9-inch springform pan, I recommend doubling the entire recipe—crust, filling, and topping—to get the right height. Just remember that doubling the volume means you’ll need to extend that final freeze time significantly, probably to 5 or 6 hours minimum.
Q4. Is there a way to make the cherry layer less pink?
The freeze-dried cherries are intense, which I love! If you want a subtler color, you can use half the amount of freeze-dried cherries and add a tablespoon of cherry juice (not from concentrate, if possible) to the remaining cashew cream. This gives you the flavor without overpowering the color.
Estimated Nutritional Overview for No-Bake Vegan Cherry Cheesecake
Here’s a basic look at what you’re getting in each slice. Remember, since this is a homemade vegan dessert relying heavily on nuts and coconut, the fat content is higher, but it’s all good, unsaturated fat from the cashews and coconut oil! These values are estimates based on standard ingredient calculations.
| Nutrient | Amount Per Slice (Approx.) |
|---|---|
| Serving Size | 1 slice |
| Calories | 380 |
| Fat | 28g |
| Carbohydrates | 26g |
| Protein | 7g |
Tips for Success with No-Bake Vegan Cherry Cheesecake
I’ve learned a few tricks over the years to make sure this cashew cheesecake comes out perfect every single time. First, please, please use a high-speed blender. If you don’t have one, you’ll need to soak your cashews longer—maybe even boil them for 15 minutes before soaking—to ensure that filling isn’t gritty. That smooth texture is non-negotiable!
Second, don’t skip the initial 30-minute freeze between the layers. It stops the vanilla layer from mixing into the cherry layer when you pour the second half on. That separation is what gives you those beautiful distinct colors!
My biggest pro tip? When it’s time to slice, take a sharp knife and run it under very hot water for about ten seconds, then dry it completely. Wipe the knife clean between every single slice. This trick guarantees you get those gorgeous, clean wedges you see in the photos, otherwise, the coconut oil and coconut milk cause sticking!
For more visual inspiration on our recipes, feel free to check out our Pinterest page.
Storing and Serving Your No-Bake Vegan Cherry Cheesecake
Because this recipe relies on frozen elements to maintain its structure, storage is key. You can keep this beauty in the refrigerator, covered tightly, for about 3 to 4 days. It softens slightly, which some people prefer, so it’s easier to cut straight from the fridge. If you aren’t planning on finishing it within four days, the freezer is your best friend!
When frozen solid, it lasts beautifully for up to a month. If you serve it straight from the freezer, let it sit out on the counter for about 15 to 20 minutes before you try to slice it. This allows the filling to soften just enough to get that perfect creamy mouthfeel without turning soupy.
Storage and Reheating Guide
| Storage Location | Maximum Duration | Serving Note |
|---|---|---|
| Refrigerator | 3-4 Days | Slice easily after 5 minutes at room temperature. |
| Freezer | Up to 1 Month | Allow 15-20 minutes to soften before slicing cleanly. |
Frequently Asked Questions About No-Bake Vegan Cherry Cheesecake
Q1. Can I substitute the pecans in the crust with something else?
You absolutely can! If you have nut allergies or just prefer a different taste, almonds or walnuts work wonderfully in that pecan crust. Just make sure you use the same amount. The dates will still bind it together perfectly, even with a different nut!
Q2. What happens if I don’t soak the cashews?
Oh, don’t do it! If you skip soaking, your filling will be gritty, and you’ll end up with a cashew paste rather than that silky cashew cheesecake texture we are aiming for. If you’re in a huge rush, boiling them works, but soaking overnight is always best for the smoothest results.
Q3. Can I make this a full-sized cheesecake instead of a 6-inch one?
You can definitely scale this up! If you use a standard 9-inch springform pan, I recommend doubling the entire recipe—crust, filling, and topping—to get the right height. Just remember that doubling the volume means you’ll need to extend that final freeze time significantly, probably to 5 or 6 hours minimum.
Q4. Is there a way to make the cherry layer less pink?
The freeze-dried cherries are intense, which I love! If you want a subtler color, you can use half the amount of freeze-dried cherries and add a tablespoon of cherry juice (not from concentrate, if possible) to the remaining cashew cream. This gives you the flavor without overpowering the color.
Estimated Nutritional Overview for No-Bake Vegan Cherry Cheesecake
Here’s a basic look at what you’re getting in each slice. Remember, since this is a homemade vegan dessert relying heavily on nuts and coconut, the fat content is higher, but it’s all good, unsaturated fat from the cashews and coconut oil! These values are estimates based on standard ingredient calculations.
| Nutrient | Amount Per Slice (Approx.) |
|---|---|
| Serving Size | 1 slice |
| Calories | 380 |
| Fat | 28g |
| Carbohydrates | 26g |
| Protein | 7g |

Amazing 3-Step No-bake vegan cherry cheesecake
- Total Time: 4 hours 0 minutes
- Yield: 12 slices
- Diet: Vegan
Description
Creamy and fruity, this no-bake vegan cherry cheesecake features a nutty crust, silky cashew filling, and rich chocolate topping—perfect for any occasion.
Ingredients
- 1 cup unsweetened flaked coconut
- 1/2 cup raw pecans
- 1/2 cup pitted Medjool dates, about 6 dates
- 1/4 teaspoon fine sea salt
- 2 cups raw cashews, soaked in water for at least 4 hours then drained
- 1/2 cup full-fat coconut milk
- 1/4 cup melted refined coconut oil
- 1/3 cup pure maple syrup
- 2 tablespoons fresh lemon juice
- 1 teaspoon pure vanilla extract
- 2/3 cup freeze-dried cherries
- 3 ounces dark chocolate, finely chopped
- 1/4 cup full-fat coconut milk
- Fresh cherries, halved (for garnish)
Instructions
- Lightly grease a 6-inch springform pan with coconut oil and line the bottom with parchment paper. Set aside.
- Add coconut, pecans, dates, and salt to a food processor. Blend until the mixture forms a sticky dough with small nut pieces visible.
- Press the crust firmly and evenly into the bottom of the prepared pan. Transfer to the freezer.
- In a high-speed blender, combine cashews, coconut milk, coconut oil, maple syrup, lemon juice, and vanilla. Blend until completely smooth and creamy, about 2 to 3 minutes.
- Pour half of the mixture over the crust. Tap the pan on the counter to smooth out and release air bubbles. Freeze for 30 minutes.
- Add freeze-dried cherries to the remaining half of the mixture and blend until smooth and pink. Pour over the chilled vanilla layer, smooth the top, and tap to even out.
- Freeze the cheesecake for at least 3 hours until firm.
- For the ganache, warm coconut milk in a small saucepan until just simmering. Pour over chopped chocolate in a bowl and let sit for 3 minutes. Whisk until smooth and glossy.
- Spread the ganache over the chilled cheesecake and let it drip down the sides. Top with fresh cherries.
- Chill in the refrigerator for at least 30 minutes before slicing. For clean slices, warm a knife under hot water and dry it between cuts.
Notes
- Soak cashews for at least 4 hours for the creamiest filling.
- Use a high-speed blender for the smoothest texture.
- Warm a knife under hot water before slicing for clean cuts.
- Prep Time: 30 minutes
- Cook Time: 0 minutes
- Category: Dessert
- Method: No-Bake
- Cuisine: American