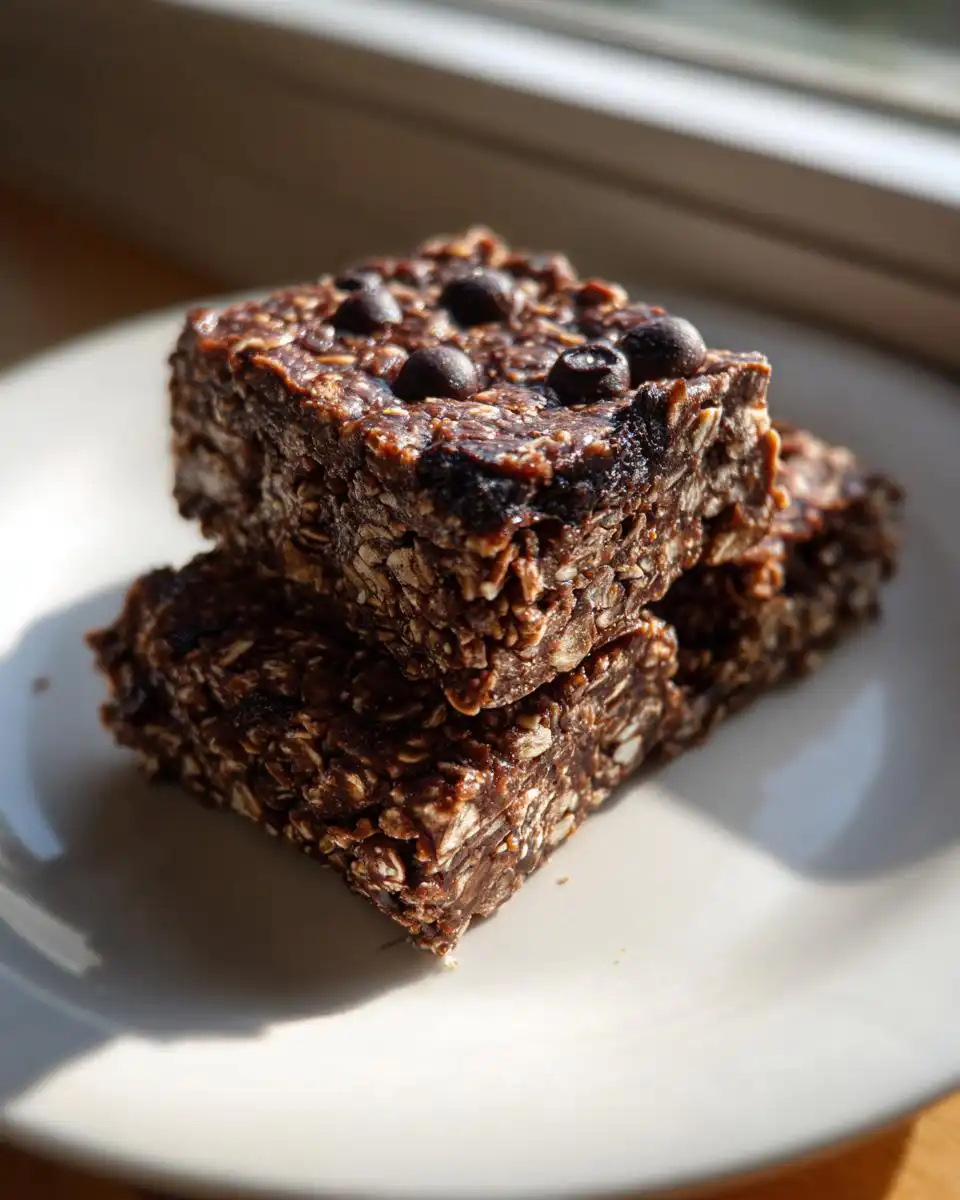
It’s the middle of a Tuesday afternoon, the sun is blazing down here in Asheville, NC, and suddenly you hit that wall. You know the one—where your stomach starts rumbling, but the thought of driving somewhere for a snack feels like climbing a mountain? That’s exactly when I reach for my ultimate fix: No-Bake Chocolate Peanut Oat Energy Squares. Seriously, these are lifesavers!
When I was working hard on my 80-pound weight loss journey, I realized I couldn’t survive on sad little salads. I needed fuel that tasted like comfort but cleaned up my system. That’s how my Easy Detox Recipes blog was born, focusing on taking those rich, satisfying flavors of Southern comfort food and making them clean and quick. These squares are the perfect example of that philosophy in action. They come together faster than brewing a pot of coffee, and you don’t even have to turn on the oven. We’re talking pure, unadulterated energy in about 15 minutes of active time.

Why You Will Love These No-Bake Chocolate Peanut Oat Energy Squares
If you’re anything like me, you need snacks that keep up with a busy life without sacrificing flavor or nutrition. That’s why these No-Bake Chocolate Peanut Oat Energy Squares are my go-to recipe for meal prep every single week. They are incredibly satisfying, taste like a decadent treat, but are packed with the good stuff you need to keep going.
There’s just no beating the convenience here. Seriously, you can mix these up faster than ordering takeout! And best of all, we’re using whole ingredients that actually fuel your body, not drag you down.
Quick Prep and Minimal Effort
We’re talking 15 minutes of active work, maximum. Forget preheating the oven or waiting around for things to bake—the only heat required is a quick zap in the microwave to loosen up the peanut butter. Once they’re pressed into the pan, they just chill out in the fridge until they are perfectly firm. It’s the easiest energy bar you’ll ever make, hands down.
Clean Fuel for Busy Days
These squares are built for sustained energy. The rolled oats give you slow-releasing carbs, and the chia and flaxseeds pack in serious fiber and healthy fats. That protein from the peanut butter keeps you full for hours. It’s the perfect little power bite to keep your energy balanced and support that clean eating lifestyle we’re striving for.
Equipment Needed for Your No-Bake Chocolate Peanut Oat Energy Squares
You don’t need a huge arsenal of fancy gadgets to make these amazing No-Bake Chocolate Peanut Oat Energy Squares. Seriously, this recipe is designed for speed and simplicity, so we are keeping the equipment list short and sweet. You likely have everything you need sitting in your kitchen right now!
Essential Tools
- An 8×8-inch square baking pan. This size is perfect for getting the right height and density.
- Parchment paper. This is non-negotiable—it’s your handle for lifting the whole batch out later!
- A large, microwave-safe mixing bowl. We need room to stir everything together without making a huge mess.
- A sturdy spatula or wooden spoon for mixing everything thoroughly.
- A sharp knife for cutting clean squares once they are chilled.
Gathering Ingredients for No-Bake Chocolate Peanut Oat Energy Squares
When making energy bars, especially ones that don’t see the heat of an oven, the quality of your ingredients really shines through. For these No-Bake Chocolate Peanut Oat Energy Squares, we need to be clear about what we’re using so they set up perfectly and taste amazing. Trust me, using the right kind of oats makes all the difference!
I’ve listed out everything you need below. Make sure your peanut butter is the creamy, natural kind—the kind that separates a little—because that mixes much better than the highly processed stuff.
Ingredient List and Clarity
The measurements here are critical for the right binding texture. When you gather your items, make sure you have everything measured out before you start melting the peanut butter base. You’ll want unambiguous amounts for everything to ensure those bars hold together beautifully.
| Item | Amount | Notes |
|---|---|---|
| Old-Fashioned Rolled Oats | 1 ½ cups | Use rolled oats, not quick oats or steel-cut! |
| Creamy Natural Peanut Butter | 1 cup | Must be runny when warm. |
| Pure Maple Syrup (or Honey) | ½ cup | This is the main sweetener and binder. |
| Unsweetened Cocoa Powder | ¼ cup | For that rich chocolate flavor. |
| Chia Seeds | 2 tbsp | Great for binding and nutrition. |
| Flaxseeds (or Pumpkin Seeds) | 2 tbsp | Ground or whole is fine. |
| Vanilla Extract | 1 tsp | For warmth. |
| Sea Salt | ¼ tsp | To balance the sweetness. |
| Mini Dark Chocolate Chips (Optional) | ¼ cup | For a little texture burst! |
Ingredient Substitutions and Notes
I know not everyone can use peanuts, and sometimes you just don’t have chia seeds on hand! If you need a nut-free version of these No-Bake Chocolate Peanut Oat Energy Squares, swap that peanut butter out for sunflower seed butter or tahini—it works like a charm. Also, please stick to rolled oats; quick oats get mushy and steel-cut oats stay way too hard after chilling.
If you want a little fruity surprise, toss in some dried cherries. And remember that protein boost idea? You can swap the cocoa powder for chocolate protein powder if you’re prioritizing that post-workout recovery. Just remember that protein powder can sometimes make the mix a bit drier, so be ready to add a tiny splash of water if needed.
Step-by-Step Instructions for Making No-Bake Chocolate Peanut Oat Energy Squares
Alright, let’s get down to business! This is where the magic happens, and honestly, it’s almost impossible to mess up. We are making these No-Bake Chocolate Peanut Oat Energy Squares shine by focusing on two main things: getting everything coated evenly and pressing it down like you mean it. Pay attention to these steps, and you’ll have perfect bars every time.
Preparing the Pan and Melting the Base
First things first, get your 8×8 pan ready. You absolutely must line it with parchment paper, and here’s the trick: leave a good overhang on two opposite sides. These overhangs become your handles later on, letting you lift the entire solid block out like a tray. Trust me, trying to scoop them out later is a recipe for heartbreak and crumbs!
Next, let’s tackle the base. In a big microwave-safe bowl, toss in your peanut butter and maple syrup. Pop that in the microwave—usually 30 to 60 seconds is plenty. You don’t want it boiling, just warm enough so it’s nice and runny. Give it a quick stir, adding your vanilla and salt until it looks smooth and glossy. That warmth is what helps everything else mix without breaking up the oats.
Creating the Smooth Wet Mixture
Now that your base is warm and liquidy, it’s time to dump in all the dry stuff: the rolled oats, the cocoa powder, the chia seeds, and the flaxseeds. You’re going to pour them right into that warm peanut butter mixture. Don’t be shy here!
Grab your sturdiest spatula—this is where you need some elbow grease. You have to stir vigorously! Keep mixing until you see zero dry oats hiding at the bottom of the bowl. Everything needs to be completely coated in that chocolatey peanut butter goodness. If, for some reason, it looks too stiff and crumbly after a good minute of stirring, just add a tiny teaspoon of warm water or melted coconut oil to loosen it up just a hair.
Folding in Add-Ins and Pressing Firmly
If you decided to use those mini dark chocolate chips for extra texture, fold them in gently now. But be quick! If the mix is still piping hot from the microwave, those chips will melt right away, and we want visible chunks. Once they’re folded in, immediately dump the whole sticky mass into your prepared pan.
This next part is the most important step for non-crumbling No-Bake Chocolate Peanut Oat Energy Squares: pressing! Use the back of a metal measuring cup or a sturdy spoon and press that mixture down. I mean hard. You need to pack it down firmly and evenly into every single corner. Really put your weight into it; this compression is what makes the bars stick together when they chill.
Setting and Cutting Your No-Bake Chocolate Peanut Oat Energy Squares
Once you’ve pressed it down until the surface is flat and dense, it’s time for patience. Place the pan right into the refrigerator. They need at least an hour, maybe a little longer if your kitchen is warm, to fully set up and firm up properly. Don’t rush this chilling time!
When they are rock solid, use those parchment paper handles to lift the entire block out onto a cutting board. Use a sharp knife—and I mean sharp—to cut them into 16 neat squares. Cutting them while they are still very cold ensures clean edges on your perfect No-Bake Chocolate Peanut Oat Energy Squares.
Tips for Achieving Perfect No-Bake Chocolate Peanut Oat Energy Squares
Even though these are no-bake, there are a couple of places where things can go sideways if you aren’t careful. Most of the issues people run into with these No-Bake Chocolate Peanut Oat Energy Squares come down to two things: either they crumble, or they stick to the pan. Don’t worry, we can fix both of those issues right now with a little focus!
Remember, since we aren’t using heat to activate binding agents, we have to rely on compression and cold temperatures to hold everything together. If you follow these two key focus points, your squares will be sturdy enough for any lunchbox or hiking trip. You can find more tips on clean eating and quick recipes on our Medium page.
Mastering the Pressing Technique
I cannot stress this enough: you have to press the mixture down firmly! Think about packing brown sugar into a measuring cup—you need that level of density. If you just gently spread the mixture into the pan, it will fall apart the second you try to cut it because the oats and seeds haven’t been forced close enough to bond with the peanut butter syrup. Use the bottom of a flat measuring cup and press down hard across the entire surface until it feels solid.
Ensuring Clean Slices
The second big tip is about slicing. If you try to cut these No-Bake Chocolate Peanut Oat Energy Squares when they are even slightly warm or soft, they will smear and stick to your knife. You must let them chill for a full hour in the fridge, sometimes longer if your kitchen is hot. Once they are rock hard, pull the whole slab out using the parchment handles. Use a large, sharp chef’s knife and press straight down firmly rather than sawing back and forth. That clean, cold cut makes all the difference!
Storing and Handling Your Energy Bars
Keeping these delicious No-Bake Chocolate Peanut Oat Energy Squares fresh is super easy, but you do need to be mindful of the temperature! Since they rely on peanut butter and maple syrup to stay together, if they get too warm, they can get a little soft or even start to weep a bit. We want them firm and ready to grab when that afternoon energy dip hits.
The great news is that they store really well, which makes them excellent for meal prepping an entire week’s worth of snacks in one go. Just make sure they are in an airtight container, and you are all set! For more meal prep ideas, check out our ground turkey meal prep recipe.
Storage and Shelf Life Table
Here is the quick guide on how long your squares will happily hang out in the fridge or freezer. The key to long-term storage is keeping them airtight to maintain that perfect texture.
| Storage Location | Maximum Time | Notes |
|---|---|---|
| Airtight Container (Room Temp) | A few hours (Best kept cool) | Not recommended for long periods, especially in summer. |
| Refrigerator | Up to 2 Weeks | Store airtight to maintain firmness. |
| Freezer | Up to 3 Months | Wrap individually before freezing for best results. |
Frequently Asked Questions About This Recipe
I always get questions when people first try making my easy detox snacks! It’s normal when you’re used to baking with an oven. Here are a few things I hear most often about getting these No-Bake Chocolate Peanut Oat Energy Squares just right.
Don’t worry if your first batch needs a little tweaking. That’s how we learn! These answers should help you troubleshoot any little hiccups you run into during your first attempt. You can also follow us on Pinterest for visual guides.
Can I make these No-Bake Chocolate Peanut Oat Energy Squares completely nut-free?
Yes, absolutely! If you have a nut allergy or just ran out of peanut butter, you can definitely swap it out. The best substitutes for that creamy texture in these No-Bake Chocolate Peanut Oat Energy Squares are sunflower seed butter or tahini. Just make sure whatever you use is the natural, creamy kind so it melts nicely with the syrup!
What is the best way to boost the protein content in these squares?
If you’re making these as a serious post-workout fuel, you can easily pump up the protein. The easiest way is to swap out the cocoa powder for your favorite chocolate protein powder. Just be aware that protein powder tends to absorb moisture differently than cocoa, so you might need to add an extra teaspoon of water or a splash of milk to keep the mixture from getting too dry while you stir.
Why are my bars crumbling after cutting?
Crumbling is almost always a sign that you skimped on the pressing step! You need to pack that oat mixture down into the pan as hard as you can—remember, that compression is what holds the bars together since we aren’t baking them. Also, double-check that you used old-fashioned rolled oats and not quick oats, which get too mushy and don’t bind as well, leading to a fragile final product.
Enjoying Your Energy Boost
Now that you have a pan full of these wonderful No-Bake Chocolate Peanut Oat Energy Squares, how should you enjoy them? They are perfect straight from the fridge when you need a quick lift. I love grabbing one with my morning coffee—it’s like having a healthy candy bar for breakfast!
They also pair beautifully with fresh fruit, like a crisp apple or some bright berries, for a balanced snack. Let me know down in the comments what you think of this recipe and how fast they disappeared in your house!
Print
Amazing 16 No-Bake Chocolate Peanut Oat Energy Squares
- Total Time: 1 hour 10 minutes
- Yield: 16 squares
- Diet: Vegetarian
Description
Make these easy No-Bake Chocolate Peanut Oat Energy Squares with rolled oats, chia seeds, and cocoa. A protein-packed snack ready in 15 minutes.
Ingredients
- 1 ½ cups old-fashioned rolled oats (gluten-free if needed)
- 1 cup creamy natural peanut butter
- ½ cup pure maple syrup (or honey)
- ¼ cup unsweetened cocoa powder
- 2 tbsp chia seeds
- 2 tbsp flaxseeds (ground or whole) or pumpkin seeds
- 1 tsp vanilla extract
- ¼ tsp sea salt
- ¼ cup mini dark chocolate chips (optional, for texture)
Instructions
- Line an 8×8-inch square baking pan with parchment paper, leaving some overhang on the sides for easy removal.
- In a large microwave-safe bowl, combine the peanut butter and maple syrup. Microwave for 30–60 seconds until warm and runny, then stir in the vanilla extract and salt until smooth.
- Pour the rolled oats, cocoa powder, chia seeds, and flaxseeds into the bowl with the wet mixture.
- Stir vigorously with a spatula until the oats and seeds are completely coated in the chocolate-peanut butter mixture. If the mixture is too dry, add a teaspoon of warm water or melted coconut oil.
- If using chocolate chips, fold them in now. Ensure the mixture is not piping hot, or they will melt completely.
- Dump the mixture into the prepared pan. Use the back of a spoon or the bottom of a measuring cup to press the mixture down very firmly and evenly into the corners. Pressing hard is key to ensuring the bars hold together.
- Place the pan in the refrigerator for at least 30–60 minutes to let the bars set and firm up.
- Lift the block out using the parchment paper handles and use a sharp knife to cut into 16 squares.
- Wash hands thoroughly before mixing by hand; store in a cool environment to prevent ingredients from spoiling or melting.
Notes
- Nut-Free: Swap peanut butter for sunflower seed butter or tahini.
- Protein Boost: Replace cocoa powder with chocolate protein powder.
- Seed Swap: Use hemp hearts, sesame seeds, or chopped sunflower seeds instead of chia or flax.
- Fruity Twist: Mix in ¼ cup of dried cranberries or chopped dried cherries.
- Coconut Kick: Add ¼ cup of unsweetened shredded coconut to the oat mixture.
- Use Rolled Oats: Quick oats make texture mushy; steel-cut oats are too hard.
- Press Firmly: Pack the mixture down hard to prevent crumbling.
- Warm the PB: Heating peanut butter and syrup slightly aids mixing.
- Slice Cold: Cut bars immediately after removing them from the fridge for clean slices.
- Storage: Store airtight in the refrigerator for up to 2 weeks or freeze for up to 3 months.
- Prep Time: 10 minutes
- Cook Time: 0 minutes
- Category: Snack/Energy Bar
- Method: No-Bake
- Cuisine: American