If you are constantly running out the door with zero time to think about healthy snacks, I totally get it. Back when I was navigating my own 80-pound weight loss journey, fueled by a need to clean up my favorite Southern comfort foods, I realized I needed grab-and-go food that didn’t taste like cardboard. That’s how my Easy Detox Recipes blog started! Here in Asheville, NC, life moves fast, and we need snacks that keep up. That’s why I’m so thrilled to share this Soft Banana Oat Snack Bars Recipe with you today. The absolute best part? It’s a true one-bowl wonder! Seriously, fewer dishes mean less stress, and these bars are packed with natural sweetness from those brown, spotty bananas you usually toss out.

Why You’ll Love This Soft Banana Oat Snack Bars Recipe
Honestly, this recipe is a lifesaver for busy weeks. I developed it specifically because I needed something that tasted like a treat but fit right into my clean eating plan. It checks all the boxes for quick, reliable snacking. Trust me, once you try this, it’ll become your go-to!
- It’s incredibly fast to put together—we are talking minutes before it hits the oven.
- You get amazing, natural sweetness without relying on refined sugars.
- These bars freeze beautifully, meaning you always have a snack ready when you need it most.
Quick Preparation and Cleanup
This is the real magic trick here. Because we mix everything right in the bowl where we mashed the bananas, cleanup is a breeze. Grab your spatula, wash one bowl, and maybe your measuring cups. That’s it! No mixer required, no extra bowls for wet and dry ingredients—just simple, straightforward baking.
Perfect for Meal Prep
If you’re packing lunches for school or just trying to avoid the afternoon vending machine slump at work, these are your best friends. They hold up really well in the fridge, and you can easily double the batch and freeze half. They thaw out perfectly overnight in the lunch bag!
Essential Ingredients for Soft Banana Oat Snack Bars Recipe
When we talk about making these bars truly special, it all comes down to the quality and ripeness of what you put in the bowl. I’ve tried making these with yellow bananas before, and let me tell you, it’s just not the same experience. For a naturally sweet, unbelievably soft bar, you need fruit that looks like it’s past its prime!
| Ingredient | Quantity | Purpose in the Bar |
|---|---|---|
| Very Ripe Bananas | 3 medium | Moisture, natural sweetness, and binder |
| Rolled Oats | 2 cups | Structure and fiber base |
| Quick Oats | 1/4 cup | Helps achieve a slightly softer set than rolled oats alone |
| Honey | 1/4 cup | Gentle sweetener and moisture |
| Coconut Oil or Butter | 1/4 cup (melted) | Richness and binding fat |
| Egg | 1 large | Binding agent, essential for structure |
| Cinnamon | 1 teaspoon | Warm spice that complements the banana |
| Baking Powder & Salt | 1/2 tsp & 1/4 tsp | Leavening and flavor balance |
Ingredient Clarity and Sourcing
I cannot stress this enough: use bananas that are practically black on the peel! Those super spotty bananas are your secret weapon in this Soft Banana Oat Snack Bars Recipe. As bananas ripen past yellow, their starches convert to sugar, meaning you get intense natural sweetness without adding tons of honey. They also break down much easier when mashed, creating a smoother, more uniform base that locks in moisture while baking.
Optional Mix-Ins Explained
This is where you can customize these bars for your family! The ground flaxseed (if you use it) is my little trick for adding a nutritional boost and a bit of extra binding power, acting almost like a light egg replacer if you ever need it. If you want a little texture or burst of flavor, tossing in chocolate chips or dried fruit like chopped apricots or raisins is fantastic. Just make sure those dried fruits are chopped small so they don’t throw off the balance of the batter!
Equipment Needed for Baking
You don’t need a fancy setup for this recipe, which is part of why I love it so much! Having these few items ready keeps the process smooth and fast. Don’t stress if you don’t have an 8-inch square pan; I’ll cover substitutions later, but for this batch, you’ll want:
- One large mixing bowl (for containing all the goodness!)
- A sturdy whisk or fork, and a rubber spatula for stirring
- An 8-inch square baking pan
- Parchment paper (essential for lifting everything out!)
Step-by-Step Instructions for Soft Banana Oat Snack Bars Recipe
Okay, let’s get baking! Since this Soft Banana Oat Snack Bars Recipe is all about ease, we’re working quickly here. The key to success is keeping the steps in order so that the oats have just enough time to soak up the wet ingredients before they go into the oven.
Preparation and Mixing the Batter
First things first, get your oven preheated to 350 degrees Fahrenheit—middle rack position is the best spot for even baking. Now, grab that 8-inch square pan. You absolutely must grease it lightly, but here’s the pro Southern trick: line it with parchment paper so that the paper hangs over two opposite sides. This overhang creates a ‘sling’ that lets you lift the entire baked slab out easily later. No sticking, no broken edges!
Start with your wet ingredients in that big bowl. Mash those bananas until they look mostly smooth—a few tiny lumps are fine, they just add character. Whisk in your honey, melted coconut oil (or butter!), the egg, and the vanilla until everything looks happy and combined. Now, add all your dry stuff right on top of that wet mixture: both types of oats, the cinnamon, baking powder, salt, and that optional flaxseed. Use your spatula to stir everything around until every single oat flake is coated. Don’t overmix! Just make sure there are no dry pockets left at the bottom of the bowl. If you’re using chocolate chips or dried fruit, fold those in gently right at the end.
Baking and Achieving Perfect Texture
Scrape that thick batter into your prepared pan. This is important: use the back of your spatula to press the batter down firmly and evenly across the entire pan. These bars won’t spread much on their own, so you have to make sure they are packed in tight if you want them to hold their shape once they cool.
Slide that pan into the preheated oven. We are looking at 20 to 24 minutes total. You’ll know they are done when the edges turn just slightly golden and the top surface looks dry to the touch. Another great test, which I always use, is to gently press the center with a fingertip—it should spring right back at you. If it sinks in or feels gooey, give it another two minutes.
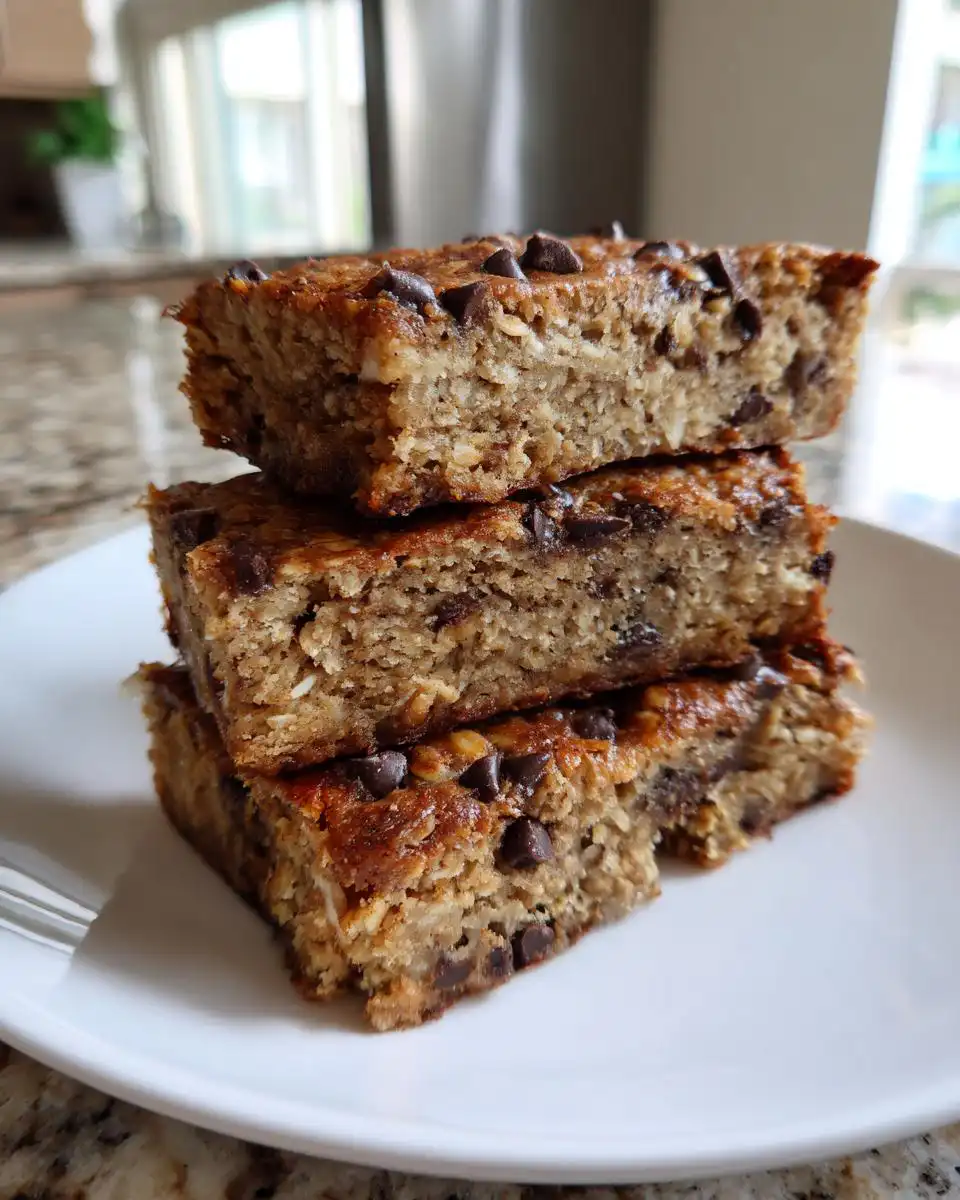
Cooling and Cutting for Clean Slices
Resist the urge to cut these right out of the oven! Seriously, this is where most people mess up the final presentation. The bars are too soft and crumbly when hot. Let them cool completely in the pan on a wire rack. This resting time allows the structure to set up properly. Once they are totally cool—and I mean cool to the touch all the way through—use those parchment sling handles to lift the whole thing out onto a cutting board. Use a sharp knife, and wipe the blade clean between each cut if you want those super neat edges for your lunchboxes!
Tips for Success with Soft Banana Oat Snack Bars Recipe
If you follow the basic steps, you’ll have great bars, but if you want them to be legendary—the softest, most perfect snack bars you’ve ever made—you need to pay attention to these little details. I learned these tricks over many batches when I was perfecting my clean eating routine here in Asheville.
Ensuring Ultimate Softness
My favorite way to guarantee maximum chewiness is to slightly pull them out of the oven a minute or two early. If the center still looks a tiny bit wet, don’t panic! If you let them cool completely, that residual heat will finish the cooking process, leaving you with a softer, almost under-baked texture that is divine. If you’re really worried about structure, place the whole cooled slab in the fridge for 30 minutes before slicing—it firms them right up.
Packing the Pan Correctly
Remember I mentioned pressing down the batter? That step is crucial for this specific Soft Banana Oat Snack Bars Recipe because we aren’t using a ton of binding flour or sugar. You need to use the bottom of a measuring cup or a sturdy spatula to really compact the oats into the pan evenly. If you leave one side light and fluffy, that corner will crumble off the moment you try to grab it later!
Storing Your Homemade Soft Banana Oat Snack Bars Recipe
Since these bars contain an egg and we aren’t using a ton of preservatives, how you store them really impacts their texture and safety. They are so easy to keep fresh, but you do need to be mindful of the time they sit out, especially in a warm kitchen.
| Storage Method | Maximum Time | Notes |
|---|---|---|
| Room Temperature (Cool, Dry) | Up to 1 day | Best right after baking, but keep an eye on them. |
| Refrigerator | 4 to 5 days | Keeps them firm and fresh; they might firm up slightly more. |
| Freezer | Up to 2 months | Wrap individually first for the best grab-and-go convenience. |
Frequently Asked Questions About These Bars
Can I make these without honey?
You absolutely can! If you prefer to use maple syrup, that works wonderfully and keeps the bars vegan-friendly if you skip the egg (though you should check on binding if you skip the egg). Brown rice syrup is another good option if you want to avoid the strong flavor of maple. Just swap it cup-for-cup with the honey measurement.
How do I substitute the coconut oil?
I love coconut oil for its neutral flavor and how it sets up nicely when chilled, but unsalted butter is the perfect substitute here. If you use butter, just make sure you melt it completely before adding it to the wet ingredients. You can even use a neutral-flavored oil like avocado oil if you don’t have butter on hand!
Are these bars gluten-free?
Since oats are naturally gluten-free but often processed near wheat products, if you have celiac concerns, you must use certified gluten-free old-fashioned rolled oats and quick oats. Otherwise, the recipe is naturally free of wheat, barley, and rye!
Next Steps After Baking
Now that you have a pan full of easy, detox-friendly snacks, I’d love to hear what you think! Go ahead and try one warm, then save the rest for later. Snap a photo and let me know how they turned out on social media! You can also find more quick snack ideas over on my Pinterest board.
Tips for Success with Soft Banana Oat Snack Bars Recipe
If you follow the basic steps, you’ll have great bars, but if you want them to be legendary—the softest, most perfect snack bars you’ve ever made—you need to pay attention to these little details. I learned these tricks over many batches when I was perfecting my clean eating routine here in Asheville.
Ensuring Ultimate Softness
My favorite way to guarantee maximum chewiness is to slightly pull them out of the oven a minute or two early. If the center still looks a tiny bit wet, don’t panic! If you let them cool completely, that residual heat will finish the cooking process, leaving you with a softer, almost under-baked texture that is divine. If you’re really worried about structure, place the whole cooled slab in the fridge for 30 minutes before slicing—it firms them right up.
Packing the Pan Correctly
Remember I mentioned pressing down the batter? That step is crucial for this specific Soft Banana Oat Snack Bars Recipe because we aren’t using a ton of binding flour or sugar. You need to use the bottom of a measuring cup or a sturdy spatula to really compact the oats into the pan evenly. If you leave one side light and fluffy, that corner will crumble off the moment you try to grab it later!
Storing Your Homemade Soft Banana Oat Snack Bars Recipe
Since these bars contain an egg and we aren’t using a ton of preservatives, how you store them really impacts their texture and safety. They are so easy to keep fresh, but you do need to be mindful of the time they sit out, especially in a warm kitchen. We packed these for convenience, so let’s make sure they stay good for as long as possible! For more tips on quick, healthy food ideas, check out my Medium page.
| Storage Method | Maximum Time | Notes |
|---|---|---|
| Room Temperature (Cool, Dry) | Up to 1 day | Best right after baking, but keep an eye on them. |
| Refrigerator | 4 to 5 days | Keeps them firm and fresh; they might firm up slightly more. |
| Freezer | Up to 2 months | Wrap individually first for the best grab-and-go convenience. |
Frequently Asked Questions About These Bars
I always get a ton of questions when I post a new simple snack recipe, and that’s totally fair! We all have different pantry staples and dietary needs, so let’s clear up any confusion you might have before you jump into mixing up a batch.
Can I make these without honey?
Oh yes, you certainly can skip the honey! If you are looking for a liquid sweetener substitute, maple syrup is my first recommendation—it brings a lovely, subtle flavor that pairs great with banana and oat. Brown rice syrup is another excellent choice if you want something a little more neutral. Just swap it out one-for-one with the honey amount. Remember, since we aren’t using a ton of sugar, the banana is doing most of the heavy lifting for sweetness!
How do I substitute the coconut oil?
If coconut oil isn’t your favorite or you just don’t have any melted down, unsalted butter is the perfect stand-in. It adds a nice richness that everyone loves. Measure out the same amount of melted butter as you would coconut oil. If you’re aiming for a dairy-free bar but can’t use coconut oil, a neutral vegetable oil like avocado oil works too, but you might notice the bars are a touch softer when they cool down.
Are these bars gluten-free?
The base of the recipe uses rolled oats and quick oats, which are naturally gluten-free grains. However, if you or someone you are baking for needs these to be strictly gluten-free, you absolutely must buy oats that are specifically labeled and certified gluten-free. Oats can easily get cross-contaminated during processing, so check that label carefully if you need to avoid gluten!
Next Steps After Baking
Whew! You did it! Now you have a whole batch of easy, healthy fuel ready to go. Don’t let these delicious bars just sit there waiting! I really want to know what you think of the texture. Take a moment after you’ve cooled and cut them to rate the recipe, or better yet, snap a picture and share your creation with me online!
Tips for Success with Soft Banana Oat Snack Bars Recipe
If you follow the basic steps, you’ll have great bars, but if you want them to be legendary—the softest, most perfect snack bars you’ve ever made—you need to pay attention to these little details. I learned these tricks over many batches when I was perfecting my clean eating routine here in Asheville. For more ideas on clean eating, check out my Easy Detox Recipes collection.
Ensuring Ultimate Softness
My favorite way to guarantee maximum chewiness is to slightly pull them out of the oven a minute or two early. If the center still looks a tiny bit wet, don’t panic! If you let them cool completely, that residual heat will finish the cooking process, leaving you with a softer, almost under-baked texture that is divine. If you’re really worried about structure, place the whole cooled slab in the fridge for 30 minutes before slicing—it firms them right up.
Packing the Pan Correctly
Remember I mentioned pressing down the batter? That step is crucial for this specific Soft Banana Oat Snack Bars Recipe because we aren’t using a ton of binding flour or sugar. You need to use the bottom of a measuring cup or a sturdy spatula to really compact the oats into the pan evenly. If you leave one side light and fluffy, that corner will crumble off the moment you try to grab it later!
Storing Your Homemade Soft Banana Oat Snack Bars Recipe
Since these bars contain an egg and we aren’t using a ton of preservatives, how you store them really impacts their texture and safety. They are so easy to keep fresh, but you do need to be mindful of the time they sit out, especially in a warm kitchen. We packed these for convenience, so let’s make sure they stay good for as long as possible!
| Storage Method | Maximum Time | Notes |
|---|---|---|
| Room Temperature (Cool, Dry) | Up to 1 day | Best right after baking, but keep an eye on them. |
| Refrigerator | 4 to 5 days | Keeps them firm and fresh; they might firm up slightly more. |
| Freezer | Up to 2 months | Wrap individually first for the best grab-and-go convenience. |
Frequently Asked Questions About These Bars
I always get a ton of questions when I post a new simple snack recipe, and that’s totally fair! We all have different pantry staples and dietary needs, so let’s clear up any confusion you might have before you jump into mixing up a batch. If you are looking for more snack inspiration, check out my collection of recipes.
Can I make these without honey?
Oh yes, you certainly can skip the honey! If you are looking for a liquid sweetener substitute, maple syrup is my first recommendation—it brings a lovely, subtle flavor that pairs great with banana and oat. Brown rice syrup is another excellent choice if you want something a little more neutral. Just swap it out one-for-one with the honey amount. Remember, since we aren’t using a ton of sugar, the banana is doing most of the heavy lifting for sweetness!
How do I substitute the coconut oil?
If coconut oil isn’t your favorite or you just don’t have any melted down, unsalted butter is the perfect stand-in. It adds a nice richness that everyone loves. Measure out the same amount of melted butter as you would coconut oil. If you’re aiming for a dairy-free bar but can’t use coconut oil, a neutral vegetable oil like avocado oil works too, but you might notice the bars are a touch softer when they cool down.
Are these bars gluten-free?
The base of the recipe uses rolled oats and quick oats, which are naturally gluten-free grains. However, if you or someone you are baking for needs these to be strictly gluten-free, you absolutely must buy oats that are specifically labeled and certified gluten-free. Oats can easily get cross-contaminated during processing, so check that label carefully if you need to avoid gluten!
Next Steps After Baking
Whew! You did it! Now you have a whole batch of easy, healthy fuel ready to go. Don’t let these delicious bars just sit there waiting! I really want to know what you think of the texture. Take a moment after you’ve cooled and cut them to rate the recipe, or better yet, snap a picture and share your creation with me online!
Print
Divine 1-Bowl Soft Banana Oat Snack Bars Recipe
- Total Time: 30 to 35 minutes
- Yield: 12 snack bars
Description
Soft banana oat snack bars made in one bowl with ripe bananas, oats, and a touch of honey. These are an easy, freezer-friendly snack perfect for lunchboxes and busy work days.
Ingredients
- 3 medium very ripe bananas mashed
- 2 cups old fashioned rolled oats
- 1 quarter cup quick oats
- 1 quarter cup honey
- 1 quarter cup melted coconut oil or melted unsalted butter
- 1 large egg
- 1 teaspoon vanilla extract
- 1 teaspoon ground cinnamon
- 1 half teaspoon baking powder
- 1 quarter teaspoon fine sea salt
- 2 tablespoons ground flaxseed optional
- 1 third cup mini chocolate chips or finely chopped dried fruit optional
- Neutral oil or butter for greasing pan
Instructions
- Preheat your oven to 350 degrees Fahrenheit. Place the rack in the center.
- Lightly grease an 8 inch square baking pan. Line it with a parchment strip overhanging two sides for easy removal.
- In a large bowl, mash the bananas until mostly smooth. Whisk in the honey, melted coconut oil, egg, and vanilla until combined.
- Add the rolled oats, quick oats, cinnamon, baking powder, salt, and flaxseed (if using) to the wet mixture. Stir with a spatula until all oats are coated.
- Fold in chocolate chips or dried fruit, if using. Scrape the batter into the prepared pan. Press it into an even layer.
- Bake for 20 to 24 minutes. The top should look dry, edges lightly golden, and the center should spring back when pressed.
- Let the bars cool completely in the pan on a rack. This allows them to firm up for clean slicing. Lift the slab out with the parchment and cut into 12 bars.
- Store bars containing egg and dairy covered in the refrigerator if not eaten within one day. Do not leave them at room temperature longer than 2 hours.
Notes
- Use very spotty bananas for the best natural sweetness and soft texture.
- Pack the batter firmly into the pan so the bars hold their shape.
- Let the bars cool fully before cutting; use a sharp knife wiped between cuts for neat edges.
- For extra soft bars, underbake by one or two minutes and chill the cooled pan before slicing.
- Freeze individually wrapped bars for grab and go snacks.
- Store at room temperature for up to 1 day in a cool, dry kitchen.
- Keep refrigerated for 4 to 5 days for best texture.
- Freeze for up to 2 months.
- Prep Time: 10 minutes
- Cook Time: 20 to 24 minutes