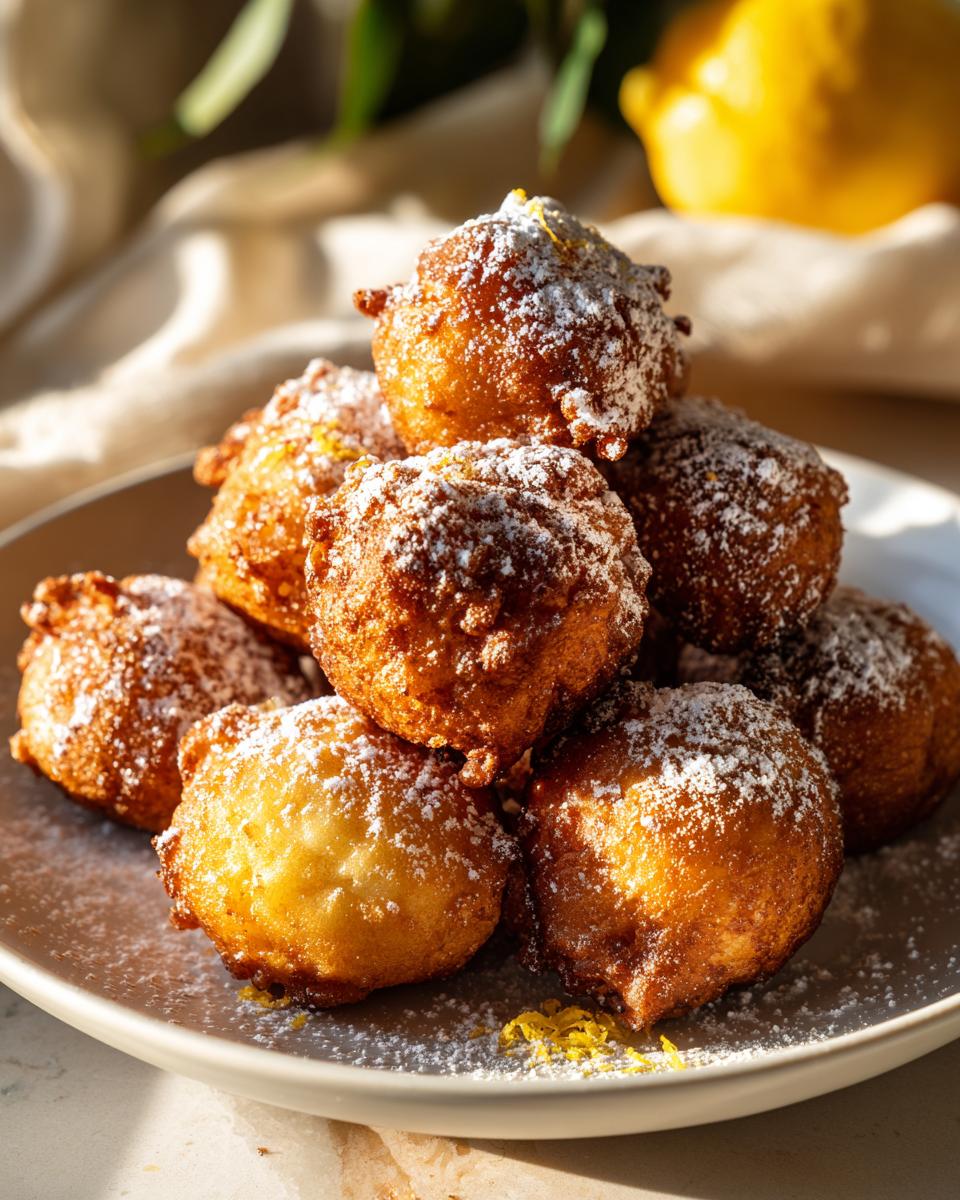
I’m going to let you in on my absolute favorite secret for a quick sweet snack that tastes like it took hours: these incredible Yogurt Fritters. Seriously, if you need something warm, crispy on the outside, and unbelievably fluffy on the inside right now, this is it. I whipped up a batch last Tuesday because I had some leftover Greek yogurt staring at me, and suddenly my kitchen smelled like a carnival.
The magic behind these Yogurt Fritters is that they use simple pantry staples, but the yogurt keeps them light—not heavy and doughy like some fried dough recipes. Don’t worry about deep frying being complicated; this recipe moves fast. You’ll be dusting these beauties with powdered sugar before you know it. Trust me, once you try this quick recipe, it’ll be your go-to for satisfying that sweet craving!
Essential Ingredients for Perfect Yogurt Fritters
When it comes to making these Yogurt Fritters, you can’t just throw things in willy-nilly. You need precision, especially because we are frying them! My goal here wasn’t just to make fried dough; it was to make light, airy puffs that practically float away. That means paying attention to the wet stuff and the dry stuff separately before they meet.
I’ve listed everything below. Don’t substitute the Greek yogurt for regular yogurt—it makes a huge difference in how thick and tangy the batter gets. Also, make sure your baking powder is fresh; old powder means flat fritters, and we absolutely cannot have flat fritters!
| Ingredient | Amount |
|---|---|
| Large Eggs | 2 |
| Granulated Sugar | 1/4 cup |
| Vegetable Oil (for batter) | 2 tablespoons |
| Plain Greek Yogurt | 1 cup |
| Lemon Zest | 1 teaspoon |
| All-Purpose Flour | 2 cups |
| Baking Powder | 2 teaspoons |
| Salt | 1/2 teaspoon |
| Vegetable Oil (for frying) | 4 cups |
| Powdered Sugar (for dusting) | 2 tablespoons |
Measuring Ingredients for Your Yogurt Fritters
Precision matters here, folks. You’ll want to level off your flour when measuring, or else your batter will be too thick and heavy, and we want fluffy! The Greek yogurt is non-negotiable. It’s thicker than regular yogurt, which gives the batter structure without needing a ton of extra flour. That structure is what keeps the fritters light when they hit the hot oil.
Also, make sure you measure that lemon zest! It adds just a tiny, bright background note that cuts through the richness of the fried dough. It’s subtle, but without it, the fritters taste a little one-note.
Preparing the Dry Components
This is where we build that fluffiness! You must sift the flour, baking powder, and salt together. I know, I know, nobody likes sifting anymore, but for frying delicate things like these Yogurt Fritters, it’s key. Sifting breaks up any lumps in the flour and, more importantly, it incorporates air into the baking powder and flour mixture.
When you fold this airy dry mix into the wet ingredients, you’re setting yourself up for success. If you skip sifting, you risk dense spots in your finished fritters. Take the extra two minutes; your taste buds will thank you!
Equipment Needed for Frying Yogurt Fritters
Since we’re dealing with hot oil, having the right gear ready before you even start mixing the batter is super important for safety and getting that perfect golden look. Don’t even think about starting the frying process until you have these things laid out!
First up, you absolutely need a deep, heavy-bottomed pot—something sturdy that holds heat well. You’ll need a reliable thermometer; I use a digital probe, and it’s a lifesaver because consistency is everything when frying. You also need two small spoons for scooping the batter into the oil. Finally, make sure you have a wire rack set over paper towels ready to catch the excess oil. That rack keeps the bottoms from getting soggy!
Step-by-Step Instructions for Yogurt Fritters
Okay, now for the fun part! This whole process moves really quickly once you get going, so have your draining rack ready and your oil heating up before you finish mixing the wet ingredients. We’re aiming for speed and perfect heat management here to get the fluffiest Yogurt Fritters possible.
Creating the Smooth Yogurt Batter
Start with your eggs and sugar in a good-sized bowl. You want to beat these together until they get pale and look a little thick—almost ribbon-like when you lift the whisk. This step whips air in, which is crucial for lift! Once you hit that stage, slowly whisk in your 2 tablespoons of vegetable oil and then the full cup of Greek yogurt. Keep mixing until it looks smooth and happy; don’t worry if it looks a little thin at this point.
Next, stir in that teaspoon of lemon zest. Make sure it gets distributed everywhere. Remember how we prepped the dry ingredients? Those sifted flour, baking powder, and salt need to be ready to go right beside your wet bowl.
Combining Wet and Dry Mixtures for Yogurt Fritters
This is the make-or-break moment for texture! You need to fold the dry ingredients into the wet mixture. I mean it—fold, don’t stir or beat! Use a rubber spatula and gently bring the flour mixture into the yogurt mixture. You are only mixing until you no longer see big streaks of dry flour. If you overmix, you develop gluten, and suddenly your light, airy Yogurt Fritters turn into chewy little hockey pucks. Stop when it’s just combined into a soft, thick batter. Seriously, a few lumps are better than a rubbery texture.
Frying Your Golden Yogurt Fritters Safely
Time to heat the oil. You need about 4 cups in a deep pot, and you must get it to exactly 340 degrees Fahrenheit. If it’s too cool, the fritters soak up oil and get greasy. If it’s too hot, they burn before the inside cooks. Trust the thermometer on this one!
Once it hits that sweet spot, grab two small spoons. Scoop up a little batter with one spoon and use the edge of the second spoon to gently push the batter off into the hot oil as a small, 1-inch round. Don’t crowd the pot! Fry them in small batches so the oil temperature doesn’t crash.
They need about 3 to 4 minutes total. Turn them constantly with a slotted spoon so they brown evenly on all sides. The recipe tells you to check for an internal temperature of 190°F—this is your safety check to ensure the dough is cooked through. Once they hit that deep golden brown color and pass the temperature test, lift them out immediately.
Finishing and Serving the Yogurt Fritters
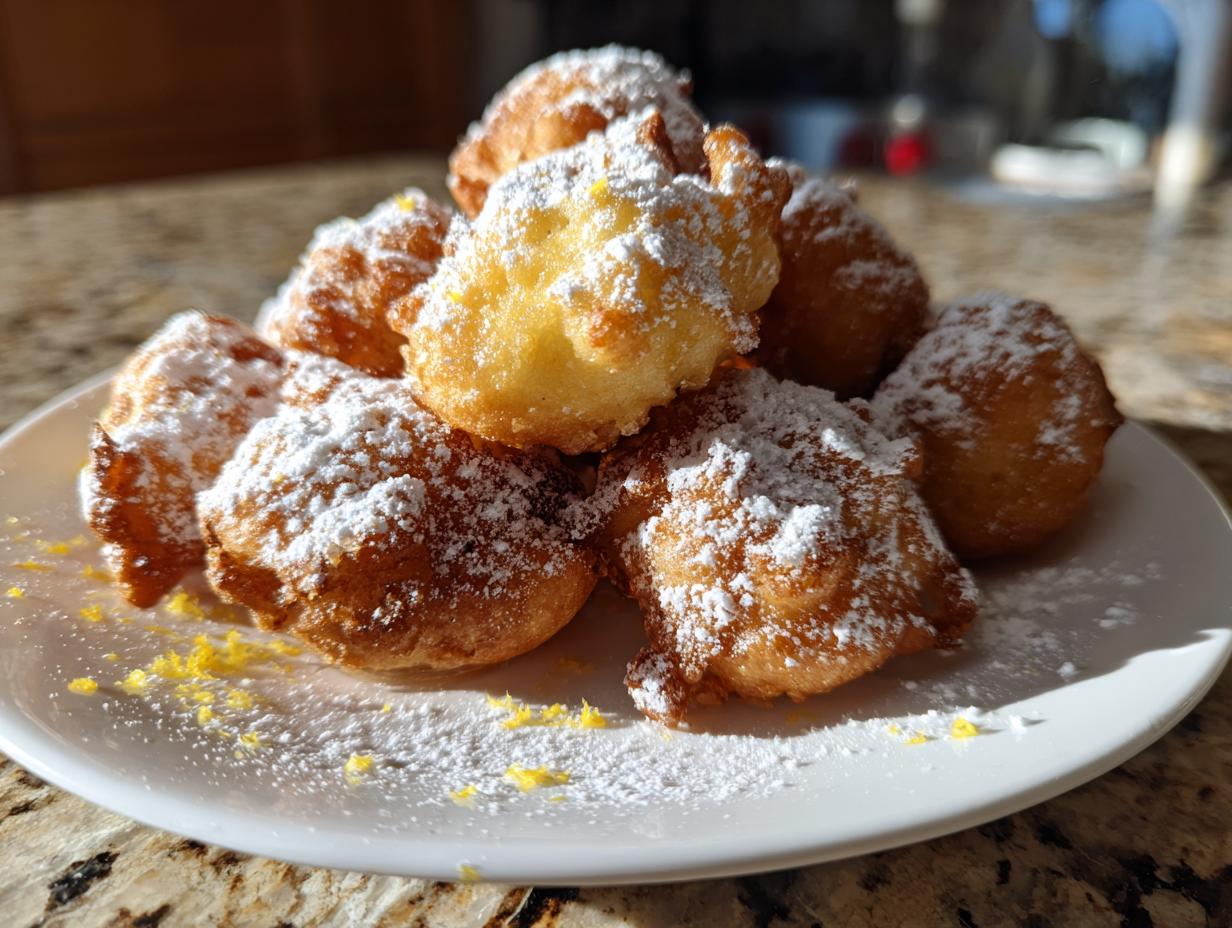
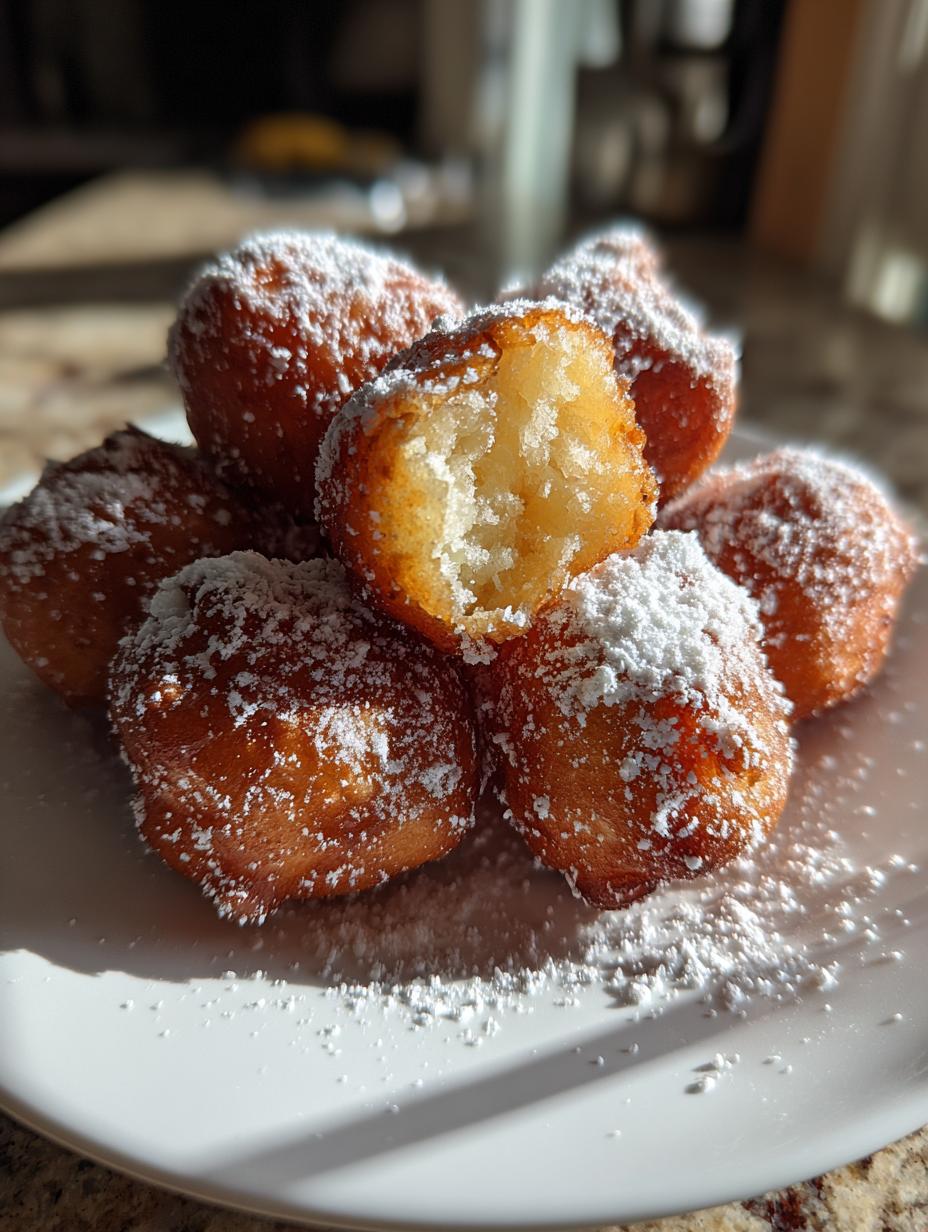
As soon as those beautiful fritters come out of the oil, place them right onto that waiting wire rack over the paper towels. This lets the excess oil drip away fast. Don’t let them sit in a pile; they need air circulation to stay crisp. While they are still warm—not piping hot, but warm enough to steam a little—dust them generously with powdered sugar. That warm sugar coating is what makes these Yogurt Fritters absolutely irresistible!
Tips for Success When Making Yogurt Fritters
I’ve made this recipe so many times that I know exactly where things can go wrong, so let me share a few things I learned the hard way. The biggest issue people have with fried dough is usually greasiness, and we want crispy, not oily, Yogurt Fritters!
First tip: Control your oil temperature like it’s your job! If you see the batter sinking to the bottom and staying there, your oil is too cold. If it starts smoking, it’s way too hot. Stick to that 340°F target for the best results.
Second, remember what I said about folding? Seriously, stop mixing when you still see a tiny bit of flour. That slight under-mixing is what guarantees those lovely, light air pockets inside your Yogurt Fritters. Overmixing is the enemy of fluffiness!
And finally, when you scoop the batter, use two spoons and make them small. Big clumps take forever to cook through, and by the time the center is done, the outside will be too dark. Small, uniform pieces cook evenly and look adorable dusted with powdered sugar.
If you are looking for other quick sweet snacks, check out my recipe for banana oatmeal bars.
Storage and Reheating Instructions for Leftover Yogurt Fritters
If you somehow manage to have any of these delicious Yogurt Fritters left over—which I doubt—you need to store them correctly so they don’t turn into sad, soggy disks. The key to keeping them good is air circulation, even in storage. Don’t seal them airtight right away!
Let them cool completely on the wire rack after dusting them with powdered sugar. Once they are totally cool, place them in an airtight container, but here’s the trick: put a paper towel on the bottom and one on top. That paper towel absorbs any residual moisture that tries to steam them soft. They should be good for about two days at room temperature.
When you want to reheat them, skip the microwave entirely! You want to bring back that crisp exterior. The toaster oven or a regular oven is your best friend here. Here’s a quick guide for bringing those leftovers back to life:
| Storage Method | Duration | Reheating Suggestion |
|---|---|---|
| Airtight Container (Room Temp) | Up to 2 days | Toaster Oven (350°F, 3-5 minutes) |
| Freezing | Up to 1 month | Bake from frozen (375°F, 10-12 minutes) |
Frequently Asked Questions About Yogurt Fritters
I always get questions when I post pictures of these, so let’s cover the common sticking points right here. Most people worry about the texture or what happens if they try to cheat on the frying part. I’ve tried the substitutions, and trust me, sticking to the plan makes the best Yogurt Fritters!
Can I bake these Yogurt Fritters instead of frying?
You certainly can try to bake them, and I guess that would make them ‘yogurt puffs’ instead of fritters! But honestly, the whole point of this recipe is that lovely crisp shell that only hot oil gives you. If you bake them, they will come out more like dense little muffins because they won’t puff up the same way when they aren’t submerged in oil. If you must bake, try brushing them heavily with oil first and baking them on a high heat, but they won’t have that classic golden fried flavor we love.
What kind of yogurt works best for the best texture?
It has to be plain Greek yogurt, hands down. Regular yogurt has way too much water content, and if you use that, you’ll end up having to add so much extra flour to get the batter thick enough. That extra flour weighs the fritter down, and you lose that essential light, fluffy texture in your Yogurt Fritters. Greek yogurt is strained, meaning it’s thicker and tangier, which is exactly what we need to balance the sugar and baking powder.
Q. My batter seems too thin! What did I do wrong?
If your batter is too runny, it means you likely didn’t use Greek yogurt, or maybe your eggs were extra large. Don’t panic! Just add one extra tablespoon of sifted flour at a time until the batter holds its shape on the spoon when you lift it. Remember, we want thick, not pourable!
Q. How do I stop the powdered sugar from melting off?
The powdered sugar melts because it hits hot fritters! You need to let them cool for just a minute or two after they come off the rack so they aren’t steaming hot anymore. They should still be warm enough for the sugar to stick, but not hot enough to instantly dissolve it into a glaze.
For more tips on using yogurt in baking, see my post on Greek yogurt blueberry protein muffins.
Nutritional Estimate for Yogurt Fritters
Now, I’m not a nutritionist, so take these numbers with a grain of salt—or maybe a dusting of powdered sugar! Frying adds fat, of course. These estimates are based on dividing the whole batch into what I think is a reasonable serving size of about 5 or 6 fritters. If you eat the whole batch yourself (no judgment!), the numbers will obviously be higher!
This table just gives you a ballpark idea of what you are enjoying when you make these sweet snacks:
| Nutrient | Estimate Per Serving |
|---|---|
| Calories | 410 |
| Fat | 16g |
| Carbohydrates | 58g |
| Protein | 9g |
The Greek yogurt does help bump up the protein a bit, which is nice for a dessert! Enjoy them responsibly!
If you are interested in seeing more of my recipe creations, you can follow my updates on Medium.
Share Your Homemade Yogurt Fritters
I just love hearing from you all when you try my recipes! Did your Yogurt Fritters come out super fluffy? Were they golden brown perfection? Don’t be shy!
Head down to the comments below and let me know how they turned out. Rate this easy recipe and tell me if you added anything extra—maybe a drizzle of honey instead of just powdered sugar? I can’t wait to see your beautiful fried dough creations!
You can also find inspiration for other sweet treats on my Pinterest page.
Print
5 Fluffy Yogurt Fritters Magic Recipe
- Total Time: 25 minutes
- Yield: 4 servings 1x
- Diet: Vegetarian
Description
Make these light and fluffy Yogurt Fritters in minutes for a sweet snack. This easy recipe uses simple pantry staples for a perfectly crisp golden finish.
Ingredients
- 2 large eggs
- 1/4 cup granulated sugar
- 2 tablespoons vegetable oil
- 1 cup plain Greek yogurt
- 1 teaspoon lemon zest
- 2 cups all-purpose flour
- 2 teaspoons baking powder
- 1/2 teaspoon salt
- 4 cups vegetable oil for frying
- 2 tablespoons powdered sugar for dusting
Instructions
- Beat the eggs and granulated sugar in a medium mixing bowl until the mixture is pale and slightly thickened.
- Whisk in 2 tablespoons of vegetable oil and the Greek yogurt until the batter is smooth.
- Stir in the lemon zest to distribute it evenly throughout the wet ingredients.
- Sift the all-purpose flour, baking powder, and salt together in a separate bowl.
- Fold the dry ingredients into the yogurt mixture until a soft, thick batter forms.
- Heat 4 cups of vegetable oil in a deep pot over medium heat until it reaches 340°F.
- Use two small teaspoons to carefully drop 1-inch rounds of batter into the hot oil.
- Fry the fritters in batches for 3 to 4 minutes while turning them frequently to ensure even browning.
- Remove the fritters when they are deep golden brown and reach an internal temperature of 190°F.
- Drain the hot fritters on a wire rack set over a paper towel-lined baking sheet.
- Dust the warm fritters generously with powdered sugar before serving.
- Confirm the dough is fully cooked through by checking the internal temperature of all fried items.
Notes
- Ensure all fried items reach a safe internal temperature to confirm the dough is fully cooked through.
- Prep Time: 10 minutes
- Cook Time: 15 minutes
- Category: Dessert
- Method: Frying
- Cuisine: American
Nutrition
- Serving Size: 1 serving
- Calories: 410
- Sugar: Unknown
- Sodium: Unknown
- Fat: 16g
- Saturated Fat: Unknown
- Unsaturated Fat: Unknown
- Trans Fat: Unknown
- Carbohydrates: 58g
- Fiber: Unknown
- Protein: 9g
- Cholesterol: Unknown