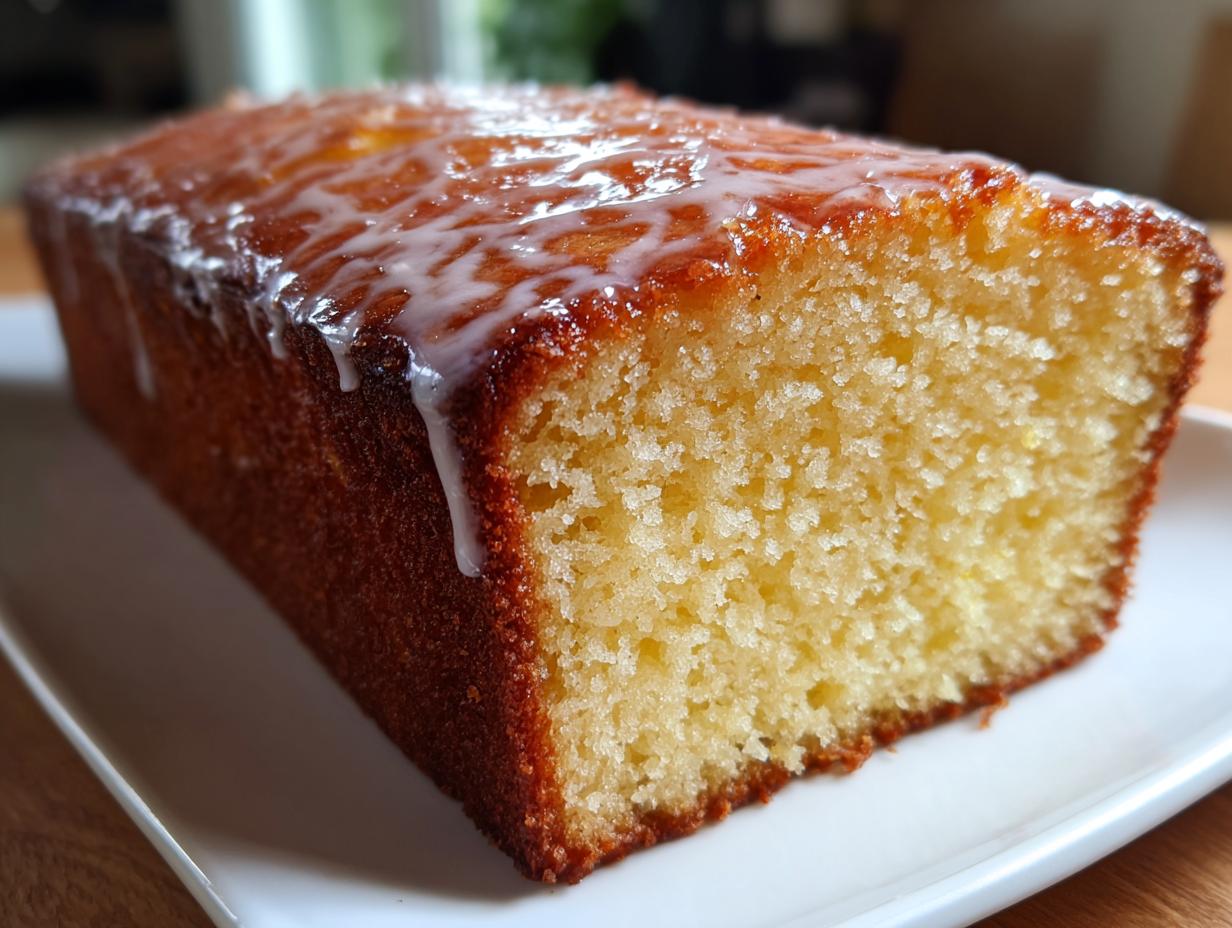
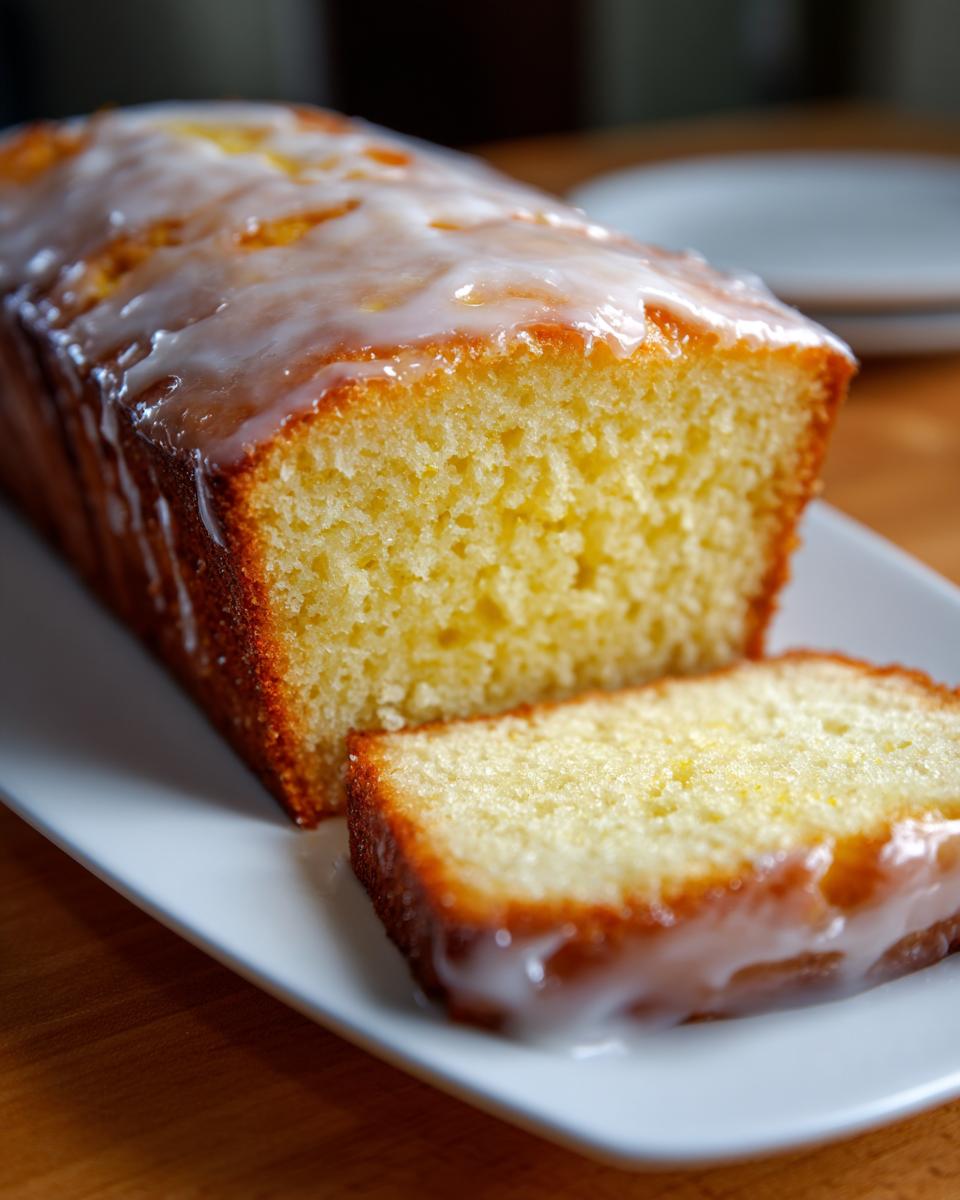
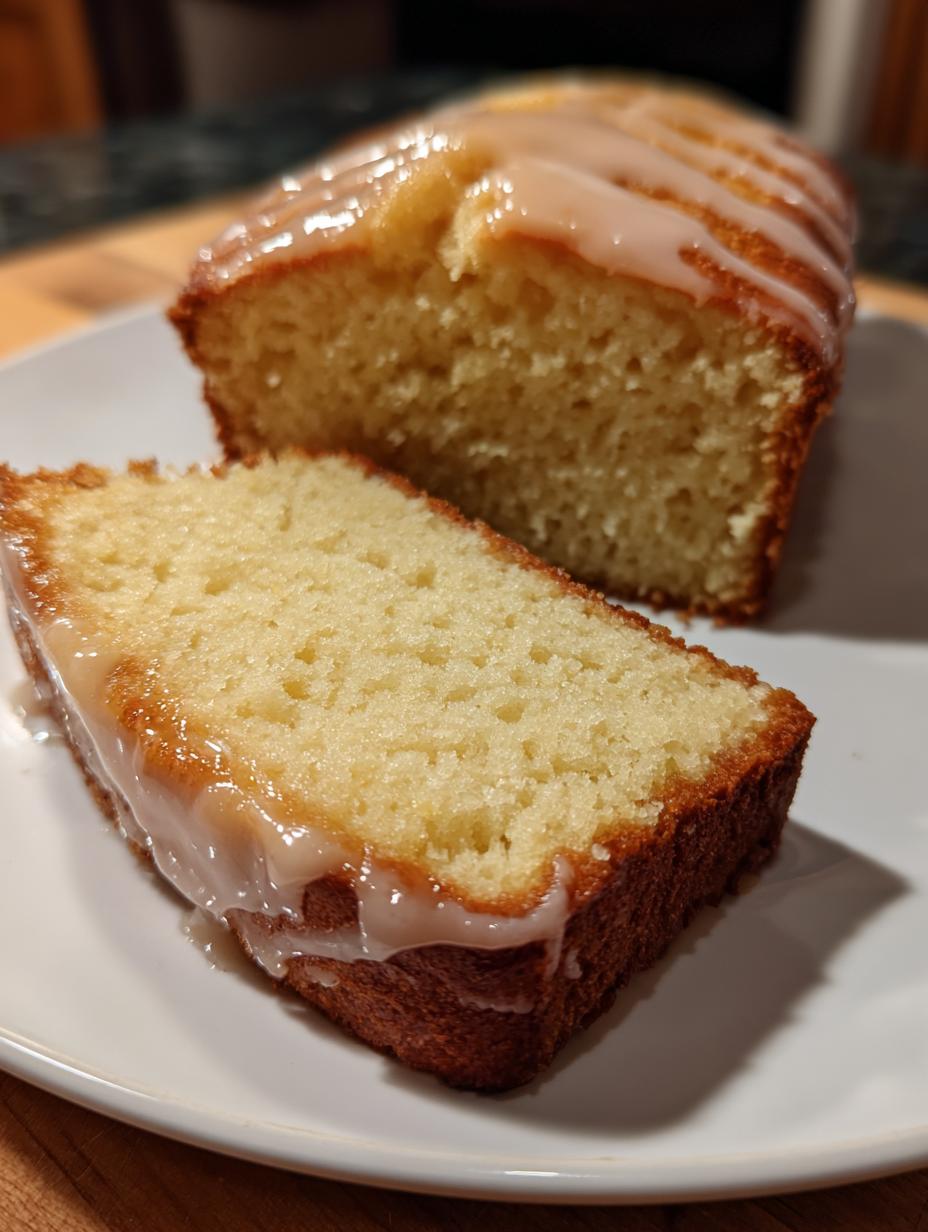
If you’re looking for a cake that whispers sweet simplicity instead of shouting rich indulgence, you’ve hit the jackpot. This Yogurt Cake is my absolute favorite when I need a guaranteed win with minimal fuss. I’m talking one bowl, maybe five minutes of actual work, and you end up with this incredibly moist, tender loaf that smells like sunshine because of all that lemon zest.
Honestly, I was skeptical at first. How could something so easy be so good? But the yogurt does all the heavy lifting here, keeping the crumb soft and light—it’s just magic. You don’t need fancy mixers or complicated folding techniques for this Yogurt Cake. It’s the kind of recipe I whip up after work when I suddenly decide we need dessert *tonight*. Trust me, pull out your largest mixing bowl; we’re keeping the dishes low!
This simple loaf cake is proof that the best things in baking often require the fewest steps. It’s perfect for beginners, but I still reach for it when I want something comforting and familiar.
Essential Ingredients for Your Yogurt Cake
The beauty of this recipe lies in how few ingredients it uses, which means you really need to pay attention to the quality of what you choose! Since this is a Yogurt Cake, the yogurt itself is the star, providing both the moisture and that slight, welcome tang. Don’t grab the Greek stuff yet—we want standard, full-fat plain yogurt here. It keeps the batter looser, which is exactly what we need for that tender crumb.
Everything else is pantry-stable, which is why I love it so much. Just make sure your baking powder is fresh so you get a nice lift!
Ingredient Clarity and Preparation
When you measure out your flour, don’t scoop it straight out of the bag with the cup; that packs it down too much! Spoon the flour lightly into the measuring cup and level it off with a knife. This small step makes a huge difference in the final texture of your Yogurt Cake. Also, zest that lemon before you squeeze it for juice—we want all that fragrant oil, not the tart juice in the batter itself.
Equipment Needed for This Yogurt Cake Recipe
You truly don’t need much, which is part of the charm! Grab your biggest mixing bowl—we’re keeping things contained. You’ll need a whisk for the initial combination, a rubber spatula for gently folding later, and a standard 9×5-inch loaf pan. If you have one, a small saucepan will be necessary only if you decide to do the optional jam glaze. That’s it, I promise!
Step-by-Step Instructions to Bake Your Yogurt Cake
Okay, get your oven preheated now—we want it ready to go when the batter is mixed. Set that heat to 350 degrees Fahrenheit and make sure your oven rack is sitting right in the middle. This ensures the heat surrounds the loaf evenly, which is crucial for a cake this moist.
Next, get your 9×5-inch loaf pan ready. You can grease it really well with butter or shortening, but honestly, I always recommend lining it with parchment paper. Just cut a strip long enough to hang over the sides a little bit—that way, when the cake is done, you just lift it right out. No sticking, no drama!
Preparing the Wet and Dry Components
Grab that big bowl. We start with the wet ingredients first, which is key for a smooth base. Whisk your two eggs and the half-cup of sugar together until they look pale and nicely combined. Don’t worry about whipping air in like you would for a sponge cake; we just want them incorporated.
Now, pour in the oil, that lovely lemon zest, the vanilla extract, and the full cup of plain yogurt. Stir this gently until everything looks like one smooth, pale yellow liquid. It should be pourable and look a little thin—that’s normal for a yogurt-based batter!
Here’s where we have to be careful! In a separate, smaller bowl, quickly whisk your flour, baking powder, and that tiny pinch of salt together. Now, sprinkle this dry mixture right over the wet ingredients. Use your rubber spatula and fold—and I mean gently fold—until you see no more dry streaks of flour. Stop immediately when the last streak disappears. If you keep mixing, you’ll develop the gluten, and instead of a tender Yogurt Cake, you’ll end up with a dense brick. We want fluffy!
Baking Time and Testing for Doneness in Your Yogurt Cake
Pour that batter into your prepared pan. Give the top a little smooth swipe with your spatula to make it even. Slide it onto that middle oven rack. It’s going to bake for about 35 to 40 minutes at 350°F. Since every oven is different, you must check it!
Around the 35-minute mark, grab a wooden skewer or a thin toothpick. Stick it right into the very center of the loaf. If it comes out clean, or maybe with just a few moist, pale crumbs clinging to it, it’s done! If you see wet batter, give it another five minutes and check again. Don’t open the door too often, though, or the top might sink on you.
Creating the Optional Light Glaze for Your Yogurt Cake
If you want that little extra something, don’t wait until the cake is cold! This glaze needs the warmth of the cake to set nicely. Take 3 tablespoons of your apricot or orange jam—apricot is my favorite for this—and put it in a tiny saucepan with just a teaspoon or two of warm water. Heat it over low heat until it melts down into a runny, brushable liquid. It only takes about a minute.
Take the cake out of the oven and let it sit in the pan for about 10 minutes. Then, while it’s still warm, take a pastry brush and quickly paint that warm jam glaze right over the top surface of your Yogurt Cake. It makes it shiny and adds a lovely fruity note. After glazing, transfer the whole thing onto a wire rack to cool completely before slicing.
Tips for Success When Making This Yogurt Cake
I’ve made this recipe dozens of times, and I can tell you exactly where things can go sideways, usually because I got impatient! The number one rule for this incredibly easy Yogurt Cake is simple: do not overmix the flour.
When you add the dry ingredients, you are switching from whisking to folding. Folding means using a large spatula to gently cut down through the middle of the batter and scrape up the sides. You need to stop the second those white streaks disappear. A few small lumps are totally fine; seriously, those lumps bake out and leave you with a softer cake. If you mix until it’s perfectly smooth, you’ve already activated too much gluten, and that beautiful tender crumb will turn tough.
Also, don’t try to substitute cold yogurt! Make sure your yogurt is at least room temperature, maybe even slightly warm—just take it out of the fridge when you start gathering your other ingredients. Room temperature liquids emulsify much better with the oil and eggs. Follow those two pointers, and your Yogurt Cake will be perfect every single time.
Ingredient Notes and Substitutions for Your Recipe
This recipe is built around the moisture and richness provided by standard plain yogurt and oil. If you need to make changes, you should know how it affects your final Yogurt Cake structure. The balance here is delicate because we aren’t using butter, relying on that oil for tenderness.
If you absolutely must substitute the oil, use a neutral-flavored one like canola or sunflower oil. Olive oil, while delicious in savory dishes, has a strong flavor that will definitely fight with the lemon zest. Don’t try to substitute the oil with applesauce or mashed banana—that changes the chemical structure too much and requires you to adjust the leavening agents, turning it into a completely different recipe.
Regarding the yogurt: As I mentioned before, Greek yogurt is thicker because much of the whey has been strained out. If you use Greek yogurt for your Yogurt Cake, you’ll need to add an extra tablespoon or two of milk or water to the wet ingredients just to get the batter to a pourable consistency. If you use sour cream instead, you can often skip that extra liquid, but the cake might be slightly denser.
And one last thing—if you don’t have fresh lemons, you can use a teaspoon of good quality lemon extract, but you’ll miss that beautiful, bright flavor from the actual zest. I always say, if you’re going to bake a lemon-flavored cake, use real lemons! If you are looking for other simple baking ideas, check out my thoughts on baking.
Serving Suggestions for Your Delicious Yogurt Cake
This Yogurt Cake is truly fantastic all on its own, especially with that faint perfume of lemon zest, but sometimes a little something extra makes the dessert feel special. Since the cake is already quite moist and flavorful, we don’t want to weigh it down with heavy frostings.
My favorite way to serve it when I’m feeling lazy is to simply dust the cooled top with a light layer of powdered sugar. It looks elegant without any effort!
If you’re serving this for a brunch or a summer snack, pair slices of the Yogurt Cake with a bowl of fresh berries—strawberries or raspberries cut through the richness perfectly. A dollop of lightly sweetened whipped cream alongside is also a wonderful, light addition. It’s just a perfect, easy treat for any time of day. For other easy fruit pairings, you might enjoy my recipe for Strawberry Bread Softness with Glaze.
Storing and Reheating Your Leftover Yogurt Cake
The great thing about this simple Yogurt Cake is how long it stays fresh! Because we used oil instead of butter, it stays wonderfully moist for days. You definitely don’t need to rush to finish it, though I rarely manage that myself!
If you’ve skipped the jam glaze, you can keep the loaf right on the counter. If you used the glaze, I still recommend keeping it covered so the top doesn’t get sticky, but room temperature is still fine for a couple of days. For longer storage, popping it into the fridge is the safest bet, especially if your kitchen is warm.
When it comes to reheating, honestly, this cake shines best at room temperature. If you’ve chilled it and want to bring back that just-baked softness, a quick zap in the microwave is all you need. Don’t overheat it, or you’ll lose that lovely yogurt moisture!
Here’s my quick guide for keeping your loaf perfect:
| Storage Method | Duration | Best Practice |
|---|---|---|
| Room Temperature | Up to 3 days | Wrap tightly in plastic wrap or foil. Keep away from extreme heat. |
| Refrigerator | Up to 5 days | Store in an airtight container. Let sit on the counter for 20 minutes before serving for best flavor. |
| Freezer | Up to 2 months | Slice first! Wrap individual slices tightly in plastic wrap, then place them in a freezer bag. |
If you freeze your slices, just unwrap one and microwave it for about 15–20 seconds. It tastes almost exactly like fresh-from-the-oven Yogurt Cake! For more baking inspiration, feel free to browse my Pinterest baking boards.
Frequently Asked Questions About Yogurt Cake
Baking is sometimes simple, but it always brings questions! I’ve gathered the ones I hear most often about this recipe. If you’re worried about texture or storage, check these out—they should clear everything up so you can bake your next perfect Yogurt Cake without a hitch.
Can I use Greek yogurt instead of plain yogurt in this recipe?
That’s a great question, and one I get a lot! You *can* use Greek yogurt, but you need to compensate because it’s much thicker than the standard plain yogurt called for. Greek yogurt has less water, which will result in a slightly denser crumb in your finished Yogurt Cake. If you swap it in, add about 1 to 2 extra tablespoons of milk or water to the wet ingredients when you mix them. This thins the batter out just enough to mimic the consistency of regular yogurt, ensuring you still get that light texture.
How long does the finished Yogurt Cake stay fresh?
Because this recipe relies on oil instead of butter, it has fantastic shelf stability! If you leave it covered tightly at room temperature, it stays wonderfully moist for a solid three days. If you used the optional jam glaze, I’d stick to covering it well and keeping it on the counter for about two days, just to be safe. If you need it to last longer than that, move it to the fridge, but remember to let it warm up a bit before eating so the flavor comes through!
What kind of pan works best for this simple cake?
For the baking times listed (35–40 minutes), a standard 9×5-inch loaf pan is what I developed the recipe in. That depth gives you that classic, tall slice. If you use an 8×4-inch pan, the cake will be deeper, so you’ll need to add about 10 to 15 minutes to the baking time, checking carefully! If you want to use two 8-inch round pans instead? You’ll cut the baking time down significantly—probably closer to 25–30 minutes. Just watch that skewer test closely, as round pans bake much faster than a deep loaf!
Sharing Your Homemade Yogurt Cake Experience
I truly hope this simple, bright Yogurt Cake brings a little bit of sunshine to your table! It’s such a reliable recipe, and I love knowing I’ve shared something so easy yet so delicious. When you make a batch, please come back and let me know how it turned out! Drop a star rating below, or tell me in the comments if you stuck with the jam glaze or went for a simple dusting of sugar. Happy baking!