Winter No Bake Jello Pie is the absolute hero when you need a beautiful, impressive dessert but the thought of turning on the oven makes you shiver! Hello, I’m Jordan Bell, coming at you from Asheville, North Carolina. If you’ve followed my journey, you know I’ve shed about 80 pounds, and my blog, Easy Detox Recipes, is all about proving that eating clean doesn’t mean giving up the flavors we love.
Now, I live for Southern comfort food, but let’s be honest, sometimes you need something quick that doesn’t involve hours of fuss. This pie delivers that bright, fruity flavor we crave, but it’s ready with almost entirely chill time. It’s the perfect cool contrast to heavy winter meals. Trust me, when you pull this vibrant, layered beauty out of the fridge, everyone will think you spent all day on it. You won’t believe how simple it is!
Gathering Your Components for the Winter No Bake Jello Pie
Okay, the best part about this recipe is that it relies almost entirely on pantry and fridge staples! That means less running to the store when a dessert craving hits. For this spectacular Winter No Bake Jello Pie, you need to make sure your components are ready before you start assembling, especially because those Jello layers set quickly. It’s all about having everything staged and ready to go so the process flows smoothly! We are aiming for distinct, beautiful layers, so temperature matters!
The cream cheese absolutely must be fully softened—I mean, it should yield easily to a gentle press, or you’ll end up with little lumps in your creamy layer, and we definitely don’t want that. Also, make sure your whipped topping is completely thawed before you need it for the final step. It’s all about having everything staged and ready to go so the process flows smoothly!
Ingredient Specifications for This Easy Winter No Bake Jello Pie
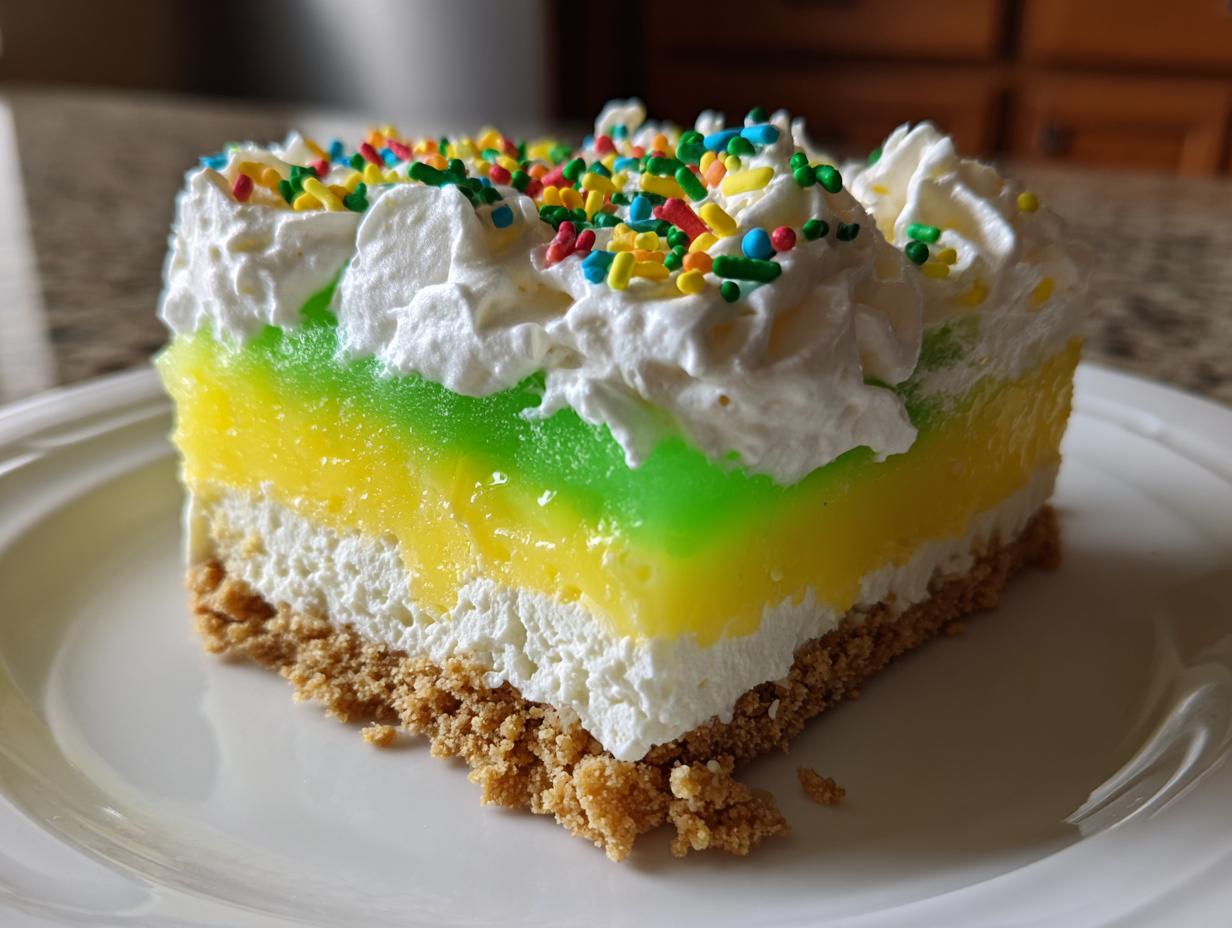
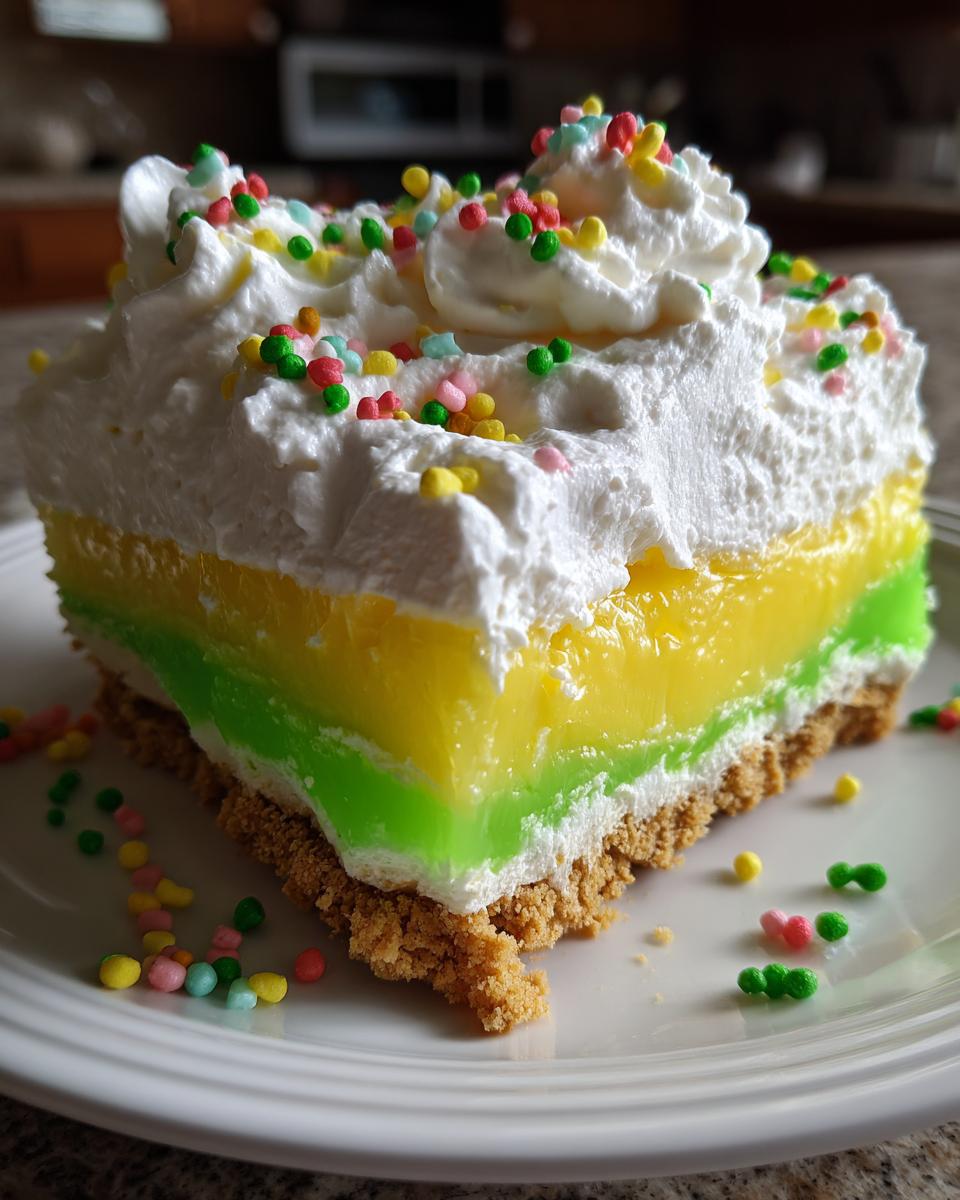
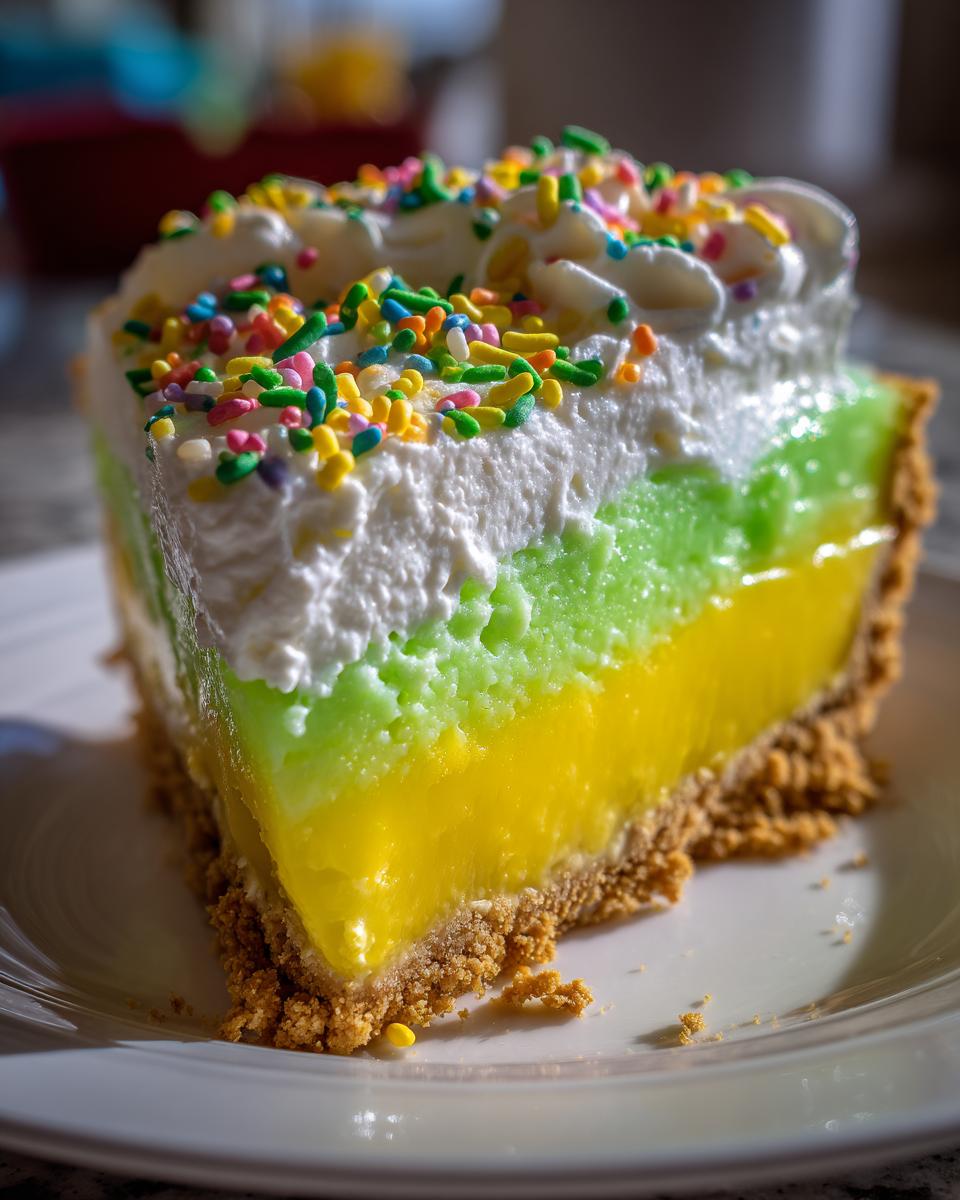
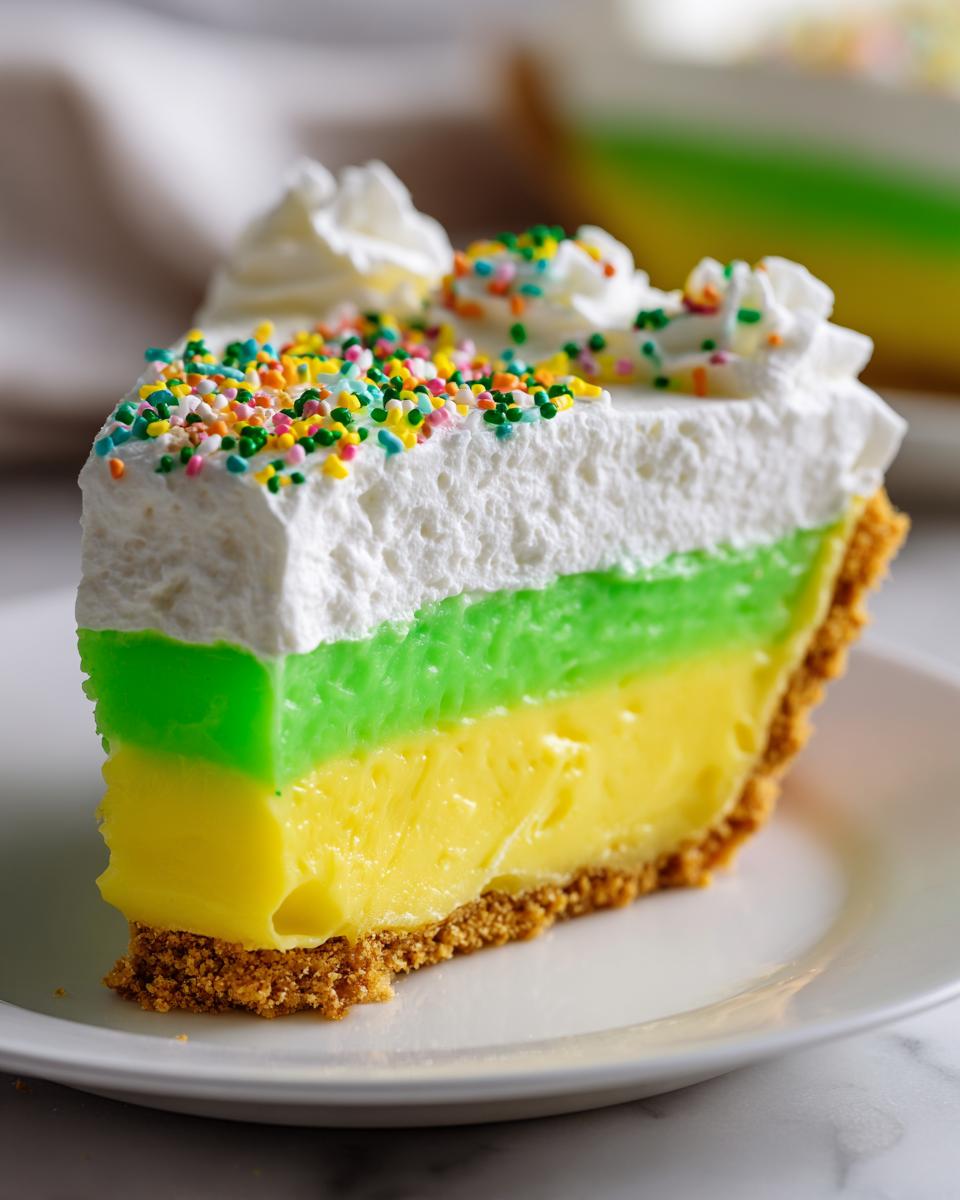
When assembling your Winter No Bake Jello Pie, precision helps keep those layers clean. You need one standard 9-inch pre-made graham cracker crust—don’t stress about making your own crust here; we’re keeping it easy! For the creamy middle, you need 8 ounces of cream cheese that’s nice and soft, mixed with a half cup of granulated sugar and just one teaspoon of vanilla extract for that classic flavor.
The fun part is the Jello! You’ll use two 3-ounce boxes of Jello, and I love mixing lemon and lime because they look so bright against the white cream cheese, but feel free to experiment. Remember, you’ll need exactly 2 cups of boiling water to dissolve each flavor, followed by 1 cup of cold water for each box to help the setting process along. Finally, 8 ounces of thawed whipped topping tops it all off, maybe with a sprinkle or two!
Essential Equipment for Smooth Layering
You don’t need a ton of fancy gear for this one, thankfully! A sturdy mixing bowl is a must for whipping up that cream cheese mixture until it’s light and fluffy. You’ll definitely want an electric hand mixer for that step, or you’ll be stirring until your arm aches. Make sure you have measuring cups and spoons handy, and a large, heat-safe bowl or measuring cup for dissolving the Jello with boiling water. A rubber spatula will be your best friend for gently spreading those layers without disturbing the set Jello underneath.
Step-by-Step Method for Your Winter No Bake Jello Pie
This pie is all about timing, so have your fridge space ready! We move quickly through the mixing, but we let the chilling do the heavy lifting. Follow these steps exactly, and you’ll have those gorgeous, clean layers everyone talks about when they see this Winter No Bake Jello Pie.
Preparing the Creamy Base Layer
First things first, grab that softened cream cheese. Put it in your mixing bowl and beat it until it is completely smooth. I mean no lumps whatsoever—this is crucial! Once it looks like fluffy white clouds, add in your half cup of sugar and that single teaspoon of vanilla extract. Keep mixing until the whole thing is light and airy. Set this creamy dream aside for a moment while we tackle the first Jello layer.
Setting the First Fruity Layer Correctly
Now for the color! Take one box of your chosen Jello—I’m using lemon first—and dissolve it completely in 1 cup of boiling water. Stir until there are zero granules left at the bottom. Then, stir in 1 cup of cold water. You do not want to rush this next part! Pour about half of this liquid Jello mixture right into your waiting graham cracker crust. Pop that into the fridge for 30 to 45 minutes. You’re looking for it to be partially set—it should be jiggly but firm enough that if you gently touch it, it doesn’t stick to your finger immediately. If it’s too liquidy, the cream cheese layer will sink right through it, and that ruins the look! If you are interested in other gelatin tricks, check out this gelatin trick recipe.
Assembling and Final Setting of the Winter No Bake Jello Pie
Once that first layer is set just right, pull the pie out. Carefully spread that fluffy cream cheese mixture evenly over the Jello layer. You can use the back of a spoon to gently smooth it out. Back into the fridge it goes for another 30 to 45 minutes until that middle layer is firm to the touch. While that’s setting, mix up your second Jello flavor (lime works great!) using the remaining boiling and cold water. Once the cream cheese layer is firm, gently pour the second Jello liquid over it. This is the final layer before the long chill. Cover your beautiful Winter No Bake Jello Pie loosely and let it chill for a minimum of 4 to 6 hours, but honestly, overnight is always best for the firmest, cleanest slices.
| Task | Timing/Notes |
|---|---|
| Cream Cheese | Beat until totally smooth before adding sugar. |
| First Jello Layer | Chill 30-45 mins until partially set (jiggly but not wet). |
| Cream Cheese Layer | Chill 30-45 mins until firm before topping. |
| Final Chill | 4-6 hours minimum, or overnight for best results. |
Why This Winter No Bake Jello Pie Works So Well
When the weather is cold and you don’t want to heat up the kitchen, this pie is your best friend. It’s the definition of low-effort, high-reward dessert. Honestly, I love how it brightens up a dreary winter evening with all that color!
- It requires zero oven time, which is a massive win when I’m trying to keep my energy bills low.
- The cleanup is minimal—just a few bowls and a spatula, no messy baking sheets or sticky pans.
- It tastes fantastic made completely ahead of time, meaning you can prep it the day before your gathering.
- The texture contrast is unbeatable: crisp crust, smooth cream, and that fun, fruity wobble.
- It’s incredibly versatile; you can swap out the Jello flavors based on what you have on hand.
Expert Tips for Perfect Winter No Bake Jello Pie Layers
Getting those clean, distinct layers in this beautiful pie takes just a little bit of technique, but once you nail it, you’ll never look back. It’s not about complicated baking science; it’s about respecting the chilling times and being gentle when assembling. Trust me, a little patience here pays off big time in the final presentation! You can see more visual tips on my Medium profile.
Addressing Common Texture Issues
If you have lumps in your creamy center, it’s almost always because the cream cheese wasn’t fully softened before you started mixing. Don’t microwave it until it’s melty—just leave it on the counter for a good hour or two until it’s truly pliable. Also, when you go to pour that liquid Jello over a set layer, use the back of a spoon held just above the surface. Pour the liquid *onto* the spoon; this disperses the weight and prevents the liquid from cutting right through that delicate set layer underneath. It’s a tiny trick, but it keeps everything looking professional!
Making Your Winter No Bake Jello Pie Ahead of Time
This is truly the best part of this recipe: it gets better with time! I actually prefer making my Winter No Bake Jello Pie the day before I plan to serve it. The longer those flavors meld together in the cold, the richer the creamy layer tastes against the bright Jello. You can bake that crust (or use the pre-made one) and get the first layer set the night before. Just cover it tightly and keep it in the fridge. When you’re ready to serve the next day, just finish the layers and top with the whipped cream right before you bring it to the table.
Storing and Serving Your Chilled Dessert
Since this dessert is all about that perfect chill, storage is key. Keep your pie covered tightly in the refrigerator. It stays wonderfully fresh like this for up to four days, which is great for leftovers, though I doubt you’ll have many! Because it’s a no-bake recipe, please do not try to freeze it. Freezing tends to ruin the texture of the whipped topping and can make the Jello watery when it thaws.
When it’s time to serve those beautiful slices, you need a trick for clean cuts. Get a sharp knife and dip the blade into a glass of very hot water, wiping it dry quickly before each slice. This melts the Jello just enough to glide right through without dragging the layers. Serve it straight from the fridge!
| Storage Method | Duration |
|---|---|
| Refrigerate (Covered) | Up to 4 days |
| Freezing | Not recommended |
| Serving Prep | Dip knife in hot water for clean slices. |
Common Questions About This No Bake Dessert
I get so many questions whenever I post photos of this pie online! People love that it’s easy, but they always want to know how to tweak it for different occasions. It’s such a flexible recipe, even though we are sticking strictly to a no-bake structure here.
One of the most frequent inquiries I get is about flavor combinations. Can you use strawberry and orange Jello instead of lemon and lime? Absolutely! The key is ensuring you are using the same size boxes (3 ounces) and following the water ratios precisely so the setting times remain consistent for your Winter No Bake Jello Pie. Just make sure the flavors you choose contrast well visually!
Another thing people ask is if they can skip the cream cheese layer to make it lighter. While you certainly could, that middle creamy layer is what gives the pie its structure and richness. If you skip it, you’ll need to significantly adjust the chilling time for the bottom Jello layer, or the top layer will just sink in. It’s easier to stick to the recipe for that perfect texture! If you need more ideas on easy desserts, check out my desserts category.
Can I Substitute the Graham Cracker Crust for the Winter No Bake Jello Pie
The pre-made graham cracker crust is my go-to because it saves about 15 minutes of mixing and pressing crumbs, which is a huge bonus when I’m busy. If you really want to switch it up, you absolutely can make your own crust using vanilla wafers or even shortbread cookies instead of graham crackers. Just crush them up finely and mix them with about 4 tablespoons of melted butter until it’s evenly moistened, then press it firmly into your pie plate.
However, I always caution folks against trying things like a shortbread crust for this specific Winter No Bake Jello Pie if they plan on keeping it for several days. The moisture from the Jello can sometimes make a cookie crust a little too soft faster than a graham cracker crust does. Sticking to the graham cracker base keeps that bottom layer perfectly crisp and ready for slicing all week long! For more recipe inspiration, follow my Pinterest boards.
Share Your Thoughts on This Favorite Dessert
Alright, friends, I really want to know what you think! Have you tried this quick and colorful pie yet? Did you stick with the lemon and lime, or did you mix up the flavors? Drop a comment below and let me know how it turned out. If you made it, snap a picture and share it on social media—tag me so I can see your beautiful, wobbly creations!
Print
Amazing 3 Layer Winter No Bake Jello Pie
- Total Time: 6 hours
- Yield: 8 servings 1x
- Diet: N/A
Description
Refreshing No Bake Jello Pie layers fruity jiggle over creamy filling in a crisp crust, ready with mostly chill time for busy winter nights. This family-pleasing dessert uses pantry staples like assorted Jello flavors for vibrant, cool slices everyone loves.
Ingredients
- 1 (9-inch) pre-made graham cracker crust
- 8 ounces cream cheese, softened
- 1/2 cup granulated sugar
- 1 teaspoon vanilla extract
- 2 (3-ounce) boxes Jello (lemon and lime flavors)
- 2 cups boiling water
- 2 cups cold water
- 8 ounces whipped topping, thawed
- Seasonal sprinkles
Instructions
- Beat softened cream cheese until smooth.
- Add sugar and vanilla; beat until fluffy.
- Dissolve one box lemon Jello in 1 cup boiling water; stir in 1 cup cold water.
- Pour half Jello into crust; chill 30-45 minutes until partially set.
- Spread cream cheese layer evenly over Jello.
- Chill 30-45 minutes until firm.
- Dissolve lime Jello in remaining boiling and cold water; pour over cream cheese.
- Chill 4-6 hours or overnight until set.
- Spread whipped topping; add sprinkles and serve chilled.
Notes
- Soften cream cheese fully to avoid lumps.
- Pour Jello slowly over spoon back for clean layers.
- Chill first layer partially jiggly before adding cream cheese.
- Make ahead; flavors improve overnight.
- Slice with sharp knife dipped in hot water.
- Refrigerate covered up to 4 days. Do not freeze.
- Prep Time: 25 minutes
- Cook Time: 0 minutes
- Category: Dessert
- Method: No Bake
- Cuisine: American
Nutrition
- Serving Size: 1 slice
- Calories: 375
- Sugar: Unknown
- Sodium: Unknown
- Fat: 22g
- Saturated Fat: Unknown
- Unsaturated Fat: Unknown
- Trans Fat: Unknown
- Carbohydrates: 45g
- Fiber: Unknown
- Protein: 5g
- Cholesterol: Unknown