When those first real chilly winds blow down from the Blue Ridge Mountains here in Asheville, NC, all I crave is something warm, hearty, and deeply comforting. That’s why I’m so excited to share this White Turkey Chili with you today! It’s the perfect antidote to a cold evening.
For those of you new here, I’m Jordan Bell, and I run the Easy Detox Recipes blog. My own journey losing 80 pounds was built on a simple principle: you don’t have to give up the rich, soul-satisfying flavors of Southern comfort food just because you’re eating clean. This chili proves it! We’re keeping all the creamy texture and deep flavor you expect, but cutting out the heavy stuff you don’t need.
Forget those tired tomato-based pots; this version is packed with cannellini beans and green chiles, making it lighter but incredibly satisfying. Trust me, this creamy, cozy pot of White Turkey Chili is about to become your go-to meal all winter long. It’s pure comfort, made right.
Gathering Ingredients for White Turkey Chili
Before we even think about heating up the Dutch oven, we need to get our supplies ready. Making a great White Turkey Chili is all about having everything prepped and waiting, which is what I call my ‘mise en place’—it keeps things moving fast once you start cooking! Don’t worry if you don’t have exact measurements right now; just gather the components.
We are building layers of flavor here, from the fresh veggies to the spices that really sing. Below is the full list of everything you’ll need to pull this beautiful, creamy chili together. Check the notes next to each item for any special handling.
Essential Ingredients for Creamy White Turkey Chili
The list below has everything required for this recipe. Make sure your cannellini beans are properly drained and rinsed before they hit the pot! Exact quantities and preparation notes are listed right in the table for easy reference.
Table of White Turkey Chili Ingredients
| Component | Quantity | Preparation Note |
|---|---|---|
| Ground Turkey | 1\u00bd pounds | N/A |
| Olive Oil | 2 tablespoons | N/A |
| White Onion | 1 large | Diced |
| Poblano Peppers | 2 | Seeded and diced |
| Jalape\u00f1o Pepper | 1 | Seeded and minced |
| Garlic | 4 cloves | Minced |
| Cannellini Beans | 3 cans (15 oz each) | Drained and rinsed |
| Diced Green Chiles | 2 cans (4 oz each) | N/A |
| Chicken Broth | 3 cups | Low-sodium preferred |
| Spices (Cumin, Chili Powder, Oregano, Coriander, Cayenne) | Various | Ground |
| Salt & Pepper | To taste | N/A |
| Bay Leaf | 1 | N/A |
| Sour Cream | \u00bd cup | Reduced-fat |
| Fresh Lime Juice | 2 tablespoons | N/A |
Preparing Your White Turkey Chili Base
Okay, now for the fun part where everything starts smelling incredible! We are making the base for this amazing, deeply flavorful White Turkey Chili right here in one big pot. No fancy cleanup required, which is just how I like my weeknight meals. We start slow and build that flavor foundation carefully.
Sautéing Vegetables for White Turkey Chili
Grab your biggest Dutch oven or a heavy-bottomed pot. Heat up that olive oil over medium heat until you see it shimmer a little bit—that’s your signal it’s ready. Toss in your diced white onion first. Let those cook down for a good five minutes. You want them soft and translucent, not brown and crispy. That gentle cooking releases their sweetness!
Browning Ground Turkey and Toasting Spices
Next up, bring in the ground turkey. Use a wooden spoon to break it up into small crumbles as it cooks. Keep stirring until it’s completely gone from pink—that takes about eight minutes. Once the turkey is done, throw in your seeded poblano peppers and that minced jalapeño and garlic. Cook them for just three more minutes until you can really smell that fresh garlic perfume. Now, pay attention! This next part is crucial for a deep flavor in your White Turkey Chili. Add all your ground spices—cumin, chili powder, oregano, coriander, and cayenne. You have to stir that constantly for about two minutes. Toasting those spices in the hot oil wakes them up completely. It makes a world of difference, trust me!
Simmering the Flavor into White Turkey Chili
We’ve got our aromatic base ready, and those spices are singing! Now it’s time to turn this mixture into real chili. This is where the magic really starts happening, and the whole kitchen begins smelling like the coziest spot on earth. Don’t rush this part; it’s all about letting those ingredients get to know each other in the broth.
Combining Liquids and Beans
Time to pour in the chicken broth—I always use low-sodium so I can control the salt myself later on. Next go in those beautiful cannellini beans—make sure you’ve rinsed off all that canning liquid first! Then we add the diced green chiles and, importantly, that single bay leaf. That bay leaf adds a mysterious, earthy depth that you just can’t skip in a great White Turkey Chili. Give everything a good stir to make sure the turkey and veggies are submerged nicely in the liquid.
Simmering Time for Perfect White Turkey Chili Consistency
Turn the heat up until the whole pot comes to a gentle boil. Once you see those bubbles, immediately reduce the heat way down low—we want a bare simmer, just a little occasional bubble breaking the surface. We need to let this cook uncovered for a full 35 minutes. Why uncovered? Because that lets the steam escape slowly, which is key to thickening the chili naturally. As it simmers, you’ll notice the broth reducing slightly and the flavors concentrating. This slow simmer is what takes this from being turkey soup to a hearty, flavorful White Turkey Chili. Stir it every ten minutes or so just to make sure nothing is sticking to the bottom while it works its magic.
Finishing Touches for Your White Turkey Chili
The long simmer is done, and now we just need to bring in the elements that make this chili so wonderfully rich and bright. We are about two minutes away from serving the best White Turkey Chili you’ve ever made. Don’t worry about tasting it one last time until everything is mixed in!
Achieving Creaminess in White Turkey Chili
First things first: find that bay leaf and fish it out! You don’t want anyone biting into that! Now, take the pot completely off the heat. This is super important, just like I noted in the tips—if you add the sour cream while the chili is still boiling hot, it can sometimes curdle a little. We want smooth creaminess! Stir in your reduced-fat sour cream until it melts right into the broth, making everything velvety. Then, splash in those two tablespoons of fresh lime juice. That lime cuts through the richness perfectly and wakes up all those spices we toasted earlier. Finally, give it a taste test and adjust your salt and pepper. A good White Turkey Chili needs that final seasoning check!
Why You’ll Love This White Turkey Chili
I know you’re busy, and honestly, who has time for complicated recipes during the week? That’s why I developed this specific White Turkey Chili to be incredibly satisfying without demanding all day on the stove. It hits all the right notes: cozy, hearty, and fits right into a clean-eating lifestyle. You’re going to keep coming back to this one, I promise! You can see more of my clean eating philosophy on my Medium profile.
Key Benefits of This Recipe
- It comes together fast, clocking in at just over an hour total time, perfect for weeknights.
- It’s naturally tomato-free, giving you a unique, creamy, and bright flavor profile.
- We use lean ground turkey and low-sodium broth, keeping it firmly in the clean eating category. If you are looking for more lean protein ideas, check out my post on ground turkey meal prep.
- The combination of cannellini beans and turkey provides a huge protein punch to keep you full.
- It freezes beautifully, meaning you can double the batch of this delicious White Turkey Chili for future meals!
Ingredient Notes and Substitutions for White Turkey Chili
One of the best things about making your own chili is being able to tweak it to exactly what you have on hand or what you prefer! While this recipe is fantastic as written, don’t panic if you’re missing one specific item. We want this White Turkey Chili to be flexible for your kitchen. I always encourage playful experimentation, but please try to stick close to the fresh ingredients for the best results! You can find more recipe inspiration on my Pinterest boards.
I’ve gone through my notes to pull out the best swaps and flavor enhancers that keep the spirit of this creamy recipe intact, even when you need to substitute.
Alternate Beans and Creamy Texture Tips
If you run out of cannellini beans or just prefer a different texture, Great Northern beans or even navy beans work wonderfully—they melt into the chili almost the same way. For a tangier flavor and a protein boost, you can swap out the sour cream for plain Greek yogurt. It acts just like sour cream but gives you a little something extra. And here’s a great trick: if your chili seems a little thin after the simmer, take about a cup of those cannellini beans out, mash them up really well against the side of the pot with your spoon, and stir them back in. It thickens the whole pot of White Turkey Chili naturally!
Flavor Boosters for Your White Turkey Chili
If you want to really deepen the flavor profile without adding heat, look for fire-roasted diced green chiles next time you shop. Wow, do those add a smoky background note! If you like things spicier, you can leave the seeds in the jalapeño, or just add a little extra cayenne pepper right when you toast the spices. Remember that lime juice at the end? Don’t ever skip it! Bottled juice just doesn’t have the same zing. That fresh lime is what makes all those earthy cumin and oregano flavors pop in your White Turkey Chili.
Storing and Reheating Your White Turkey Chili
The best part about making a big pot of this White Turkey Chili is having leftovers! It tastes even better the next day once all those spices have really settled in. You can definitely keep this chili around for a few days, or even stash it away for a busy night later on. Just remember that creamy element we added at the end requires a little gentle handling when reheating.
Storage and Reheating Instructions
Keep any leftovers in an airtight container in the refrigerator. It stays good for up to four days, which is perfect for lunch prep! If you want to freeze it, go right ahead, but be warned: the sour cream might separate a little bit when it thaws. That’s okay, though—it still tastes great! You need to reheat it gently. Never blast it on high heat. On the stovetop, use low heat and stir often so it doesn’t scorch at the bottom. If you’re using the microwave, two or three minutes should do it, but make sure you stir halfway through to distribute the heat evenly. This ensures every bowl of White Turkey Chili is perfect!
Storage and Reheating Table
| Storage Method | Duration | Reheating Tip |
|---|---|---|
| Refrigerator | Up to 4 days | Stir frequently over medium-low heat on the stove. |
| Freezer | Up to 3 months | Microwave in intervals, stirring between each one. |
Frequently Asked Questions About White Turkey Chili
I always get so many great questions after posting a new favorite, and I totally get it—you want your White Turkey Chili to be absolutely perfect the first time you make it! Here are a few things I hear most often from folks trying out this recipe for the first time. Hopefully, this clears up any lingering doubts!
Common Questions About Making White Turkey Chili
Q1. Can I make this chili ahead of time for better flavor?
Absolutely! Like most great chilis, this White Turkey Chili benefits from sitting overnight. The spices really meld together beautifully. Just remember to store it without the fresh toppings (like avocado or cilantro) and stir in the sour cream and lime juice right before you reheat it the next day.
Q2. I need to lower the sodium content even more—what should I do?
That’s easy to adjust! Since we call for low-sodium chicken broth, your next step is to skip adding any extra salt until the very end, after you’ve tasted it. You can also rinse your canned beans extra thoroughly, which removes a surprising amount of residual sodium.
Q3. What if I don’t like cannellini beans? What’s a good swap?
If you’re out of cannellini, Great Northern or navy beans are fantastic stand-ins—they have a similar creamy texture when cooked down. You could even use chickpeas in a pinch, though the flavor profile changes slightly. The main thing is making sure you use white beans!
Q4. How important is browning the turkey well?
It’s really important for the overall depth of flavor in your White Turkey Chili. Browning the meat creates those little flavorful crusty bits on the bottom of the pan—we call that fond! When you deglaze with the broth, those bits lift up and become part of the sauce, giving the chili a richer, less one-note taste.
Share Your White Turkey Chili Experience
Now that you’ve made a huge, cozy pot of this wonderful White Turkey Chili, I really want to hear what you thought! Did you top it with extra Monterey Jack? Did you try Greek yogurt instead of sour cream?
Please take a minute to leave me a rating right below this section and share your experience in the comments. Your feedback helps others feel confident trying out my clean comfort recipes!
Print
Amazing 1 White Turkey Chili Secret
- Total Time: 1 hour 5 minutes
- Yield: 6 servings 1x
- Diet: Low Fat
Description
This creamy white turkey chili with cannellini beans offers a comforting twist on traditional chili. Made without tomatoes and loaded with green chiles for cozy winter meals.
Ingredients
- 1½ pounds ground turkey
- 2 tablespoons olive oil
- 1 large white onion, diced
- 2 poblano peppers, seeded and diced
- 1 jalapeño pepper, seeded and minced
- 4 cloves garlic, minced
- 3 cans 15 ounces cannellini beans, drained and rinsed
- 2 cans 4 ounces diced green chiles
- 3 cups low-sodium chicken broth
- 2 tablespoons ground cumin
- 1 tablespoon chili powder
- 1 teaspoon dried oregano
- 1 teaspoon ground coriander
- ½ teaspoon cayenne pepper
- 1 teaspoon salt
- ½ teaspoon black pepper
- 1 bay leaf
- ½ cup reduced-fat sour cream
- 2 tablespoons fresh lime juice
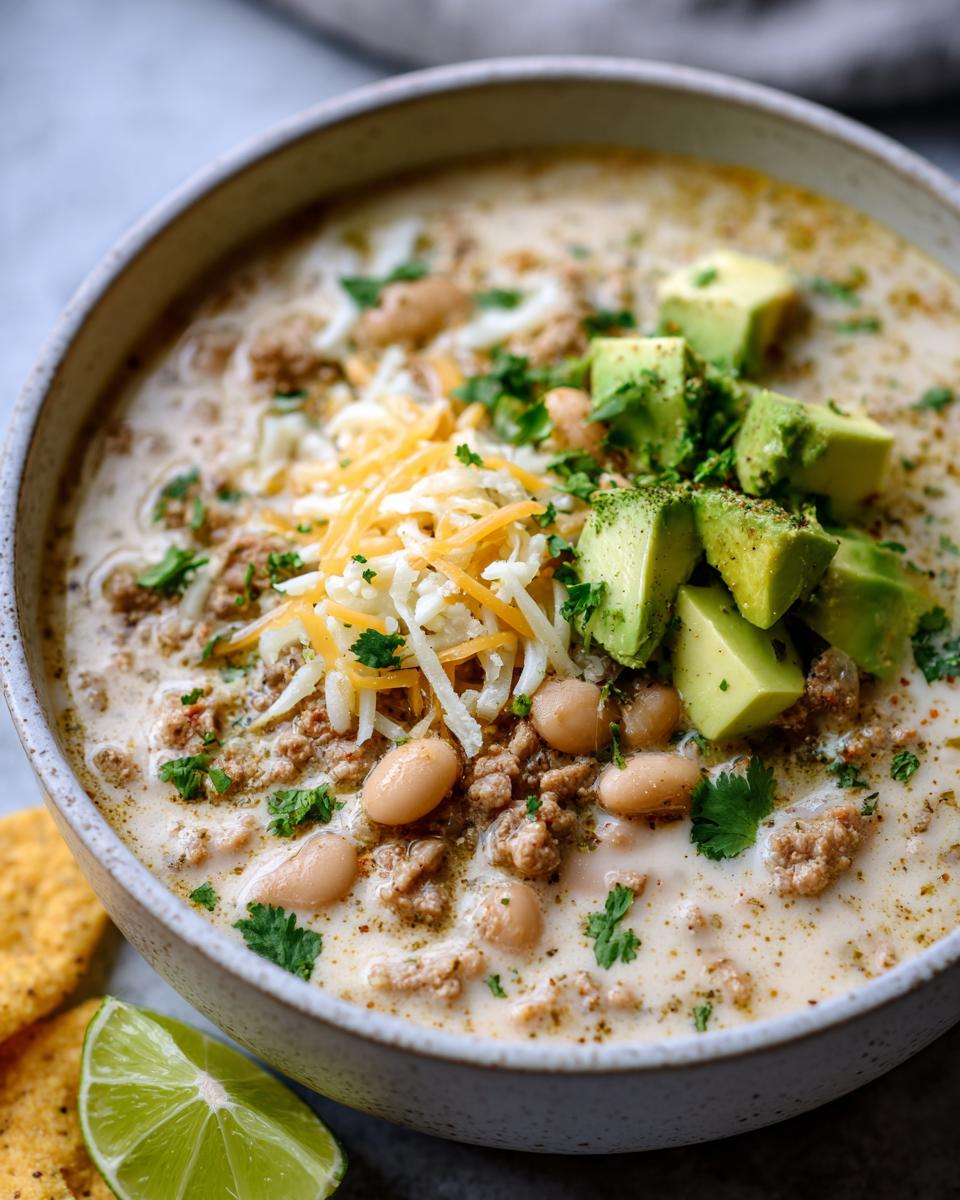
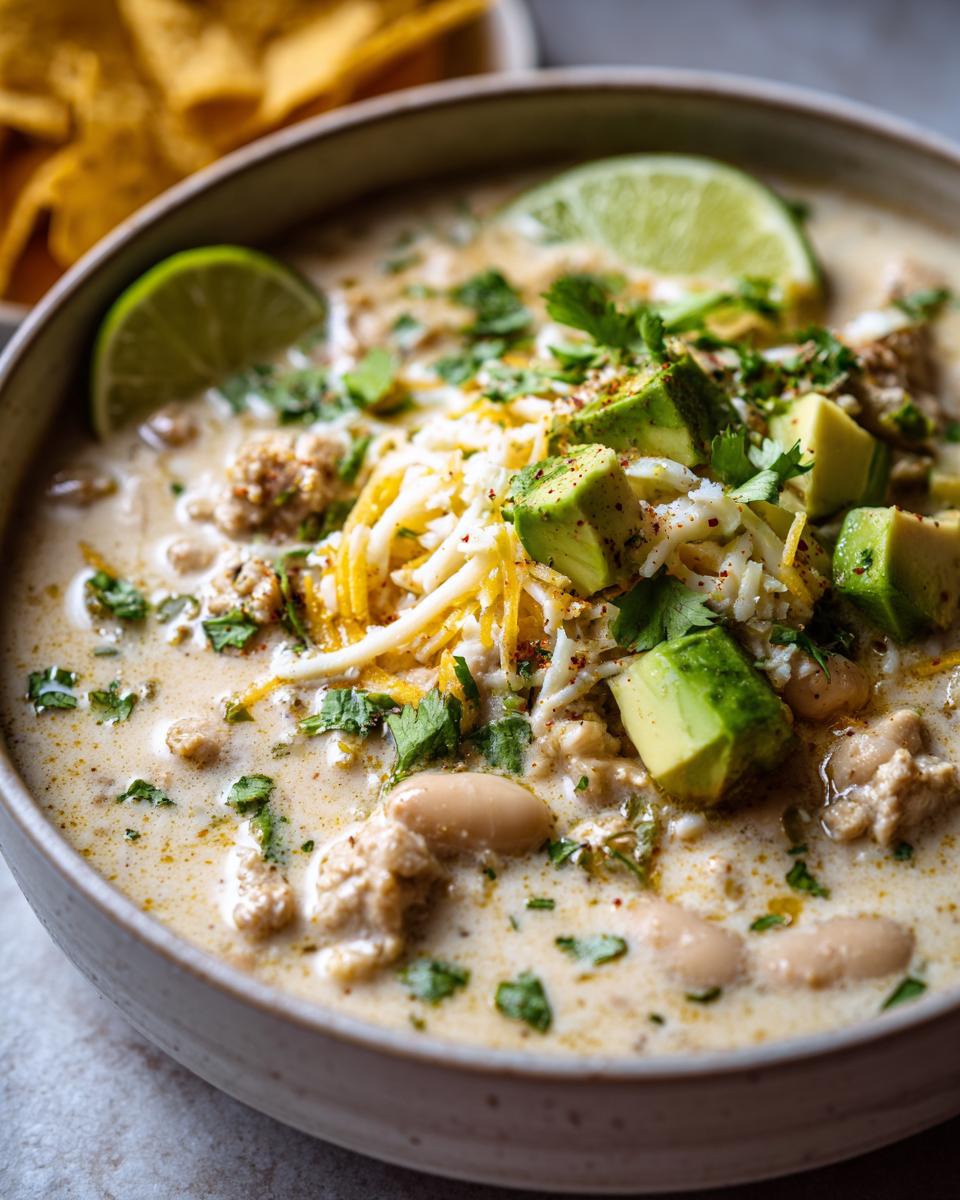
- For Serving: Monterey Jack cheese, shredded; Diced avocado; Fresh cilantro, chopped; Sliced jalapeños; Lime wedges; Tortilla chips
Instructions
- Heat olive oil in a large Dutch oven over medium heat until shimmering.
- Add diced onion and cook for 5 minutes until softened and translucent.
- Add ground turkey, breaking it up with a wooden spoon and cooking until no longer pink and cooked through, about 8 minutes.
- Stir in poblano peppers, jalapeño, and garlic, cooking for 3 minutes until fragrant.
- Add cumin, chili powder, oregano, coriander, cayenne, salt, and black pepper, stirring constantly for 2 minutes to toast spices.
- Pour in chicken broth, then add cannellini beans, diced green chiles, and bay leaf, stirring to combine.
- Bring mixture to a boil, then reduce heat to low and simmer uncovered for 35 minutes, stirring occasionally until flavors meld and chili thickens slightly.
- Remove bay leaf and discard, then stir in sour cream and lime juice until fully incorporated.
- Taste and adjust seasonings as needed.
- Ladle into bowls and top with Monterey Jack cheese, avocado, cilantro, jalapeños, and serve with lime wedges and tortilla chips.
Notes
- Use Great Northern beans or navy beans instead of cannellini for similar texture.
- Replace sour cream with Greek yogurt for tangier flavor and extra protein.
- Add 2 cups shredded cooked chicken breast instead of ground turkey for different texture.
- Use fire-roasted green chiles for deeper smoky flavor.
- Make it spicier by leaving seeds in jalapeño or adding extra cayenne.
- Stir in 2 cups fresh spinach during last 5 minutes of cooking for added greens.
- Don’t skip the bay leaf as it adds subtle earthy depth to the broth.
- Add sour cream at the end off heat to prevent curdling from high temperatures.
- Mash a portion of the beans against the pot to naturally thicken the chili.
- Fresh lime juice brightens all the flavors, so don’t substitute bottled juice.
- Let chili rest for 10 minutes before serving to allow creaminess to develop.
- Store chili in an airtight container in the refrigerator for up to 4 days.
- Freeze for up to 3 months, though the sour cream may separate slightly upon thawing.
- Reheat gently on the stovetop over medium-low heat, stirring frequently to prevent scorching.
- Microwave portions for 2 to 3 minutes, stirring halfway through.
- Prep Time: 15 minutes
- Cook Time: 50 minutes
- Category: Main Dish
- Method: Stovetop
- Cuisine: American
Nutrition
- Serving Size: 1 serving
- Calories: 395
- Sugar: N/A
- Sodium: N/A
- Fat: 12g
- Saturated Fat: N/A
- Unsaturated Fat: N/A
- Trans Fat: N/A
- Carbohydrates: 38g
- Fiber: N/A
- Protein: 32g
- Cholesterol: N/A