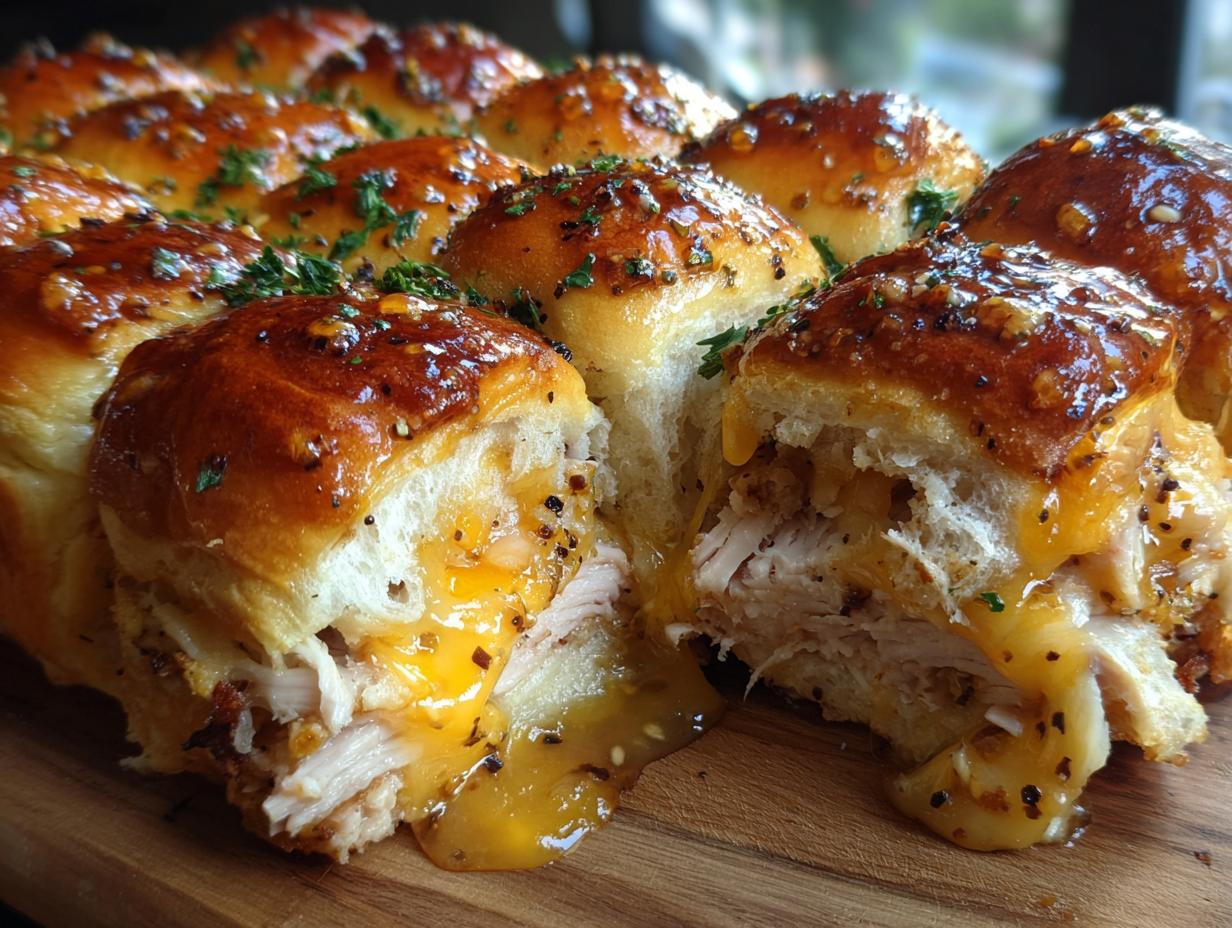
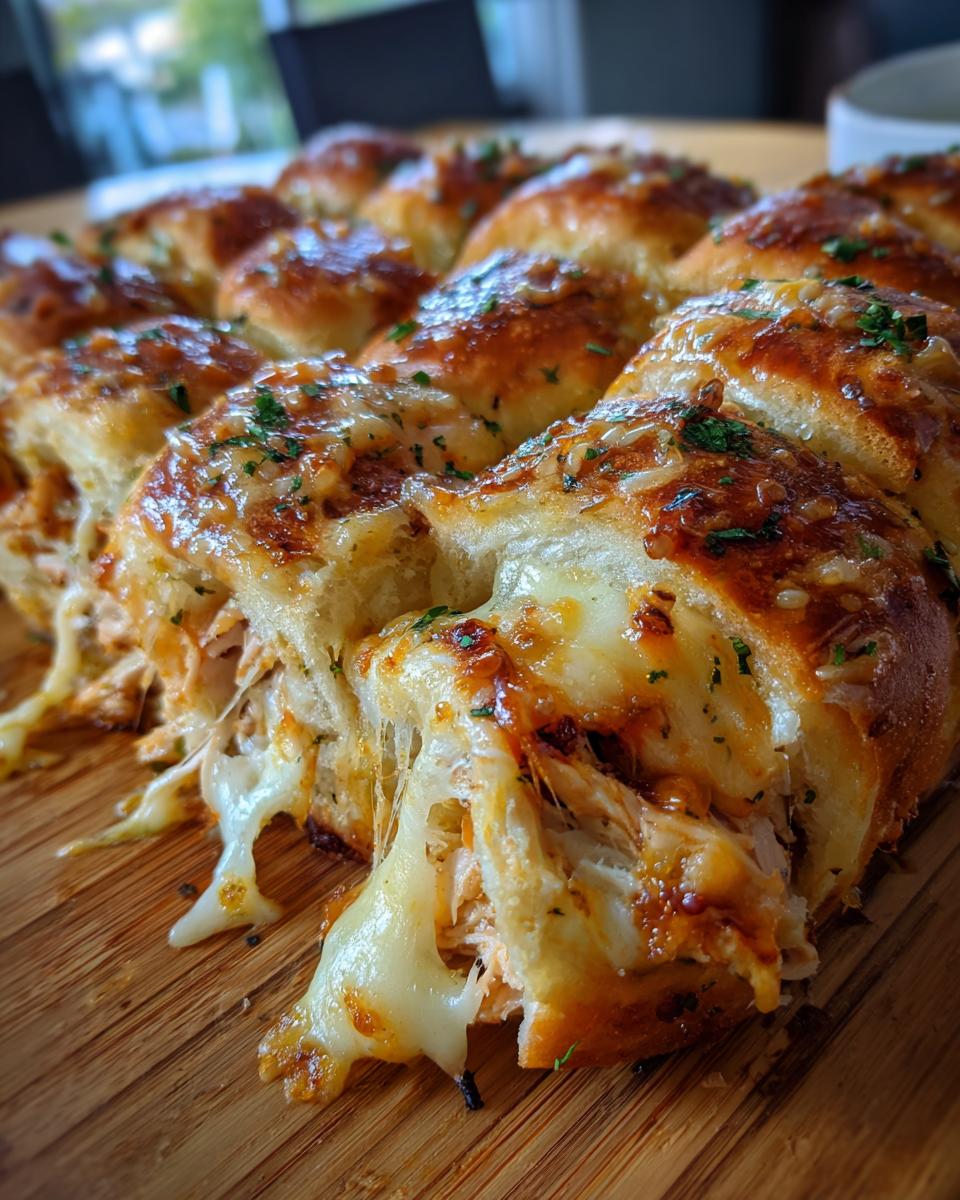
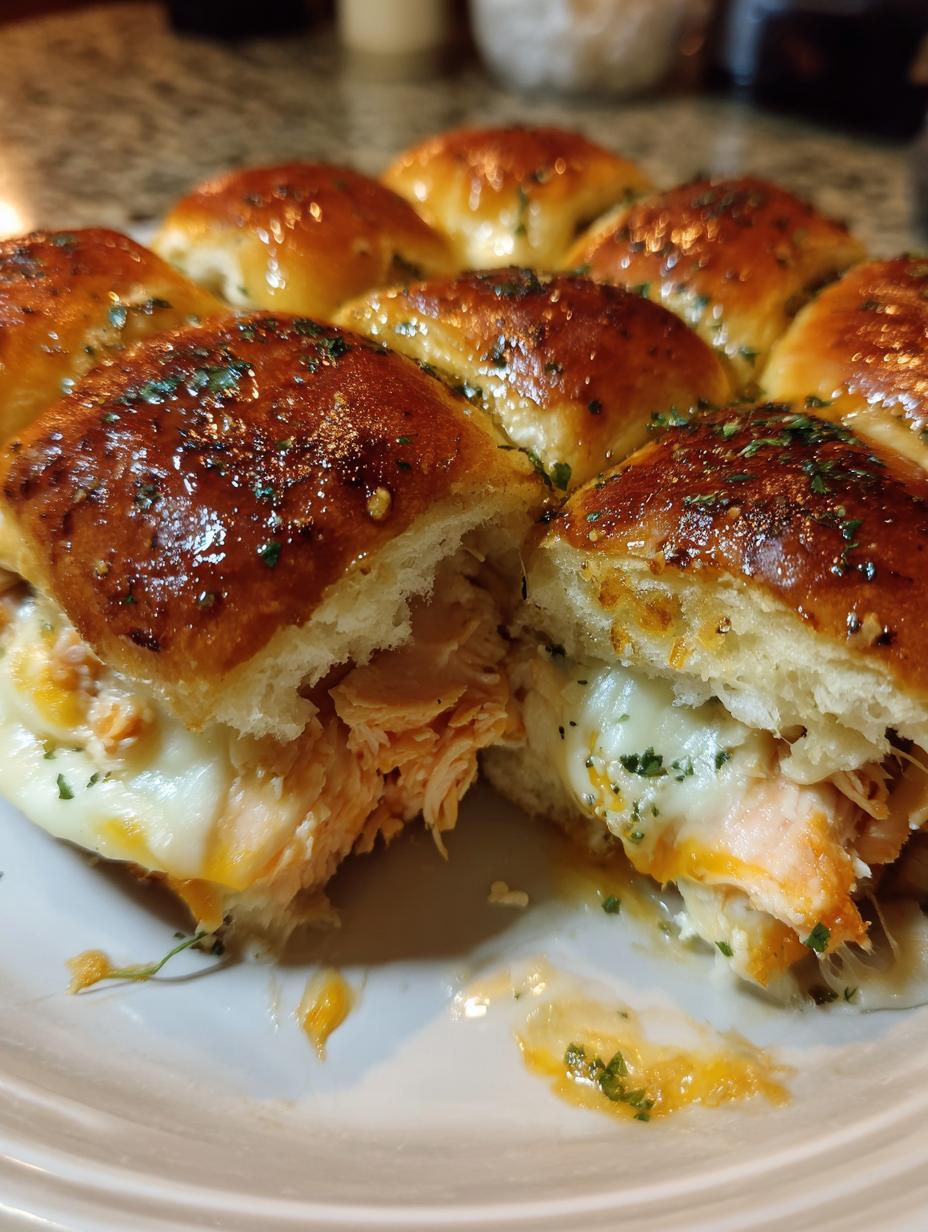
Listen, if you are looking for the absolute easiest, most crowd-pleasing appetizer in the history of appetizers, stop scrolling right now. These baked turkey and cheese sliders are my go-to for everything—Super Bowl parties, unexpected guests, or just a Tuesday when I need comfort food fast. Seriously, the combination of that soft, sweet roll, the savory smoked turkey, and that pool of melted cheese? It’s pure magic.
The real secret that makes these different from any other sandwich you’ve thrown in the oven is the buttery, garlicky glaze we brush on top. It toasts up perfectly, giving you this incredible crunch while the inside stays unbelievably soft and gooey. Forget assembling individual sandwiches; we’re making these in one big sheet, which is why I call them the ultimate party food. Trust me, these turkey and cheese sliders disappear faster than you can pour the drinks!
Gathering Your Ingredients for Perfect Turkey and Cheese Sliders
Getting these turkey and cheese sliders ready is all about having your ducks in a row before you start slicing. Since we’re building this sandwich loaf all at once, everything needs to be measured and ready to go. Don’t try prepping the sauce while the rolls are out—it just leads to chaos and uneven coverage, trust me!
We rely on quality ingredients here to make sure the flavor pops, especially that smoky turkey and the mix of cheeses we use. But the real star, as I mentioned, is that gorgeous topping we paint on at the end. You’ll need two separate bowls for mixing up the interior sauce and the exterior glaze.
Essential Components for Your Baked Sliders
You absolutely must use those soft dinner rolls that come connected in one package—do not separate them until the very end! We need twelve connected bottoms and twelve connected tops. For the meat and cheese, you’ll need about eight ounces of sliced smoked turkey breast and four ounces each of Swiss and cheddar cheese. Make sure the cheese is sliced thin so it melts beautifully and evenly over all those rolls.
Crafting the Honey Dijon Glaze
This topping is what sets these baked sliders apart. You’ll need about two tablespoons of butter melted down completely. Then, we mix that with one teaspoon of Dijon mustard, one teaspoon of honey, and just a half teaspoon of garlic powder. If you’re feeling fancy—and you should be—toss in a teaspoon of poppy seeds for texture. That little bit of crunch makes such a difference!
Equipment Needed for Making Turkey and Cheese Sliders
You don’t need much fancy gear for these easy turkey and cheese sliders, which is another reason I love making them when I’m rushing! Grab a standard 9×13-inch baking dish. Lining it with parchment paper is my non-negotiable step for the cleanest cleanup, so make sure you have some handy. You’ll also need two small mixing bowls—one for the inside sauce and one for the outside glaze—and a sharp knife for slicing the rolls horizontally without tearing them apart.
Step-by-Step Guide to Preparing Turkey and Cheese Sliders
Okay, now that we have everything ready—the rolls are waiting, the sauces are mixed—it’s time to put these amazing turkey and cheese sliders together. Don’t rush this part! Taking your time during assembly ensures every single slider is perfectly layered and gooey when it comes out of the oven. This method keeps the rolls connected right up until you serve them, which is the best part!
Initial Preparation and Base Layer Assembly
First things first, crank that oven up to 350 degrees Fahrenheit. I always line my baking dish with parchment paper; it saves you from scrubbing cheese off the bottom later—trust me on that one! Now, take your package of rolls and, using a large serrated knife, slice them horizontally right through the middle, keeping them connected like one big sandwich loaf. Place the bottom halves carefully into your lined dish.
Time for the creamy internal sauce! Whisk together the mayonnaise, one tablespoon of Dijon mustard, and one teaspoon of honey until it’s totally smooth. Spread this sauce evenly across the entire surface of those bottom rolls. Don’t skimp! You want that flavor seeping down into every crevice.
Layering the Meats and Cheeses
This is where it gets satisfying. Take your eight ounces of smoked turkey breast and layer it evenly across the sauce. You want good coverage, but try not to pile it too high in the center, or the tops won’t sit right. Next up, the cheeses! Layer the four ounces of Swiss cheese right on top of the turkey, followed by the four ounces of cheddar. Having two different cheeses gives you that perfect pull and complex flavor when everything melts together.
Gently place the top halves of the rolls right back onto the cheese layer. Try to align them as best you can with the bottom halves. They might shift a little, but that’s okay!
Applying the Signature Glaze and Baking Schedule
Now for the grand finale before the oven—the glaze! Take your melted butter mix—that gorgeous blend of butter, the second measure of Dijon and honey, garlic powder, and poppy seeds—and brush it generously all over the top of the rolls. Make sure every square inch of the top gets coated; this is what gets golden brown and crispy!
Cover the dish loosely with aluminum foil. We bake them covered for the first 10 minutes at 350°F. This step steams them slightly, ensuring the cheese starts melting beautifully without burning the tops. After 10 minutes, pull that foil off! Bake uncovered for another 10 to 12 minutes. You are looking for the tops to be golden brown and the cheese oozing out the sides. Pull these incredible turkey and cheese sliders out, sprinkle them with fresh parsley if you want the pretty garnish, let them rest for just five minutes, and slice them apart!
Tips for Making Your Turkey and Cheese Sliders Exceptional
Even though these baked turkey and cheese sliders are pretty foolproof, I’ve picked up a few tricks over the years that elevate them from good to absolutely unforgettable. My goal is always maximum gooeyness with minimal fuss, and these little adjustments make all the difference. If you follow my initial assembly instructions, you’re already halfway there, but these tips guarantee success, especially when you’re serving them to a demanding crowd.
Don’t be afraid to press down gently when you assemble the layers. We want good contact between the sauce, the turkey, and the cheese so everything melds together perfectly during baking. These turkey and cheese sliders are incredibly adaptable, but these next few points are things I never skip.
Assembly Shortcuts for Speed
The biggest time-saver, which I mentioned, is slicing those rolls horizontally while they are still connected. If you try to slice twelve individual rolls and then try to line them up, you’ll go crazy! Keep them together until the very last step after they come out of the oven. Also, make sure your turkey is thinly sliced; thick chunks will prevent the tops from sitting flat before you glaze them.
Achieving the Perfect Melt
If your oven runs hot, you might find that the tops brown too quickly before the cheese is fully melted inside. If you notice the tops getting dark after just five minutes uncovered, just tent that foil back over them immediately! That trapped heat will finish melting the cheese without scorching the poppy seeds. Conversely, if you are using a lot of very cold cheese, you might need that initial 10 minutes covered just a little longer, maybe 12 minutes, before uncovering for the final crisp.
Storing and Reheating Leftover Turkey and Cheese Sliders
Even though these turkey and cheese sliders are usually demolished in minutes at any party I host, sometimes I get lucky and have a few left over for lunch the next day. They are actually still really good cold, straight from the fridge, but if you want that gooey, buttery texture back, you have to reheat them correctly. We definitely don’t want soggy bread!
Storage Guidelines
If you have any leftover turkey and cheese sliders, the best way to store them is to let them cool completely first, then place them in a single layer in an airtight container. I usually put a paper towel on the bottom just to absorb any residual moisture. They should keep nicely in the refrigerator for about three days, tops.
Reheating Instructions for Freshness
Forget the microwave if you want to keep that amazing baked texture! The microwave will make the rolls rubbery. Instead, preheat your oven—or even better, a toaster oven—to about 325°F. Place the leftover sliders on a lined baking sheet and heat them for about 8 to 10 minutes. This gentle heat melts the cheese back into submission and crisps up that honey-Dijon topping again. They come out nearly as good as fresh!
Nutritional Estimates for One Slider
I always get asked about the macros for these tasty little bites, especially since they disappear so fast! Since every batch is slightly different based on the brand of rolls or how much glaze you brush on, these numbers are just a helpful guide. Think of this as a ballpark estimate for one of our perfect turkey and cheese sliders. You can find more fun recipe ideas on our Medium page!
Remember, this is based on the recipe using all the ingredients listed above. Cooking should always be fun, not stressful, so don’t worry too much about hitting these exact numbers!
- Calories: 220
- Fat: 12g
- Protein: 12g
- Carbohydrates: 15g
Please note that these are estimated values per slider and can vary based on your specific ingredients.
What Your Guests Ask About These Sliders
I swear, the minute I set these out, people start asking questions! They are such great party food because they look fancy but are so simple. Most of the time, people want to know if they can prep them early or if they can swap out the cheese. I’ve answered my top three most-asked questions about these baked sliders right here for you! For more visual inspiration, check out our Pinterest boards.
Can I Make These Ahead of Time?
You absolutely can assemble these ahead of time, which is a lifesaver when you’re hosting! My advice is to assemble everything—the sauce, the turkey, the cheese—but hold off on brushing on that beautiful butter glaze. Cover the assembled sliders tightly with plastic wrap and keep them in the fridge for up to six hours. Right before you bake them, brush on the glaze and proceed with the recipe. If you glaze them too early, the rolls will get soggy sitting in the fridge.
What Cheese Substitutions Work Best?
While I love the nutty flavor of Swiss paired with sharp cheddar, feel free to mix it up! The key here is using cheese that melts well. Provolone is a fantastic substitute for Swiss; it’s mild and stretches beautifully. Monterey Jack is another winner if you want something extra mild and gooey. Avoid hard cheeses like Parmesan, as they won’t melt into that beautiful, cohesive layer we are aiming for in these baked sliders. If you are looking for other great appetizer ideas, check out our recipe for festive charcuterie style appetizer board.
Print
Amazing 12-Min turkey and cheese sliders
- Total Time: 30 minutes
- Yield: 12 sliders 1x
- Diet: N/A
Description
These baked turkey and cheese sliders are melty, buttery, and crowd-pleasing. Perfect for game day or parties—ready in 30 minutes!
Ingredients
- 1 package (12 count) soft dinner rolls, connected
- 2 tablespoons mayonnaise
- 1 tablespoon Dijon mustard
- 1 teaspoon honey
- 8 ounces sliced smoked turkey breast
- 4 ounces sliced Swiss cheese
- 4 ounces sliced cheddar cheese
- 2 tablespoons butter, melted
- 1 teaspoon Dijon mustard
- 1 teaspoon honey
- 1/2 teaspoon garlic powder
- 1 teaspoon poppy seeds (optional)
- 1 tablespoon chopped parsley for garnish
Instructions
- Preheat oven to 350°F. Line a baking dish with parchment paper.
- Without separating the rolls, slice them in half horizontally. Place the bottom halves in the prepared dish.
- In a small bowl, whisk together mayonnaise, Dijon mustard, and honey.
- Spread the mixture over the cut side of the bottom rolls.
- Layer turkey evenly over the sauce, then top with Swiss and cheddar cheeses.
- Place the top halves of the rolls over the cheese.
- In another bowl, mix melted butter, Dijon mustard, honey, garlic powder, and poppy seeds.
- Brush the tops of the rolls generously with the glaze.
- Cover loosely with foil and bake 10 minutes. Remove foil and bake another 10 to 12 minutes until the tops are golden and cheese is melted.
- Sprinkle with parsley, slice along roll lines, and serve warm.
Notes
- The rolls should be left connected when slicing horizontally for easier assembly.
- Bake time may vary slightly depending on your oven.
- Prep Time: 10 minutes
- Cook Time: 20 minutes
- Category: Appetizer
- Method: Baking
- Cuisine: American
Nutrition
- Serving Size: 1 slider
- Calories: 220
- Sugar: Not specified
- Sodium: Not specified
- Fat: 12g
- Saturated Fat: Not specified
- Unsaturated Fat: Not specified
- Trans Fat: Not specified
- Carbohydrates: 15g
- Fiber: Not specified
- Protein: 12g
- Cholesterol: Not specified