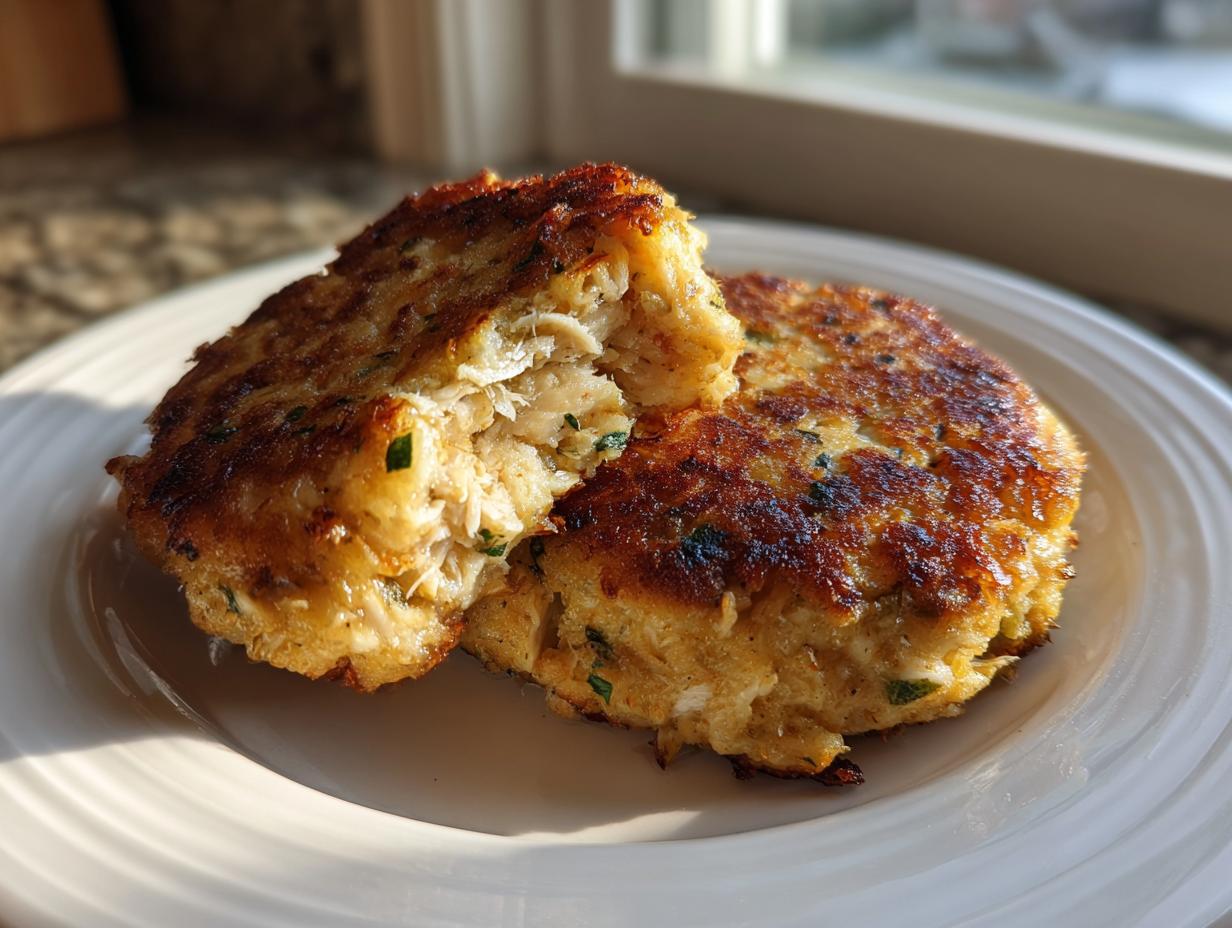
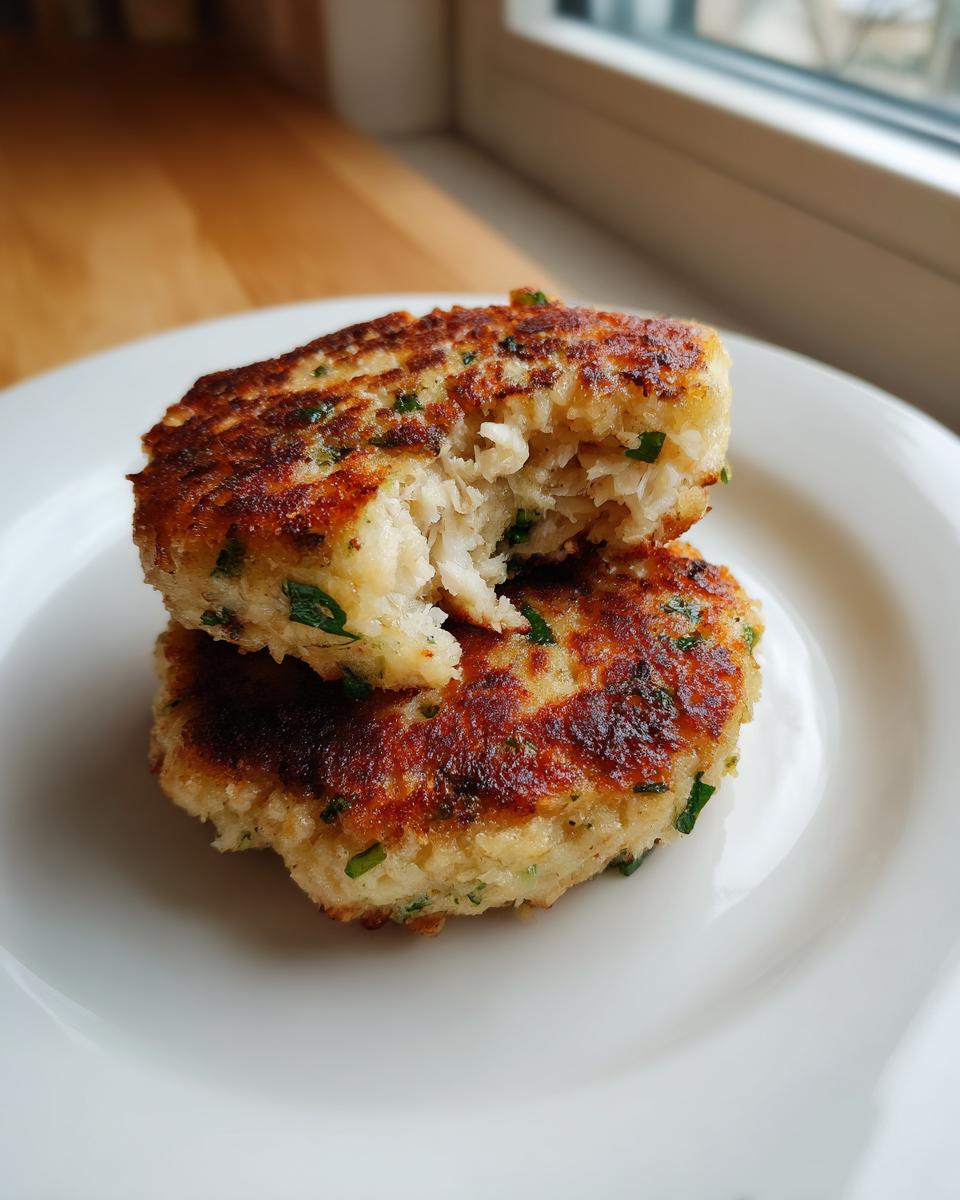
I have to tell you, when life gets crazy and the fridge looks suspiciously empty, these Tuna Cakes are my absolute sanity saver. Seriously, we’re talking about a genuinely satisfying, high-protein meal that magically appears on the table in about 20 minutes flat. I used to rely on sad sandwiches when I was short on time, but these crispy beauties changed everything.
The best part about making these Tuna Cakes is that they use things I already have sitting in the pantry. No emergency grocery runs needed! They get this incredible golden crust when you fry them, but the inside stays so tender and flaky. I’ve made these for quick weeknight dinners more times than I can count, and my family never complains. They think I’m some kind of culinary wizard because they cook so fast!
If you’re looking for a budget-friendly way to get some serious protein into your meal without spending an hour over the stove, stick with me. These are fast, flavorful, and frankly, addictive. You can find more quick dinner ideas like this on our Medium page.
Essential Ingredients for Perfect Tuna Cakes
When I talk about these being a pantry meal, I really mean it! You likely have 90% of what you need right now. The secret to getting these Tuna Cakes to hold together and taste amazing relies on using good quality basics. We aren’t using any fancy fresh herbs here—just good, solid cupboard ingredients that deliver big flavor when combined correctly.
Don’t substitute the Dijon mustard; that little bit of tang cuts right through the richness of the mayo and tuna. It’s crucial for that bright flavor we are shooting for.
Required Components
Here is the exact list I always follow. Make sure your tuna is well-drained; that’s step one for a non-soggy cake! If you need other quick meal inspiration, check out our simple healthy orzo recipe.
| Ingredient | Amount/Prep |
|---|---|
| Tuna in water | 2 cans, drained (about 10 oz total) |
| Large egg | 1 |
| Mayonnaise | \u00bc cup |
| Breadcrumbs or almond flour | \u00bc cup |
| Dijon mustard | 1 tablespoon |
| Green onions | 2 tablespoons, finely chopped |
| Lemon juice | 1 tablespoon |
| Garlic powder | \u00bd teaspoon |
| Smoked paprika | \u00bd teaspoon |
| Salt and pepper | \u00bc teaspoon each |
| Olive oil | 2 tablespoons (for frying) |
Ingredient Notes and Substitutions for Your Tuna Cakes
If you don’t have regular breadcrumbs, don’t panic! Almond flour works beautifully and actually keeps these Tuna Cakes a little lighter. If you are out of mayo, you can use plain Greek yogurt, but you might need an extra splash of lemon juice to keep things tangy. Just make sure whatever binder you use is thick.
Another thing: if your mayo is low-fat, the cakes might be a little looser, so add an extra teaspoon of your breadcrumb choice if that happens. It’s all about feel, really!
Equipment Needed for Making Tuna Cakes
You don’t need a fancy kitchen for these! Honestly, keeping your equipment simple is part of what makes these so fast. You’ll want a good medium-sized bowl for mixing everything up. Nothing too small, or you’ll end up wearing half the ingredients!
You absolutely need a large nonstick skillet—that’s key for getting that golden crust without sticking. A sturdy spatula for flipping is a must, and of course, a plate lined with paper towels to catch the extra oil after frying.
Step-by-Step Instructions for Crispy Tuna Cakes
Okay, this is where the magic happens, and trust me, it moves fast! Since we only have 10 minutes to cook these, timing is everything. Get your skillet heating up while you mix, and you’ll be eating in no time.
Mixing the Tuna Cake Base
Grab that medium bowl and toss in all your ingredients: the drained tuna, the egg, the mayo, the breadcrumbs, Dijon, green onions, lemon juice, and all those lovely spices. Now, here is the most important rule for texture: Mix gently! I mean it. Use a fork or a rubber spatula and fold everything together just until you don’t see any dry pockets of breadcrumbs anymore. If you overmix tuna, it gets this weird, pasty texture, and we want flaky and tender.
Stop mixing the second it holds together. Seriously, resist the urge to stir it five more times just because you can. It should look chunky yet cohesive.
Shaping and Perfecting the Patties
Once everything is just combined, you need to divide that big scoop of mixture into six equal portions. I usually eyeball it first, then give them a quick weigh if I’m feeling fussy, but usually, they look about the same size. Roll each portion loosely in your hands, then flatten them gently into patties. They should be about half an inch thick. Don’t make them too thin, or they might fall apart when you flip them!
Make sure they are compact—you want them firmly shaped so they don’t crumble when they hit the hot oil. Set those six perfect little rounds aside on a clean plate while you deal with the heat.
Achieving Golden Brown Tuna Cakes Through Frying
Time for the sizzle! Place your large nonstick skillet over medium heat. This is crucial—if it’s too high, the outside burns before the inside warms up, and if it’s too low, they soak up all the oil and get greasy. Medium heat is your sweet spot.
Add your two tablespoons of olive oil and let it get shimmering hot. Carefully place the Tuna Cakes into the hot oil—don’t overcrowd the pan, work in batches if you have to. Let them cook undisturbed for 3 to 4 minutes on the first side. You’re looking for a deep, irresistible golden-brown crust. Once they look perfect, gently slide that spatula underneath and flip them over. Cook the second side for another 3 to 4 minutes until they match the first side.
When they are done, use your paper towel-lined plate to blot off any extra oil. They are ready to serve immediately! For more quick dinner inspiration, check out our lemon chicken orzo dinner.
Why These Tuna Cakes Belong in Your Rotation
I keep coming back to these because they tick every single box a busy cook needs ticked. They aren’t just a good meal; they are a strategic meal! You can feel good about serving them because they pack a serious nutritional punch without draining your wallet or your evening.
Honestly, if you have these ingredients on hand, you have dinner solved in under half an hour. That’s why these Tuna Cakes are always in my emergency rotation. You can see more of our favorite quick recipes on Pinterest.
- They are incredibly fast—ready from start to finish in 20 minutes!
- They are a high-protein powerhouse, keeping everyone feeling full and satisfied.
- They are super budget-friendly since they rely entirely on pantry staples.
- They fry up beautifully crispy, so you never feel like you’re eating something bland or boring.
Tips for Making the Best Tuna Cakes Every Time
I’ve learned a few things over the years making these dozens of times. The difference between a great batch of Tuna Cakes and one that’s just ‘okay’ really comes down to texture management. You want them sturdy enough to flip but light enough to be tender inside.
My biggest piece of advice is about mixing—I’ve said it before, but I’ll say it again: be gentle! Overworking the mixture makes the protein in the tuna tighten up, resulting in rubbery cakes. You want to fold until just combined, even if you see a tiny bit of flour streak. It’ll disappear when it fries.
For the absolute crispiest crust, make sure your oil is hot enough before the patties go in. You should see a tiny bit of immediate bubbling around the edges when they touch the pan. If it just sits there sadly, the oil isn’t ready, and your Tuna Cakes will absorb it and turn greasy instead of golden.
Also, don’t press down on them once they are in the pan! I know it’s tempting to smash them flat with the spatula to help them cook, but that just pushes out the binder and makes them dry. Let the medium heat do the work!
Serving Suggestions for Your Meal
These tuna cakes are fantastic on their own, but they really shine when paired with something fresh and light. Since these are pan-fried, I try to balance that richness with something bright on the side. Heavy sides just weigh down the meal, and we want to keep things feeling quick and easy here!
My go-to is always a super simple lemon vinaigrette tossed over mixed greens. It’s fast, and the acid cuts through the savory tuna perfectly. If you’re looking for something heartier, serve them over a quick bed of brown rice or quinoa. That makes it a great high-protein grain bowl! For other quick sides, try our one pot orzo and vegetable dinner.
Don’t forget the garnish! A final squeeze of fresh lemon juice right before you eat makes a huge difference. A little sprinkle of fresh parsley, if you happen to have some on hand, adds a nice pop of color, too. They are great tucked into a toasted bun if you’re craving a sandwich!
Storing and Reheating Leftover Tuna Cakes
I always try to make a double batch because these Tuna Cakes are even better the next day—if you can resist eating them all in one sitting! They store really well, which is another reason they are such a lifesaver for busy lunches. You want to make sure they are completely cooled down before you put them away, though. Putting hot food straight into the fridge can mess up your temperature control.
Keeping them fresh means you always have a high-protein option ready to go for a snack or a quick lunch later in the week.
Storage Guidelines
If you’re just keeping them for a few days, place the cooled cakes in an airtight container layered with wax paper or parchment paper between each layer so they don’t stick together. They stay perfectly good in the refrigerator for about three days. If you need to keep them longer, you can definitely freeze them!
For freezing, wrap each individual cake tightly in plastic wrap first, then place them all into a heavy-duty freezer bag. They keep well for up to a month this way. Just make sure to label the bag so you remember what’s inside!
Reheating for Best Results
The goal when reheating is to bring back that crispy exterior we worked so hard to achieve. Microwaving is fast, yes, but it makes them soft, and we don’t want soft Tuna Cakes! Skip the microwave unless you are in a massive rush.
For the best texture, use a skillet. Put just a tiny bit of fresh olive oil in your nonstick pan over medium heat, and warm them for about 3 minutes per side until they are heated through and the crust is crisp again. If you have a bigger batch to reheat, the oven works great! Lay them on a baking sheet and warm them at 350 degrees Fahrenheit for about 10 minutes. That keeps them nice and firm.
Frequently Asked Questions About Tuna Cakes
I always get questions about these, especially from people trying to make sure they don’t end up with mushy patties! These little high-protein wonders are surprisingly versatile, but a few key points always come up when people make their first batch of Tuna Cakes.
Here are the things I hear most often from friends trying out the recipe for the first time:
Q1. How do I ensure my Tuna Cakes are crispy and not soggy?
The crispiness comes down to two things: draining the tuna really, really well, and making sure your oil is hot enough before the patties go in. If the oil isn’t shimmering, they will soak it up instead of frying nicely. That’s the secret to amazing, Crispy Tuna Cakes!
Q2. Can I skip the mayonnaise? I want to keep these lower fat.
You can swap the mayo for plain Greek yogurt, but you might need to adjust the breadcrumbs slightly. The mayo helps bind everything and adds richness. If you skip it entirely, you’ll need a bit more egg or a tablespoon of mustard to hold the Tuna Cakes together so they don’t fall apart when frying. If you are interested in using Greek yogurt in other recipes, check out our Greek yogurt blueberry protein muffins.
Q3. Are these really a good high-protein meal if I am watching my carbs?
Yes! Because we use canned tuna, you get a huge boost of protein for very few carbs. If you need to lower the carbs even more, just substitute the breadcrumbs entirely with almond flour or crushed pork rinds. They still hold together beautifully and keep that great texture.
Q4. Can I bake these instead of frying them?
You absolutely can bake them for a lighter result, but you won’t get the same crust. If you bake them, set your oven to 400 degrees Fahrenheit and bake for about 15 to 20 minutes, flipping halfway through. They won’t be as golden brown, but they will still be delicious and hold their shape.
Sharing Your Favorite Tuna Cakes Experience
I really hope you love making these quick and easy Tuna Cakes as much as my family does. They are a staple here because they never fail!
If you try them out this week, please come back and leave a rating or a quick comment below. Hearing what you thought—maybe what you served them with—helps build trust in this little community we have here. Happy cooking!
Print
Shocking 6-Minute Tuna Cakes Save Dinner Now
- Total Time: 20 minutes
- Yield: 6 tuna cakes 1x
- Diet: N/A
Description
These crispy tuna cakes are golden outside and tender inside. This is a quick, high-protein meal ready in 20 minutes using pantry staples. They are an easy, budget-friendly meal full of flavor.
Ingredients
- 2 cans tuna in water, drained (about 10 ounces total)
- 1 large egg
- ¼ cup mayonnaise
- ¼ cup breadcrumbs or almond flour
- 1 tablespoon Dijon mustard
- 2 tablespoons finely chopped green onions
- 1 tablespoon lemon juice
- ½ teaspoon garlic powder
- ½ teaspoon smoked paprika
- ¼ teaspoon salt
- ¼ teaspoon black pepper
- 2 tablespoons olive oil (for frying)
Instructions
- Combine drained tuna, egg, mayonnaise, breadcrumbs, Dijon mustard, green onions, lemon juice, garlic powder, paprika, salt, and pepper in a medium bowl. Mix gently until combined.
- Divide the mixture into 6 equal portions and shape each into a compact patty, about ½ inch thick.
- Heat olive oil in a large nonstick skillet over medium heat.
- Add the tuna cakes and cook for 3–4 minutes per side until golden brown and crisp.
- Move the cooked tuna cakes to a paper towel-lined plate to drain excess oil.
- Serve warm, garnish with fresh parsley or lemon wedges.
Notes
- Refrigerate leftovers for up to 3 days or freeze for up to 1 month.
- Reheat in the oven or skillet until warm.
- Prep Time: 10 minutes
- Cook Time: 10 minutes
- Category: Main Dish
- Method: Pan-Frying
- Cuisine: American
Nutrition
- Serving Size: 1 tuna cake
- Calories: 180
- Sugar: N/A
- Sodium: N/A
- Fat: 10g
- Saturated Fat: N/A
- Unsaturated Fat: N/A
- Trans Fat: N/A
- Carbohydrates: 3g
- Fiber: N/A
- Protein: 18g
- Cholesterol: N/A