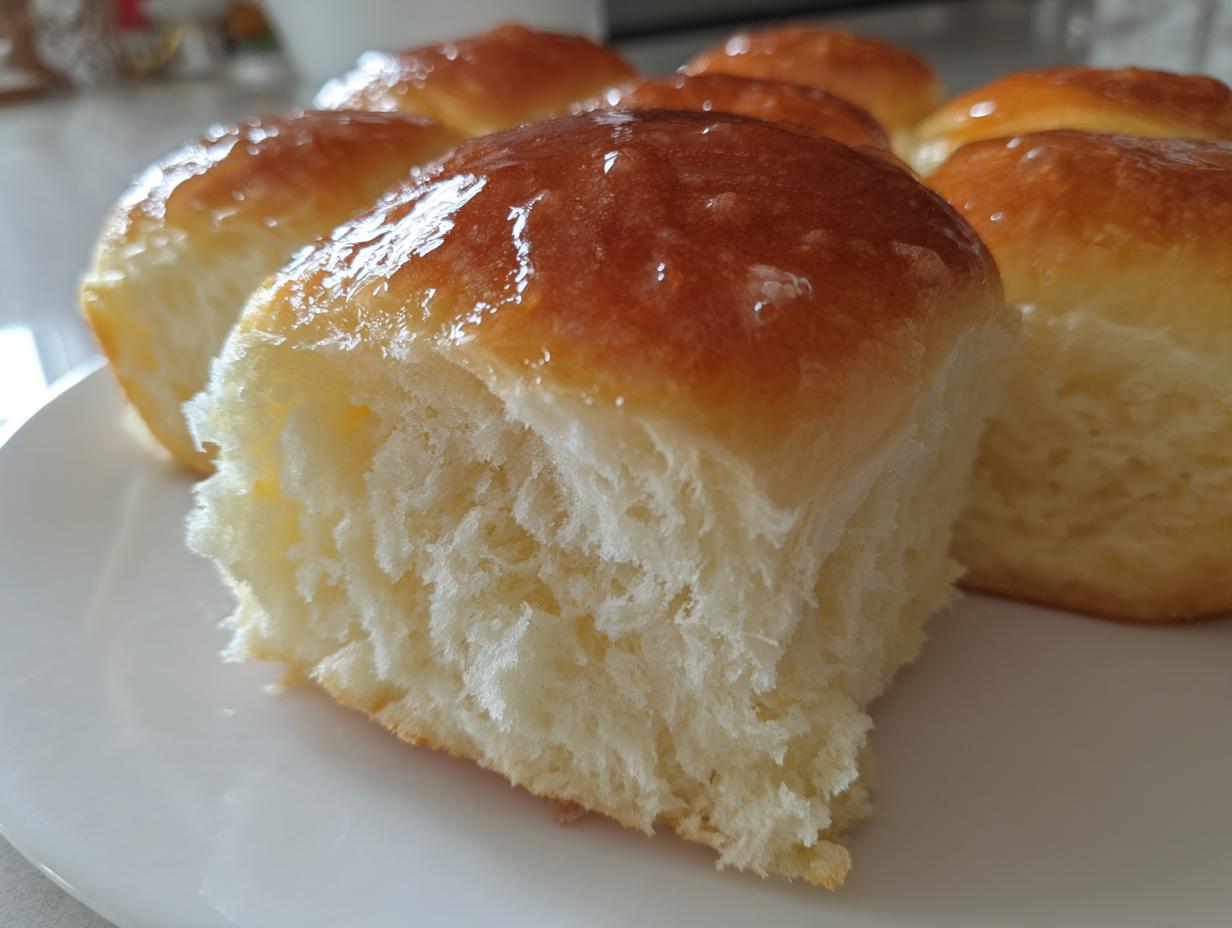
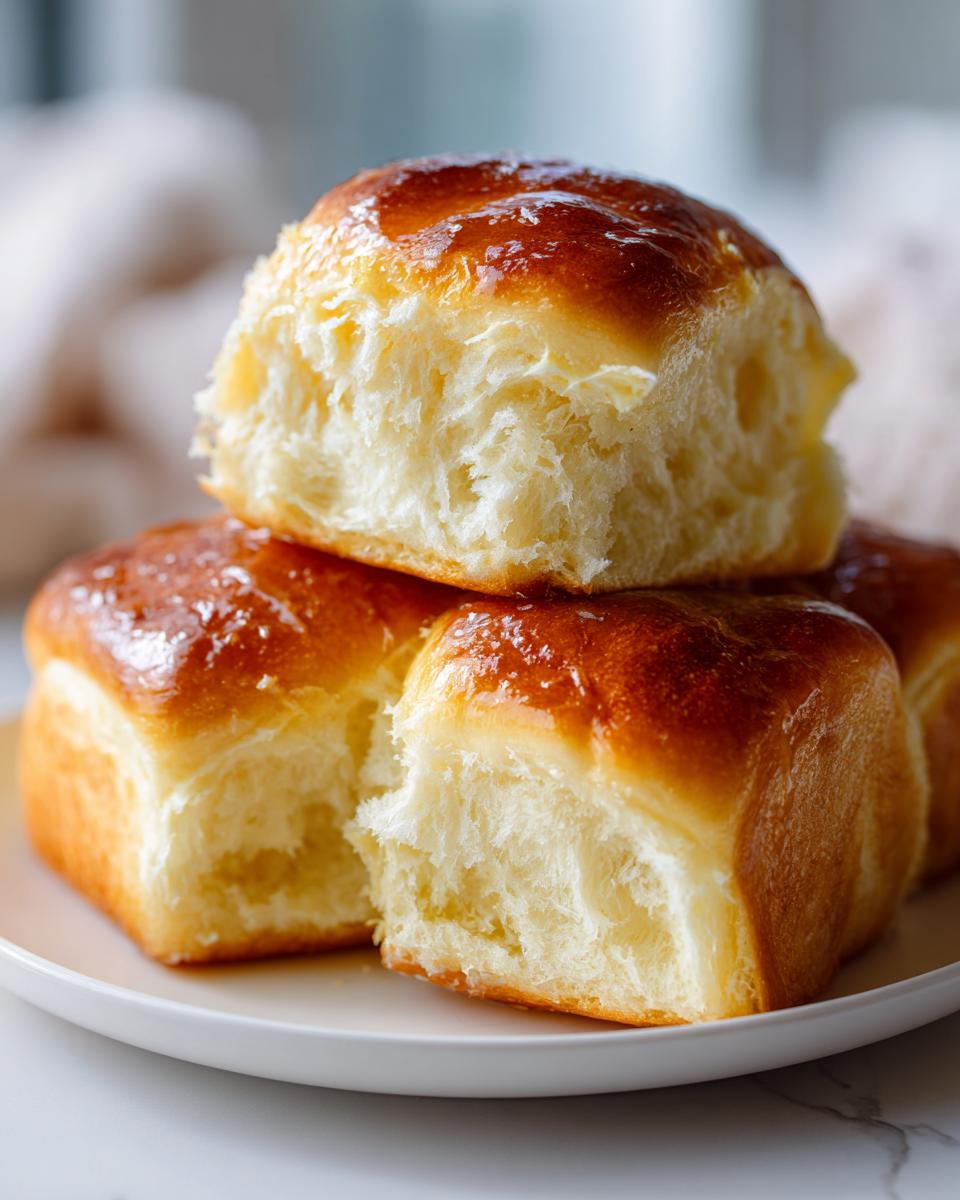
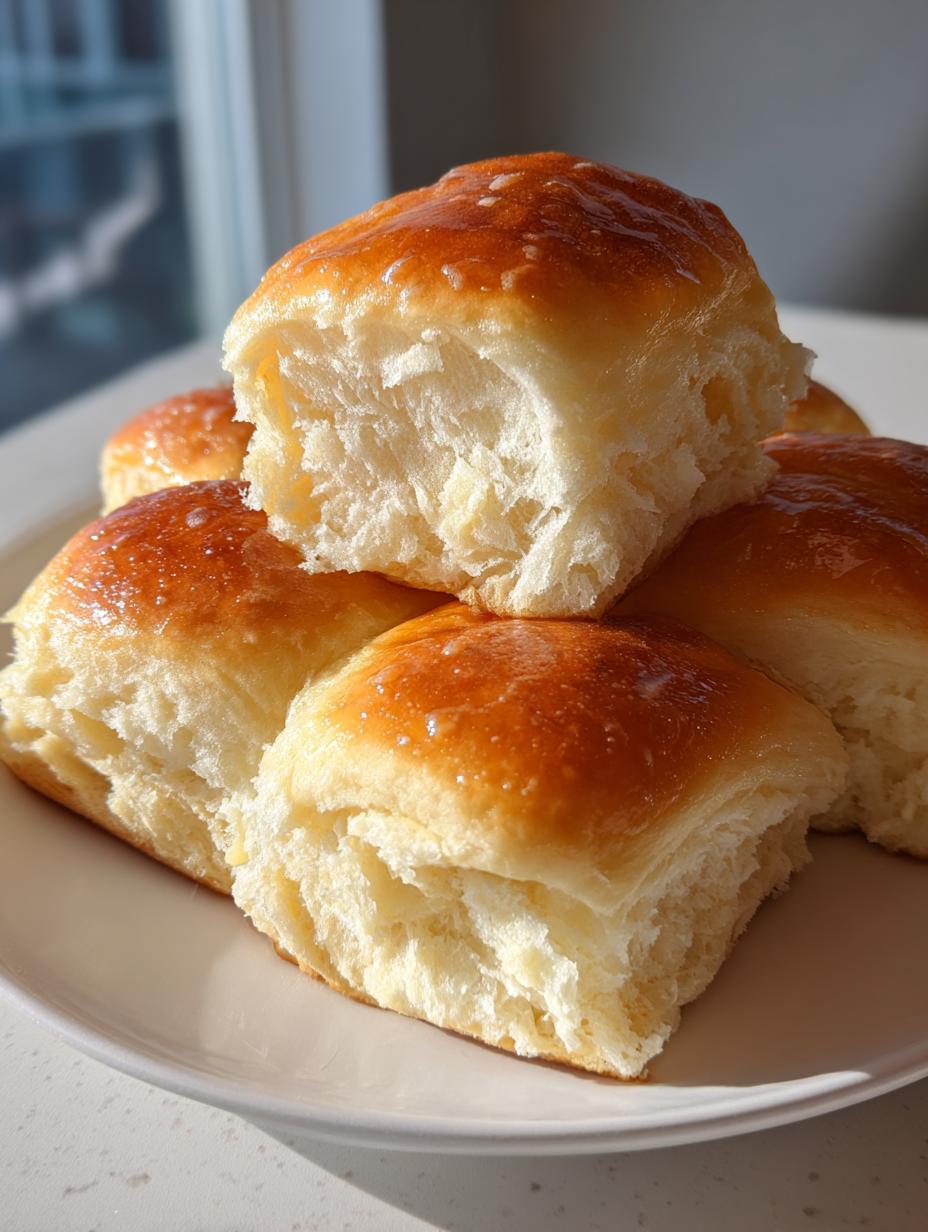
Oh my gosh, you are going to LOVE making these rolls! Seriously, if you’ve ever dreamed of biting into those warm, slightly sweet, unbelievably fluffy dinner rolls right out of the oven, then you need this recipe for Texas Roadhouse Rolls. I spent months trying to nail that perfect delicate crumb and buttery finish.
The secret isn’t just the sugar; it’s how everything comes together before the kneading even starts. I must have made twenty batches before I landed on the perfect ratio of milk to water and found the exact moment to pull the dough out of the mixer. These Texas Roadhouse Rolls are tender, golden, and just begging for a massive smear of honey butter.
Forget those dry, store-bought buns! These homemade rolls are foolproof once you know the little tricks I picked up. We’re going to make sure your kitchen smells like a bakery for the entire afternoon. Trust me, your family will ask for these every single week!
Essential Ingredients for Perfect Texas Roadhouse Rolls
Okay, before we get to the fun part—the kneading—we need to talk ingredients. Getting the right feel for these rolls means paying attention to detail here. This recipe is generous, yielding about 30 to 36 of those famous, soft little gems. You can’t just throw anything in here if you want authentic Texas Roadhouse Rolls!
We need specific types of ingredients to get that perfect golden crust and fluffy interior. Don’t try to substitute the yeast or the milk temperature; that’s where things go sideways quickly!
Dry Components
For the dry stuff, we’re using a good amount of all-purpose flour—plan on needing between 7 and 7 1/2 cups total, depending on how humid it is that day. We activate the yeast using active dry yeast, which needs that warm water to wake up properly. We also need that granulated sugar and the salt, of course.
Wet Components and Flavorings
This is where the magic starts building. The milk needs to be heated until it’s warm, but not hot—aim for about 110 degrees Fahrenheit. If it’s too hot, you’ll kill the yeast, and we’ll end up with sad, flat dough. Also, make sure you have that rich, liquid honey ready; it adds so much depth that plain sugar just can’t manage.
Creating the Signature Honey Butter
You absolutely cannot have these rolls without the topping! For the honey butter, you need softened, unsalted butter—make sure it’s soft, not melted. Then you mix that with a bit more honey and a tiny pinch of ground cinnamon. That cinnamon is the secret weapon that makes the topping sing!
Equipment Needed for Your Texas Roadhouse Rolls
You don’t need a million fancy gadgets for these rolls, but a few items really make the process smoother, especially when dealing with this much dough. Having the right gear helps you handle the sticky mess better and ensures even baking. I always pull these things out before I even measure the flour!
Stand Mixer and Baking Gear
If you have a stand mixer, use it! The dough hook is your best friend for the kneading part. You’ll also need a large, greased bowl for the first rise. Once the dough is ready, grab a good rolling pin—you need to get that dough rolled out evenly to about a half-inch thick. For baking, you’ll want a couple of standard baking sheets, and don’t forget those small bowls for melting butter and mixing the honey topping!
Step-by-Step Instructions for Baking Texas Roadhouse Rolls
This is where the magic happens! Don’t rush these steps; the timing is what separates a good roll from an absolutely legendary one. We’re going to follow these steps precisely to get that signature light, airy texture for our Texas Roadhouse Rolls.
Activating Yeast and Mixing the Dough
First things first, we need happy yeast. Grab your stand mixer bowl—we aren’t even using the mixer yet! Combine the warm water (remember, about 110°F, just warm to the touch) with the yeast and just one tablespoon of the sugar. Let this sit on the counter for about ten minutes. When you come back, it should be bubbly and foamy, like a tiny, delicious science experiment gone right. That’s how you know it’s alive!
While that’s happening, gently warm your milk on the stove until those tiny bubbles just start forming around the edges. Take it off the heat immediately and let it cool down to that same 110°F range. If you dump hot milk in, you’ve just made milk soup, not dough! Once both the milk and yeast are ready, mix them together with the rest of the sugar, the honey, the melted butter, the eggs, and the salt. Stir that all up, and then start adding the flour two cups at a time on low speed.
Kneading and First Rise of the Texas Roadhouse Rolls Dough
Keep adding flour slowly until the dough pulls away from the sides of the bowl. It should still be a little tacky—don’t add so much flour that it turns stiff! Now, attach the dough hook. You need to knead this for about 5 to 7 minutes using your mixer. If you’re doing this the old-fashioned way by hand, plan on kneading for a solid 8 to 10 minutes until it feels smooth and elastic. You want it to pass the windowpane test, or at least feel really springy.
Lightly grease a clean bowl, pop the dough in there, cover it with a clean towel, and put it somewhere warm. We let this sit for a full hour, or until it has doubled in size. Give it space to breathe!
Shaping and Second Proofing
Once it’s puffy, gently punch the air out—don’t deflate it completely, just deflate it a bit. Turn the dough out onto a lightly floured surface. Now, roll it out gently until it’s about a half-inch thick. You’re aiming for squares, about two inches wide. Don’t worry about perfect uniformity; these are rustic, homemade rolls! Place those squares onto your baking sheets, making sure there’s a little space between them so they can grow into each other slightly.
Cover them loosely again and let them rest for another 45 minutes to an hour. They need to look puffy and big again before they hit the oven. This second rise is key to those pillowy Texas Roadhouse Rolls!
Baking and Finishing Your Buttery Rolls
Preheat your oven to 350°F while those rolls are finishing their second proof. Bake them for about 14 to 18 minutes. You’re looking for that beautiful, deep golden brown color on top. This is the most important part for the texture: as soon as you pull them out of the oven, grab that extra melted butter and brush it liberally all over the tops of every single roll. Don’t wait! That hot butter sinks in and keeps them soft and shiny. Serve them immediately with that honey butter!
Tips for Achieving Expert-Level Texas Roadhouse Rolls
Even following the steps perfectly, dough can sometimes have a mind of its own! The difference between a great roll and a truly phenomenal one—the kind you get at the restaurant—comes down to handling the dough correctly. If you keep these few tips in mind, you’ll master the texture every time you make these Texas Roadhouse Rolls.
Don’t be afraid that the dough seems wet at first; that’s the key to fluffiness! We are aiming for soft and slightly tender, not tough and dry.
Controlling Dough Consistency
When you start adding the flour after the wet ingredients are combined, go slow! I mean it—add flour a quarter cup at a time once you get past the initial two cups. Stop mixing the second the dough starts pulling away from the sides of the bowl. If you add too much flour too fast, you’ll get bread that’s too dense. A slightly tacky dough that sticks just a tiny bit to your fingers is perfect. If it’s too sticky to handle, add just a dusting more flour, but resist the urge to dump it all in!
Ensuring a Soft, Fluffy Texture
The biggest mistake people make that ruins the softness of their Texas Roadhouse Rolls is over-kneading or over-proofing. When you knead, stop as soon as the dough is smooth and elastic—don’t run the mixer on high speed for ten minutes, or you’ll develop too much gluten, making them tough. During both rises, make sure your rising spot isn’t too hot! If it’s scorching hot, the yeast works too fast, and the texture suffers. A gentle, slow rise yields the softest, fluffiest roll possible.
Frequently Asked Questions About Texas Roadhouse Rolls
I get so many questions about these rolls because everyone wants that restaurant-quality softness at home! Here are the things I hear most often when people are trying to perfect their batch of Texas Roadhouse Rolls.
Can I Make the Dough Ahead of Time
Yes, you totally can! If you want to save time the next day, you can let the dough go through the first rise, punch it down, shape the rolls, and place them on the baking sheet. Instead of the second rise at room temperature, cover the tray tightly with plastic wrap and stick it in the fridge. This slows everything way down. Take them out about 90 minutes before you want to bake them so they can warm up and complete that final proof on the counter.
What is the Best Way to Store Leftover Texas Roadhouse Rolls
Honestly, you should eat them the day you make them—that’s when they are truly at their peak! But if you have leftovers, store them in an airtight container at room temperature for up to three days. Do not store them in the fridge! The fridge dries them out instantly. To bring them back to life, wrap them loosely in foil and heat them in a 300°F oven for about 5 to 8 minutes until they are genuinely warm again.
Why Did My Rolls Not Rise Properly
This usually comes down to two things. First, check your water or milk temperature when activating the yeast. If it was too hot, the yeast died, and you’ll never get a rise. Second, check your temperature in the rising spot. If your kitchen is cold, the yeast gets sluggish. Try placing the bowl in an oven that is turned OFF, but with the light bulb on—that little bit of warmth is usually enough to get those Texas Roadhouse Rolls dough rising nicely!
Storing and Reheating Your Homemade Rolls
You’ve made a huge batch of these gorgeous, buttery rolls, and you probably won’t eat them all in one sitting—though I highly recommend trying! Proper storage is key to keeping that soft texture, especially since these rely on yeast and milk. I always aim to eat most of them the day they come out of the oven, but they keep well for a few days if you treat them right. Never put fresh bread in the fridge; it just turns them stale faster!
Here’s a quick rundown so you know exactly how long everything lasts:
| Item | Storage Location | Duration |
|---|---|---|
| Baked Rolls | Airtight container on counter | 3 Days |
| Baked Rolls | Freezer (wrapped well) | Up to 3 Months |
Storing the Honey Butter Topping
The honey butter is slightly different because it has a high fat and sugar content. If you plan on using the leftovers within three days, keeping it in a small, airtight container right on the counter is fine—it stays nice and soft for easy spreading. If you made a massive batch and need it to last longer, definitely pop it into the fridge. It will firm up hard in there, so just let it sit on the counter for about 30 minutes before you plan on serving it again!
Serving Suggestions for Your Buttery Rolls
These rolls are so flavorful on their own, especially drowning in that honey butter, but they are fantastic alongside a big bowl of chili or stew on a cold night. Seriously, they soak up broth like nothing else! If you are looking for great soup recipes to pair these with, check out some of my favorite cozy soup recipes.
Because they have that slight sweetness, they pair beautifully with savory main courses that aren’t too heavily spiced. Think about serving them with roast chicken or maybe a simple pot roast. They are also wonderful sliced open and lightly toasted the next morning for a sweet breakfast treat! You can find more great breakfast ideas on my Medium page.
Estimated Nutritional Data for Texas Roadhouse Rolls
I always get asked about the nutrition, and while I’m a baker, not a dietitian, I can give you a general idea of what’s in these wonderful rolls. Remember, this is just an estimate! Since we’re using whole milk, butter, and honey, they are certainly a treat. These numbers are based on dividing the entire recipe yield (about 33 rolls) evenly. If you make smaller rolls, your numbers will be lower, and if you load up on that honey butter, well, they’ll be higher!
Use these figures as a reference point for planning your meal, but keep in mind that exact values depend on the specific brands of flour and honey you use. For more recipe ideas, you can always check out my Pinterest boards.
| Nutrient | Approximate Value (Per Roll) |
|---|---|
| Calories | 135 |
| Fat | 2g |
| Carbohydrates | 26g |
| Protein | 4g |
These are truly rich rolls, so enjoy them in moderation! They are worth every single bite, especially when you’ve worked hard to get that perfect texture. If you are interested in other bread recipes, check out this miracle no-knead bread.
Print
30 Amazing Texas Roadhouse Rolls Secret
- Total Time: 2 hours
- Yield: 30–36 rolls 1x
- Diet: Vegetarian
Description
Make fluffy, buttery Texas Roadhouse-style rolls at home. These sweet, golden dinner rolls are perfect with homemade honey butter or any meal.
Ingredients
- 2 cups whole milk
- ½ cup warm water (about 110°F)
- 4 teaspoons active dry yeast
- 5 tablespoons granulated sugar (divided)
- ¼ cup honey
- 3 tablespoons melted unsalted butter
- 2 large eggs
- 2 teaspoons salt
- 7–7½ cups all-purpose flour (as needed)
- 2 tablespoons melted butter (for brushing warm rolls)
- ½ cup softened butter (for honey butter)
- 3 tablespoons honey (for honey butter)
- ¼ teaspoon ground cinnamon (for honey butter)
Instructions
- In a stand mixer bowl, combine warm water, yeast, and 1 tablespoon of sugar. Let stand 10 minutes until foamy.
- Heat milk in a saucepan until small bubbles form on edges. Remove from heat and cool to about 110°F.
- Add cooled milk, remaining sugar, honey, melted butter, eggs, and salt to the yeast mixture. Stir.
- Mix in 2 cups of flour on low speed. Gradually add remaining flour until soft dough forms, pulling away from the bowl sides. The dough should be slightly tacky.
- Knead with a dough hook for 5–7 minutes (or by hand for 8–10 minutes) until smooth and elastic.
- Place dough in a greased bowl, cover, and let rise in a warm place for 1 hour or until doubled.
- Punch down dough and roll out on a floured surface to ½-inch thickness. Cut into 2-inch squares and place on baking sheets, spaced apart.
- Cover loosely and let rise for another 45–60 minutes, until doubled.
- Preheat oven to 350°F. Bake for 14–18 minutes until golden brown.
- Remove from oven and immediately brush with melted butter. Serve warm with honey butter if desired.
Notes
- To make honey butter, beat butter, honey, and cinnamon together until fluffy.
- Store honey butter at room temperature for up to 3 days or refrigerate for up to a week.
- Prep Time: 20 minutes (plus rising time)
- Cook Time: 15 minutes
- Category: Bread
- Method: Baking
- Cuisine: American
Nutrition
- Serving Size: 1 roll
- Calories: 135
- Sugar: Unknown
- Sodium: Unknown
- Fat: 2g
- Saturated Fat: Unknown
- Unsaturated Fat: Unknown
- Trans Fat: Unknown
- Carbohydrates: 26g
- Fiber: Unknown
- Protein: 4g
- Cholesterol: Unknown