If you need a dessert that tastes like you spent hours fussing over it but actually took about fifteen minutes of actual work, then stop what you’re doing and make these Strawberry Yogurt Dessert Cups right now. Seriously, these no-bake treats are my absolute favorite hack for busy weeknights when a sugar craving hits hard.
I’ve tried every fancy layered dessert under the sun, but nothing beats the simplicity and fresh flavor here. The secret is really just using good quality Greek yogurt—it gives you that thick, creamy base that holds up beautifully against the sweet strawberries and that satisfying crunch from the granola. I almost always have the ingredients on hand, which is why these cups have saved me more times than I can count when unexpected guests drop by. 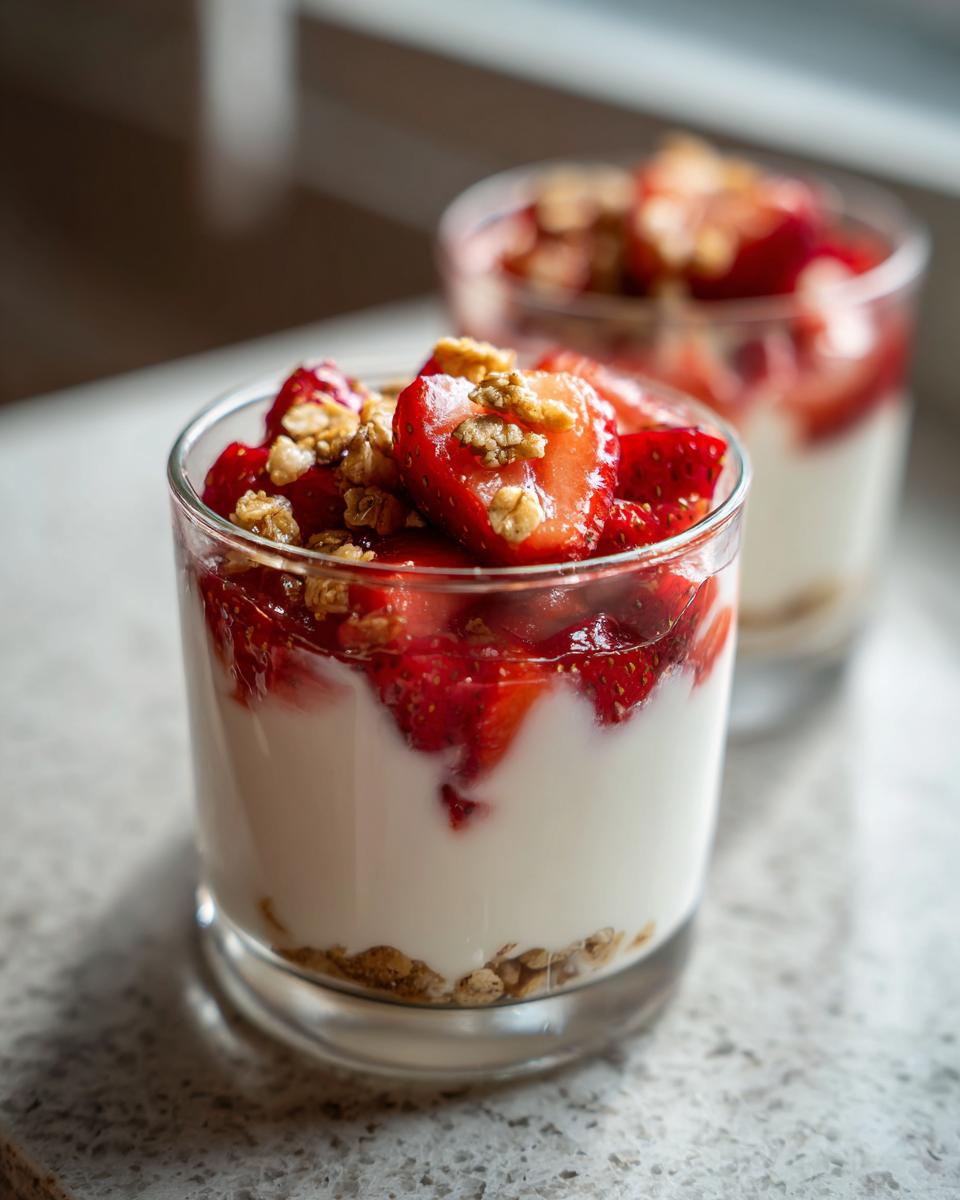
Forget turning on the oven; this whole process is assembly only! We’re talking about layering bright, juicy strawberries with tangy yogurt and crunchy goodness. Trust me, once you try this ridiculously easy recipe for Strawberry Yogurt Dessert Cups, it’s going straight into your regular rotation. Let’s get started before the craving gets worse!
Gathering Your Ingredients for Strawberry Yogurt Dessert Cups
Okay, gathering supplies for these Strawberry Yogurt Dessert Cups is almost as fun as eating them! Since this is a no-bake situation, the quality of what you put in really shines through. We need three main teams here: the fruit, the creamy base, and the crunch factor. Don’t stress about perfection; just measure out what you need.
I always make sure my strawberries are firm and ripe. That first step of letting them sit with the honey is important because it draws out those lovely juices that soak into the yogurt later on. It’s a tiny step that makes a huge difference in the final flavor profile of your cups. 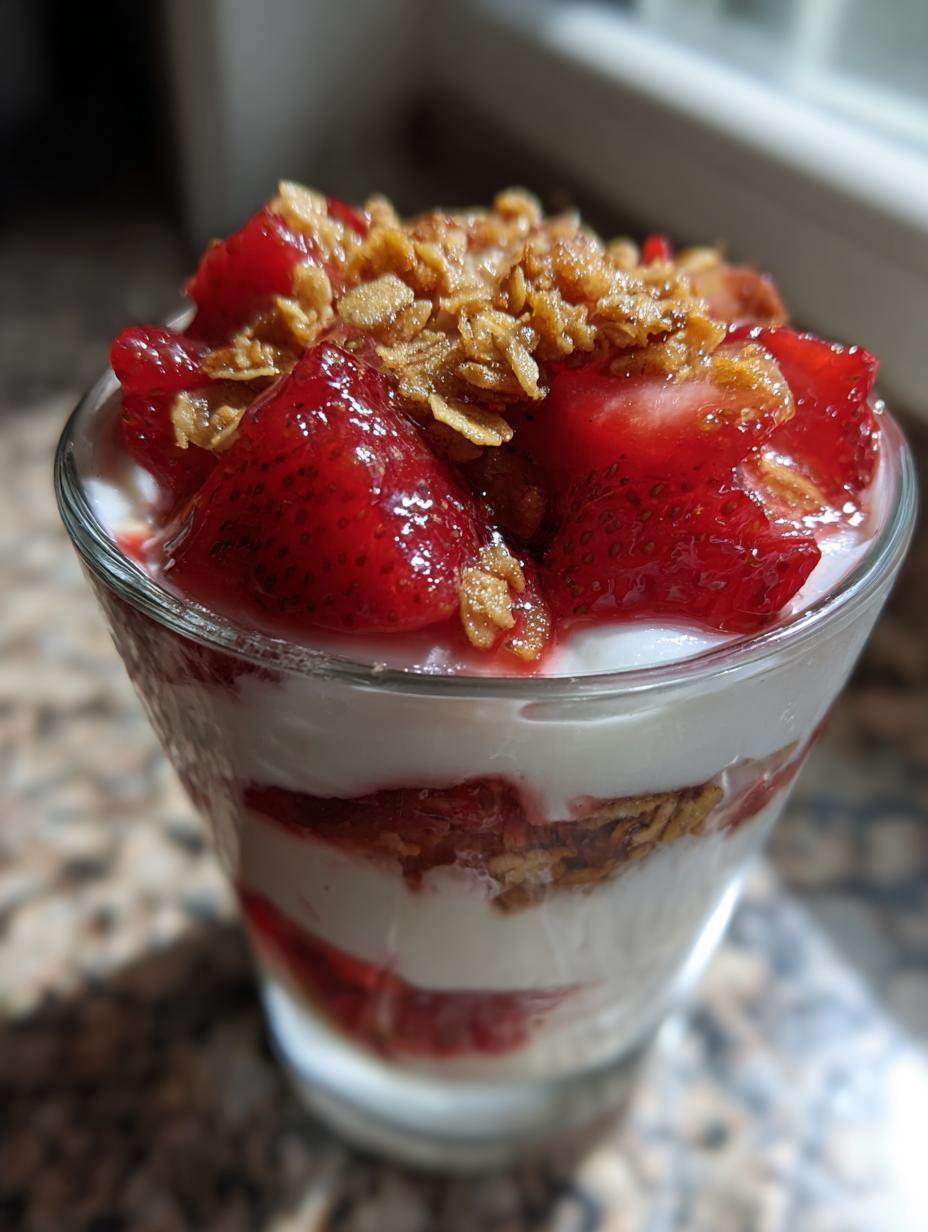
Essential Components for Strawberry Yogurt Dessert Cups
You’ll need four things for the assembly, plus the strawberries that need a little pre-treatment. Remember, using plain Greek yogurt is my top tip here—it just gives the best structure for these layered Strawberry Yogurt Dessert Cups.
- One and a half cups of fresh strawberries, and make sure you dice them up pretty small—about the size of a pinky fingernail.
- Two tablespoons of honey reserved just for those strawberries.
- One and a half cups of plain Greek yogurt. Don’t use the runny kind!
- One tablespoon of honey for sweetening the yogurt batch.
- Half a teaspoon of vanilla powder—it really wakes up the yogurt flavor.
- Half a cup of your favorite crunchy granola.
Equipment Needed for Quick Assembly
Since we are keeping this super fast, you don’t need much fancy gear at all! Grab a couple of small bowls for mixing up your layers. You’ll also want a whisk or a sturdy spoon for getting that yogurt perfectly smooth.
Most importantly, grab four small serving glasses or jars. These are what make the final presentation look so great! If you are looking for other quick dessert ideas, check out these dessert recipes.
Step-by-Step Preparation of Strawberry Yogurt Dessert Cups
This is where the magic happens, and I promise you, it moves fast! We’re going to prep our two main components first, and then it’s all about stacking. Remember, we’re aiming for four beautiful Strawberry Yogurt Dessert Cups, but if you’re feeling ambitious, you can easily double this batch!
Preparing the Fresh Strawberry Layer
First things first, let’s get those strawberries ready to mingle. Take your diced strawberries—and I mean dice them small, like tiny cubes—and toss them into a small bowl. Now, sprinkle those two tablespoons of honey right over the top. Give it a gentle stir, just enough to coat everything. You want the honey to start pulling out the natural juices from the fruit. Set this bowl aside while you deal with the yogurt; five minutes is plenty of time for this step to work its alchemy.
Creating the Creamy Yogurt Mixture
Next up is the creamy part! Grab your bowl with the Greek yogurt, the single tablespoon of honey you set aside for this, and that little bit of vanilla powder. Whisk this vigorously. I mean, really whisk it until it’s completely uniform. You’re looking for that lovely, thick texture—no streaks of white yogurt or clumps of honey allowed! If you’re using vanilla powder like I do, make sure it’s fully incorporated so you don’t get a dusty pocket later. It should look shiny and ready to spread. For more recipes using Greek yogurt, see my yogurt fritters recipe.
Assembling Your Strawberry Yogurt Dessert Cups
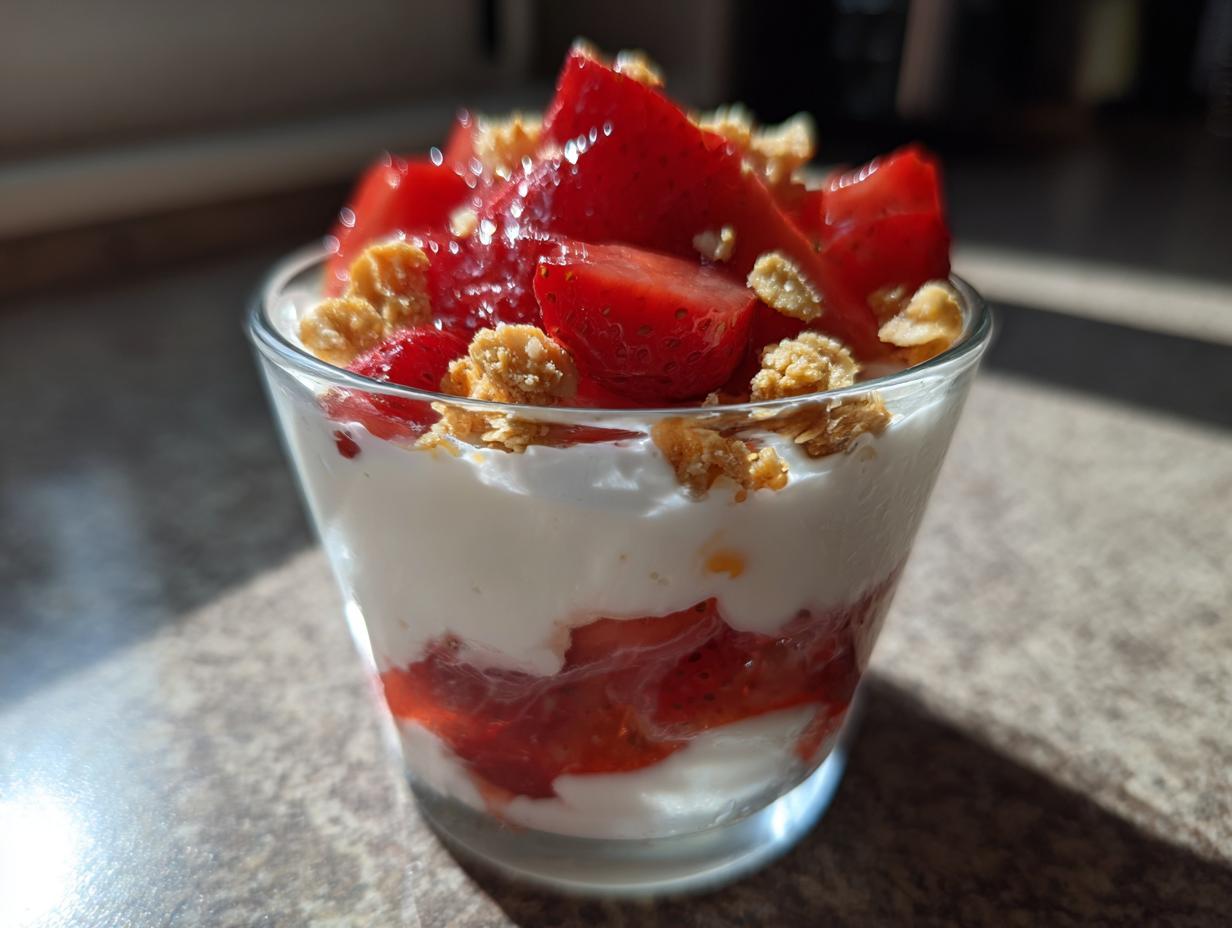
Time to build these beauties! Grab your four chosen glasses or jars. Start with the crunch: drop about one tablespoon of granola right into the bottom of each cup. Don’t pack it down! Next, spoon a generous layer of that creamy yogurt mixture right on top of the granola. Then, spoon a layer of your honeyed strawberries over the yogurt. See how pretty that looks already? That’s layer one done.
Now, we repeat! You should have enough mixture to do this twice, depending on your cup size. Add another layer of granola, then yogurt, and finally, top it off with the remaining strawberries. Make sure the very top layer is the prettiest strawberries you saved, just for looks. Don’t worry about making the layers perfect; the slight unevenness just adds character to these Strawberry Yogurt Dessert Cups. Pop them in the fridge immediately! You can find more no-bake ideas on our Pinterest page.
Tips for Perfect Strawberry Yogurt Dessert Cups
Even though these Strawberry Yogurt Dessert Cups are super simple, a couple of little tricks I’ve learned over the years can really elevate them from good to absolutely fantastic. My biggest piece of advice revolves around texture and sweetness—you have total control here!
If you find your yogurt mixture is just a little too stiff, don’t panic and dump in tons of milk! That will ruin the creamy structure we worked so hard to achieve. Instead, add just a teaspoon of water or a splash of leftover strawberry juice from the honeyed fruit bowl. It loosens things up without thinning out the flavor.
When it comes to sweetness, taste everything before you layer! I use plain Greek yogurt because I like the tang, but if you prefer things sweeter, stir in an extra half teaspoon of honey into the yogurt base. Conversely, if your strawberries are super sweet, you might even skip the honey in the fruit layer entirely. It’s all about balancing that tart, sweet, and crunchy combo that makes these Strawberry Yogurt Dessert Cups so addictive. Remember that chilling time is non-negotiable; it helps the granola soften just slightly so it doesn’t feel like eating rocks! If you are interested in other high-protein snacks, check out this high-protein cheesecake fluff.
Storing and Serving Your Refreshing Treat
Okay, this is the hardest part: waiting! You absolutely must chill these immediately after assembly. That minimum of 20 minutes in the refrigerator isn’t just a suggestion; it lets those layers settle and meld together beautifully. It firms up the yogurt just enough so you get that lovely contrast when you dig in.
If you’re making these ahead, they hold up really well for about two days in the fridge, provided they are covered tight. I usually cover them with plastic wrap directly touching the top layer of strawberries to keep them from drying out. Honestly, they taste best on day one, but they are still perfectly delicious on day two. Just give them a quick stir if the granola seems too soft, though I personally love when the granola absorbs a little yogurt juice! For more strawberry-themed treats, look at the strawberry bread recipe.
Understanding the Nutrition in Your Strawberry Yogurt Dessert Cups
Even though these Strawberry Yogurt Dessert Cups taste like a total indulgence, they are actually packed with good stuff, thanks to that Greek yogurt base and all that fresh fruit! Since this is a no-bake assembly job using varied ingredients, these numbers are definitely estimates, but they give you a great idea of what you’re enjoying.
It’s a great snack because you get a solid hit of protein from the yogurt, which keeps you feeling full way longer than a regular sugary dessert would. It’s always nice when your favorite treat is actually helping you out a bit!
Estimated Nutritional Breakdown Table
Here’s a quick look at the approximate breakdown for one serving of these delicious layered cups:
| Nutrient | Estimate Per Cup |
|---|---|
| Calories | 190 |
| Protein | 10 g |
| Fat | 4 g |
| Carbohydrates | 26 g |
Frequently Asked Questions About Strawberry Yogurt Dessert Cups
I get so many messages about these cups, so I figured I’d answer the most common things people ask about making these Strawberry Yogurt Dessert Cups. It’s usually about substitutions or how to make them even faster!
Q1. Can I use regular yogurt instead of Greek yogurt?
You can, but trust me, you really shouldn’t! Regular yogurt is much thinner, and it will turn your beautiful layers into a soupy mess once it sits for a while. Greek yogurt is essential because its thickness helps support the weight of the fruit and granola in these Strawberry Yogurt Dessert Cups. If you must substitute, try mixing regular yogurt with a tablespoon of instant pudding mix to thicken it up.
Q2. What’s the best way to make these ahead of time?
I mentioned chilling for 20 minutes, but if you are prepping for a party, you can assemble them up to 24 hours ahead. The secret is to keep the granola separate until just before serving if you want maximum crunch. If you don’t mind slightly softer granola, assemble everything but the very top layer of fruit, cover them tightly, and chill.
Q3. My strawberries aren’t very sweet. Can I add more honey?
Absolutely! That’s why I emphasized tasting everything. If your fruit layer is tart, feel free to bump up the honey in the strawberry bowl to maybe three tablespoons. You can even drizzle a tiny bit of extra honey over the final yogurt layer before adding the top strawberries for an extra sweet touch.
Q4. Can I swap out the granola for something else?
Sure thing! If you need a gluten-free option, use gluten-free granola or even crushed nuts like almonds or pecans. If you want to make this a super light snack, you could use crushed freeze-dried strawberries instead of granola, but you’ll lose that nice chewy texture.

Divine 4-Layer Strawberry Yogurt Dessert Cups
- Total Time: 15 minutes
- Yield: 4 dessert cups 1x
- Diet: Vegetarian
Description
Creamy strawberry yogurt dessert cups layered with fresh strawberries and crunchy granola. Easy no-bake treat made in minutes.
Ingredients
- 1 1/2 cups fresh strawberries, finely diced
- 2 tablespoons honey (for strawberry layer)
- 1 1/2 cups plain Greek yogurt
- 1 tablespoon honey (for yogurt layer)
- 1/2 teaspoon vanilla powder
- 1/2 cup granola
Instructions
- Stir diced strawberries with 2 tablespoons honey. Let stand for 5 minutes.
- Mix Greek yogurt, 1 tablespoon honey, and vanilla powder until smooth.
- Place 1 tablespoon granola into the bottom of each serving cup.
- Spoon a layer of yogurt over the granola.
- Add a layer of the honeyed strawberries on top of the yogurt.
- Repeat layers with granola, yogurt, and strawberries until cups are filled.
- Top with a few strawberries for presentation.
- Chill for at least 20 minutes before serving.
Notes
- Use plain Greek yogurt for a thicker, creamier texture.
- Adjust honey to your preferred sweetness level.
- Chill time improves the final texture.
- Prep Time: 15 minutes
- Cook Time: 0 minutes
- Category: Dessert
- Method: No-Bake Assembly
- Cuisine: American
Nutrition
- Serving Size: 1 cup
- Calories: 190
- Sugar: N/A
- Sodium: N/A
- Fat: 4 g
- Saturated Fat: N/A
- Unsaturated Fat: N/A
- Trans Fat: N/A
- Carbohydrates: 26 g
- Fiber: N/A
- Protein: 10 g
- Cholesterol: N/A