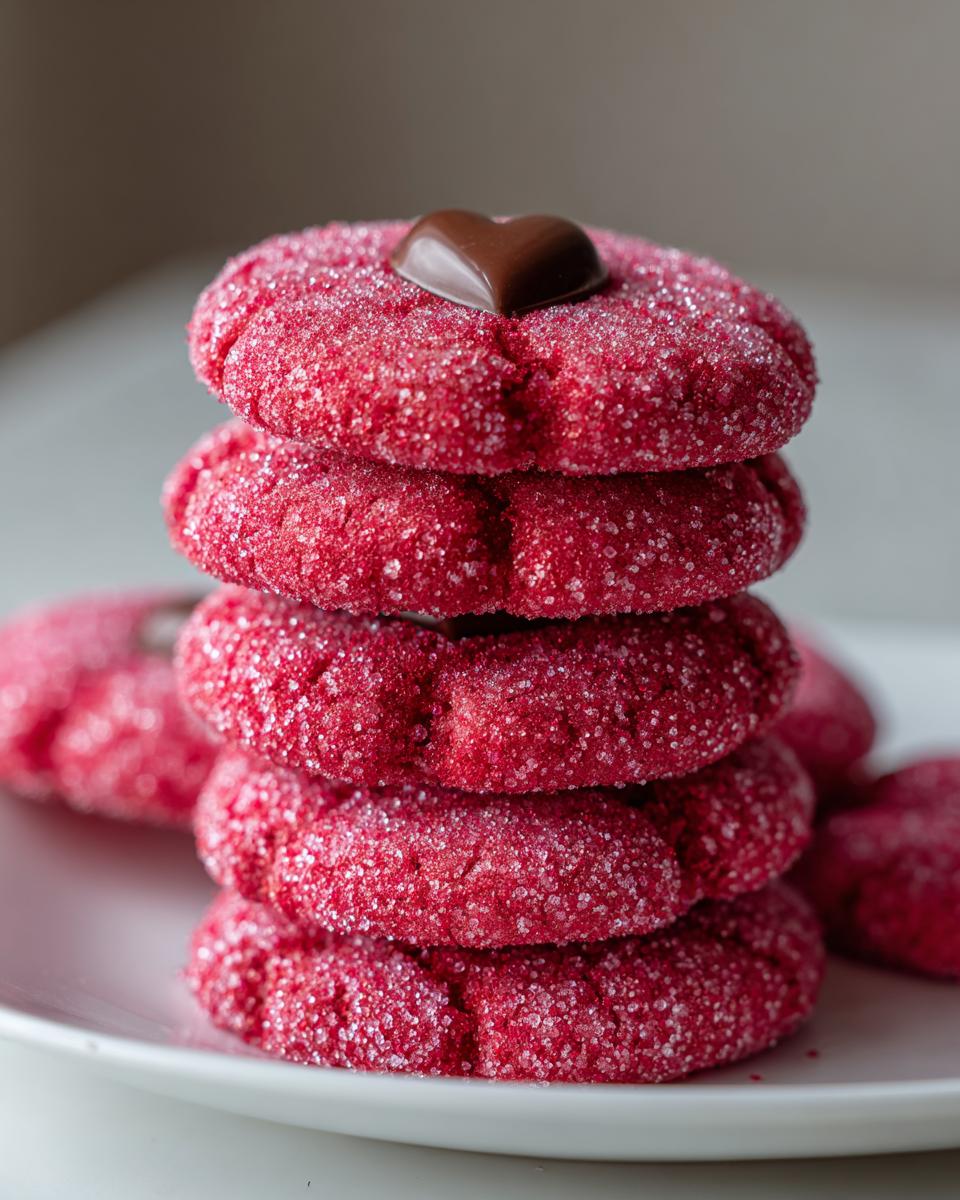
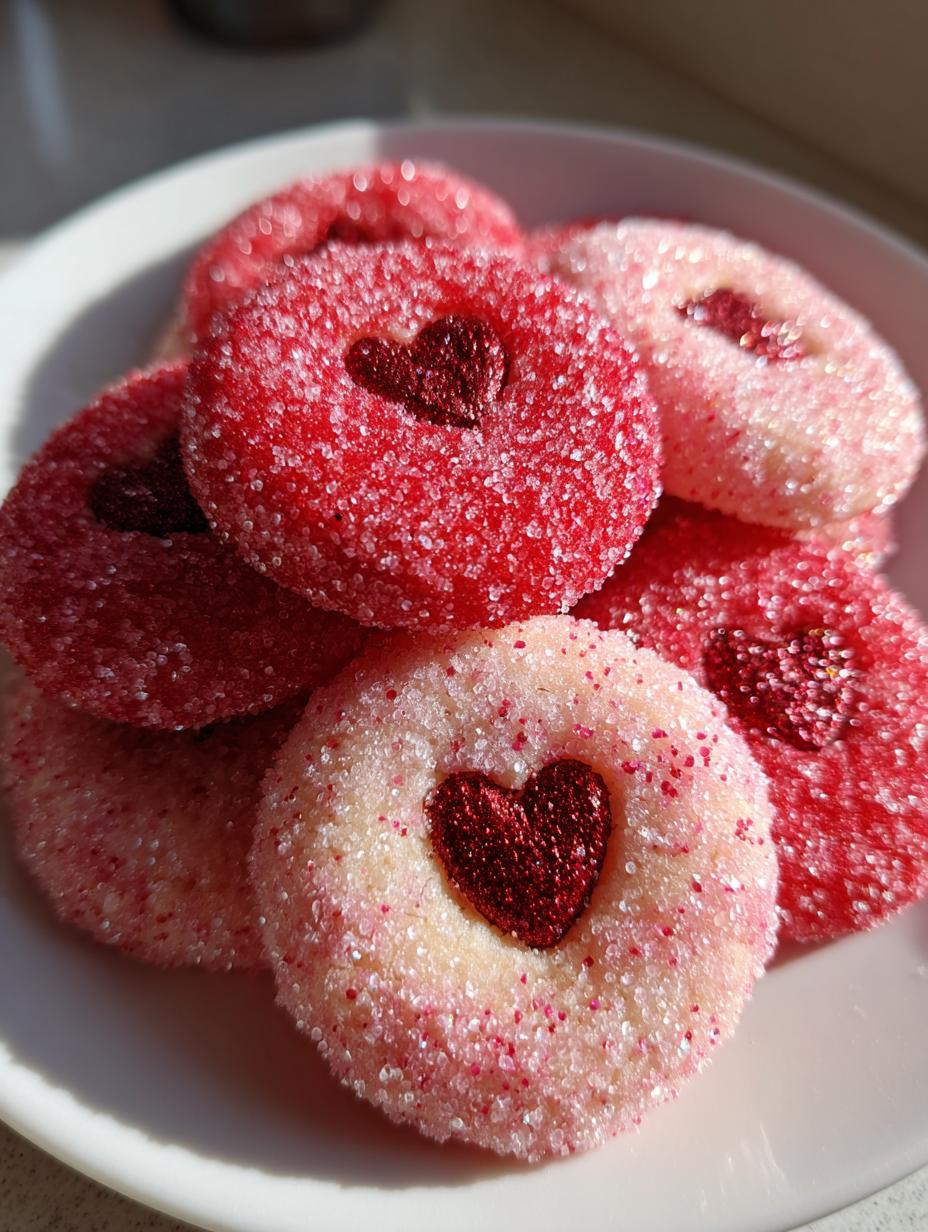
Forget those dry, crumbly sugar cookies you have to dunk in milk just to swallow! I finally cracked the code for the softest, most melt-in-your-mouth treat, and I’m thrilled to share my secret: cream cheese! These sparkle sugar cookies are unbelievably tender, and the combination of bright pink sugar and a little chocolate heart on top makes them look like they came straight from a fancy bakery. Honestly, they’re my go-to for every single celebration now. They bake up fast, but the chilling time is worth every single minute, trust me!
Gathering Your Ingredients for sparkle sugar cookies
Before we even think about turning on the mixer, we need to talk about what goes into these amazing cookies. The success of these sparkle sugar cookies hinges on having your ingredients ready and at the right temperature. Seriously, don’t try to rush the softening process; cold cream cheese is the enemy of fluffy dough!
I always lay out my butter and cream cheese about an hour before I plan to start mixing. That perfect, slightly cool, yet yielding texture is crucial for that initial creaming step. Everything else is pretty standard pantry fare, but quality really does shine through here, especially with that vanilla.
Dry Components Explained
We keep the dry stuff simple, which is what allows those wet ingredients to really shine. You’ll need about two and three-quarter cups of all-purpose flour. Make sure you measure this correctly—spoon it into the cup and level it off, don’t just scoop straight from the bag, or your cookies will be tough! We whisk this with baking powder for lift and just a tiny bit of salt to balance out all that sweetness.
Wet Bases and Flavorings
This is where the magic happens! You need the full three ounces of full-fat cream cheese alongside your butter. Don’t skimp on the fat content here; that’s what keeps them soft for days. Once that’s creamy, you add the sugar, one egg, and my absolute favorite part: vanilla bean paste. That paste gives you those beautiful little black flecks you see in bakery cookies, and the flavor is so much deeper than plain extract.
The Sparkle: Sugar Coating and Toppings
For the coating, you must use sanding sugar, not regular granulated sugar. Sanding sugar is coarser and holds its color and crunch during the baking process. I love using pink or red for Valentine’s or holidays, but any color works! And for the top? You want those little chocolate candy hearts or rounds, unwrapped and ready to press right into the hot cookie immediately after they come out of the oven.
Essential Equipment for Baking
You don’t need a million gadgets for these cookies, but a few things really make the process smoother. Definitely grab your trusty electric mixer for creaming the butter and cheese—your arm will thank you! You’ll need parchment paper for lining those baking sheets, and a shallow bowl is perfect for rolling the dough balls in that beautiful sanding sugar. Oh, and a small glass with a flat bottom is my secret for getting those perfectly uniform, slightly flattened tops!
Step-by-Step Instructions for perfect sparkle sugar cookies
Okay, now for the fun part! We’re going to turn those ingredients into the softest sparkle sugar cookies you’ve ever made. Timing is everything here, especially with the chilling, so pay attention to those steps!
Mixing the Soft Dough
First things first, get your dry ingredients whisked together in a bowl and set them aside. Now, grab your mixer for the wet base. You need to beat that softened butter and cream cheese on medium-high speed for a full two minutes until it’s completely smooth—no lumps allowed! Once that looks good, add your cup of sugar and beat it for another minute until it gets that light, fluffy look. Then, beat in the egg and the vanilla bean paste until everything is totally combined. Don’t overdo this part!
Now we mix in the flour mixture, but here’s where you need to be gentle. Turn the mixer speed down to low and add the flour mixture slowly. You only mix until you just can’t see any more dry streaks. Stop the mixer right there! If you mix too long now, you’ll develop the gluten and lose that signature cream cheese softness we are aiming for.
Chilling and Shaping Your Cookies
This next step is non-negotiable, folks: cover that soft dough tightly and get it into the fridge for 45 minutes. If you skip this, the cookies will turn into flat puddles in the oven, and we absolutely don’t want that! While it chills, go ahead and preheat your oven to 350°F and line two great big baking sheets with parchment paper. This parchment is your best friend for easy cleanup later.
When the dough is chilled and firm enough to handle, it’s time for the sparkle! Pour that pink or red sanding sugar into a shallow dish. Scoop out dough balls that are about one tablespoon each. Roll each ball between your palms until it’s round, and then roll it all over in the sugar until it’s completely coated.
- Place the coated dough balls on your prepared sheets about two inches apart.
- Take a small glass with a flat bottom—I always dip the bottom in a little sugar first just to be safe—and gently press each ball down until it’s flattened to about half an inch thick.
Baking and Finishing the sparkle sugar cookies
Slide those beauties into your preheated 350°F oven. They bake for 11 to 12 minutes. You’re looking for the edges to be just barely set and maybe a hint of golden color on the bottom, but the tops should still look pale. Remember, these are soft sugar cookies, not crispy ones!
This next step is crucial for that beautiful finish on your sparkle sugar cookies: As soon as they come out of the oven, while they are still piping hot, gently press one chocolate candy right into the center of each cookie. The heat melts the bottom of the candy just enough to anchor it perfectly. Don’t mess with them for five minutes—let them sit right on that hot baking sheet to firm up a little bit. Then, very carefully, transfer them to a wire rack to cool completely before you even think about storing them!
Tips for Success with Cream Cheese Cookies
Listen, these cookies are forgiving, but they have a couple of quirks because of that wonderful cream cheese! The number one thing to remember is that cream cheese adds moisture, which is great for keeping them soft, but it also means they need that chilling time. If you try to skip the 45 minutes in the fridge, I promise you’ll end up with sticky messes on your baking sheet instead of perfect rounds.
When you are pressing the dough down with the glass, don’t press so hard that you squeeze the sugar coating right off! You just want to gently flatten them to about half an inch. If you press too thin, they bake faster and lose some of that trademark soft texture we worked so hard to achieve.
Also, never skip pressing that chocolate candy into the cookie while it’s hot! If you wait until they cool down even a little bit, the candy will just sit on top and slide right off later. That little bit of melted adhesion is what keeps them looking professional and perfectly decorated. These cookies are made to be soft, so handle them gently once they are baked!
Storing and Keeping Your sparkle sugar cookies Fresh
The best part about using cream cheese in these recipes is that they stay wonderfully soft for days! You don’t want to ruin that texture by storing them incorrectly. Forget airtight containers right away; those trap too much moisture and can make the sanding sugar get sticky.
For the first day or two, I just stack these sparkle sugar cookies loosely in a cake carrier or on a serving platter, leaving them uncovered for a few hours after they’ve cooled completely. If you need to store them longer—say, up to four days—line a sturdy container with a paper towel on the bottom, place a single layer of cookies, add another paper towel, and then the next layer. This absorbs any extra moisture. They taste just as divine on day three!
Common Questions About sparkle sugar cookies
I get so many questions about these cookies once people try the recipe! They are so unique because of the cream cheese, which changes a few standard baking rules. Here are the three things I hear most often about making the best sparkle sugar cookies.
Can I roll these cookies in regular granulated sugar instead of sanding sugar?
You absolutely *can*, but I highly advise against it if you want the look and texture I described! Granulated sugar melts much faster in the oven than sanding sugar does. If you use regular sugar, your cookies will likely look duller, and the sugar might just melt right into the dough instead of staying bright and sparkly on the outside.
How long do these soft sugar cookies stay fresh?
This is the best part about using that cream cheese! Because of the fat and moisture content, these soft sugar cookies stay wonderfully soft for at least three to four days when stored correctly. They really don’t dry out like standard butter cookies do. I’ve even eaten one on day five, and it was still perfectly chewy!
Why did my cookies spread too much while baking?
Nine times out of ten, spreading happens because the dough wasn’t chilled long enough. That 45 minutes in the fridge is essential to firm up the butter and cream cheese so the dough holds its shape better when it hits the heat. Also, make sure you’re pressing them down gently—if you press them too thin before baking, they cook too fast and spread out before the structure sets.
Sharing Your Delicious Creations
I really, really hope you love making these as much as I love eating them! Once you’ve frosted them with that little chocolate candy, snap a picture and tag me online. Seriously, seeing your colorful batches of sparkle sugar cookies makes my day. Let me know in the comments how they turned out for you! You can also find more fun ideas on my blog or check out my Pinterest page for visual inspiration.
Print
Amazing 3-step sparkle sugar cookies secret
- Total Time: 67 minutes
- Yield: 28 to 30 cookies 1x
- Diet: Vegetarian
Description
Soft cream cheese sugar cookies rolled in colorful sanding sugar and topped with chocolate candy. Perfect for gifting or celebrating any special occasion. These cookies are extra soft due to the cream cheese.
Ingredients
- 2 and 3/4 cups all-purpose flour
- 1 and 1/4 teaspoons baking powder
- 1/2 teaspoon salt
- 3/4 cup unsalted butter, softened
- 3 ounces full-fat cream cheese, softened
- 1 cup granulated sugar
- 1 large egg
- 1 and 1/2 teaspoons vanilla bean paste
- 2/3 cup pink or red sanding sugar
- 28 to 30 small chocolate candy hearts or rounds, unwrapped
Instructions
- Whisk together flour, baking powder, and salt in a medium bowl. Set aside.
- Beat softened butter and cream cheese with an electric mixer on medium-high speed for 2 minutes until smooth and creamy.
- Add granulated sugar to the butter mixture and beat for 1 minute until fluffy. Add egg and vanilla bean paste and beat until fully incorporated.
- Mix in the flour mixture on low speed just until no dry streaks remain and a soft dough forms.
- Cover dough tightly and refrigerate for 45 minutes until firm enough to handle.
- Preheat oven to 350°F. Line two baking sheets with parchment paper.
- Pour sanding sugar into a shallow bowl. Scoop 1 tablespoon portions of dough, roll into balls, then roll each ball in sanding sugar to coat completely.
- Place coated dough balls 2 inches apart on prepared baking sheets. Gently press each one with the bottom of a glass to flatten slightly to about 1/2 inch thick.
- Bake for 11 to 12 minutes until edges are barely set and bottoms are lightly golden but tops remain pale.
- Immediately press one chocolate candy gently into the center of each hot cookie. Let cookies cool on the baking sheet for 5 minutes.
- Transfer cookies to a wire rack to cool completely before storing.
Notes
- The cream cheese keeps these cookies incredibly soft for days.
- Use pink or red sanding sugar for a festive look.
- Prep Time: 15 minutes
- Cook Time: 12 minutes
- Category: Dessert
- Method: Baking
- Cuisine: American
Nutrition
- Serving Size: 1 cookie
- Calories: 115
- Sugar: N/A
- Sodium: N/A
- Fat: 5g
- Saturated Fat: N/A
- Unsaturated Fat: N/A
- Trans Fat: N/A
- Carbohydrates: 16g
- Fiber: N/A
- Protein: 1g
- Cholesterol: N/A