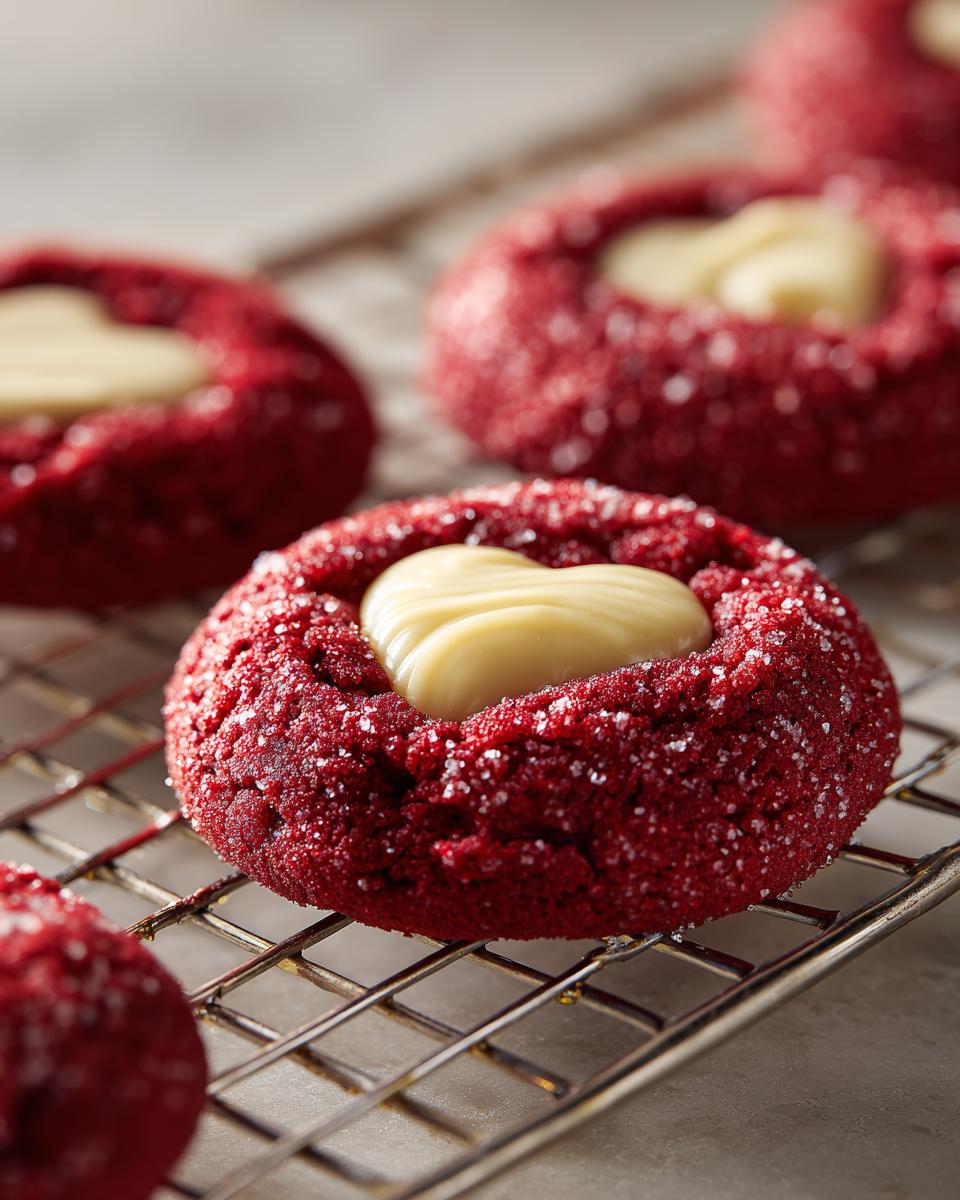
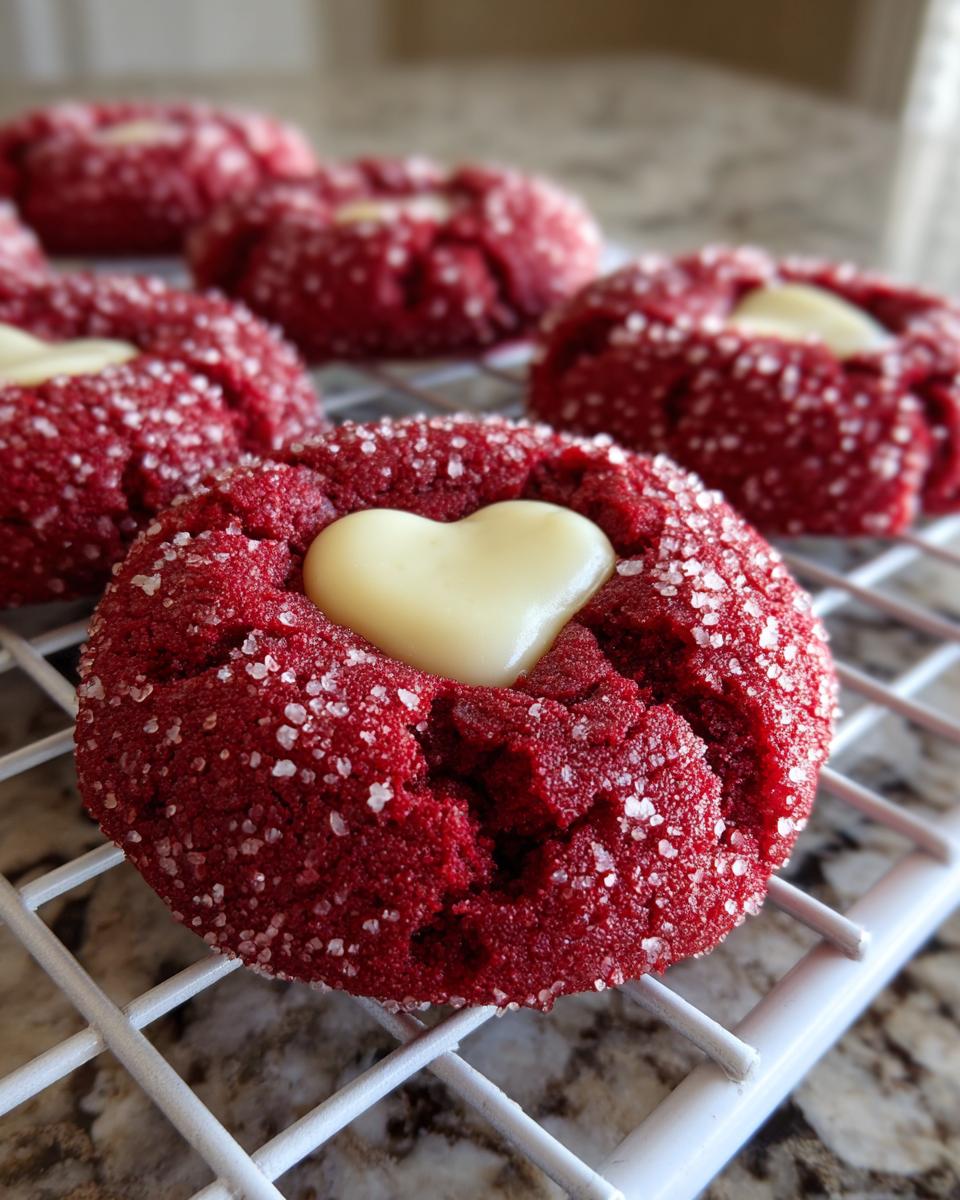
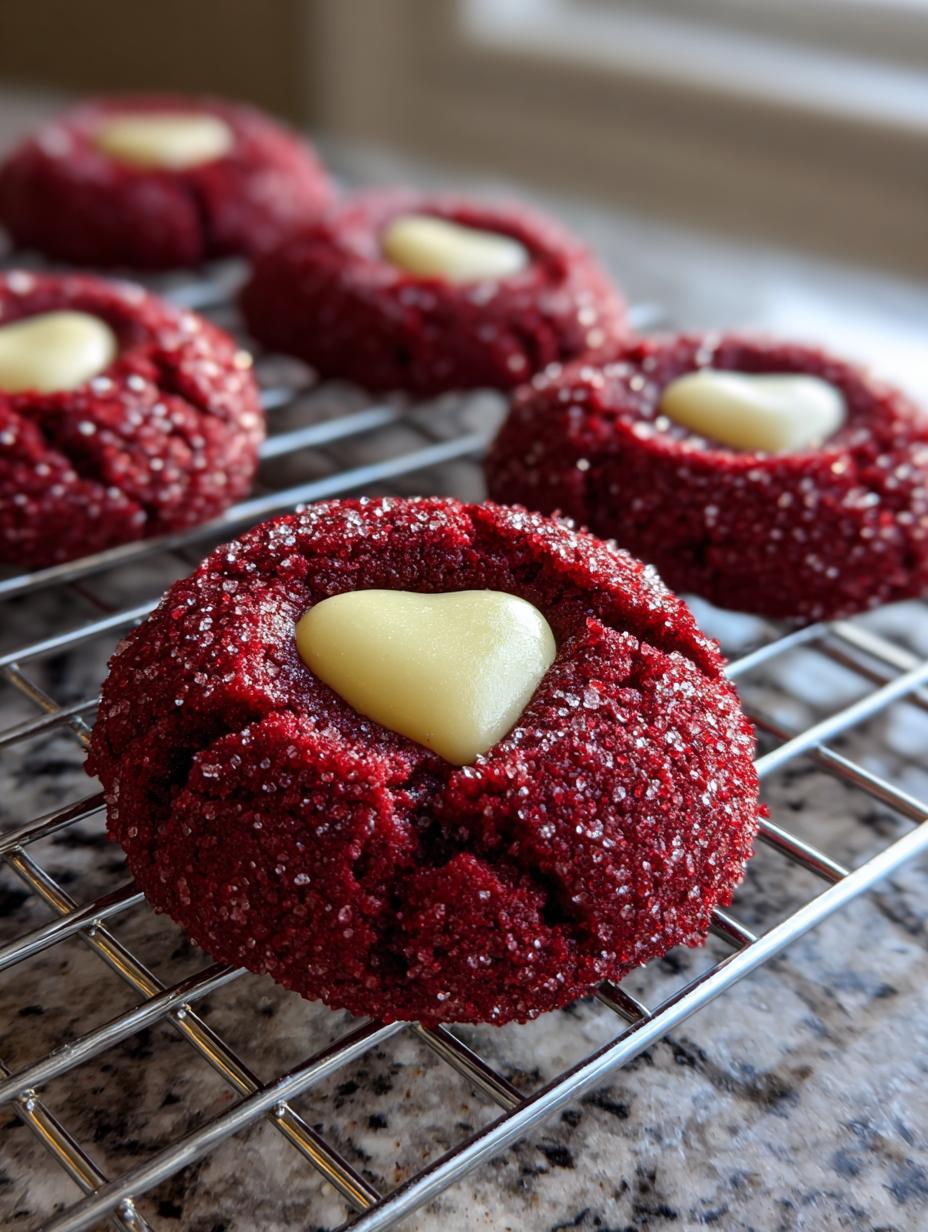
When you need that perfect festive fix but can’t face a mountain of dough, this small-batch recipe is my absolute lifeline! Seriously, who needs thirty cookies when six perfect ones will do? These aren’t your average flat, sandy sugar cookies, oh no. We’re talking chewy, soft-centered Red Velvet cookies that hide a molten white chocolate heart. It’s pure magic, especially when you’re just craving one or two for a quiet evening. It’s the best way to get that luxurious holiday flavor without committing to a giant baking marathon.
Essential Ingredients for Perfect Red Velvet Cookies
You know, the secret to any great cookie is really just treating your ingredients with respect. This small batch recipe for Red Velvet cookies is no exception. We aren’t using a ton of stuff here, which is why the quality of what we do use really shines through. You want that intense red color and that delicate cocoa background, and that starts right here with the dry goods.
Trust me, using the right cocoa powder makes all the difference in balancing the sweetness of the sugar and the chocolate center we add later. Don’t skimp!
Dry Ingredients for Your Red Velvet
When you measure these out, be careful not to pack the flour down. I always gently spoon the flour into the measuring cup and level it off. For this small batch, precision matters because we only have six cookies to play with!
- 1/2 cup plus 1 tablespoon all-purpose flour
- 2 tablespoons unsweetened cocoa powder (the good stuff!)
- 1/4 teaspoon baking soda
- 1/8 teaspoon fine sea salt
Wet Ingredients and Coloring for Red Velvet
This is where the color magic happens. If you use standard liquid food coloring, you’ll end up with a pale pink mess, and nobody wants that. You absolutely must use a good quality red gel food coloring. It’s concentrated, so a little goes a long way toward that iconic, deep hue.
Also, notice we’re using melted butter here, not softened. This helps keep the cookie texture chewy instead of cakey, which is exactly what we want for these soft treats.
- 4 tablespoons unsalted butter, melted
- 1/3 cup granulated sugar (plus extra for rolling!)
- 1 large egg yolk
- 1 teaspoon red gel food coloring
Equipment Needed to Bake Red Velvet Cookies
You don’t need a huge arsenal of gadgets for this small batch, which is another reason I love it for a weeknight treat! Just grab a few basics from your drawer. Having everything ready keeps the process moving quickly, especially since the dough comes together so fast.
- A small baking sheet is perfect, but make sure you have parchment paper!
- Two mixing bowls—one medium for the wet stuff and one for sifting the dry.
- A whisk for the initial sugar and butter mix, and a sturdy spatula for folding in the flour.
- Measuring cups and spoons—accuracy is key here!
- A small plate with the extra sugar ready for rolling.
Step-by-Step Instructions for Amazing Red Velvet
Okay, let’s get mixing! This recipe moves fast, so have your oven preheated to 350\xB0F and your parchment paper ready before you even grab the bowl. You only get six cookies, so we want to make every step count!
Preparing the Red Velvet Dough Base
First things first, get that melted butter and the main portion of sugar whisked together in your bowl. You’re just combining them until they look happy together. Then, add in that egg yolk and the red gel coloring. Whisk it until that mixture is a shocking, uniform, beautiful red. Seriously, the color payoff here is amazing! Don’t stop stirring until there are no white streaks left.
Now for the dry stuff. I like to sift the flour, cocoa, baking soda, and salt right over the wet ingredients. This saves on dishes and ensures everything is distributed evenly. When you mix, use a spatula and be gentle! We are folding, not beating. Mix just until you see no more dry flour streaks. If you overmix at this stage, your cookies will be tough, and we want chewy Red Velvet, remember?
Shaping and Coating Your Red Velvet Cookie Balls
Once the dough is just combined, it’s time to divide it up. Since this makes six cookies, just eyeball it or use a small kitchen scale if you’re feeling fussy—I just kind of eyeball it, honestly. Roll each portion into a nice, smooth ball. Make sure those balls are tight and uniform so they bake evenly.
Get that extra two tablespoons of granulated sugar ready on a small plate. Take each dough ball and roll it around until it’s completely coated in sugar. That outer sugar layer is what gives us those lovely crackles and that classic sugar cookie crunch on the outside while keeping the inside soft.
Baking and Setting the Red Velvet Cookies
Place those beautiful red spheres about two inches apart on your prepared sheet. They will spread a little bit, but not too much, thanks to the small amount of fat. Pop them into the 350\xB0F oven for 10 to 12 minutes. You’re looking for the edges to look set, and the tops should look a little dry and maybe even starting to crackle a bit. That’s your visual cue!
Here’s a non-negotiable step for these specific Red Velvet cookies: You must let them cool on the baking sheet for a full 10 minutes after they come out. If you try to move them too soon, they will fall apart! Their structure is still too fragile right out of the oven.
Inserting the White Chocolate Center for Your Red Velvet
Once those 10 minutes are up and the cookies have firmed up slightly, it’s time for the treasure! Take one of those white chocolate peanut butter hearts—or whatever shape you chose—and press it firmly right into the center of the warm cookie. The residual heat will soften the chocolate just enough to nestle in without melting everywhere.
After you’ve nestled in all six chocolate centers, you need to transfer them carefully to a cooling rack, but wait—they need another firming session. Transfer the whole sheet pan to the refrigerator for about 30 minutes. This chills the chocolate core so you get that satisfying snap when you bite into the soft cookie. Don’t skip the chill; it makes the final texture perfect!
Tips for Success with Your Red Velvet Cookies
Baking these small-batch Red Velvet cookies is mostly straightforward, but a couple of little tricks can take them from good to absolutely show-stopping. My biggest piece of advice, which I learned the hard way, is about that color. If you want that deep, signature Valentine’s Day red, you have to use gel coloring. Liquid drops just dilute the batter too much and you end up with a pale pink that tastes like plain vanilla.
Another thing people worry about is spreading. Since this recipe relies on melted butter and only an egg yolk, they can spread more than a traditional drop cookie. To combat this, make sure your dough balls are rolled tightly and that you’re using the extra granulated sugar coating—it acts almost like a little crust barrier. Also, don’t overbake! Overbaking is what dries out any cookie, but especially these, because we need that soft center.
Finally, remember the cooling times. The 10 minutes on the pan is crucial for structure, and that last 30-minute chill sets the chocolate. If you rush those steps, you’ll end up with a soft, messy pile of deliciousness instead of a perfectly formed Red Velvet treat!
Storage and Reheating Instructions for Red Velvet
Since this is a small batch, you might actually have leftovers—if you can resist them! The best way to store these Red Velvet cookies is airtight. They stay wonderfully soft for a couple of days at room temperature. Keep them in a container where they aren’t stacked too tightly, or they might smudge that beautiful red color.
If you need them to last longer, you can absolutely freeze them! Just make sure the chocolate center is totally firm from the fridge before freezing. They are great eaten straight from the fridge the next day, too, if you like a firmer chocolate bite.
Here’s a quick guide on how long they hang out well:
| Location | Timeframe | Notes |
|---|---|---|
| Room Temperature (Airtight) | Up to 3 Days | Keeps the cookie softest. |
| Refrigerator | Up to 5 Days | Chocolate center will be very firm. |
| Freezer (Airtight Container) | Up to 2 Months | Thaw on the counter for 30 minutes. |
Frequently Asked Questions About Red Velvet Sugar Cookies
I get so many questions about these little cookies! They seem simple, but people always want to know how to get that perfect texture and color. Don’t worry if you have questions; baking should be fun, not stressful! Check out more baking tips here.
Can I make this Red Velvet recipe without white chocolate?
Oh, absolutely! If you don’t have those specific peanut butter hearts or just prefer a classic cookie, you can definitely skip the center. If you omit the chocolate heart, you should reduce the initial baking time by about one minute, just because you aren’t pressing anything into the center later. Or, you can skip the final 30-minute chill step entirely! If you want to substitute, try pressing a small square of dark chocolate in while the cookie is warm, or even a dollop of plain cream cheese frosting after they cool completely. Just remember, no chocolate center means no final chilling step required.
How do I get the best red color in my Red Velvet cookies?
This is the number one question I get! If you want that deep, vibrant, beautiful Red Velvet color that screams holiday cheer, you must use gel food coloring. Seriously, ditch the liquid drops that come in the little plastic bottle. Liquid coloring is mostly water, and it thins out your dough while giving you a weak pink. Gel coloring is super concentrated, so you use just a tiny bit, and it delivers intense color payoff without messing up your flour-to-fat ratio. It’s worth the trip to the baking aisle!
What if my cookie dough seems too sticky to roll?
Since this is a small-batch recipe, the dough consistency can sometimes feel a little softer than a big batch. If you find your dough is just too sticky to roll into tight balls, don’t panic! Just pop the whole bowl into the fridge for about 10 minutes. Chilling the dough slightly firms up the melted butter just enough so you can handle it without it sticking all over your hands. Roll it quickly once it’s slightly chilled, and you’ll be fine.
Understanding the Nutrition in Your Red Velvet Treat
Now, these cookies are pure joy, but they do have a little bit of everything—butter, sugar, and chocolate! Since this is a small-batch recipe and the final nutrition depends heavily on the exact brand of white chocolate you use, please treat these numbers as a fun estimate. I always tell my friends that calories don’t count when the cookie is this good, but it’s nice to have a general idea! If you are looking for other small batch treats, try these bars!
| Nutrient | Approximate Value |
|---|---|
| Serving Size | 1 cookie |
| Calories | 325 |
| Fat | 22g |
| Carbohydrates | 27g |
| Protein | 8g |
This table gives you a ballpark figure, focusing on the main macros. It’s a rich little treat, packed with flavor!
Share Your Delicious Red Velvet Creations
I truly hope you loved making these six perfect cookies as much as I love sharing them with you! Now it’s your turn. Did they turn out perfectly chewy? Did your white chocolate heart melt just right? I want to see them! See more of my creations on Pinterest.
Drop a comment below and tell me how they tasted. Tag me on social media when you share your beautiful red treats. Happy baking, friends!
Print
6 Amazing Red Velvet Secrets Now
- Total Time: 50 minutes
- Yield: 6 cookies 1x
- Diet: Vegetarian
Description
Soft and chewy Red Velvet Sugar Cookies with a sweet white chocolate center. This small-batch recipe gives you a festive cookie with a hint of cocoa.
Ingredients
- 4 tablespoons unsalted butter, melted
- 1/3 cup granulated sugar
- 2 tablespoons granulated sugar for rolling
- 1 large egg yolk
- 1 teaspoon red gel food coloring
- 1/2 cup plus 1 tablespoon all-purpose flour
- 2 tablespoons unsweetened cocoa powder
- 1/4 teaspoon baking soda
- 1/8 teaspoon fine sea salt
- 6 white chocolate peanut butter hearts
Instructions
- Preheat the oven to 350°F and line a small baking sheet with parchment paper.
- Whisk the melted butter and 1/3 cup sugar in a medium bowl until combined.
- Stir in the egg yolk and red gel food coloring until the mixture is a uniform bright red.
- Sift the flour, cocoa powder, baking soda, and salt directly into the wet ingredients.
- Mix the dough gently with a spatula until no dry streaks of flour remain.
- Divide the dough into 6 equal portions and roll each into a smooth ball.
- Roll each dough ball in the extra 2 tablespoons of granulated sugar to coat the exterior completely.
- Place the cookies 2 inches apart on the prepared baking sheet.
- Bake for 10 to 12 minutes until the edges are set and the tops appear slightly dry and crackled.
- Cool the cookies on the pan for 10 minutes to allow the structure to firm up.
- Press one white chocolate heart firmly into the center of each warm cookie.
- Transfer to the refrigerator for 30 minutes to set the chocolate hearts before serving.
Notes
- Use gel food coloring for the most intense red color.
- The cooling time on the pan is important for the cookie structure.
- Refrigerating the cookies firms up the chocolate center for a better bite.
- Prep Time: 10 minutes
- Cook Time: 10 minutes
- Category: Dessert
- Method: Baking
- Cuisine: American
Nutrition
- Serving Size: 1 cookie
- Calories: 325
- Sugar: Unknown
- Sodium: Unknown
- Fat: 22g
- Saturated Fat: Unknown
- Unsaturated Fat: Unknown
- Trans Fat: Unknown
- Carbohydrates: 27g
- Fiber: Unknown
- Protein: 8g
- Cholesterol: Unknown