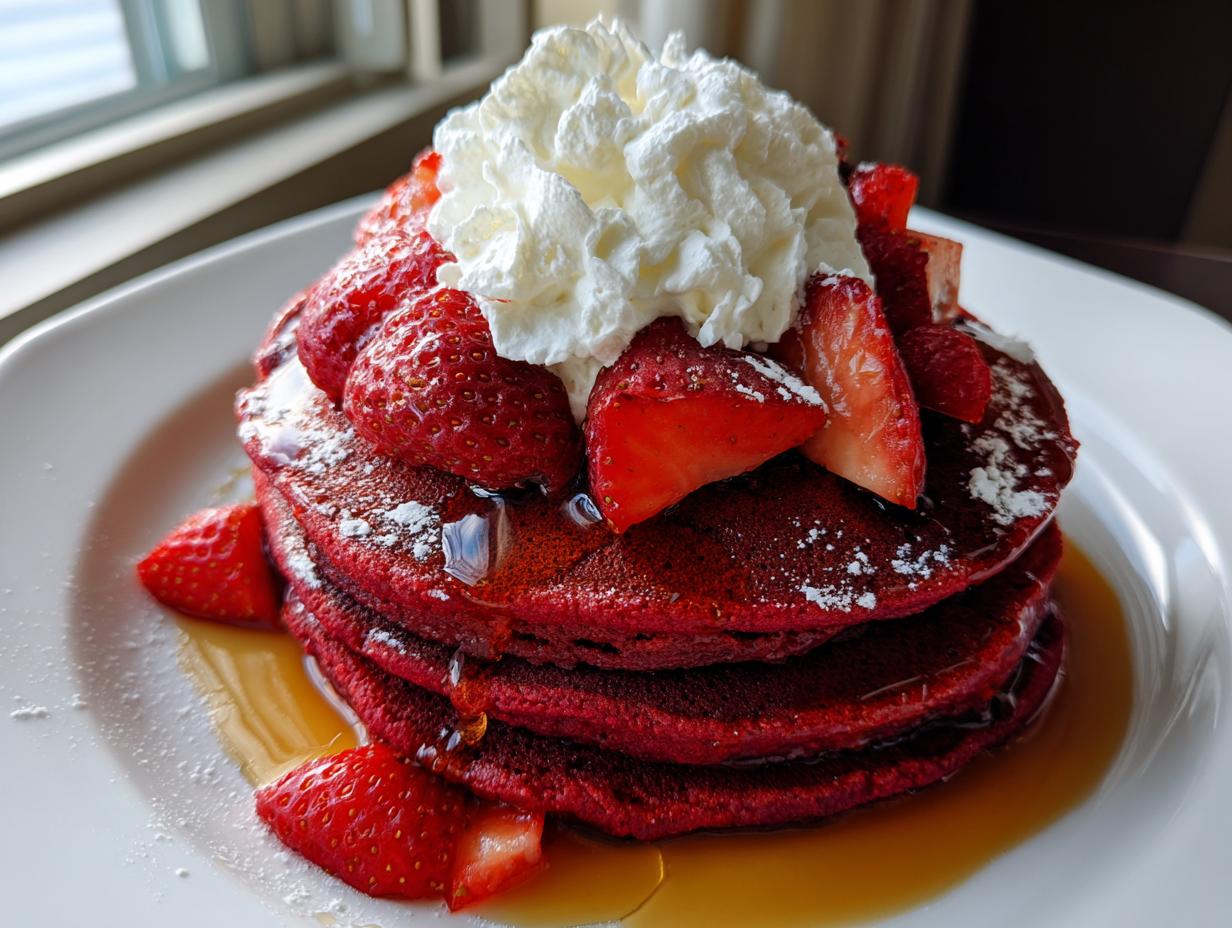
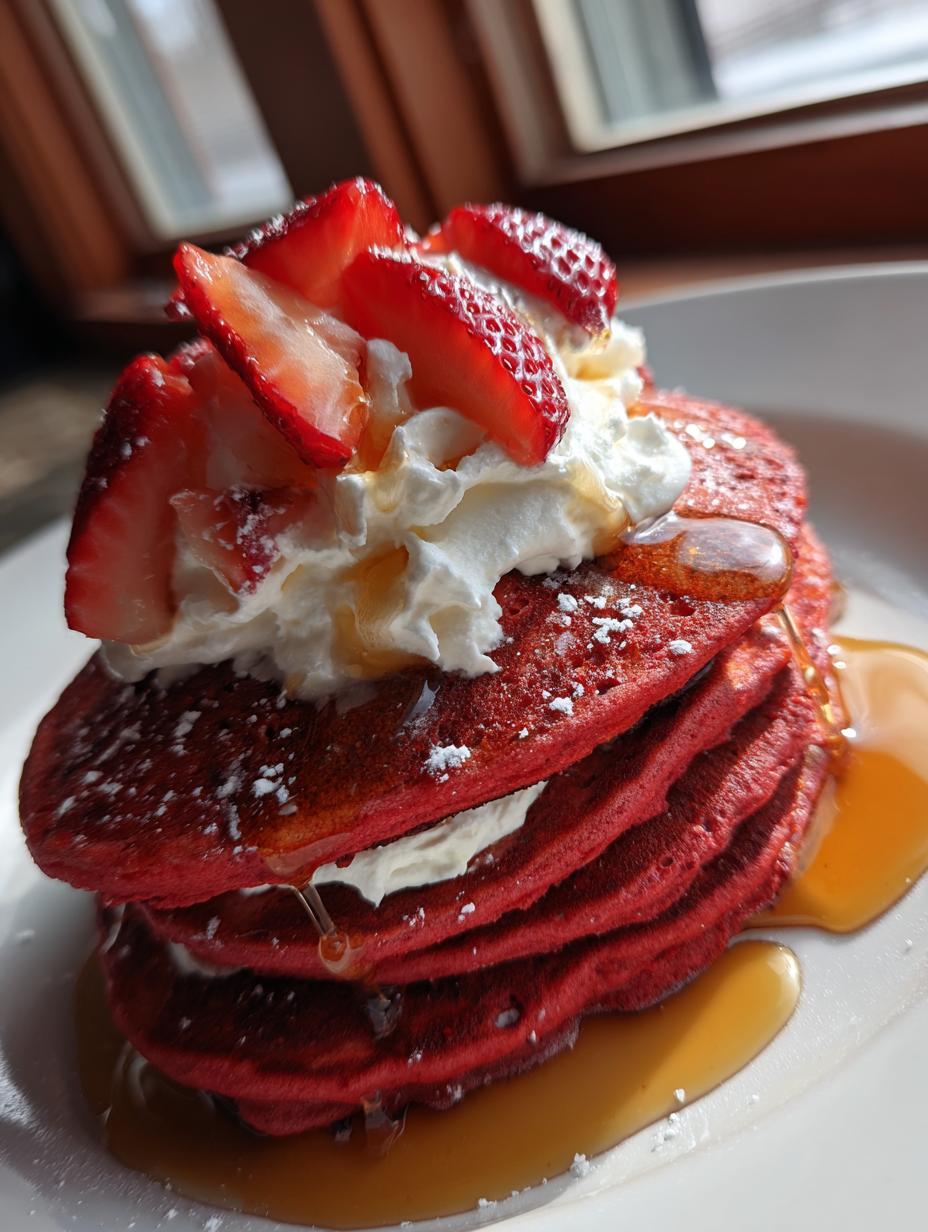
Forget boring weekend breakfasts! If you want to truly wow the family, you need to whip up a stack of these Red Velvet Pancakes. Seriously, these aren’t just pancakes; they are a celebration waiting to happen. The color is just stunning—that deep, vibrant red that pops off the plate—and the flavor is pure magic.
What sets these apart from your standard flapjacks is the beautiful tang you get from the buttermilk combined with just a hint of rich cocoa. It tastes exactly like that classic cake we all love, but in fluffy, easy-to-make pancake form. I started making these for my kids’ birthdays when they were little, and now they demand them every few months, no special occasion required!
We are talking about pancakes that are incredibly light thanks to a few simple tricks, but they hold up beautifully under a mountain of whipped cream. Trust me, once you try these, you’ll never go back to plain pancakes on a Saturday morning again. It’s my secret weapon for making morning time feel special!

Gathering Ingredients for Perfect Red Velvet Pancakes
Getting ready to make these gorgeous Red Velvet Pancakes is half the fun! The secret here is using good quality ingredients, especially when it comes to the color and tang. Don’t try to skimp on the cocoa or the buttermilk; they are the backbone of that delicious flavor profile we are after. It’s a short ingredient list, so make sure what you pull out of the pantry is ready to go.
I always lay everything out on the counter before I even turn on the stove. It keeps things calm, and you won’t forget anything important when you’re rushing to mix! Everything comes together quickly once you start, so preparation is key. Below is the list—double-check you have everything before you start whisking. You can find more recipe inspiration on our Medium page.
Essential Dry Ingredients for Red Velvet Pancakes
For the dry side of things, precision matters, especially with the leaveners. We need the flour, of course, but the baking soda and baking powder work together to give these Red Velvet Pancakes their signature lift. Don’t skip the cocoa powder either; it’s what gives us that lovely, subtle chocolate note that makes this recipe famous. Make sure you measure your sugar correctly too!
- 1 cup all-purpose flour
- 1 teaspoon baking soda
- 1/4 teaspoon baking powder
- 1/4 teaspoon salt
- 2 tablespoons granulated sugar
- 2 tablespoons unsweetened cocoa powder
Wet Components and Coloring
This is where the magic really happens! The combination of buttermilk and sour cream is what makes these pancakes so tender and fluffy—it reacts beautifully with the soda. And we absolutely cannot forget the food coloring! I insist on using gel coloring here; liquid coloring just won’t give you that deep, true red color we want for our Red Velvet Pancakes. A little vanilla always rounds out the flavor.
- 1 large egg
- 3/4 cup buttermilk
- 1/4 cup sour cream
- 1 tablespoon red gel food coloring
- 1 teaspoon vanilla extract
Fats and Serving Toppings
You need melted butter mixed into the batter itself for richness, so make sure you have that ready to drizzle in last. For serving, these pancakes demand something creamy and fresh to cut through that richness. Whipped cream is non-negotiable in my book, and fresh, sliced strawberries are the perfect pairing for that color contrast!
- 3 tablespoons unsalted butter, melted
- Extra unsalted butter for greasing
- Whipped cream for serving
- Maple syrup for serving
- Fresh strawberries, sliced for serving
Equipment Needed for Making Red Velvet Pancakes
You really don’t need any fancy gadgets for these Red Velvet Pancakes, which is great news for a quick breakfast! Grab a couple of good mixing bowls—one big one for the dry stuff and a medium one for the wet ingredients. A good whisk is essential for getting those dry components lump-free before you start combining.
The star tool, though, is your heavy-bottomed nonstick skillet or griddle. You need even heat distribution so all your pancakes cook up the same color. Oh, and a ladle or a 1/4 cup measuring cup works perfectly for scooping the batter evenly onto the hot surface!
Step-by-Step Instructions for Red Velvet Pancakes
Now that you have everything ready, let’s get these beautiful Red Velvet Pancakes on the griddle! The whole process moves really fast once you start mixing, so try to have your toppings ready to go on the side. We are aiming for a light, airy texture, and the mixing technique is where we nail that goal.
First, make sure your melted butter has cooled just a touch before you add it in—too hot and it can start to cook the egg prematurely. Take your time during the mixing stages; rushing leads to tough pancakes, and we want maximum fluffiness here. If you are looking for other breakfast ideas, check out our vegan tofu scramble.
Mixing the Batter for Optimal Fluffiness
Start by giving those dry ingredients a good whisk together in the large bowl. You want to make sure that baking soda is totally distributed so you don’t end up with a weirdly flavored bite later! In the second bowl, beat your egg first, then add the buttermilk, sour cream, vanilla, and that gorgeous red food coloring. Whisk that wet mixture until it looks like a smooth, deep red liquid.
Now, pour the wet ingredients right into the dry. Use a rubber spatula—not a whisk—and fold everything together gently. Stop mixing the moment you see the streaks of flour disappear. I mean it, stop! If you see lumps, that’s fine; those are your friends because they mean you haven’t overdeveloped the gluten. Finally, drizzle in that melted butter and give it just one or two more gentle folds to incorporate. If your batter seems stiff, don’t panic! Stir in one or two extra tablespoons of buttermilk until it flows slowly off the spoon.
Cooking Your Red Velvet Pancakes Perfectly
Time for the heat! Set your nonstick skillet over medium heat. This is important—too high and the outside burns before the inside cooks, giving you a pale center. Lightly grease the pan with a small pat of butter; use a paper towel to wipe off any excess so you aren’t frying them, just lightly greasing.
Use a 1/4 cup measure to scoop the batter onto the hot skillet for each of your Red Velvet Pancakes. Don’t crowd the pan! Now, watch them closely. You are waiting for two things: tiny bubbles to start popping up across the surface, and for the edges to look a little dull or set. That’s your cue! Slide your spatula underneath and flip them quickly. They only need about one or two more minutes on the second side until they look golden brown underneath. Stack them up, keep them warm, and get ready for the best breakfast ever!
Tips for Success When Making Red Velvet Pancakes
I’ve made these Red Velvet Pancakes so many times that a few little tricks have become second nature to me. Honestly, the difference between a good pancake and an *amazing* one is all in the details you pay attention to right before they hit the heat. Don’t stress if your first batch isn’t perfect; you’ll get the hang of it quickly! If you want to see more visual tips, check out our Pinterest profile.
Remember, these pancakes are rich because of the sour cream and butter, so we have to be gentle with the mixing to keep them light. A few simple rules will ensure you get that classic fluffy texture and that gorgeous, vibrant color every single time you make them.
Maintaining Batter Consistency
My biggest piece of advice? Don’t overmix the batter, ever! When you combine the wet and dry ingredients, stop stirring as soon as you can no longer see dry flour streaks. Seriously, if you see a few small lumps, leave them alone! Overmixing develops gluten, and that turns your beautiful Red Velvet Pancakes into chewy little hockey pucks instead of fluffy clouds. If you find your batter seems too heavy or thick after mixing, just stir in a tiny splash more buttermilk until it has that perfect slow-drip consistency. For other baking tips, consider looking at our banana oatmeal bars.
Achieving Uniform Color and Texture
If you want that true, deep red velvet look, you have to use gel food coloring, like I mentioned before. Liquid coloring just waters down the batter too much and gives you a weak pink that disappears when cooked. Use a good quality, concentrated gel, and mix it thoroughly into your wet ingredients until it’s one consistent shade of red before you mix it with the dry. Also, make sure your skillet is truly medium heat. If it’s too low, the pancakes absorb too much butter and look greasy; too high, and the color browns before the inside cooks through. Even heat is key for consistent color and texture across the whole batch!
Storing and Reheating Your Red Velvet Pancakes
These Red Velvet Pancakes are so good, you might actually have leftovers—which is a win, in my book! They don’t last long around here, but if you do manage to save some, storing them properly keeps them tasting great for later. If you are interested in other breakfast recipes, check out our baked protein pancake bowls.
The best way to store them is cooled completely first. Stack them between layers of parchment paper or wax paper inside an airtight container. This stops them from sticking together in one giant red clump overnight. They hold up really well in the fridge for about three days.
When you’re ready for round two, I totally recommend reheating them in a toaster oven or a dry skillet over low heat. This crisps up the edges nicely without drying out the center. Microwave works in a pinch, but you have to be quick, or they get a little chewy!
Here’s how I keep track:
| Action | Time/Temp |
|---|---|
| Refrigerate (Airtight) | Up to 3 days |
| Reheat (Toaster Oven/Skillet) | Until warm, low heat |
| Reheat (Microwave) | 15-20 seconds per stack |
Common Questions About Red Velvet Pancakes
I always get questions after I post pictures of these beauties! It makes sense; everyone wants their Red Velvet Pancakes to turn out picture-perfect. Don’t worry if you’re new to this recipe; I’ve gathered the most common things people ask to make sure your next buttermilk breakfast is a huge success.
Here are the quick answers to keep your pancake game strong and your mornings bright!
Can I Substitute the Buttermilk in Red Velvet Pancakes?
Oh, the buttermilk question! Look, buttermilk is the secret weapon for truly fluffy pancakes because its acidity reacts perfectly with the baking soda to create lift. If you absolutely cannot find it, you can make a quick substitute. Just take regular milk—about 3/4 cup—and stir in one tablespoon of white vinegar or lemon juice. Let it sit on the counter for about five minutes until it looks slightly curdled. That homemade version works great in a pinch for these Red Velvet Pancakes, but if you can buy the real stuff, go for it!
How to Get the Brightest Red Color in Red Velvet Pancakes
This is all about the coloring choice! If you use liquid food coloring, you’ll end up needing so much of it that it throws off the batter consistency, and you just get a pale pink. For that deep, vibrant color that makes these pancakes famous, you *must* use high-quality gel food coloring. Mix the tablespoon of gel thoroughly into your wet ingredients—the egg, sour cream, and milk—until it’s one consistent shade of red before you mix it into the dry stuff. That ensures even color distribution!
What to Serve Besides Cream and Berries?
While whipped cream and strawberries are my go-to, sometimes you need a change! For something richer, a simple drizzle of chocolate ganache is heavenly with the cocoa flavor. If you want something tangier, a light dusting of powdered sugar mixed with a tiny bit of orange zest complements the buttermilk tang wonderfully. A smear of cream cheese frosting—just a thin layer—makes them taste even more like the cake! For more dessert ideas, check out our lemon raspberry eclairs.
Nutritional Estimates for Red Velvet Pancakes
I always try to keep track of what we’re eating, even when it’s a special treat like these delicious Red Velvet Pancakes! Keep in mind these numbers are just estimates based on the recipe card, as toppings can change things quickly. This is just a guideline for the pancakes themselves, before you pile on the syrup!
Here’s a rough breakdown:
| Nutrient | Estimate Per Serving |
|---|---|
| Calories | 350 |
| Fat | 15g |
| Carbohydrates | 45g |
| Protein | 8g |
Always remember these are estimated values per serving, and things like how much butter you use to grease the pan will affect the final count! If you need more recipe ideas, feel free to browse our main recipes page.
Print
Amazing 350 Calorie Red Velvet Pancakes
- Total Time: 30 minutes
- Yield: 4 servings 1x
- Diet: Vegetarian
Description
Fluffy red velvet pancakes offer rich flavor and vibrant color for special breakfasts. These simple pancakes combine cocoa notes with tangy buttermilk. Top with cream and berries for a festive family treat.
Ingredients
- 1 cup all-purpose flour
- 1 teaspoon baking soda
- 1/4 teaspoon baking powder
- 1/4 teaspoon salt
- 2 tablespoons granulated sugar
- 2 tablespoons unsweetened cocoa powder
- 1 large egg
- 3/4 cup buttermilk
- 1/4 cup sour cream
- 1 tablespoon red gel food coloring
- 1 teaspoon vanilla extract
- 3 tablespoons unsalted butter, melted
- Extra unsalted butter for greasing
- Whipped cream for serving
- Maple syrup for serving
- Fresh strawberries, sliced for serving
Instructions
- Whisk all dry ingredients together in a large bowl.
- Beat the egg, buttermilk, sour cream, food coloring, and vanilla in a separate bowl until smooth.
- Stir the wet mixture into the dry ingredients until just combined. Do not overmix.
- Gradually mix in the melted butter to form a smooth batter. Add 1-2 tablespoons of extra buttermilk if the batter is too thick.
- Heat a nonstick skillet over medium heat. Lightly grease the skillet with butter.
- Scoop 1/4 cup of batter onto the skillet for each pancake.
- Cook until bubbles appear on the surface and the edges look set, about 2 minutes.
- Flip the pancake and cook for 1-2 more minutes until golden brown.
- Stack the cooked pancakes and keep them warm. Repeat the process with the remaining batter.
- Serve the pancakes topped with whipped cream, maple syrup, and fresh strawberry slices.
Notes
- Always cook eggs and dairy to 165°F internal temperature for safety.
- Prep Time: 10 minutes
- Cook Time: 20 minutes
- Category: Breakfast
- Method: Skillet
- Cuisine: American
Nutrition
- Serving Size: Per serving (estimated)
- Calories: 350
- Sugar: N/A
- Sodium: N/A
- Fat: 15g
- Saturated Fat: N/A
- Unsaturated Fat: N/A
- Trans Fat: N/A
- Carbohydrates: 45g
- Fiber: N/A
- Protein: 8g
- Cholesterol: N/A