If you’re looking for the ultimate crowd-pleaser, stop right here because I’m about to share my recipe for the best Pull-Apart Stuffing Rolls you’ve ever tasted. Seriously, these things disappear faster than pie at a county fair! I’m Jordan Bell, and I’m based right here in Asheville, North Carolina. After my own 80-pound weight loss journey, I realized that comfort food doesn’t have to weigh you down. Here on the Easy Detox Recipes blog, I focus on taking those rich, savory Southern traditions—like classic stuffing—and making them clean enough for everyday eating, but delicious enough for any holiday table. These rolls are the perfect marriage of savory sausage stuffing and soft, tender yeast dough.
Why You Need These Pull-Apart Stuffing Rolls Now
Let’s be honest, scooping traditional stuffing onto a plate can be messy, and sometimes you just want something easy to grab. That’s why I developed these rolls! They take all the deep, herby flavor you crave and package it into a fun, shareable format. Forget the casserole dish; these knots are designed for passing around the table.
Quick Benefits of Pull-Apart Stuffing Rolls
- They are perfectly portioned—no need for serving spoons!
- The sausage and herb filling offers that deep, savory stuffing flavor.
- You get the soft dough texture right next to the crisp, baked edges.
- They are made with cleaner ingredients, so you can feel good about serving them.
Gathering Your Ingredients for Pull-Apart Stuffing Rolls
Okay, getting ready to make these fantastic Pull-Apart Stuffing Rolls is just as important as the baking itself. You can’t rush the prep, especially when it comes to building that incredible savory filling. I’ve listed everything you need below, but trust me on this: fresh herbs make a world of difference here. Don’t settle for dried sage if you can find fresh—it really elevates the whole experience! You can find more tips on flavor building on my Medium page.
Savory Filling Components
This is where the stuffing flavor comes alive! We start with good quality ground chicken or turkey sausage. Make sure you get the seasoned kind, but if you use unseasoned, you’ll need to add a little extra salt and pepper later. We sauté that with classic aromatics—onion, celery, and garlic—but the real secret weapon is the fresh sage. It just smells like Thanksgiving when it hits the hot pan!
- 8 ounces seasoned ground chicken or turkey sausage, removed from casings
- 1 small onion, finely chopped (about 3/4 cup)
- 1 rib celery, finely chopped (about 1/2 cup)
- 4 medium cloves garlic, finely chopped
- 1/4 cup minced fresh sage leaves
- 1/4 cup minced fresh parsley leaves
- Kosher salt and freshly ground black pepper
Dough and Finishing Ingredients for Pull-Apart Stuffing Rolls
For the dough, I usually grab a good quality store-bought pizza dough because it saves so much time, and honestly, it works perfectly for these Pull-Apart Stuffing Rolls. But you need to make sure you have plenty of flour handy for dusting your surface so things don’t stick everywhere—and believe me, they will stick if you skip the flour!
- 1 pound homemade or store-bought pizza dough
- 4 tablespoons butter, divided (you’ll use this for sautéing and brushing later)
- All-purpose flour, for dusting
- 2 tablespoons extra-virgin olive oil
Step-by-Step Preparation of Pull-Apart Stuffing Rolls
Now for the fun part! Making these Pull-Apart Stuffing Rolls is a two-part process: first, we build that magnificent, savory filling, and then we turn the dough into little edible knots. Don’t worry about making everything perfect in the filling stage; we’re aiming for flavor, not presentation yet!
Creating the Savory Sausage Stuffing Base
Grab a large skillet and melt 2 tablespoons of that butter over medium-high heat. Once it’s shimmering, toss in your sausage meat—make sure you’ve taken it out of the casings! Use a whisk or a potato masher to break that sausage up into really fine, crumbly pieces. We need it cooked down quite a bit. Keep stirring it until you only see a tiny bit of pink left; usually, this takes about 8 minutes.
Once the meat is mostly done, it’s time for the veggies. Add your chopped onion, celery, and garlic, along with that wonderful fresh sage. Now, you need patience here because this part is crucial for flavor depth. Stir this mixture often until those vegetables are soft and sweet, which takes about 10 minutes. When everything smells amazing, stir in your fresh parsley and season generously with salt and pepper. Taste it! Does it taste like great stuffing? Yes? Perfect. Transfer that whole mixture into a large bowl and let it cool completely. Seriously, don’t skip the cooling part, or you’ll melt your dough later!
Assembling the Pull-Apart Stuffing Rolls Knots
Once the filling is cool—and I mean cool, not just warm—we move to the dough. Lightly flour your workspace. Divide that pound of pizza dough right in half. Take one piece and roll it out into a long rectangle, about 8 inches long and 4 inches wide. It doesn’t have to be perfect, just get it thin enough.
Now, cut that strip crosswise into 12 little pieces. Repeat that whole rolling and cutting process with your second piece of dough so you end up with 24 dough segments total. This is the tricky but fun part: take each dough strip and gently tie it into a simple knot. Don’t pull too tight, or the dough won’t rise well! Once knotted, drop those knots into the bowl with your cooled sausage mixture. Gently toss everything together until every single little knot is coated in that savory goodness. It’s going to look messy, but trust me on this! See more visual inspiration for knot tying on Pinterest.
The Crucial Proofing Stage for Perfect Pull-Apart Stuffing Rolls
Take a 9×13-inch baking dish and grease it up with 1 tablespoon of butter. Arrange your coated knots inside in a single layer. Drizzle the whole dish with that olive oil, cover it tightly with plastic wrap, and now you have choices for the rise. If you’re baking today, let them sit until they’ve doubled in size—that usually takes about 4 hours. But if you’re planning ahead, this is where these Pull-Apart Stuffing Rolls shine! You can cover them and pop them in the fridge overnight (12 to 16 hours). If you’re freezing them, wrap them really well, and you can bake them up to a week later. If you freeze them, just remember to thaw them in the fridge first, then let them sit on the counter for an hour before baking.
Baking and Finishing Your Comfort Rolls
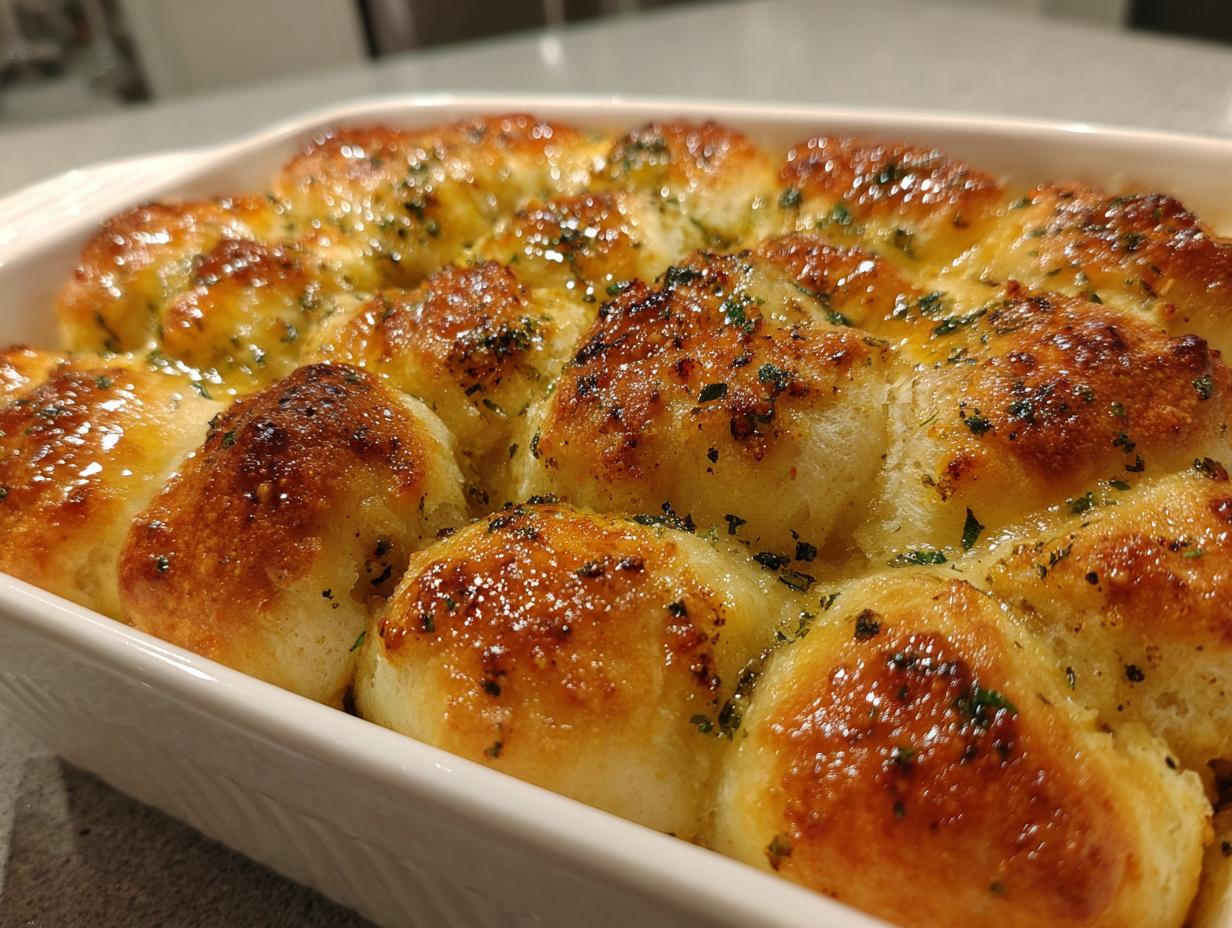
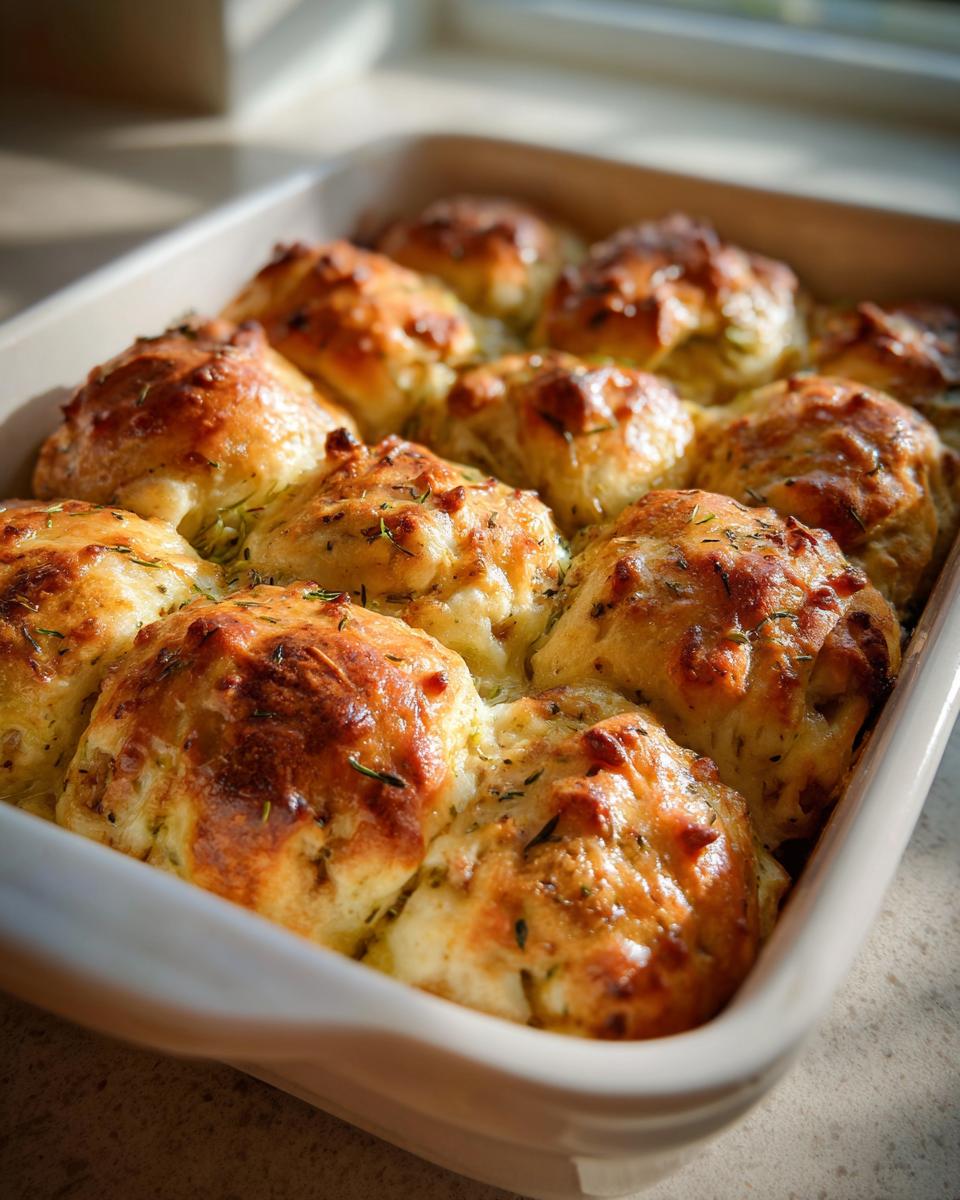
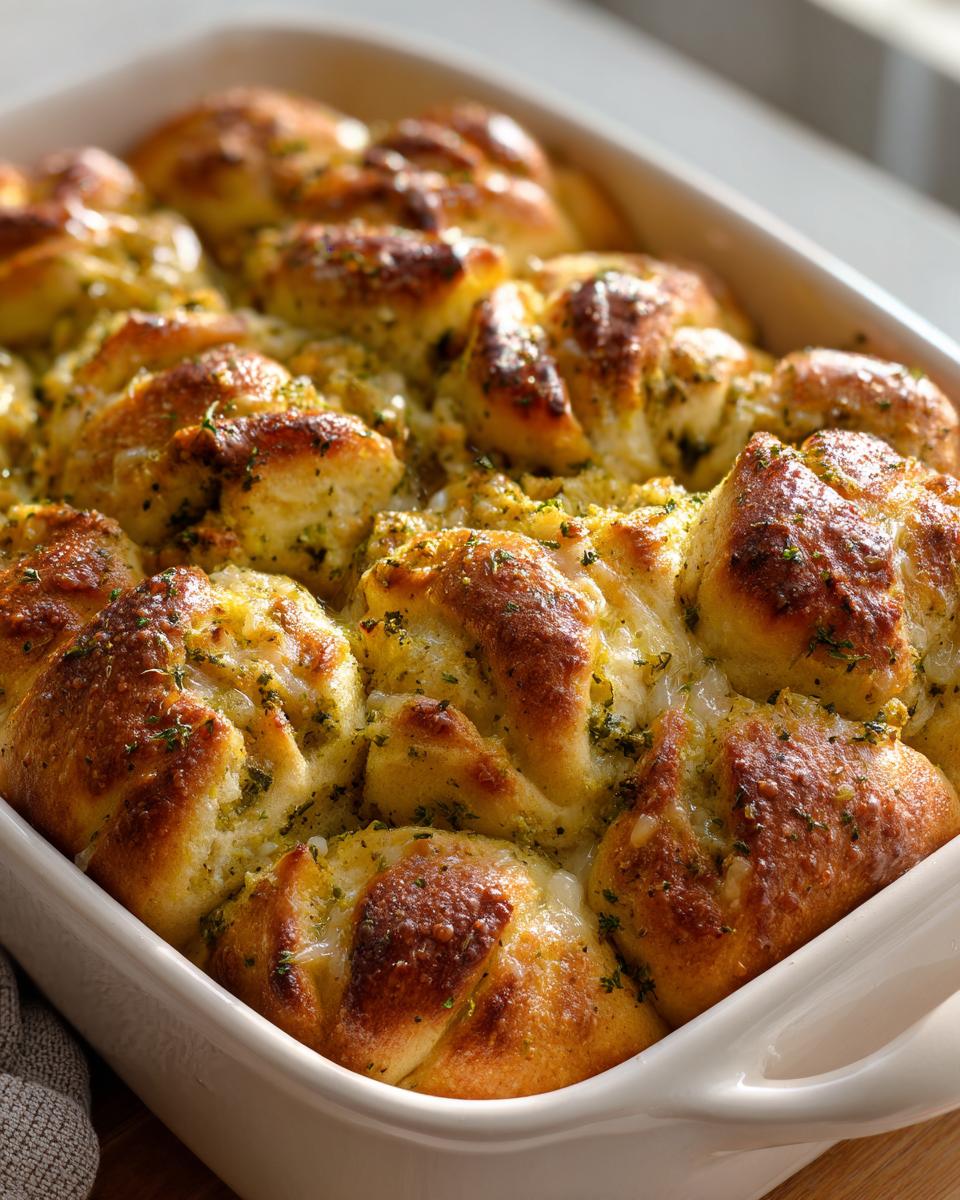
When your beautiful knots have finally puffed up and doubled in size, it’s time to get them into the heat! Preheat your oven to a nice, hot 425°F (220°C). You want that heat high enough to get a great golden crust on the dough.
Once the oven is ready, uncover your baking dish. Bake the rolls for about 25 to 30 minutes. Keep an eye on them! You are looking for that beautiful golden brown color on top and edges that look nice and crisp. They should smell absolutely incredible at this point—that savory sausage and herb aroma is the best!
This next step is non-negotiable for incredible flavor payoff. As soon as you pull the pan out of the oven, grab that last tablespoon of butter you saved. Melt it quickly, and immediately brush that melted butter all over the tops of the hot rolls. This melts right into the crust, making them shiny, soft, and adding that final rich layer of flavor. Serve them right away while they are piping hot! If you are looking for a great side dish to pair with these, check out my recipe for classic holiday stuffing.
Tips for Mastering Pull-Apart Stuffing Rolls
These rolls are tough to mess up, but a few little tricks will take them from good to legendary. My biggest tip, which I mentioned before, is using store-bought pizza dough. It’s a huge time saver, but make sure it hasn’t been sitting in your fridge for weeks! If it feels dry when you start rolling it out, it might be past its prime.
When you’re coating the knots in the sausage mixture, be gentle with your tossing. We want every piece coated, but we don’t want to smash the air out of the dough right before we let it rise. That air is what makes them fluffy! For another great savory side, consider my recipe for Cranberry Turkey Stuffing Balls.
If you are using the make-ahead freezing method, wrap those rolls up tight—I mean really tight—in a couple of layers of plastic wrap before tossing them in a freezer bag. This stops freezer burn and keeps your Pull-Apart Stuffing Rolls tasting fresh until you’re ready to bake them weeks later. If you need a quick appetizer idea, try my Cranberry Meatballs.
Serving Suggestions for Pull-Apart Stuffing Rolls
These savory bites are fantastic all on their own, especially when they are fresh out of the oven with that buttery glaze. But if you really want to take them over the top, you know what you have to do! Step 18 says to serve them warm with gravy or a dipping sauce, and I totally agree. For a great gravy recipe, check out my Turkey Gravy.
If you’re serving these alongside your main meal, a rich, homemade turkey or chicken gravy is the absolute classic companion. If you’re having them as an appetizer at a party, setting out a small bowl of creamy herbed ranch or a sharp cranberry dipping sauce makes them even more fun for people to grab and go. They are so flavorful, they really don’t need much else!
Storing and Reheating Your Leftover Pull-Apart Stuffing Rolls
I rarely have leftovers of these rolls, but when I do, I want to make sure they taste just as good the next day! Storing them properly is key to keeping that soft dough texture. If you have any leftover Pull-Apart Stuffing Rolls, the best way to keep them fresh is to wait until they are completely cool before storing them in an airtight container. Don’t put them in the fridge if you plan to eat them the next day, though; cold air dries out yeast dough so fast!
Reheating is super easy. A quick trip in the oven is always better than the microwave if you want to bring back that slight crispness on the outside. If you only have a few, a quick 5-minute toast in the toaster oven is perfect.
Storage Guidelines Table
| Storage Location | Maximum Storage Time |
|---|---|
| Room Temperature (Airtight Container) | Up to 2 days |
| Refrigerator (Airtight Container) | Up to 4 days |
| Freezer (Tightly Wrapped) | Up to 1 month |
Frequently Asked Questions About Pull-Apart Stuffing Rolls
I get so many questions about these rolls, especially around the holidays when everyone is trying to manage their kitchen timing! Here are the top things people ask me about making the best batch of Pull-Apart Stuffing Rolls.
Can I substitute the ground meat in these stuffing rolls?
You absolutely can swap out the ground chicken or turkey sausage! If you want a richer flavor, you can use mild pork sausage, but remember that pork sausage is often fattier, so you might need to drain off a little more grease during the initial cooking step. You can even use vegetarian sausage crumbles if you need a meatless option, but you might need to adjust your salt and herb amounts since those products vary widely in seasoning.
How far in advance can I prepare the dough for the Pull-Apart Stuffing Rolls?
This is one of the best features of this recipe! You have so much flexibility with the dough prep. If you want the freshest, fluffiest dough, you can let the knots rise at room temperature for about 4 hours. However, if you are hosting a big meal and need to save oven space, you can refrigerate the assembled rolls overnight—up to 16 hours—which actually deepens the flavor a little bit! Just pull them out an hour before baking to let them warm up slightly.
Because I focus on making Southern comfort food cleaner here on the blog, the exact nutritional breakdown for these Pull-Apart Stuffing Rolls depends so much on what kind of sausage you choose and how much butter you brush on at the end! Since I encourage everyone to customize with their favorite ingredients, I haven’t calculated precise data. Just know that by using leaner meats and measuring your butter, you control how rich this side dish turns out!
Print
Amazing 24 Pull-Apart Stuffing Rolls
- Total Time: 5 hours 10 minutes
- Yield: 8–10 servings 1x
- Diet: N/A
Description
Pull-Apart Stuffing Rolls are tender knots of dough filled with seasoned sausage and herbs, baked until golden brown and perfect for sharing. This recipe takes classic stuffing flavors and presents them in an easy-to-eat, shareable format. Jordan Bell from Easy Detox Recipes brings a cleaner take on Southern comfort food to your table with these rolls.
Ingredients
- 4 tablespoons (57 g) butter, divided
- 8 ounces (225 g) seasoned ground chicken or turkey sausage, removed from casings
- 1 small onion, finely chopped (about 3/4 cup)
- 1 rib celery, finely chopped (about 1/2 cup)
- 4 medium cloves garlic, finely chopped
- 1/4 cup (7 g) minced fresh sage leaves
- 1/4 cup (7 g) minced fresh parsley leaves
- Kosher salt and freshly ground black pepper
- All-purpose flour, for dusting
- 1 pound (450 g) homemade or store-bought pizza dough
- 2 tablespoons (30 ml) extra-virgin olive oil
Instructions
- Melt 2 tablespoons (28 g) butter in a large skillet over medium-high heat.
- Add the chicken or turkey sausage and mash with a whisk or potato masher to break it into fine pieces.
- Cook, stirring frequently, until only a few bits of pink remain, about 8 minutes.
- Add onion, celery, garlic, and sage and cook, stirring often, until vegetables are softened, about 10 minutes.
- Add parsley and season with salt and pepper.
- Transfer the mixture to a large bowl and let it cool completely.
- On a lightly floured surface, divide dough into 2 pieces.
- Working with one piece at a time, roll into an 8-inch-long, 4-inch-wide strip.
- Cut crosswise into 12 strips. Repeat with the second half of the dough.
- Tie each strip into a knot and place in the bowl with the sausage mixture.
- Gently toss until each knot is coated.
- Grease a 9-by-13-inch baking dish with 1 tablespoon (14 g) butter.
- Arrange knots in a single layer, drizzle with olive oil, cover tightly with plastic, and let rise until doubled in size, about 4 hours. Alternatively, refrigerate overnight (12–16 hours) or freeze for up to a week. Thaw in the refrigerator, then bring to room temperature for 1 hour before baking.
- When ready to bake, preheat the oven to 425°F (220°C).
- Uncover and bake until golden brown and crisp, 25–30 minutes.
- Melt the remaining tablespoon of butter and brush over the baked rolls immediately after removing them from the oven.
- Serve warm with gravy or a dipping sauce.
Notes
- Store-bought pizza dough works well for this recipe and makes prep easier.
- Rolls can also be frozen before baking for convenient make-ahead preparation.
- Prep Time: 15 minutes
- Cook Time: 55 minutes
- Category: Side Dish/Appetizer
- Method: Baking
- Cuisine: American
Nutrition
- Serving Size: 1 roll
- Calories: N/A
- Sugar: N/A
- Sodium: N/A
- Fat: N/A
- Saturated Fat: N/A
- Unsaturated Fat: N/A
- Trans Fat: N/A
- Carbohydrates: N/A
- Fiber: N/A
- Protein: N/A
- Cholesterol: N/A