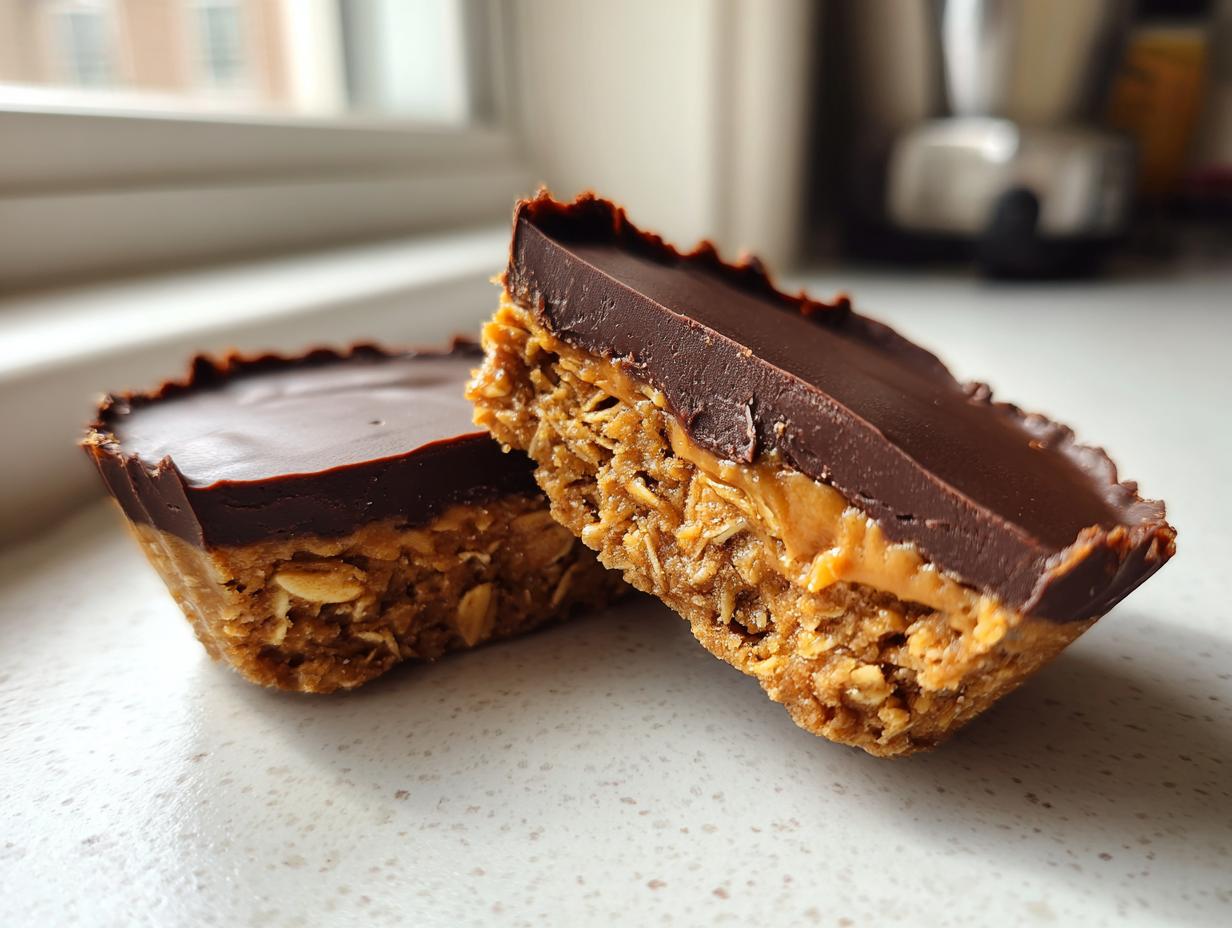
If you’re like me, sometimes you need a sweet treat *right now*, but you really don’t want to turn on the oven or spend an hour messing around. That’s why I’m obsessed with these Peanut Butter Oat Cups. Seriously, they are my secret weapon for surviving busy weeks!
I’ve tested a million “healthy” snacks, and most of them end up being either too crumbly or tasting suspiciously like cardboard. Not these! These Peanut Butter Oat Cups come together in about ten minutes flat, and the only required cooking is melting some chocolate. They taste so rich and decadent, but they’re packed with clean ingredients like oats and protein powder.
I keep a batch of these stashed in the freezer at all times. They are perfect for after a workout or when that 3 PM sugar craving hits hard. Trust me, once you see how fast you can whip these up, you’ll never look at store-bought granola bars the same way again!
Why You Will Love These Peanut Butter Oat Cups
I know everyone says their recipe is fast, but these truly are a lifesaver when you need something quick and satisfying. I’ve made these cups when I only had five minutes to spare before running out the door. Here’s why I think you’ll be making them all the time!
- They come together faster than ordering takeout—seriously, only 10 minutes of active prep time!
- They are totally no-bake, which means you save energy and don’t heat up the kitchen.
- The ingredient list is short and uses things I already have, so no last-minute grocery runs are needed.
- They last for months in the freezer, meaning you always have a healthy dessert waiting for you.
- The combination of creamy peanut butter and dark chocolate is just pure happiness in a tiny cup.
Quick Preparation Time
This is the best part! We are talking 10 minutes, tops, for the mixing and chocolate pouring. Because there’s no baking, you don’t wait around for an oven to preheat or for the cake to cool down. You mix, you pour, you freeze. It’s that simple, which is why I call this my emergency dessert stash recipe.
Freezer Friendly and Convenient
Life gets busy, and I often forget to plan ahead for snacks. That’s where the freezer comes in handy. Once these cups are hard as a rock, they just wait patiently for you. Whether you need a post-gym boost or a little something sweet after dinner, just grab one or two. They are perfectly portioned, so you don’t have to worry about overindulging!
Essential Equipment for Perfect Peanut Butter Oat Cups
You don’t need a fancy stand mixer or a dozen gadgets for this recipe, which is another reason I love it so much! But having the right few tools makes the process smooth and mess-free. If you have these basics, you’re ready to go. I always lay out my tools before I start mixing, just to make sure nothing gets forgotten in the rush!
Muffin Pan Preparation
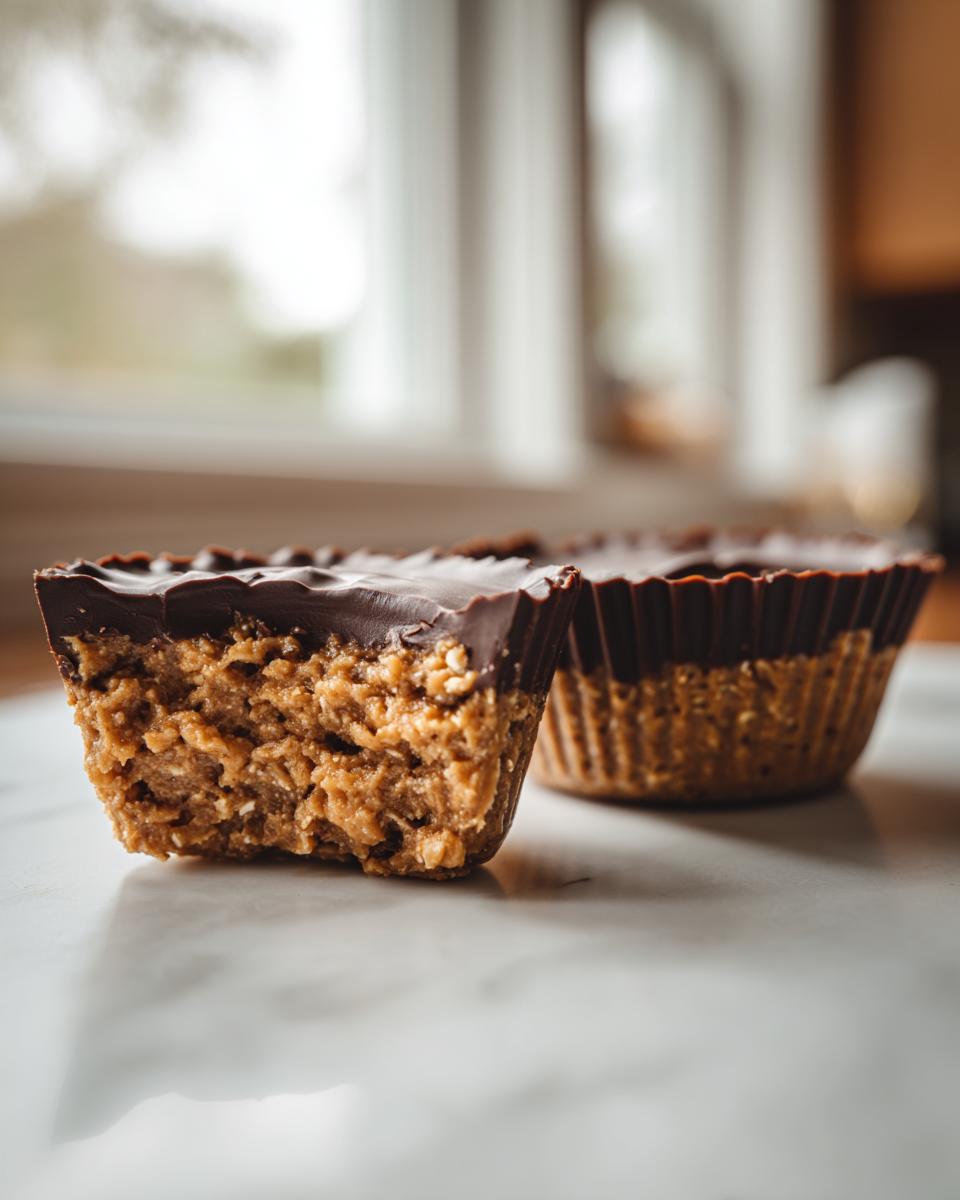
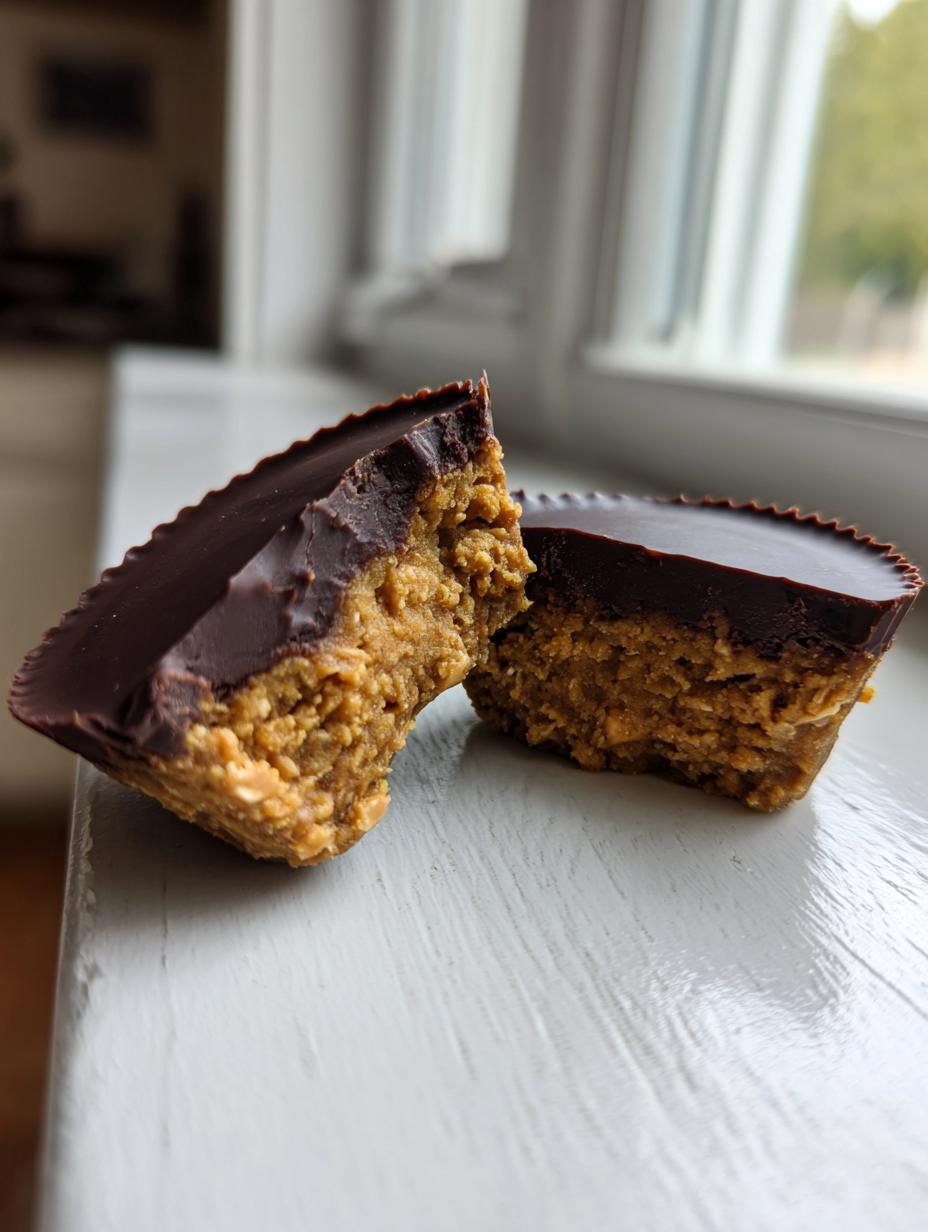
The most crucial piece of equipment here is what you use to shape them. I highly recommend using a standard 12-cup mini muffin pan. The size is just perfect for a satisfying, single-serving treat. You have two options for lining the pan, and you absolutely must use one of them, or you’ll be chipping your cups out!
- Paper Liners: These are super easy, but make sure they are the standard mini size. If you use the larger cupcake liners, the peanut butter mixture will look thin and won’t set right.
- Silicone Molds: If you have silicone mini muffin molds, these are fantastic because the cups pop out with zero effort once they are frozen solid.
If you don’t have liners, you can brush the cups lightly with coconut oil, but I find the liners give you the cleanest edges!
Ingredient Breakdown for Peanut Butter Oat Cups
I love that the ingredient list for these Peanut Butter Oat Cups is short and sweet. It means less stress when you’re trying to get them made before your willpower runs out! We’ve got the base that holds everything together and the chocolate layer that makes them taste like a fancy candy bar. You’ll want to make sure you measure these out correctly, especially the wet ingredients, for that perfect texture.
Here is exactly what you need for 12 glorious cups:
| Ingredient | Amount |
| Quick Oats | ¾ cup |
| Creamy Peanut Butter | ½ cup |
| Pure Maple Syrup | ¼ cup |
| Chia Seeds | 2 tablespoons |
| Protein Powder (Vanilla/Plain) | ¼ cup |
| Vanilla Extract | 1 teaspoon |
| Sea Salt | Pinch |
| Dark Chocolate Chips | 1 cup |
| Coconut Oil | 2 teaspoons |
Base Ingredients Clarity
When gathering your base ingredients, a few details really matter for the final result. First, use creamy peanut butter—not the natural, oily kind that separates easily. The creaminess is key to binding everything smoothly. If you use natural, just stir it really well first!
Make sure your sweetener is pure maple syrup. We aren’t using honey or artificial syrups here because the maple syrup works best with the peanut butter and oats to create that soft, fudgy interior. Also, don’t skip the chia seeds! They swell up just a tiny bit and help lock in moisture, keeping your cups from crumbling apart when you grab them.
Chocolate Topping Components
The chocolate topping is simple, but the ratio of chocolate to coconut oil is important. We use 1 cup of dark chocolate chips and only 2 teaspoons of coconut oil. That little bit of oil is what makes the chocolate melt down into a glossy, smooth liquid that pours perfectly over the oat layer.
When it melts, it sets up firm but not rock-hard, which is exactly what you want in a frozen treat. If you use too much oil, your chocolate layer will stay soft even when frozen, and that’s just not the right texture for these cups!
Step-by-Step Instructions for No-Bake Peanut Butter Oat Cups
Okay, time to put it all together! Don’t stress about making these perfect—they are very forgiving. The whole process of making these Peanut Butter Oat Cups is meant to be fast and fun. Just follow these steps, and you’ll have freezer snacks ready in no time!
Creating the Oat Base Mixture
First things first, get your liners ready in that mini muffin pan. Now, grab a good-sized bowl. We’re tossing in all the dry stuff—oats, protein powder, chia seeds, and salt—and giving those a quick whisk just to distribute everything evenly.
Next, we add the wet ingredients: peanut butter, maple syrup, and vanilla extract. Now, you need to mix this really well! You’ll be stirring until everything is totally combined. Keep going until you have a thick, uniform dough. It should feel firm enough to hold its shape but still soft enough to press easily.
Layering and Chocolate Application
Once your base is mixed, it’s time to layer up. Take that oat mixture and divide it evenly among your 12 lined cups. This is important: Use the back of a small spoon or your clean fingers to press the mixture down really firmly into the bottom of each cup. You want a nice, tight, flat surface for the chocolate to sit on.
While you’re pressing, go ahead and melt your chocolate. Combine the chocolate chips and the coconut oil in a small microwave-safe bowl. Heat this in short bursts—30 seconds at a time—stirring well between each burst. Stop as soon as it’s totally smooth and glossy. Don’t overheat it, or you’ll scorch the chocolate!
Spoon that smooth chocolate right over the top of your pressed oat layer. The coconut oil helps it spread nicely. Gently tap the whole muffin pan on the counter a couple of times. This little tap helps smooth out the chocolate surface and gets rid of any big air bubbles trapped underneath.
Setting and Freezing the Peanut Butter Oat Cups
Once the chocolate is poured, they need to chill out! Place the entire pan carefully into the freezer. You need them to freeze completely, which typically takes about 2 hours minimum. Don’t rush this part; if they aren’t totally firm, they will fall apart when you try to remove the liners.
When they are rock solid, pop them out of the mold. Store them right away in an airtight container in the freezer. If you want that perfect, slightly soft, fudge-like texture—which I highly recommend—just let them sit on the counter for about 5 to 10 minutes before you dive in!
Expert Tips for Perfect Peanut Butter Oat Cups
Even though these are no-bake, there are a few little tricks I’ve learned over the years that make the difference between a good batch of Peanut Butter Oat Cups and an absolutely amazing one. Don’t let a slightly sticky mix or scorched chocolate ruin your snack session! Here are my must-know secrets.
Achieving the Right Base Consistency
When you’re first mixing the oats, peanut butter, and syrup, it might look a little crumbly, or it might look too wet. You’re aiming for a consistency that feels like thick, slightly sticky cookie dough—the kind you could easily roll into a ball if you tried. If it seems too dry and won’t stick together when you squeeze a bit in your hand, add another teaspoon of peanut butter or maple syrup, just a tiny bit at a time.
On the flip side, if it’s too oily or sloppy, add a teaspoon of extra quick oats or protein powder. The goal is to press it down firmly into the liner, so if it’s too loose, it won’t hold its shape when frozen. Trust your hands on this—it should hold together when packed!
Chocolate Melting Technique
Melting chocolate is always a risk, especially in the microwave where things go from zero to burnt in a second. To get that smooth, shiny layer on your Peanut Butter Oat Cups, you have to use short bursts and low power. Don’t just blast it on high for a minute!
If your microwave is powerful, use 50% power for 30-second intervals, stirring really well between each one. Even better, if you have a lower setting, use that! You want the chocolate to melt gently with the help of the coconut oil. If you see any hard lumps left, stir them; residual heat will usually melt those last bits without needing more microwave time. This prevents that chalky, seized-up texture that ruins the topping.
Storing and Enjoying Your Peanut Butter Oat Cups
Once you’ve made a batch of these perfect Peanut Butter Oat Cups, the next big question is how to keep them tasting fresh! Since these are no-bake and rely on the freezer to set, storage is super easy, but there are definitely a few things that make them taste better when you finally grab one.
The best part about these is that they are incredibly stable for long-term snacking. I usually make a double batch just so I don’t have to make them again for a while. The texture changes slightly based on how long they sit in the cold, which is why knowing the ideal eating temperature is key.
Here’s a quick rundown on keeping your treats safe and delicious:
| Storage Location | Maximum Time | Texture Note |
| Airtight Container (Freezer) | Up to 2 Months | Firmest, requires slight thawing. |
| Refrigerator | 1 Week | Softer, more like a dense fudge. |
Best Practices for Freezer Storage
The freezer is your best friend here. You want to store your finished Peanut Butter Oat Cups in a truly airtight container. If you just throw them in a Ziploc bag, they can sometimes pick up freezer smells, which we definitely don’t want!
I like to separate the layers with small squares of parchment paper if I stack them high. This stops them from sticking together in one giant peanut butter log. The recipe note says they last up to 2 months, and honestly, they are still perfectly good after that, but I find the flavor is best within the first month. They freeze so well that you’ll likely eat them all long before the two-month mark, trust me!
Frequently Asked Questions About Peanut Butter Oat Cups
I get so many questions about these things, probably because everyone needs a reliable, no-fuss snack in their life! Since these Peanut Butter Oat Cups are so simple, people often wonder about swapping ingredients or what the ‘right’ way to eat them is. I’ve gathered the most common queries right here for you!
Can I substitute the peanut butter?
Absolutely! Peanut butter is the classic choice because it binds so well, but if you have an allergy or just want a change, you can swap it out. Almond butter works beautifully; it has a slightly different flavor profile but binds just as nicely with the maple syrup. Cashew butter is another great option if you want something milder. Just make sure whatever nut butter you use is the creamy variety, not the super runny natural kind, or you might need to add an extra teaspoon of oats to balance the mixture!
How firm should they be before eating?
This is my favorite debate! When they first come out of the freezer, they are rock hard—like little frozen discs of deliciousness. That’s fine if you’re desperate, but you miss out on the texture! I always recommend letting them sit on the counter for about 5 to 10 minutes before you dig in.
When they are slightly thawed, the peanut butter oat base softens just enough to become that perfect, dense fudge texture, and the chocolate top gets that satisfying snap without being too hard on your teeth. If you leave them out too long, they get sticky, so keep an eye on them!
Sharing Your Success with Peanut Butter Oat Cups
I really hope you enjoy making these cups as much as I do! They are such a staple in my house now, and I love hearing when they become a staple in yours too. Honestly, watching them set up in the freezer after I pour that shiny chocolate over the top is one of my favorite little kitchen moments.
So, if you gave these a try, please let me know what you thought! Did you try almond butter instead? Did you manage to hide them all from your family? Drop a rating below or leave a comment—I read every single one, and it helps other busy folks see just how easy and amazing these no-bake treats are. Happy snacking! Check out more quick ideas on Pinterest!
Print
Amazing 10-Minute Peanut Butter Oat Cups
- Total Time: 10 minutes
- Yield: 12 mini cups 1x
- Diet: Vegetarian
Description
These no-bake peanut butter oat cups are creamy, chocolatey, and made in 10 minutes for a healthy, freezer-friendly snack or dessert. They are easy to prep using simple ingredients.
Ingredients
- ¾ cup quick oats
- ½ cup creamy peanut butter (or almond butter)
- ¼ cup pure maple syrup
- 2 tablespoons chia seeds
- ¼ cup vanilla or plain protein powder
- 1 teaspoon pure vanilla extract
- Pinch of sea salt
- 1 cup dark chocolate chips
- 2 teaspoons coconut oil
Instructions
- Line a 12-cup mini muffin pan with liners or use a silicone mold.
- In a large mixing bowl, stir together oats, peanut butter, maple syrup, chia seeds, protein powder, vanilla, and sea salt until evenly combined. The mixture should be soft but not sticky.
- Divide the oat mixture evenly among the muffin cups, pressing it firmly into the bottom to create a smooth layer.
- In a small microwave-safe bowl, combine chocolate chips and coconut oil. Heat in 30-second intervals, stirring after each, until fully melted and smooth.
- Spoon the melted chocolate evenly over each oat cup to cover the top completely.
- Tap the pan gently on the counter to smooth the chocolate layer.
- Freeze for at least 2 hours, or until the cups are completely firm.
- Once set, pop the cups out of the mold and store them in an airtight container in the freezer.
- Let them sit at room temperature for a few minutes before eating for the best texture.
Notes
- Store in the freezer for up to 2 months.
- Best enjoyed slightly thawed for a soft, fudge-like texture.
- Prep Time: 10 minutes
- Cook Time: 0 minutes
- Category: Dessert
- Method: No-Bake
- Cuisine: American
Nutrition
- Serving Size: 1 cup
- Calories: 180
- Sugar: Unknown
- Sodium: Unknown
- Fat: 10g
- Saturated Fat: Unknown
- Unsaturated Fat: Unknown
- Trans Fat: Unknown
- Carbohydrates: 14g
- Fiber: Unknown
- Protein: 7g
- Cholesterol: Unknown