Hey y’all! Jordan Bell here, coming to you from Asheville, North Carolina. You know, it’s wild to think back to where I started – about 80 pounds ago! My journey has been all about finding a way to enjoy the comforting flavors of Southern food that I grew up with, but doing it in a way that’s actually good for me. That’s exactly why I started my blog, Easy Detox Recipes. I’m all about taking those classic, soul-warming dishes and making them clean and sustainable. And what’s more comforting than a batch of homemade Peanut Butter Blossoms? These little cookies are like a hug in every bite, and they’re proof that you don’t have to sacrifice tradition for health. They’re a perfect example of how we can make our favorite treats a little bit lighter and brighter, without losing any of that amazing flavor we crave. Trust me, these are a game-changer!
Why You’ll Love These Peanut Butter Blossoms
These Peanut Butter Blossoms are an absolute winner for so many reasons! You’ll love them because they’re:
- Super easy to whip up – seriously, you can have them ready in no time!
- Incredibly delicious, with that perfect sweet and salty combo that just can’t be beat.
- So festive and pretty, making them ideal for any holiday cookie platter or celebration.
- The ultimate crowd-pleaser for parties, bake sales, or just a cozy afternoon treat.
A Taste of Southern Comfort, Cleaned Up
Growing up in the South, comfort food is practically a love language, right? And for me, that always meant a kitchen filled with the warm, inviting aromas of classic treats. But let’s be honest, those traditional recipes can sometimes pack a punch of sugar and butter that doesn’t always align with feeling our best. That’s where this recipe for Peanut Butter Blossoms comes in! It’s my way of taking that beloved Southern staple – that nostalgic, melt-in-your-mouth goodness – and giving it a little makeover. We’re keeping all the comforting, familiar flavors you adore, but making them just a bit cleaner and lighter, so you can enjoy every single bite without any guilt. It’s that perfect blend of tradition and feel-good eating that my Easy Detox Recipes blog is all about!
Gathering Your Peanut Butter Blossoms Ingredients
Alright, let’s get our goodies together for these amazing Peanut Butter Blossoms! You’ll want to have everything prepped and ready to go. It makes the whole baking process so much smoother, trust me. We’re aiming for that perfect balance of sweet and salty, and the right ingredients are key. Don’t worry if you don’t have everything on hand; most of these are pantry staples. Just a quick trip to the store and you’ll be well on your way to cookie heaven!
Ingredient Table
| Quantity | Ingredient | Preparation Notes |
|---|---|---|
| 1 ¾ cups | All-purpose flour | Make sure it’s measured correctly! |
| ½ cup | Granulated sugar | Plus extra for rolling the dough balls. |
| ½ cup | Packed light brown sugar | Packing it ensures you get the right amount of moisture and flavor. |
| ½ cup | Unsalted butter | Make sure it’s softened – not melted, just nice and pliable. |
| ½ cup | Creamy peanut butter | Your favorite brand works great! |
| 1 | Large egg | At room temperature is best. |
| 1 tsp | Vanilla extract | Pure vanilla extract gives the best flavor. |
| 1 tsp | Baking soda | This helps the cookies puff up just right. |
| ¼ tsp | Salt | Balances out the sweetness. |
| 24 | Milk chocolate Hershey’s Kisses | Unwrapped and ready to go! These are the stars of the show. |
Crafting Perfect Peanut Butter Blossoms: Step-by-Step
Now for the fun part – actually making these incredible Peanut Butter Blossoms! It’s really not complicated at all, and the steps just flow one after another. You’ll see how quickly these come together. Just follow along, and you’ll have a batch of these festive cookies ready before you know it. Remember, patience here means deliciousness later!
Preparing the Dough
First things first, let’s get that oven preheated to 375°F (190°C). And grab some baking sheets – line them with parchment paper or silicone mats. This makes cleanup a breeze, and nobody likes stuck-on cookies, right? Now, in a big bowl, we’re going to cream together that softened butter, both the granulated sugar and the packed light brown sugar, and that creamy peanut butter. Beat it all until it’s nice and fluffy. You want it light in color and texture. Then, add in your egg and that splash of vanilla extract. Mix it all up until it’s well combined. In a separate bowl, give your flour, baking soda, and salt a little whisk together. This just makes sure everything is evenly distributed. Now, gradually add those dry ingredients into your wet mixture. Mix it up until it’s *just* combined. Seriously, don’t overmix! We just want to see the flour disappear. Overmixing can make your cookies tough, and nobody wants that.
Shaping and Baking the Festive Cookies
Once your dough is ready, it’s time to get shaping! Grab a small scoop, or just use your hands, and roll little portions of dough into about 1-inch balls. You know, like little cookie nuggets! Now, pour some extra granulated sugar into a small bowl or plate. Roll each dough ball in that sugar until it’s nicely coated all over. This gives them that pretty, sparkly finish and a little extra crunch. Place these sugar-coated balls onto your prepared baking sheets. Make sure you leave about 2 inches between them, because they will spread a little. Pop those trays into your preheated oven. They only need about 10 to 12 minutes. You’re looking for the edges to be just lightly golden, and the cookies themselves should look slightly puffed up. Don’t overbake them – we want them soft inside!
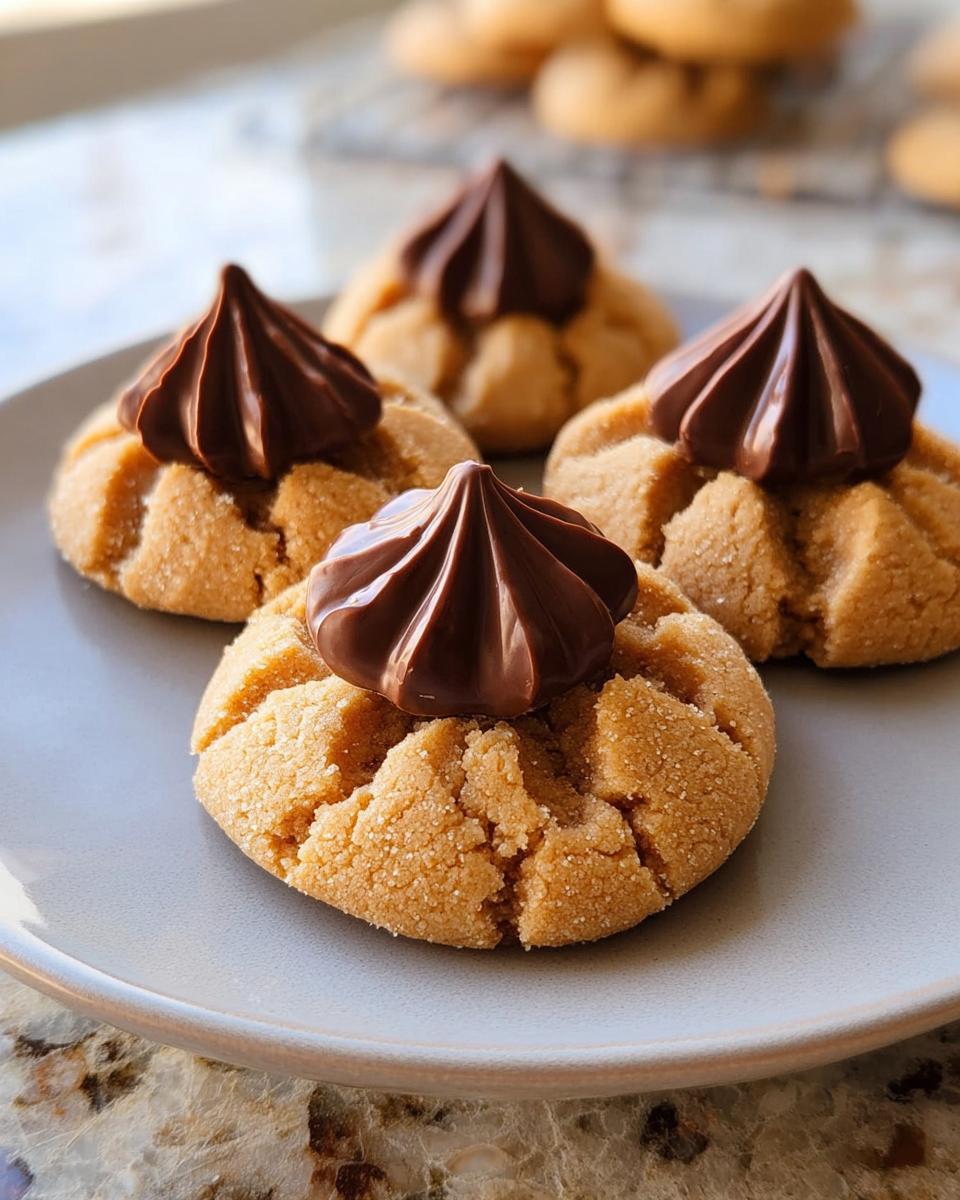
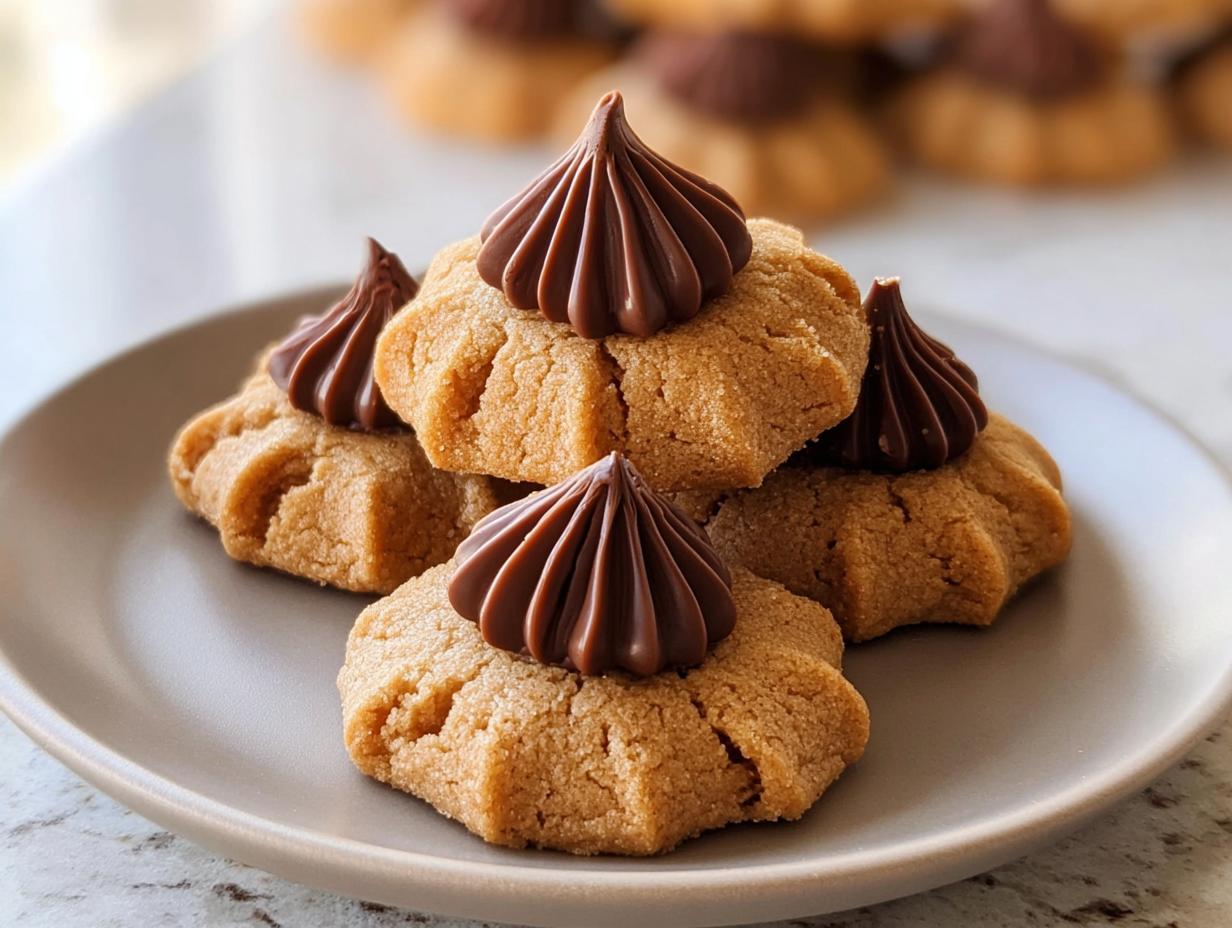
The Finishing Touch: Adding the Kiss
Okay, this is the crucial part that makes them Peanut Butter Blossoms! As SOON as those cookies come out of the oven, while they’re still hot and soft, gently press one unwrapped Hershey’s Kiss right into the center of each cookie. You might need to hold it for just a second to let it start melting and sink in. Don’t push too hard, or you’ll crack the cookie! The residual heat from the cookie will do the rest of the work, softening the chocolate perfectly. Let the cookies sit on the baking sheet for about 5 minutes. This lets them firm up just enough so they don’t fall apart. Then, carefully transfer them to a wire rack to cool completely. That’s when the chocolate kiss will be perfectly set on top. Voila! Pure magic.
Tips for Peanut Butter Blossoms Success
Making these Peanut Butter Blossoms is pretty straightforward, but a few little tricks can make sure they turn out absolutely perfect every single time. First off, pay attention to your oven temperature! Ovens can be quirky, so if you have an oven thermometer, give it a check. Baking them for just 10-12 minutes is key – you want them soft in the middle, not dry and crumbly. Pulling them out when the edges are just starting to turn golden is your cue. Also, don’t skip that step of pressing the Hershey’s Kiss in right away; the residual heat is what makes it melt into that perfect little pool. If your dough seems a bit too soft to roll, pop it in the fridge for about 15-20 minutes. It makes handling so much easier, especially if your kitchen is warm!
Ingredient Notes and Substitutions
The baking soda is what gives these Peanut Butter Blossoms their lift, and the salt is super important for balancing that sweetness and bringing out the peanut butter flavor. You can totally swap out the milk chocolate Hershey’s Kisses for dark chocolate or even peppermint ones if you’re feeling festive! It adds a fun little twist. If you’re not a fan of creamy peanut butter, crunchy works too, it just adds a bit more texture. Just make sure whatever peanut butter you use, it’s the standard kind, not the natural kind that separates a lot, as that can change the dough consistency. These little tweaks make sure your Hershey’s Kiss cookies are always a hit!
Frequently Asked Questions about Peanut Butter Blossoms
Got questions about these amazing Peanut Butter Blossoms? I’ve got answers! This recipe is pretty forgiving, but a few little tips can make all the difference. We want perfect, festive cookies every time, right? Let’s dive into what folks usually ask!
Can I make these Peanut Butter Blossoms ahead of time?
Oh, absolutely! That’s one of the best things about this recipe. You can totally prepare the cookie dough and then wrap it up tight in plastic wrap. Pop it in the fridge for up to 2 days before you plan to bake. When you’re ready, just let it sit on the counter for about 15-20 minutes to soften up a bit so you can roll it easily. It’s a lifesaver when you’re planning for holidays or parties!
How do I store leftover Peanut Butter Blossoms?
These festive cookies stay wonderfully fresh! Once they’ve cooled completely, store them in an airtight container at room temperature. They’re usually good for about 5 days. The chocolate kiss might get a little soft if it’s really warm, but they’ll still taste fantastic. Honestly, though, they rarely last that long around here!
What other festive cookies can I make?
The base for these Peanut Butter Blossoms is wonderfully versatile! If you’re looking for other festive treats, you could try adding a little bit of cinnamon or even some finely chopped nuts to the dough itself. Or, just swap out the milk chocolate Kisses for dark chocolate or even peppermint ones for a different holiday vibe. It’s a great starting point for all sorts of delicious cookie creations!
Storing and Reheating Your Peanut Butter Blossoms
These delightful Peanut Butter Blossoms are pretty sturdy, but you still want to store them right so they stay yummy! Keeping them fresh is all about controlling the air and temperature. Honestly, they’re so good, they usually disappear fast, but if you happen to have any leftovers, here’s how to keep them tasting just as good as day one.
Storage and Reheating Table
| Method | Instructions | Notes |
|---|---|---|
| Storing | Place cooled cookies in an airtight container. You can also add a slice of bread to the container to help keep them soft. | Store at room temperature for up to 5 days. They are not meant to be refrigerated as the chocolate can bloom. |
| Freezing | Wrap cooled cookies individually in plastic wrap, then place them in a freezer-safe bag or container. | Freeze for up to 3 months. Thaw at room temperature. |
| Reheating | Warm gently in a toaster oven for 1-2 minutes, or microwave for about 10 seconds. | This is optional; they are delicious at room temperature! Reheating just brings back a little of that fresh-baked warmth. |
Understanding the Nutrition of Peanut Butter Blossoms
Now, let’s chat a little about what goes into these delicious Peanut Butter Blossoms from a nutritional standpoint. It’s always good to have an idea, right? Keep in mind that these numbers are estimates, and they can totally change depending on the specific brands of ingredients you use – like your peanut butter and chocolate kisses. But this gives you a good general idea of what you’re working with per cookie. It’s all about balance, and enjoying these treats mindfully!
Estimated Nutritional Information Table
| Serving Size | Calories | Fat | Saturated Fat | Carbohydrates | Sugar | Protein | Sodium |
|---|---|---|---|---|---|---|---|
| 1 cookie | 150 | 8g | 3g | 17g | 12g | 3g | 60mg |
Share Your Peanut Butter Blossoms Creations!
Alright, cookie bakers! I’d absolutely love to hear how your Peanut Butter Blossoms turned out. Did you try any fun substitutions? Did they disappear as fast at your house as they do at mine? Drop a comment below and let me know, or even better, tag me on social media with a picture of your beautiful festive cookies! Happy baking, y’all!
You can also find more delicious recipes and baking inspiration on Pinterest and Medium.
Print
Amazing Peanut Butter Blossoms: 1 Perfect Recipe
- Total Time: 25-27 minutes
- Yield: 24 cookies 1x
- Diet: Vegetarian
Description
Peanut Butter Blossoms are classic holiday cookies. This recipe makes sweet and salty cookies with a festive look. They are perfect for any cookie platter.
Ingredients
- 1 ¾ cups all-purpose flour
- ½ cup granulated sugar plus extra for rolling
- ½ cup packed light brown sugar
- ½ cup unsalted butter softened
- ½ cup creamy peanut butter
- 1 large egg
- 1 tsp vanilla extract
- 1 tsp baking soda
- ¼ tsp salt
- 24 milk chocolate Hershey’s Kisses unwrapped
Instructions
- Preheat your oven to 375°F (190°C). Line baking sheets with parchment paper or silicone baking mats.
- In a large mixing bowl, cream together the softened butter, granulated sugar, brown sugar, and peanut butter until light and fluffy. Add the egg and vanilla extract, mixing until fully incorporated.
- In a separate bowl, whisk together the flour, baking soda, and salt. Gradually add the dry ingredients to the wet ingredients, mixing just until combined.
- Scoop out small portions of dough and roll into 1-inch balls. Roll each ball in granulated sugar until coated, and place them on the prepared baking sheets about 2 inches apart.
- Bake the cookies for 10-12 minutes or until the edges are lightly golden and the cookies are slightly puffed. Remove from the oven and immediately press a Hershey’s Kiss into the center of each cookie.
- Allow the cookies to cool on the baking sheet for 5 minutes, then transfer to a wire rack to cool completely.
Notes
- The cookie dough can be prepared and stored in the refrigerator for up to 2 days before baking.
- These cookies stay fresh in an airtight container at room temperature for up to 5 days.
- You can freeze the cookies for up to 3 months.
- You can substitute with dark chocolate or peppermint-flavored Kisses for a holiday twist.
- Prep Time: 15 minutes
- Cook Time: 10-12 minutes
- Category: Dessert
- Method: Baking
- Cuisine: American
Nutrition
- Serving Size: 1 cookie
- Calories: 150
- Sugar: 12g
- Sodium: 60mg
- Fat: 8g
- Saturated Fat: 3g
- Unsaturated Fat: 5g
- Trans Fat: 0g
- Carbohydrates: 17g
- Fiber: 1g
- Protein: 3g
- Cholesterol: 15mg