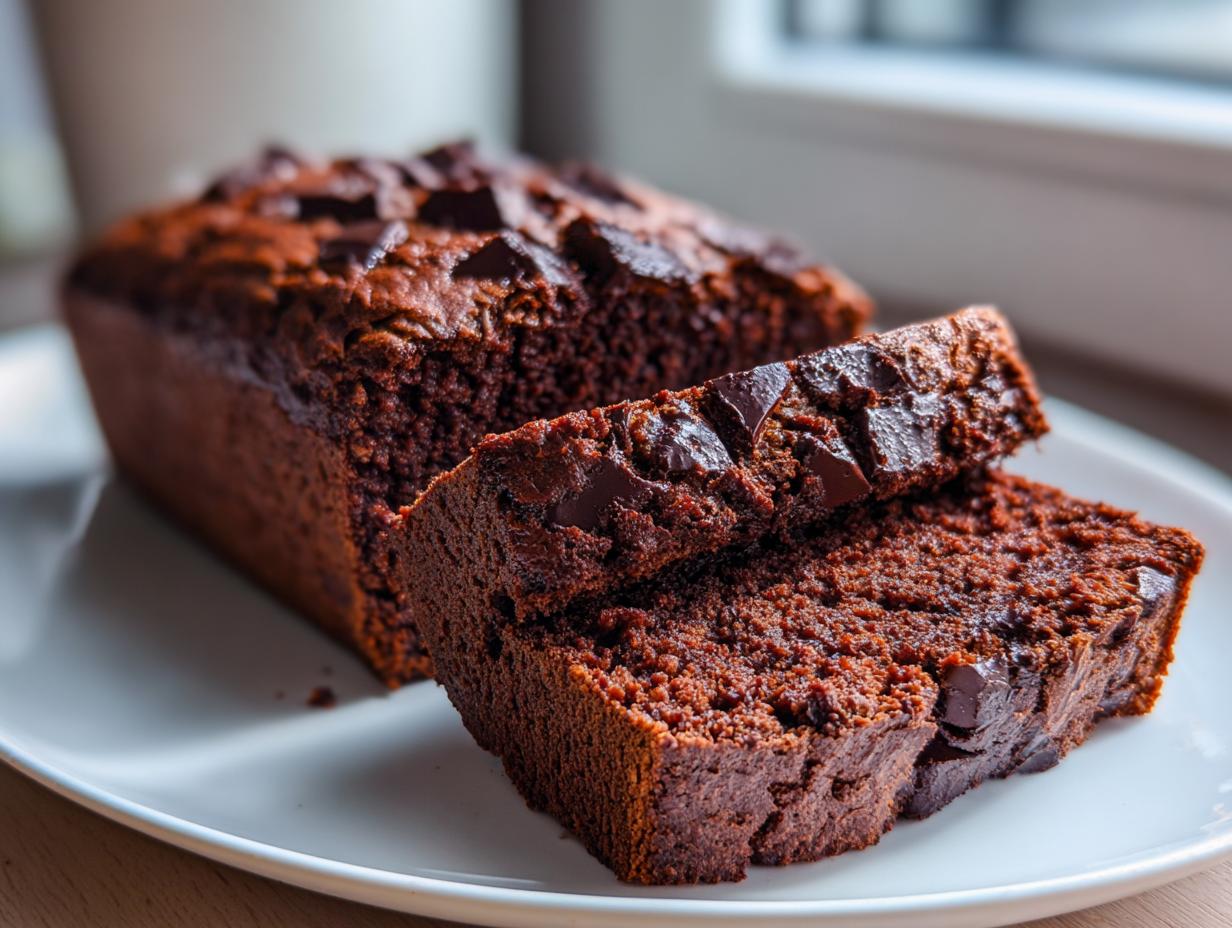
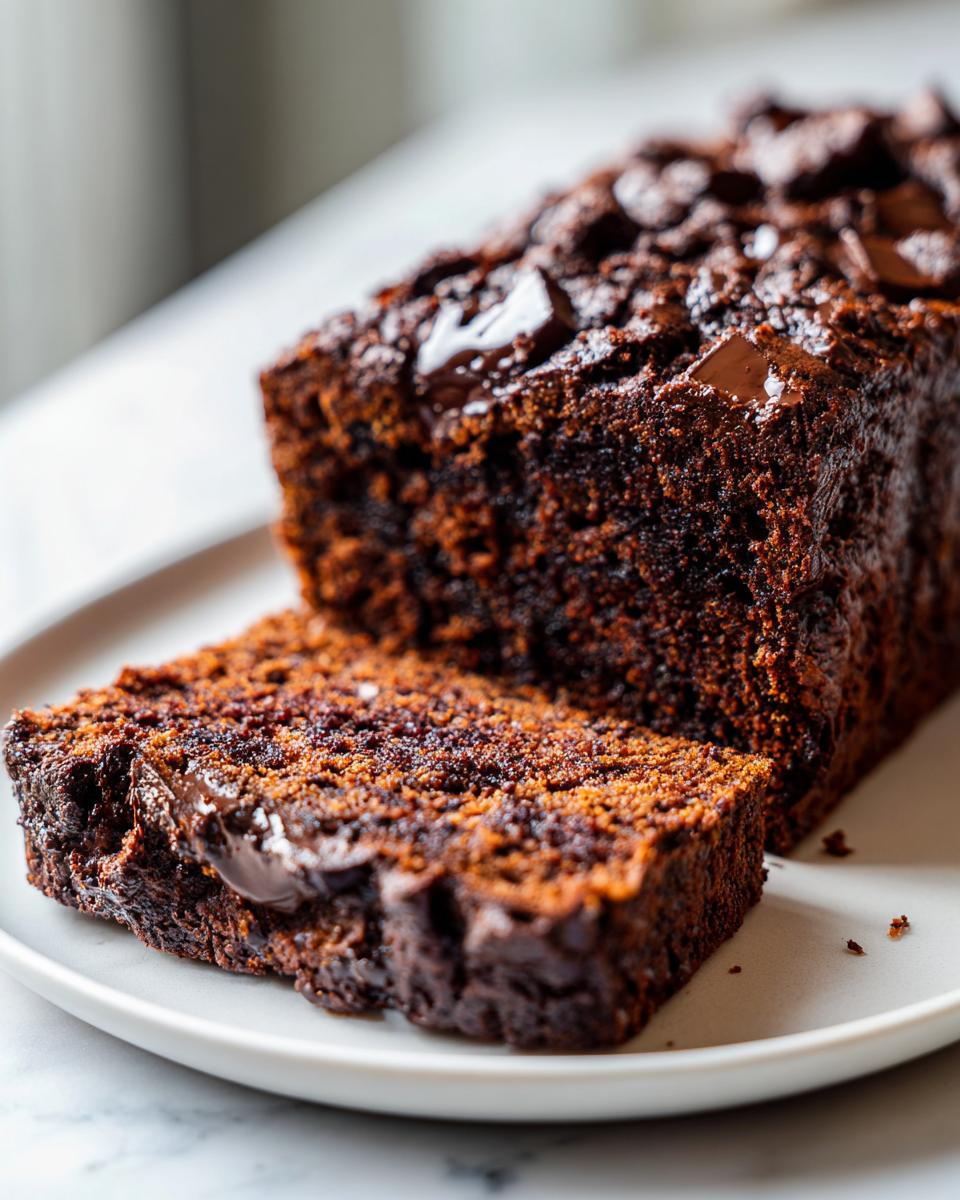
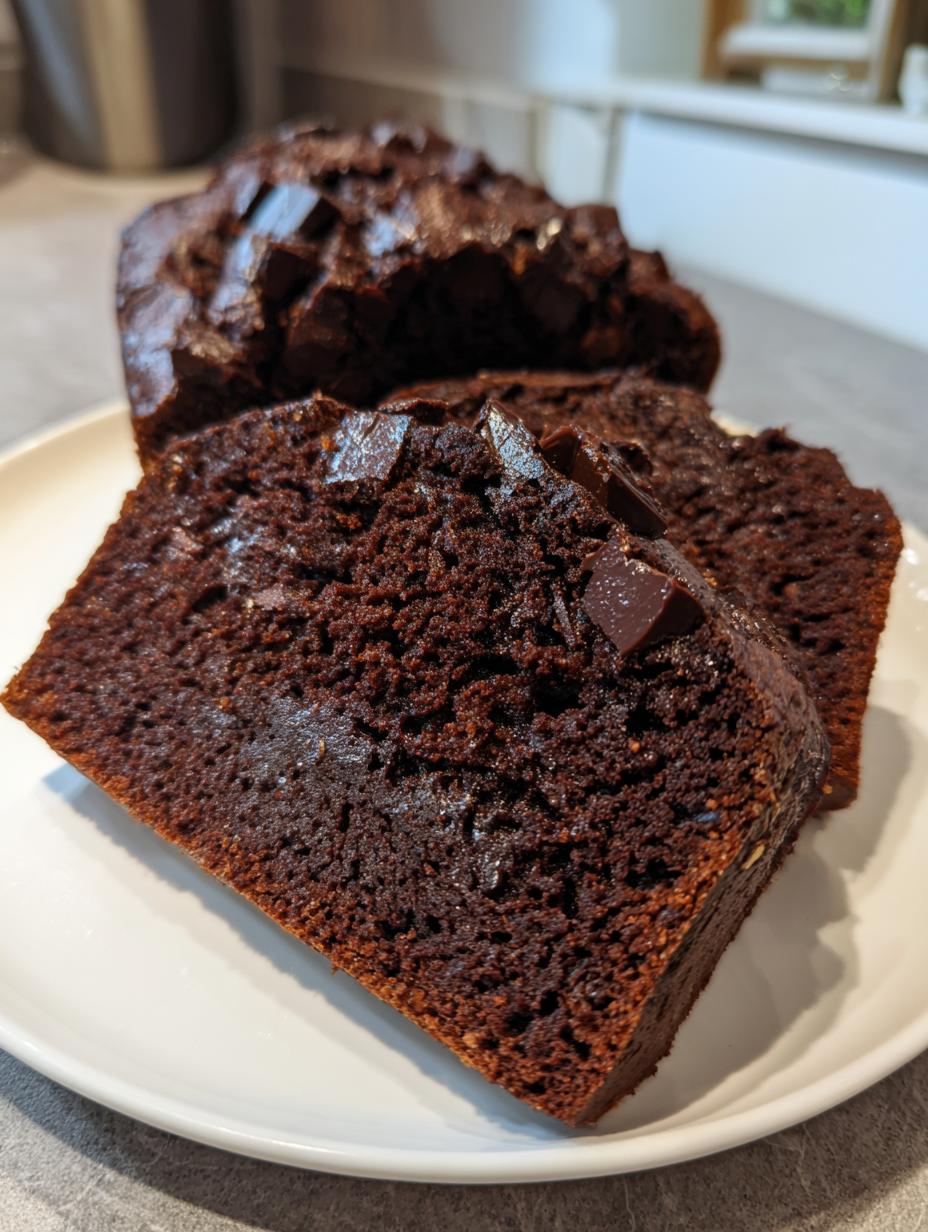
You absolutely have to try this No Knead Double Chocolate Bread With Crispy Crust. Seriously, it’s the easiest way to trick yourself into thinking you bought a fancy loaf from a European bakery right in your own kitchen. I’m talking deep, dark cocoa flavor that hits you right away, plus those pockets of melty chocolate that just ooze out when you slice into it. It’s almost unbelievable how little actual work this takes!
I messed this up a few times when I first started experimenting—mostly by not letting it rest long enough—but I finally nailed the texture. That crispy crust you see in the pictures? That only comes from using a screaming hot Dutch oven. Don’t skip that preheating step, or you’ll just end up with a sad, soft chocolate brick. Trust me, the payoff when you hear that crackle when slicing the finished No Knead Double Chocolate Bread With Crispy Crust is worth every second of waiting!
Essential Components for Your No Knead Double Chocolate Bread With Crispy Crust
Okay, so the beauty of this No Knead Double Chocolate Bread With Crispy Crust is that it uses pantry staples, but the *quality* of those staples makes all the difference. Since this is a chocolate-forward recipe, you can’t skimp on the cocoa or the chunks. I learned quickly that cheap cocoa powder tastes dusty, so go for the good stuff! We need that deep, dark flavor to balance the sweetness.
The chocolate chunks are what give you those glorious melty rivers when you slice the bread warm. Don’t use chips if you can help it; chunks hold their shape better and give you those wonderful pockets of pure melted chocolate.
Ingredient List Clarity
Here is everything you need laid out so you can check your pantry before you start mixing. Make sure your water is just right for the yeast!
Dry Ingredients
- 3 cups all purpose flour plus extra for shaping
- 1/4 cup unsweetened cocoa powder
- 2 tablespoons granulated sugar
- 1 teaspoon salt
- 1/2 teaspoon active dry yeast
Wet Ingredients and Add-ins
- 1 1/2 cups warm water about 100°F
- 1 cup semi sweet chocolate chunks
Equipment Needed for No Knead Double Chocolate Bread With Crispy Crust
You don’t need fancy mixers for this loaf, which is part of the charm! But you do need a couple of specific items to get that famous crispy crust on your No Knead Double Chocolate Bread With Crispy Crust. The most crucial piece is a heavy, oven-safe pot with a lid—that’s our Dutch oven, and it traps the steam perfectly.
Make sure you have a large mixing bowl, some parchment paper (this is a lifesaver!), and definitely a very sharp knife or a razor blade for scoring the top right before it goes into the oven. That’s it! Simple tools for an amazing result.
Step-by-Step Guide to Preparing No Knead Double Chocolate Bread With Crispy Crust
This is where the magic happens, but it’s mostly waiting! Don’t let the long resting time fool you; the active work here is super fast. We are aiming for a very wet, sticky dough because that’s what gives us that soft, chewy interior when we finally bake this fantastic No Knead Double Chocolate Bread With Crispy Crust.
Mixing and Initial Rest
Grab your biggest bowl, because this dough expands! First, you need to combine all the dry stuff. Whisk the flour, that beautiful cocoa powder, sugar, salt, and the yeast together really well. You want the yeast evenly spread out so it doesn’t accidentally clump up and cause a weird bubble situation later. Once that’s mixed, pour in your warm water—remember, about 100 degrees, not scalding hot!
Mix it with a sturdy wooden spoon until you can’t see any dry flour spots. It will look like a shaggy, sticky mess, and that’s exactly what you want. Don’t try to knead it with your hands yet! Now, gently fold in those glorious chocolate chunks. Don’t overmix them; just make sure they are distributed evenly throughout the batter. Cover that bowl tightly—I use plastic wrap, making sure it touches the surface of the dough—and find a spot in your kitchen that stays warm. It needs a long nap: four to six hours is the sweet spot. You’ll know it’s ready when it’s doubled, and you see lots of little bubbles on top.
Preheating and Dough Shaping Techniques
While your dough is finishing its long rest, it’s time to prepare the oven. This is non-negotiable for the crust! Place your Dutch oven, lid on, into the oven and crank the heat up to 450°F. You need to let that pot heat up for at least 30 minutes. It has to be ripping hot!
Once your dough is bubbly, lightly flour your counter and your hands—you’ll need the flour to keep things from sticking. Gently turn the dough out. It will look a little wild, but now we build structure. You need to fold the dough over itself about four times. Just take the edge, pull it toward the center, press down lightly, and repeat. You’re essentially tucking it in on itself. Shape it gently into a tight round, and place that round seam-side down onto a piece of parchment paper. Let it sit uncovered for just 20 minutes while the pot finishes heating. This little break helps the dough relax before baking.
Baking for Maximum Crispness
Time to move fast! Carefully take that screaming hot Dutch oven out of the oven—use really thick mitts, please! Gently lift your dough using the parchment paper sling and lower the whole thing right into the pot. The parchment keeps you safe from the heat. Take a very sharp knife or a razor blade and score the top of the dough quickly—just one good slash across the middle. This lets the steam escape correctly and gives you that nice oven spring.
Put the lid on and pop it back in the oven. Bake covered for 30 minutes. That trapped steam is what keeps the inside soft while the outside starts firming up. After 30 minutes, carefully remove the lid. Wow, the smell! Now, bake it uncovered for another 15 minutes. This is where the crust gets that beautiful, dark, crisp exterior we are aiming for. When it’s done, the loaf should sound hollow when you tap the bottom. Let it cool on a wire rack for at least 10 minutes before you even *think* about slicing it. Seriously, waiting that little bit helps the crumb set perfectly.
Expert Tips for Achieving Your Crispy Crust
You’ve followed the steps, but if you want that bakery-level crust that cracks when you squeeze it, we need to talk about a couple of little details that make a huge difference. Baking is science, even when it feels like magic, and these tweaks ensure your loaf is perfect every single time.
Water Temperature and Dough Hydration
When you mix that yeast in, temperature is everything! If the water is too cold, your yeast just sits there, sleepy and lazy, and your dough won’t rise right. If it’s too hot—say, over 115°F—you actually kill the yeast, and you’ll end up with a dense brick. Aiming for that sweet spot around 100°F ensures the yeast wakes up happy and starts doing its job creating those beautiful gasses for a light interior.
Dutch Oven Handling and Scoring
Don’t fear the heat of the Dutch oven! That intense, retained heat is what shocks the dough into massive oven spring the second it hits the pot. When you transfer the dough, be decisive; hesitation means losing precious heat. And scoring? Don’t be timid! A quick, deep slash with a very sharp blade allows the loaf a specific place to expand. If you don’t score it, the crust will just tear randomly, often on the sides, which ruins that beautiful round shape we worked so hard to create.
Frequently Asked Questions About No Knead Double Chocolate Bread With Crispy Crust
I get so many questions about this recipe because it seems almost too easy! People worry about the long rest time or whether they can swap out ingredients. Here are the things folks ask most often when they are trying to achieve that perfect No Knead Double Chocolate Bread With Crispy Crust at home.
Can I use different types of chocolate in this No Knead Double Chocolate Bread With Crispy Crust?
You certainly can play around with the chocolate, but be warned: it changes the final flavor profile! Semi-sweet chunks are my go-to because they melt beautifully but still leave some structure. If you use milk chocolate, the loaf will be noticeably sweeter, and it might spread a little more because milk chocolate has a lower melting point. Dark chocolate (60% or higher) will make this loaf incredibly rich and slightly bitter, which I personally love because it cuts through the sweetness of the bread itself. Chips work in a pinch, but they often contain stabilizers that prevent them from melting as smoothly as chunks do.
Why is my dough not rising during the long rest period?
This is usually a temperature problem. Yeast needs warmth to thrive! If your kitchen is chilly, maybe 65°F or lower, the yeast is barely crawling along. Try moving the covered bowl to a warmer spot—like inside your oven with just the light on, or near a sunny window. Never put it in a draft! Also, double-check your yeast. If it’s old, it might be inactive. If you aren’t sure, mix the yeast with a tiny bit of the warm water and a pinch of sugar first. If it doesn’t get foamy in five minutes, toss it and grab fresh yeast.
How do I know when the No Knead Double Chocolate Bread With Crispy Crust is fully baked?
Visually, you are looking for a deep, dark brown crust that looks firm and crackly. But the best test is sound! Once the 45 minutes are up, carefully pull the Dutch oven out (leave the lid off) and gently lift the loaf out onto a cooling rack. Tap the bottom of the bread with your knuckles. If it sounds hollow, like a drum, it’s done! If it sounds dull or thuddy, stick it back in the oven, uncovered, for another five minutes and test again. That hollow sound means the internal structure is set.
Storing and Reheating Your Loaf
This No Knead Double Chocolate Bread With Crispy Crust is honestly best eaten the day it’s made, but I know that rarely happens! Since it has such a high moisture content from the chocolate, it stays soft for a few days if you keep it right. It’s surprisingly resilient for a no-knead loaf, but texture maintenance is key if you want that crust back.
Best Practices for Storage
Once the bread has cooled completely—and I mean completely, or you’ll trap steam and get a soggy bottom—wrap it tightly. I prefer a paper bag first, just to absorb any residual surface moisture, and then I pop that into a large Ziploc bag, squeezing most of the air out. Keep it on the counter at room temperature. Do not put this in the fridge! Cold air dries bread out faster than anything, and we want to preserve that soft center.
Reheating for a Refreshed Crispy Crust
If you try to reheat this in the microwave, you’ll end up with hot, chewy chocolate goo, and the crust will turn leathery. Don’t do it! The absolute best way to bring that crispness back is in the oven. Slice what you plan to eat, place the slices directly on a baking sheet, and pop them into a 325°F oven for about five to seven minutes. You’ll hear that crust start to crackle again! If you only have a toaster oven, that works perfectly too, just watch it closely so the outside doesn’t burn.
Understanding the Nutritional Profile
It’s good to know what you’re eating, especially when you’re enjoying such a rich loaf! Since every oven and every batch of chocolate chunks can vary slightly, please remember that these numbers are just estimates based on the ingredients listed. It’s a decadent treat, for sure, but surprisingly good considering how much chocolate is packed in there!
Estimated Nutritional Data Table
Here is a quick look at what one slice of this bread provides:
| Nutrient | Amount Per Slice |
|---|---|
| Calories | 270 |
| Fat | 8 g |
| Carbohydrates | 45 g |
| Protein | 7 g |
Share Your No Knead Double Chocolate Bread With Crispy Crust Results
Now that you’ve baked your own incredible loaf, I really want to hear from you! Did you get that perfect crackle on the top? Did the chocolate melt just right? Please leave a rating below and tell me about your experience making this No Knead Double Chocolate Bread With Crispy Crust. I love seeing photos of everyone’s bubbly dough and finished loaves in the comments!
If you want to see more visual inspiration for recipes like this, check out our Pinterest page, or follow our journey on Medium for behind-the-scenes tips.
Print
Amazing 270 Calorie No Knead Double Chocolate Bread
- Total Time: 1 hour
- Yield: 1 loaf about 8 slices 1x
- Diet: Vegetarian
Description
This no knead double chocolate bread is rich, chewy, and deeply chocolatey with a crisp crust and soft center, made with minimal effort. It is an easy, bakery style loaf with deep cocoa flavor and melty chocolate throughout.
Ingredients
- 3 cups all purpose flour plus extra for shaping
- 1/4 cup unsweetened cocoa powder
- 2 tablespoons granulated sugar
- 1 teaspoon salt
- 1/2 teaspoon active dry yeast
- 1 1/2 cups warm water about 100°F
- 1 cup semi sweet chocolate chunks
Instructions
- In a large bowl, whisk together flour, cocoa powder, sugar, salt, and yeast until evenly combined.
- Pour in the warm water and mix with a wooden spoon until a sticky dough forms and no dry flour remains.
- Fold in the chocolate chunks until evenly distributed.
- Cover the bowl tightly and let the dough rest at room temperature for 4 to 6 hours until doubled in size and bubbly on top.
- Place a covered Dutch oven in the oven and preheat to 450°F for at least 30 minutes.
- Lightly flour a work surface and your hands, then turn out the dough and fold it over itself four times to build structure.
- Shape the dough into a round, place seam side down on parchment paper, and rest for 20 minutes.
- Carefully transfer the parchment and dough into the hot Dutch oven, score the top with a sharp knife, and cover with the lid.
- Bake covered for 30 minutes, then uncover and bake for 15 minutes until the loaf is firm and crisp on the outside.
- Remove from the oven and cool for at least 10 minutes before slicing.
Notes
- Cooling the bread slightly before slicing helps set the crumb and improves texture.
- Prep Time: 15 minutes
- Cook Time: 45 minutes
- Category: Bread
- Method: Baking
- Cuisine: American
Nutrition
- Serving Size: 1 slice
- Calories: 270
- Sugar: Not specified
- Sodium: Not specified
- Fat: 8 g
- Saturated Fat: Not specified
- Unsaturated Fat: Not specified
- Trans Fat: Not specified
- Carbohydrates: 45 g
- Fiber: Not specified
- Protein: 7 g
- Cholesterol: Not specified