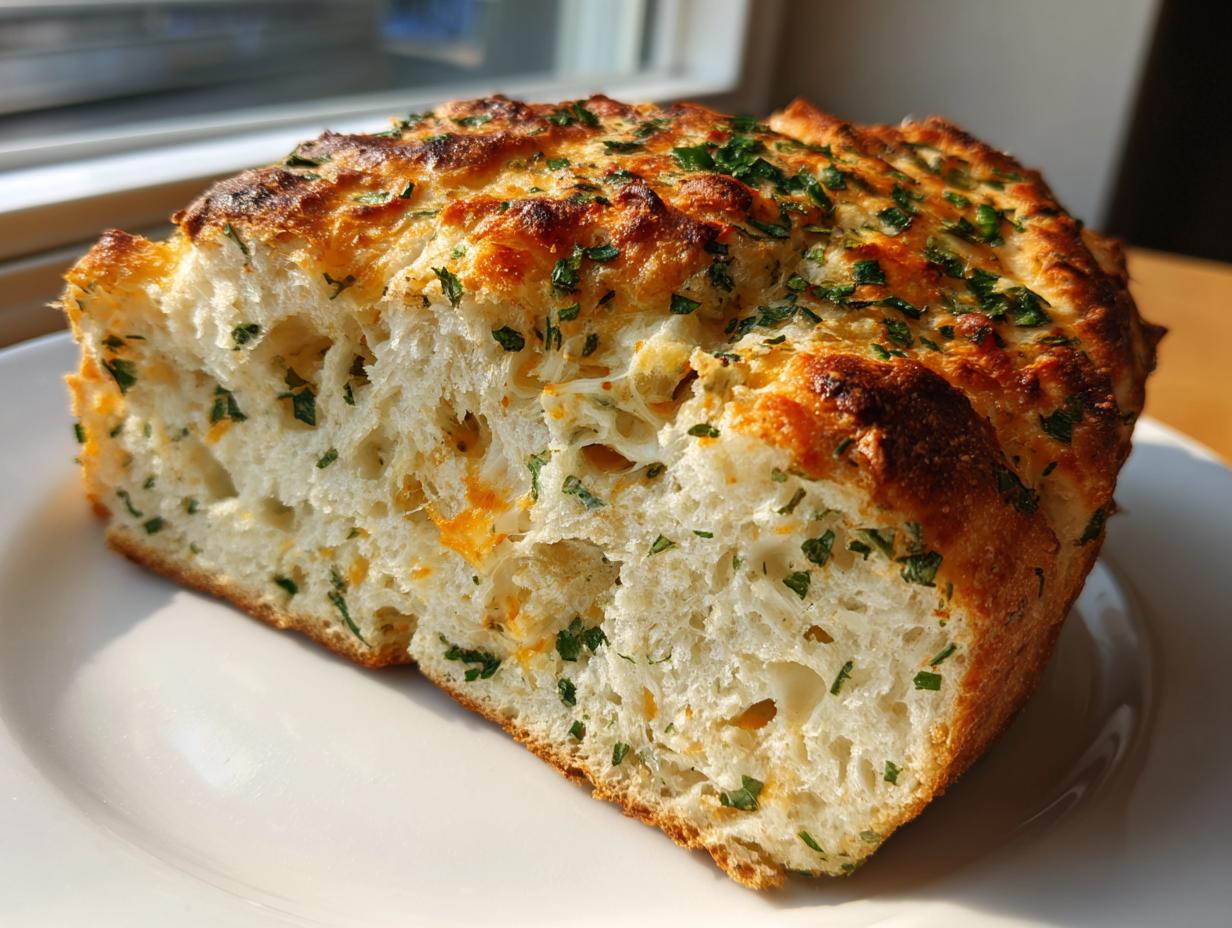
Oh my goodness, you are going to absolutely adore this recipe! If you’ve ever walked into one of those fancy artisanal bakeries and wished you could whip up something half as good without breaking a sweat, then listen up. This No Knead Cheese Herb Bread With Crispy Crust is my answer to all those baking prayers. Seriously, it’s almost embarrassing how little effort this takes.
I started messing around with no-knead dough years ago because my hands always hurt after kneading rye bread, but I needed something substantial for weekend brunches. This version, loaded with sharp cheddar and fresh herbs, quickly became legendary at every family get-together. People look at the enormous, crackly loaf cooling on the rack and assume I spent half the day wrestling with sticky dough. Nope! The magic is all in the long, slow rest.
Trust me when I say you get bakery-level results—that shatteringly crisp crust and that soft, cheesy interior—with basically zero actual work. It’s the perfect bread for beginners, but even I, a seasoned (and slightly chaotic) home cook, bring this out when I need an impressive centerpiece without the fuss. It’s just that good!

Essential Ingredients for No Knead Cheese Herb Bread With Crispy Crust
Okay, the beauty of this No Knead Cheese Herb Bread With Crispy Crust is that it relies on pantry staples, but the quality of those few items really makes the difference. We aren’t using a ton of fancy things here—just flour, water, yeast, and salt to make the structure. But those mix-ins? That’s where the flavor explosion happens!
You need good cheese, people! Don’t skimp on the cheddar; its sharpness cuts through the richness perfectly. And the herbs have to be fresh. Dried herbs just don’t give you that bright pop of flavor we need to make this bread sing. This simple ingredient list is what makes it so easy to keep on hand for an impromptu bake. If you want to see more of my favorite simple recipes, check out my recipes collection!
Detailed Component Specifications
Here’s the breakdown of exactly what you need and how to prep it. Don’t eyeball these things, especially the water temperature—it matters for waking up that yeast!
- All Purpose Flour: You need three full cups for the dough, plus an extra quarter cup just for dusting later when you shape it.
- Active Dry Yeast: Just half a teaspoon. Since this is no-knead, the yeast works slowly over hours, so we don’t need a huge amount upfront.
- Warm Water: This is crucial! It needs to be around 100 degrees Fahrenheit. If it’s too cold, the yeast sleeps; too hot, and you kill it dead!
- Sharp Cheddar Cheese: Shredded, please! The sharper the better, as it melts into those wonderful pockets.
- Chives: Thinly sliced. I mean *thinly*. We want little bursts, not big chewy pieces.
- Fresh Thyme Leaves: Strip them right off the woody stems. You need about three tablespoons of the actual leaves.
Equipment Needed for Perfect Results
You might think making bakery-style bread requires industrial mixers, but nope! For this No Knead Cheese Herb Bread With Crispy Crust, the equipment is minimal, but one item is non-negotiable for that amazing crust. Forget special pans—we’re using what you already have.
You absolutely must have a heavy, oven-safe pot with a tight-fitting lid—that means a cast iron Dutch oven is your best friend here. This pot traps the steam released by the dough, which is the secret sauce for that crunchy exterior. You’ll also need a large mixing bowl, a wooden spoon, and parchment paper for easy transfer.
Step-by-Step Instructions for No Knead Cheese Herb Bread With Crispy Crust
This is where the magic happens, and honestly, it’s more waiting than working! Follow these steps exactly, and you won’t believe you made this incredible loaf. Remember, the long rest is what develops the flavor and those beautiful air bubbles that make this No Knead Cheese Herb Bread With Crispy Crust so satisfying.
Mixing and The Long Rest
First things first, grab your largest bowl. Whisk together your three cups of flour, the salt, and the active dry yeast. Make sure they are totally combined so you don’t end up with a salty pocket later on! Once they look uniform, pour in that warm water—remember, about 100 degrees F. Now, grab your wooden spoon and mix it all up until you have a shaggy, sticky mess. Don’t try to knead this! That’s the point!
Cover that bowl tightly, I mean really tight, with plastic wrap or a lid. Now, put it somewhere warmish and forget about it for a good 4 to 6 hours. Seriously, walk away. You’ll know it’s ready when the surface is bubbly, and the dough has doubled in size. It’s going to look wildly different from when you started, and that’s a good sign! You can find more baking inspiration on my Medium page.
Preparing for Baking and Flavor Inclusion
While the dough is finishing its rest, get your Dutch oven in the oven and start preheating to 450 degrees F. You need that thing screaming hot, so give it at least 30 minutes to heat up properly. This preheating is vital for that crispy crust!
When the oven is hot, lightly flour your counter and your hands. Gently scrape that bubbly dough out onto the flour. Now, you’re going to fold it over itself about four times. Don’t punch it down; just gently lift and fold. This is where we add the flavor! After the first fold, sprinkle a generous amount of your cheddar, chives, and thyme right on top. Fold the dough over that filling. Keep folding and sprinkling the cheese mix between each of the four folds. Once done, you want to shape it into one tight little ball—pull the sides under to create surface tension. Place that round seam-side down onto a sheet of parchment paper, cover it lightly with a towel, and let it sit for a quick 20 minutes while your Dutch oven gets even hotter.
Baking the No Knead Cheese Herb Bread With Crispy Crust
This next part requires a little bravery, but you can do it! Carefully pull out that blazing hot Dutch oven. Use the parchment paper as a sling to gently lower your dough right into the hot pot. Grab a very sharp knife—a razor blade works great if you have one—and score the top with one deep cut. This lets the steam escape in a controlled way.
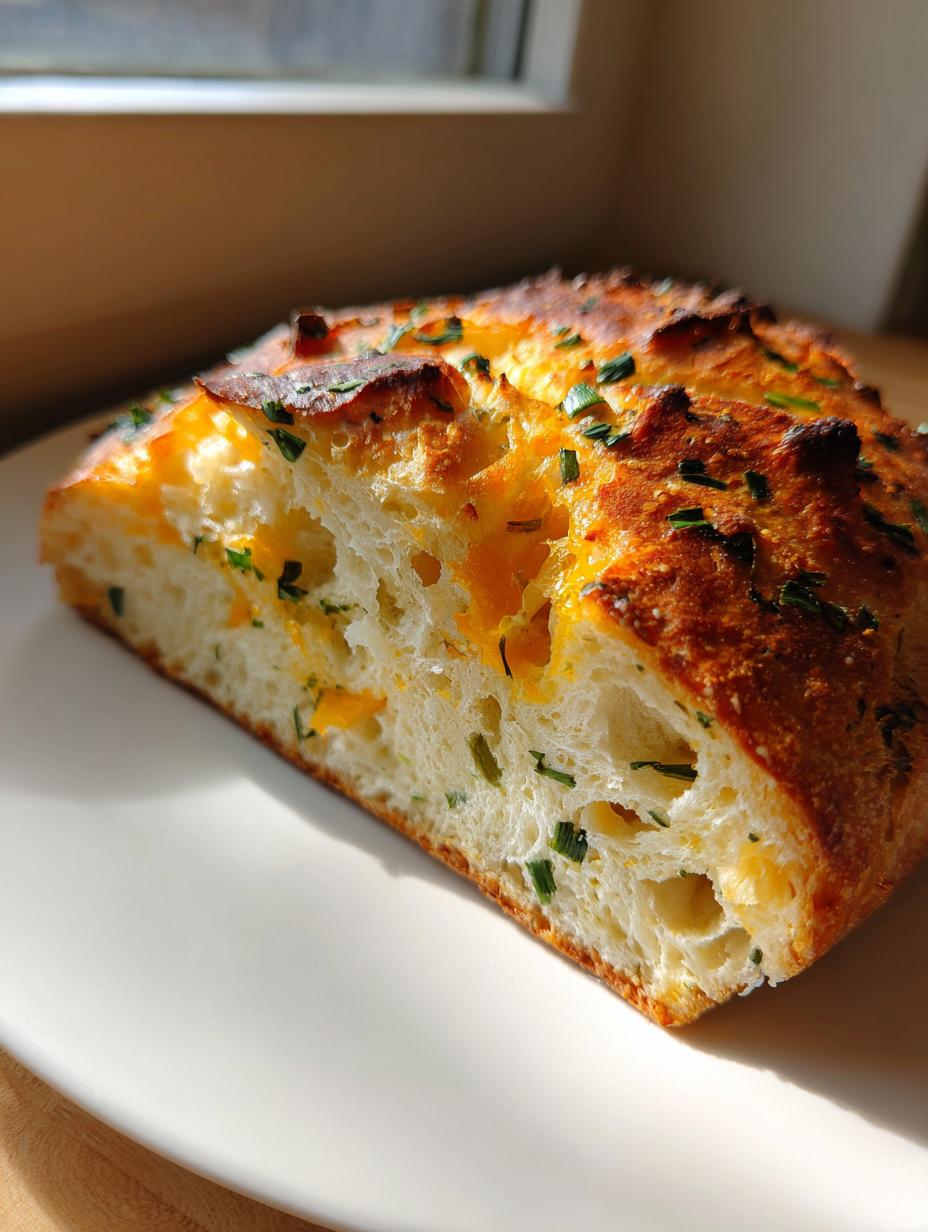
Put the lid back on immediately and pop it back in the oven. Bake it covered for 30 minutes. That trapped steam is building the structure for the perfect crust on your No Knead Cheese Herb Bread With Crispy Crust. After 30 minutes, take the lid off. Keep baking it uncovered for another 15 minutes. You are looking for a deep, rich golden brown color—it should look like it came straight from a professional bakery! If you are looking for other easy baking ideas, check out my easy breakfast pastries.
When it’s done, pull it out and let it cool on a rack for at least 10 minutes before you even think about slicing it. Trust me, cutting it too soon will just mush the soft center.
Pro Tips for an Exceptional No Knead Cheese Herb Bread With Crispy Crust
Even though this is called “no knead,” a few little tricks will take your No Knead Cheese Herb Bread With Crispy Crust from great to absolutely show-stopping. My biggest tip is about handling the dough during the folding stage. It’s sticky, I know! Don’t be tempted to add tons of extra flour; just keep your hands lightly dusted. Too much flour on the outside prevents that beautiful, crackly crust from forming.
When you fold the cheese and herbs in, try to distribute them evenly, but honestly, if you get a massive cheese pocket in one spot, that’s just a delicious surprise waiting for you! That cheese melts and steams right there in the center, making the crumb extra tender.
How do you know when this No Knead Cheese Herb Bread With Crispy Crust is truly done? After the final 15 minutes uncovered, if it looks deeply brown, give it a gentle tap on the bottom. If it sounds hollow, you’re golden! If it sounds dull or heavy, give it another five minutes uncovered. That hollow sound means the interior is cooked through and ready to set up properly as it cools. For more baking tips, follow my Pinterest board.
Storage and Reheating Your Savory Bread
This bread is truly best eaten the day it’s baked, especially while that crust is still singing, but leftovers are inevitable! You don’t want to waste any of this cheesy goodness. Keeping the texture right, especially that crispy exterior, while storing is the main battle here. Since we’ve got all that cheese and moisture inside, it tends to soften up overnight, but we can fix that easily.
Storage Guidelines
For short-term storage, just up to two days, keep your loaf on the counter wrapped loosely in a clean kitchen towel, or in a paper bag. If you wrap it too tightly in plastic right away, the trapped moisture will steam the crust right off, and we absolutely cannot have that on our No Knead Cheese Herb Bread With Crispy Crust. If you need to keep it longer, slice it first, wrap the slices tightly in plastic wrap, and pop them in the freezer for up to a month.
Reheating Methods
Reheating is key to bringing back that fresh-baked feel. Never microwave a slice! It turns chewy instantly. Instead, take your slice (or half a loaf, if you’re feeling ambitious) and place it directly onto a baking sheet. Pop it into a 350-degree oven for about five to seven minutes. That dry heat crisps the crust right back up beautifully. If you froze slices, just toss them straight from the freezer into that warm oven—no need to thaw! If you are looking for other savory bakes, try my savory cottage cheese breakfast muffins.
| Storage Method | Duration | Notes |
|---|---|---|
| Countertop (Airtight) | Up to 2 days | Best for maintaining some crust |
| Freezer | Up to 1 month | Wrap tightly before freezing |
Frequently Asked Questions About This Recipe
I get so many questions after people try this recipe for the first time. It’s easy to tweak, but some things you just shouldn’t mess with if you want that perfect loaf. People always ask about substitutions, especially since this is a no-knead recipe where the dough structure is so important.
Don’t worry if you don’t have every single herb listed, but when it comes to the cheese, stick with something sharp. The flavor really depends on it! Here are the questions I hear the most about making this bread.
Can I use whole wheat flour in this No Knead Cheese Herb Bread With Crispy Crust?
You certainly can try, but you have to know it will change things! Whole wheat flour absorbs much more water than all-purpose flour. If you swap all three cups for whole wheat, you might need to add another quarter cup of water just to get the dough to look shaggy and sticky. Also, because whole wheat has more bran, it can sometimes interfere with the yeast activity, so your rise might be a little slower. It will still be delicious, but you might lose a little bit of that extreme puffiness people love in the No Knead Cheese Herb Bread With Crispy Crust.
What is the ideal internal temperature for doneness?
I rely on the hollow sound test, but if you have an instant-read thermometer, use it! For a standard loaf, you are aiming for an internal temperature of 205 to 210 degrees F right in the center. If you check it when you remove the lid, it might read lower, so wait until after the final uncovered bake time. Hitting that temperature confirms your No Knead Cheese Herb Bread With Crispy Crust is cooked all the way through without drying out the cheesy center.
Q. Can I use dried herbs instead of fresh ones?
Yes, but use way less! For dried herbs, start with one teaspoon of dried chives and maybe half a teaspoon of dried thyme. Fresh herbs are so much brighter, though, so if you can swing it, go fresh!
Q. What if I don’t have a Dutch oven?
That’s tough because the Dutch oven creates the steam for the crust. If you absolutely must skip it, try baking the bread on a preheated pizza stone and place a broiler pan on the rack below it. Fill that lower pan with boiling water right before you put the bread in to create steam. It won’t be quite as perfect as the No Knead Cheese Herb Bread With Crispy Crust baked in cast iron, but it’s a decent workaround! For other bread recipes, check out my easy focaccia bread recipe.
Understanding the Nutrition of Your Loaf
We bake this bread because it tastes amazing and feels comforting, not necessarily because we’re counting calories, but it’s good to know what we’re eating! Since this recipe is heavy on the cheese and flour, it’s a hearty slice, perfect alongside soup or dipped in olive oil. Remember, these numbers are just estimates based on the ingredients listed, especially since cheese brands vary so much.
Here is the estimated nutritional breakdown for one slice of the No Knead Cheese Herb Bread With Crispy Crust. It’s packed with flavor and satisfying carbs!
| Component | Amount per Slice |
|---|---|
| Calories | 290 |
| Fat | 12 g |
| Carbohydrates | 34 g |
| Protein | 11 g |
Share Your Baking Experience
I just can’t wait to see what you create! This No Knead Cheese Herb Bread With Crispy Crust is so rewarding, and I love seeing your beautiful loaves pop up online. Did your cheese melt perfectly? Did that crust shatter just right?
Please leave a rating below and drop me a comment telling me how it went. Seriously, snap a picture and tag me! I read every single comment, and hearing about your success makes my whole week!
Print
Amazing No Knead Cheese Herb Bread With Crispy Crust 1
- Total Time: 1 hour
- Yield: 1 loaf about 8 slices 1x
- Diet: Vegetarian
Description
This no knead cheese herb bread bakes up with a crunchy crust, soft center, and melty cheese pockets using an easy hands off method. It is perfect for beginner bakers seeking bakery style results with minimal effort.
Ingredients
- 3 cups all purpose flour plus 1/4 cup for shaping
- 1 teaspoon salt
- 1/2 teaspoon active dry yeast
- 1 1/2 cups warm water about 100°F
- 1 1/2 cups shredded sharp cheddar cheese
- 1 cup thinly sliced chives
- 3 tablespoons fresh thyme leaves
Instructions
- Whisk together flour, salt, and yeast in a large bowl until evenly combined.
- Pour in the warm water and mix with a wooden spoon until a sticky dough forms.
- Cover the bowl tightly and let the dough rest at room temperature for 4 to 6 hours until doubled and bubbly on the surface.
- Place a covered Dutch oven in the oven and preheat to 450°F for at least 30 minutes.
- Lightly flour a work surface and your hands, then turn out the dough and fold it over itself four times.
- Sprinkle cheese, chives, and thyme between each fold, then shape the dough into a tight round.
- Place the dough seam side down on a sheet of parchment paper and cover loosely with a towel for 20 minutes.
- Carefully transfer the parchment and dough into the hot Dutch oven, score the top with a sharp knife, and cover with the lid.
- Bake covered for 30 minutes, then uncover and bake for 15 minutes until deep golden brown.
- Remove from the oven and cool for at least 10 minutes before slicing.
Notes
- Allowing the bread to cool slightly helps set the crumb and improves slicing.
- Prep Time: 15 minutes
- Cook Time: 45 minutes
- Category: Bread
- Method: Baking (Dutch Oven)
- Cuisine: American
Nutrition
- Serving Size: 1 slice
- Calories: 290
- Sugar: N/A
- Sodium: N/A
- Fat: 12 g
- Saturated Fat: N/A
- Unsaturated Fat: N/A
- Trans Fat: N/A
- Carbohydrates: 34 g
- Fiber: N/A
- Protein: 11 g
- Cholesterol: N/A