When I think about My Mother’s Peasant Bread, I think about comfort, but not the heavy kind that weighs you down. I’m Jordan Bell, coming to you from Asheville, NC, and if you’ve followed my journey at all, you know I spent years navigating comfort food that left me feeling sluggish. Losing over 80 pounds taught me that flavor doesn’t have to equal guilt; it just needs smart preparation. That’s why my blog focuses on clean takes on Southern comfort food.
But even when I’m eating clean, sometimes I just need something real—something that smells like home but doesn’t require me to spend an entire afternoon kneading dough. This recipe, my mother’s simple peasant bread, is that perfect answer. It’s ridiculously easy. You literally mix it, walk away, and come back to perfect, crusty loaves. It fits right into my philosophy: maximum flavor and satisfaction with minimal fuss.
This bread proves that you don’t need fancy techniques or endless kneading sessions to get that gorgeous, rustic crust we all love. It’s the perfect beginner’s bread, or the perfect loaf for when you’re just too tired to work a mixer!
Why You Will Love My Mother’s Peasant Bread
I know you’re busy. Between work, life, and maybe trying to eat a little cleaner like I do, who has time for complicated baking projects? That’s the beauty of this recipe—it delivers huge results with almost no effort on your part. Seriously, you mix it up in ten minutes, and the oven does the hard work. If you need a foolproof way to get wonderfully rustic bread on the table without breaking a sweat, My Mother’s Peasant Bread is your new best friend.
It’s the kind of bread that makes your kitchen smell incredible and tastes like you spent hours on it. Here’s why this simple loaf keeps showing up on my weekly menu:
Quick Preparation Time
The active time here is shockingly low. I mean it when I say it takes about ten minutes, tops, to mix everything together. You’re just combining dry ingredients, adding water, and walking away. There’s no kneading, no wrestling with sticky dough—just pure, hands-off magic while the yeast gets happy. That’s my kind of cooking!
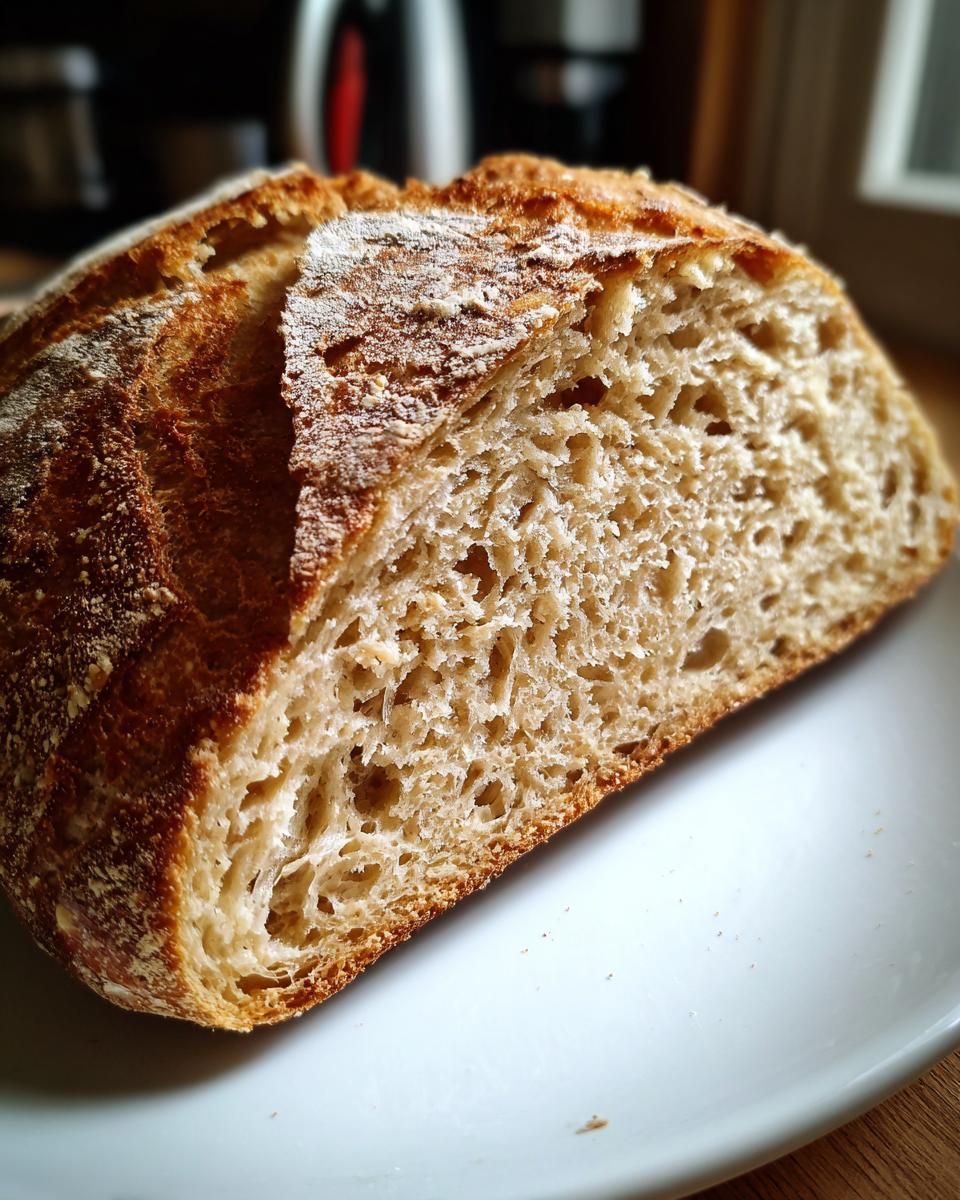
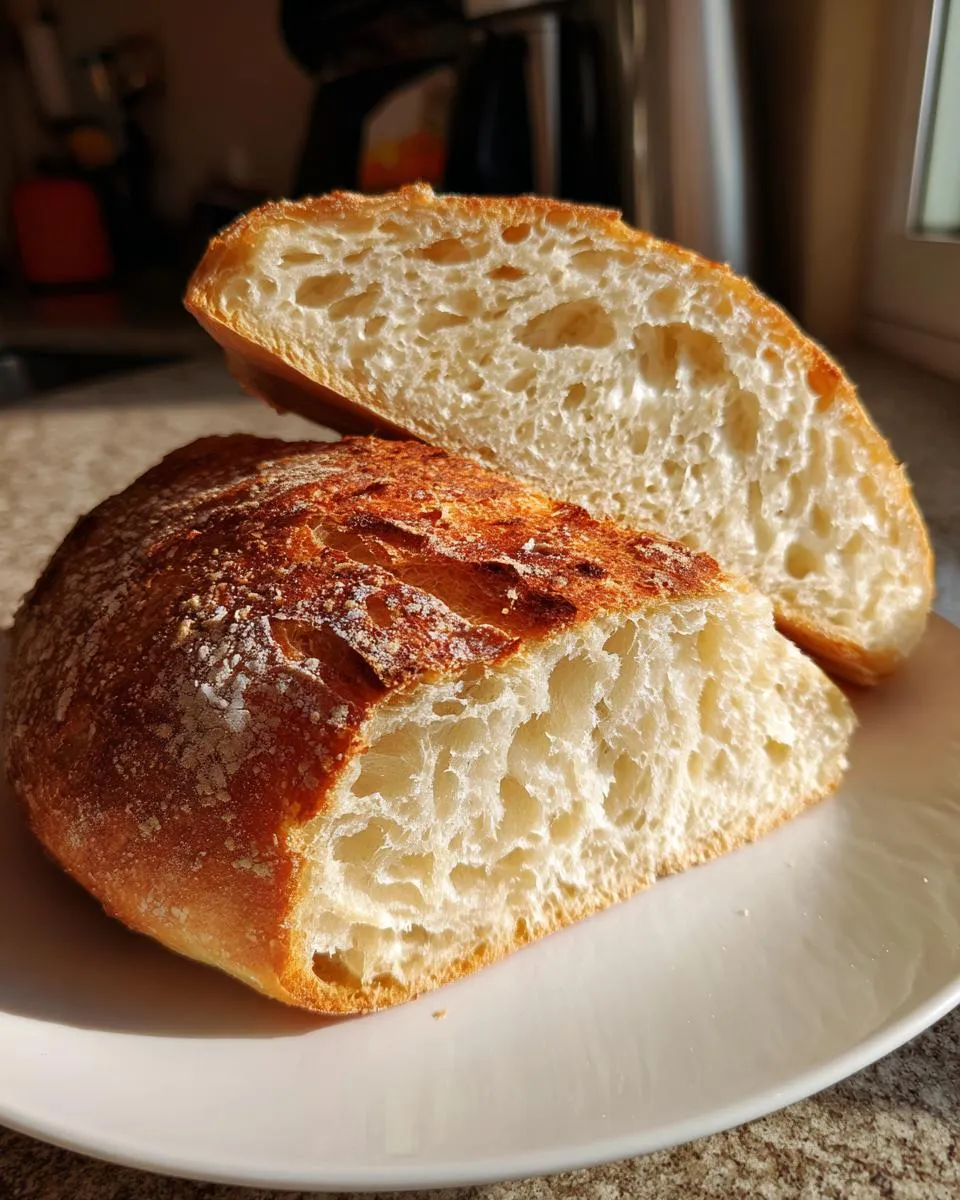
Authentic Rustic Texture
Baking this in bowls creates such a stunning result. You get this deep, crackly, golden-brown crust that just screams “artisan bakery.” But when you slice into it? Oh my gosh, the inside is soft, airy, and wonderfully chewy. It’s the perfect contrast, and it makes amazing toast or the best base for dipping into soup. If you are looking for other simple, satisfying recipes, check out my homemade bread recipe.
Minimal Ingredient Requirements
You won’t need to run to a specialty store for this bread, either. That’s the peasant bread promise! This recipe relies almost entirely on pantry staples you probably already have on hand. Flour, salt, yeast, water, and a touch of sugar. It’s proof that the simplest ingredients, handled correctly, make the best food.
Gathering Ingredients for My Mother’s Peasant Bread
Okay, even though this is the easiest bread recipe ever, we still need to respect the ingredients. Bread baking is chemistry, right? My mom always stressed that while the technique is minimal, the measurements have to be pretty close, especially when dealing with yeast and water temperature. Don’t worry, you don’t need a fancy scale for everything, but having the right amounts makes all the difference between a good loaf and a spectacular one.
When you gather everything for My Mother’s Peasant Bread, take a quick peek at what you need. We are keeping it simple, relying on basic pantry items to create something truly special.
Precise Measurement Guide for My Mother’s Peasant Bread
Here is the exact list we use every time. I’ve included the weight measurements too, because they are just so much more accurate when you’re making bread!
Ingredient Table
| Ingredient | Volume Measurement | Weight Measurement | Preparation Note |
|---|---|---|---|
| All-purpose or Bread Flour | 4 cups | 512 g | Unbleached preferred |
| Kosher Salt | 2 teaspoons | 10 g | |
| Water | 2 cups | 454 g | Lukewarm (1.5 cups cold + 0.5 cup boiling) |
| Sugar | 2 teaspoons | 8 g | |
| Instant Yeast | 2 teaspoons | 8 g | |
| Butter | About 2 tablespoons | N/A | Room temperature, for greasing |
Ingredient Notes and Substitutions
The only thing we really need to prep is that water—make sure it’s lukewarm, not hot, or you’ll shock the yeast! For the flour, my mom always used whatever good all-purpose flour she had, but if you want a little more chew, bread flour works like a charm. And that butter? It’s just for greasing the bowls so the crust doesn’t stick, so any butter you have on hand works perfectly fine for that step.
Essential Equipment Needed for This Recipe
You don’t need a stand mixer or fancy proofing baskets for this recipe, which is why I love it so much! We are keeping the equipment list super streamlined. However, there are two pieces of gear that are absolutely non-negotiable if you want that signature crackly crust that makes My Mother’s Peasant Bread so famous.
Choosing Your Baking Vessels
This is the secret weapon: You must bake this bread inside a vessel that can handle the high heat of the oven. We use two oven-safe bowls—Pyrex or any heavy, oven-safe ceramic or glass bowl works beautifully. They need to be about 1-quart or 1.5-quart size. These bowls trap the steam released by the dough during the first part of baking. That steam is what keeps the crust soft initially so the loaf can expand fully before it hardens into that perfect, rustic shell.
Step-by-Step Instructions for My Mother’s Peasant Bread
Now for the fun part—watching your dough turn into amazing bread! This is where you get to see why this recipe is so popular. It’s mostly hands-off time, but the little bit of active work you do makes all the difference in the final texture of My Mother’s Peasant Bread.
Mixing the Dough: The First Step of My Mother’s Peasant Bread
Grab a really big bowl—you need room for this dough to grow! First, whisk together all your dry ingredients: the flour, salt, sugar, and instant yeast. Make sure those are evenly distributed; we don’t want a pocket of pure salt hiding somewhere! Once they’re happy together, pour in the lukewarm water. Remember that lukewarm water trick? It wakes up the yeast just right. Mix it all with a wooden spoon or a rubber spatula until you can’t see any more dry flour streaks. It’s going to look shaggy and messy. Don’t even think about kneading it! Just stop mixing when it’s absorbed.
The First Rise: Developing Flavor
Cover that bowl tightly with plastic wrap or a clean kitchen towel. Now, we need warmth for the yeast to work its magic. Find a warm spot. My secret? I preheat my oven for just one minute, then turn it off immediately. The residual heat creates a perfect little cozy environment, but you must make sure the oven temperature stays below 100 degrees Fahrenheit, or you’ll kill your yeast! Let the dough sit in this warm haven for at least an hour. If your kitchen is chilly, give it up to two hours. You’ll know it’s ready when it’s doubled in size and bubbly.
Shaping and Second Rise Preparation
Preheat your main oven to 425°F while the dough finishes its rise. Next, prepare your bowls. Take your two oven-safe bowls and grease them generously with about a tablespoon of room temperature butter inside each one. This prevents sticking later! Now, gently punch the dough down with two sturdy forks to release the air. Using those same forks, pull the dough apart gently right down the center to divide it into two equal halves. Scoop each portion out and carefully place one half into each buttered bowl. Let them rest uncovered near the warming oven for 20 to 30 minutes. They should puff up nicely, maybe reaching the rim of the bowl, but don’t let them get too big! If you want to see more of my kitchen tips, follow me on Medium.
Baking My Mother’s Peasant Bread to Perfection
Time for the heat! Carefully place the bowls (with the dough inside) onto the middle rack of your 425°F oven. Bake them untouched for exactly 15 minutes. This high heat sets that beautiful crust. After 15 minutes, do not open the door! Reduce the oven temperature down to 375°F and continue baking for another 15 to 17 minutes. This lower temperature finishes cooking the center without burning the outside. You’re looking for a deep golden-brown color across the top.
Final Checks and Cooling
Once the time is up, pull the bowls out. Very carefully, turn each loaf out onto a wire cooling rack. Give the bottom of the loaf a little tap—if it sounds hollow, you nailed it! If the crust looks a little pale or soft, don’t panic. Just pop the loaves directly onto the oven rack (no bowls now!) and bake for about 5 more minutes to crisp things up. The most important rule here: Let the bread cool for at least 10 minutes before slicing. If you cut into it too soon, all that beautiful steam escapes, and the inside gets gummy. Patience pays off! For more easy recipes, check out my easy chicken salad recipe.
Tips for Success with Rustic Bread Baking
Even though My Mother’s Peasant Bread is foolproof, a few little tricks will take your loaves from great to absolutely unforgettable. Since this is a no-knead recipe, we rely heavily on temperature and timing to guide the dough. Think of it this way: we are helping the yeast do all the heavy lifting!
Controlling Dough Temperature
I can’t stress this enough: use lukewarm water, not tap-hot water. If the water is too hot, you essentially kill the yeast before it even gets started, and your dough won’t rise at all. Lukewarm means just barely warm to the touch—think of a comfortable baby bath. When the water is just right, the yeast wakes up happy and starts producing those lovely gases that give the bread its structure and flavor during that first long rise.
Understanding the Second Rise
The second rise is quick—only 20 to 30 minutes, and we don’t cover it. This stage is crucial for the final shape. If you let it go too long, the dough will over-proof. When that happens, the internal structure gets too weak. When you finally put it in the hot oven, instead of rising up beautifully in that bowl, it might just collapse or spread out flat. We want height and that gorgeous dome shape, so watch the clock closely during that short second rest! If you love easy comfort food, you might enjoy my creamy oven-baked chicken thighs recipe.
Frequently Asked Questions About My Mother’s Peasant Bread
I get so many lovely emails asking about tweaks and troubleshooting for this recipe! It’s one of those recipes that seems simple, but people always have specific questions about their kitchen setup. Don’t worry if you run into a snag; we can usually fix it easily. Here are the most common things folks ask when making My Mother’s Peasant Bread.
Can I make this a one-loaf recipe?
Absolutely! If you only need one rustic loaf, just cut every single ingredient in half—half the flour, half the water, etc. You’ll just need one oven-safe bowl instead of two. Since the loaf is smaller, you might find it cooks through just a tiny bit faster, so start checking for that hollow sound around the 28-minute mark total baking time, just to be safe!
What if I don’t have oven-safe bowls?
That’s a fair question! If you don’t have those specific bowls, you need something that traps steam. The next best thing is a Dutch oven. If you have a 5-quart or 6-quart Dutch oven, you can bake the entire doubled recipe in it—just make sure you let the dough rise in one big bowl first. If you want to stick to two loaves, use two smaller Dutch ovens, or even use a heavy baking sheet lined with parchment, but you’ll need to place a metal pan full of hot water on the rack below to create that steam we need for a good crust!
Why is my dough sticky after mixing?
If your dough feels sticky after you mix in the water, that’s totally normal for this no-knead bread style! Remember, we aren’t developing gluten structure through kneading; we are letting time do that work. Because we use less flour than traditional recipes, the dough stays wetter and shaggier. As long as you can’t see any dry flour hiding at the bottom of the bowl, you’re good to go. Just cover it up and let it rest! You can find more tips and inspiration on our Pinterest page.
Storing Your Homemade Bread
This bread is so good, you might not have leftovers, but just in case you do, we want to make sure it stays delicious for a day or two. Because this is a rustic, crusty loaf, we treat it differently than soft sandwich bread. The worst thing you can do is wrap it up tight in plastic wrap right away—that traps moisture and makes that beautiful crust turn soft and chewy in a bad way!
My mother always insisted on keeping it wrapped simply to protect it from dust, but allowing it to breathe. Follow these simple steps, and you’ll enjoy that fresh-baked taste long after it comes out of the oven.
Best Practices for Storing My Mother’s Peasant Bread
The rule for this bread is room temperature only, and never airtight. For up to two days, the best way to keep My Mother’s Peasant Bread fresh is to wrap it loosely in a clean, dry kitchen towel. This allows the crust to stay crisp while keeping the interior from drying out too quickly. If you have a bread box, that works too! Don’t put it in the fridge; the cold temperature actually makes bread go stale faster.
Storage and Reheating Guide
If you need it to last longer than two days, your freezer is your friend. Slice the bread first, then wrap the slices tightly in foil before placing them in a freezer bag. Here is a quick guide for keeping your loaves perfect:
| Storage Method | Duration | Reheating Tip |
|---|---|---|
| Room Temperature (Wrapped in towel) | Up to 2 days | A quick 5 minutes in a 350°F oven revives the crust! |
| Frozen (Foil wrapped) | Up to 3 months | Thaw on the counter, then reheat as above. |
Share Your Experience with This Recipe
I truly hope you enjoyed making this simple loaf. There’s nothing better than pulling that perfect, rustic bread out of your own oven. If you tried My Mother’s Peasant Bread and loved the crackly crust, please leave a rating below! I’d also love to hear how it turned out in your kitchen—tell me if you ate it still warm with just a smear of butter! If you are looking for another simple, satisfying recipe, try my homemade chili flavor recipe.
Print
My Mother’s Peasant Bread: 1 Amazing Loaf
- Total Time: 2 hours 27 minutes
- Yield: 2 loaves 1x
- Diet: N/A
Description
My Mother’s Peasant Bread is the simplest bread you will prepare. This recipe yields two rustic, delicious loaves with minimal effort. You mix the ingredients, let it rise twice, and bake it in oven-safe bowls for a perfect crust.
Ingredients
- 4 cups (512 g) unbleached all-purpose or bread flour
- 2 teaspoons (10 g) kosher salt
- 2 cups (454 g) lukewarm water (1.5 cups cold water mixed with 0.5 cup boiling water)
- 2 teaspoons (8 g) sugar
- 2 teaspoons (8 g) instant yeast
- About 2 tablespoons room temperature butter for greasing
Instructions
- In a large bowl, whisk together the flour, salt, sugar, and instant yeast.
- Add the water and mix until the flour is fully absorbed.
- Cover the bowl and let the dough rise in a warm spot for at least one hour, up to two hours in cooler conditions. (To warm a spot, preheat the oven for one minute, then turn it off; aim for below 100ºF).
- Preheat your oven to 425ºF. Grease two 1-qt or 1.5-qt oven-safe bowls with about one tablespoon of butter each.
- Punch down the dough using two forks and scrape it from the bowl sides.
- Divide the dough into two equal parts by pulling it apart from the center with the forks.
- Scoop each half and place it into the prepared bowls.
- Let the dough rise again for 20 to 30 minutes near the oven or in a warm spot until it reaches just below or above the bowl tops. Do not cover the bowls for this second rise.
- Bake for 15 minutes at 425ºF.
- Reduce the temperature to 375ºF and bake for an additional 15 to 17 minutes.
- Remove the loaves from the oven and turn them onto cooling racks.
- If the loaves look pale or soft, return them to the oven (out of the bowls) and bake for about 5 more minutes.
- Cool the bread for 10 minutes before you cut into it.
Notes
- Use Pyrex or similar oven-safe bowls for the best results.
- A fully baked loaf will sound hollow when you tap the bottom.
- Store the bread at room temperature, wrapped in a clean towel, for up to 2 days.
- Prep Time: 10 minutes
- Cook Time: 35 minutes
- Category: Bread
- Method: Baking
- Cuisine: American
Nutrition
- Serving Size: 1 loaf slice
- Calories: N/A
- Sugar: N/A
- Sodium: N/A
- Fat: N/A
- Saturated Fat: N/A
- Unsaturated Fat: N/A
- Trans Fat: N/A
- Carbohydrates: N/A
- Fiber: N/A
- Protein: N/A
- Cholesterol: N/A