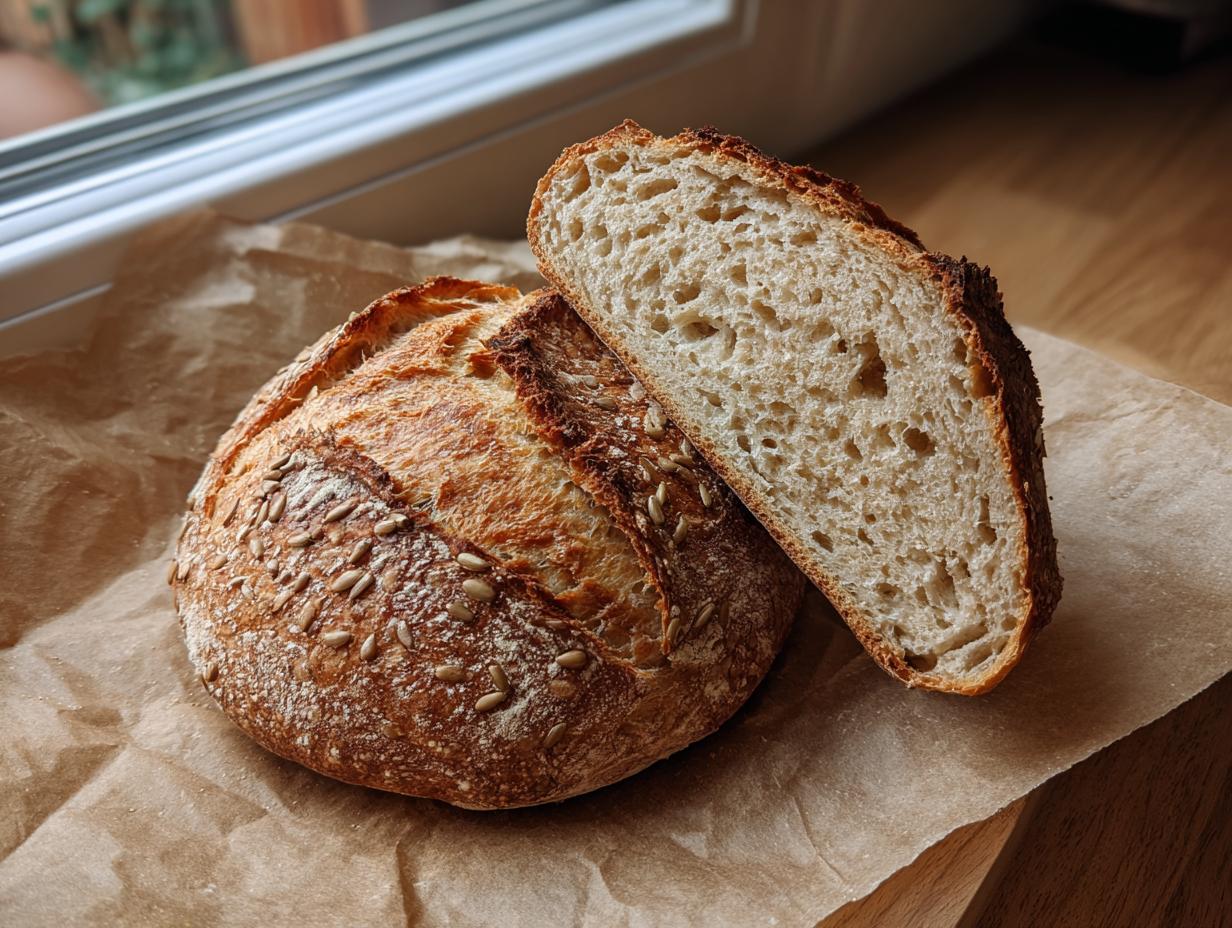
Oh, you are going to absolutely love this! If you thought making real sourdough was all about endless kneading and complicated schedules, you were wrong. Seriously, this Multiseed No-Knead Sourdough Bread is my current obsession because it gives you that incredible, tangy flavor and that satisfying crackle of a crust without any of the heavy lifting. It’s the best of both worlds, really.
I spent ages trying to get the perfect texture in a no-knead loaf, and the secret really is letting time do the work for you. We’re just mixing a few simple things together—flour, water, that bubbly starter—and then tossing in a whole garden of seeds for texture. Trust me when I say that once you see that dough puff up after the long rest, you’ll feel like a total baking wizard.
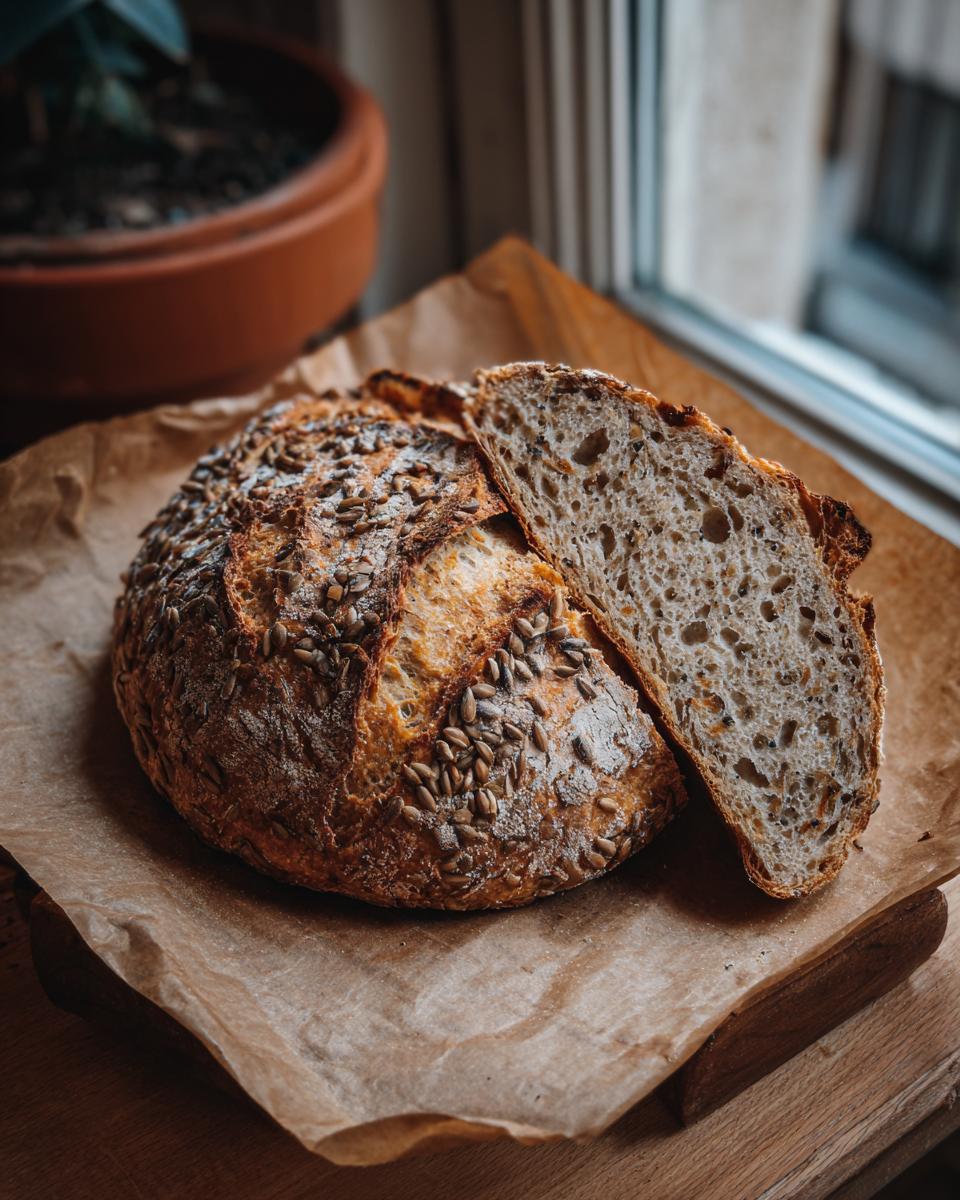
This recipe is perfect for beginners who are scared of the sourdough process, but even seasoned bakers will appreciate how hands-off it is. We’re relying on a long, slow fermentation overnight to build all that complex flavor. Just wait until you pull that steaming loaf out of the Dutch oven—the smell alone is worth the effort!
Essential Components for Your Multiseed No-Knead Sourdough Bread
Baking is chemistry, right? Well, maybe not entirely, but when you’re making something as nuanced as Multiseed No-Knead Sourdough Bread, you absolutely have to respect your ingredients. I learned the hard way that sloppy measuring leads to sad, flat bread. So, we’re going to be super clear about what goes in this bowl so we get that gorgeous rise and hearty crumb we’re aiming for.
I’ve laid out the exact list below. Pay close attention to the state of the starter and the water—that makes a huge difference in how quickly your dough wakes up! We want clarity so there are zero surprises when you mix everything together.
Ingredient Specifications and Preparation
Make sure your starter is active and bubbly—you need that life in the mix! Also, the salt needs to be fine so it dissolves completely during the initial mix. Every measurement matters here, so grab your scale if you can, but the cups and spoons listed will work just fine if you’re careful!
- Active sourdough starter (needs to be fed recently!)
- Water, room temperature (no cold shocks for the yeast!)
- Bread flour and whole wheat flour
- Sunflower seeds, pumpkin seeds, flax seeds, and sesame seeds
- Fine salt (this is important for dissolving)
Required Tools for Perfect Multiseed No-Knead Sourdough Bread
You don’t need a fancy stand mixer for this, which is the beauty of the no-knead method! But there are a couple of tools that are absolutely non-negotiable if you want that amazing crust on your Multiseed No-Knead Sourdough Bread. The main player here is the heavy pot we bake it in. That traps the steam, and steam is what gives you that professional-looking, blistered crust, trust me.
Gathering these items first means the actual mixing process is super fast, so you can get it covered and resting before you even think about cleaning up.
Equipment Checklist
- A large mixing bowl (big enough to let the dough expand!)
- A Dutch oven with a tight-fitting lid (this is your oven inside an oven)
- Parchment paper (lifesaver for moving the dough)
- A sharp knife or lame for scoring the top
- A cooling rack
Step-by-Step Instructions for Multiseed No-Knead Sourdough Bread
Okay, here’s where the magic happens! Don’t let the long fermentation time scare you; the actual hands-on time for this Multiseed No-Knead Sourdough Bread is maybe 15 minutes total. We are relying on that slow rest to develop flavor and structure. Read these steps through once before you touch anything so you know the timeline!
Mixing the Dough and Initial Rest
First things first, grab your big bowl and whisk together that active starter with your room temperature water until it looks a little cloudy. That’s the sign the yeast is happy! Next, toss in all your dry ingredients: the two flours, all those seeds—sunflower, pumpkin, flax, sesame—and of course, the salt. Now, take a sturdy spoon or a spatula and just stir everything together. You need to mix until there is absolutely no dry flour hiding anywhere at the bottom. It will look messy and sticky, almost like thick oatmeal. Cover that bowl tightly and let it sit on the counter for 30 minutes. This gives the flour a little head start to hydrate before we do any folding.
Developing Structure and Bulk Fermentation
When that 30 minutes is up, it’s time for our one and only structural work. Wet your hands slightly so the dough doesn’t stick too much. Gently reach under one side of the dough, lift it up, and fold it over itself towards the center. Rotate the bowl and do that three more times until you’ve folded all four sides. That’s it—one set of stretch and folds! Cover it back up and let it ferment at room temperature. This bulk fermentation stage usually takes about 3 to 4 hours. You’ll know it’s ready when the dough has clearly puffed up, looks airy, and you see little bubbles breaking the surface.
Shaping, Final Rest, and Oven Preheating
Once your bulk ferment is done, gently turn the sticky dough out onto a surface that you’ve only lightly dusted with flour. You don’t want to deflate all those lovely bubbles we just built! Gently coax the edges into a round shape, pulling the surface tight, and place it seam-side down onto a piece of parchment paper. Cover it loosely and let it rest for a quick 30 minutes while your oven gets screaming hot. This resting time relaxes the dough before baking. Remember, you MUST place your Dutch oven, lid and all, inside the oven while it preheats to 450°F for at least 30 minutes. A hot pot is crucial!
Baking and Achieving the Ideal Crust
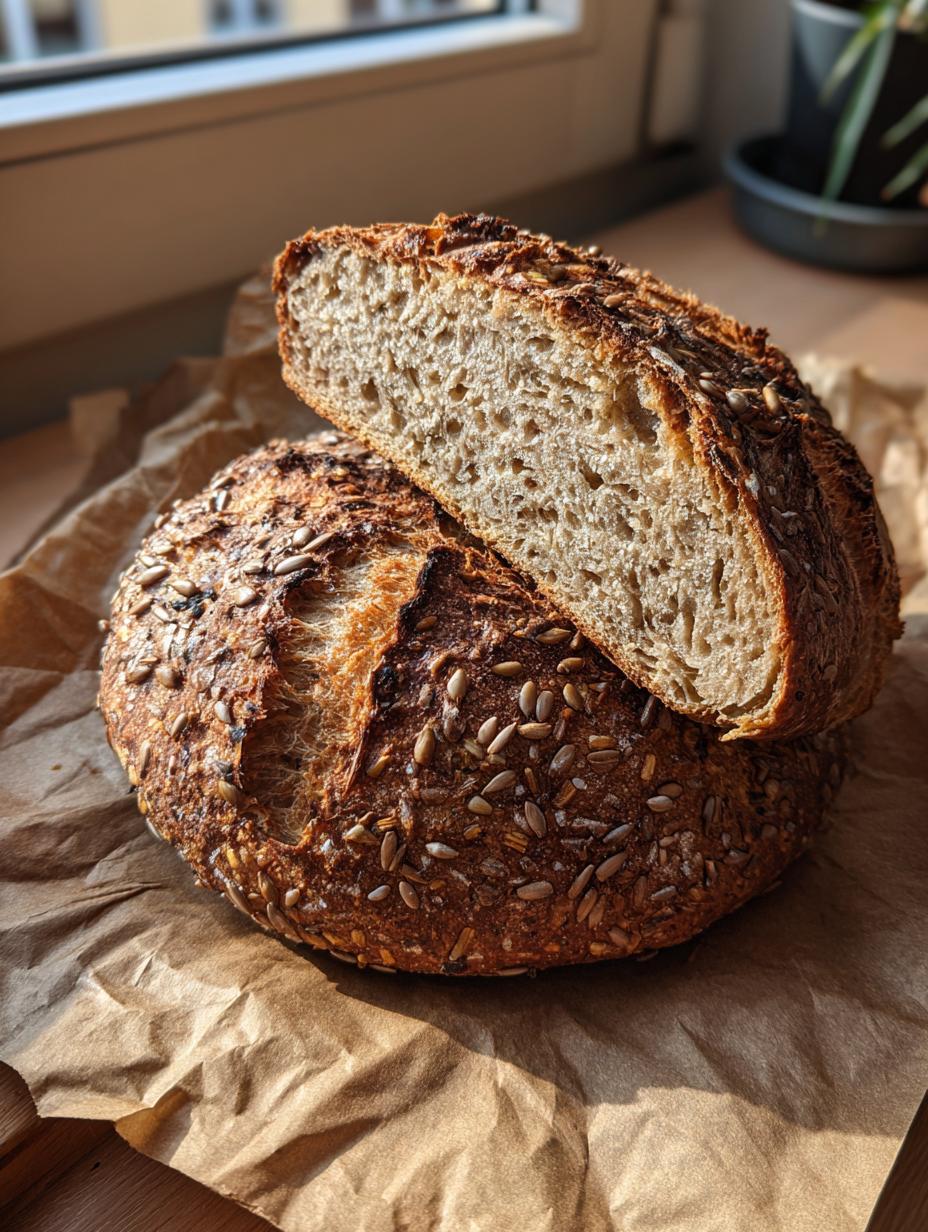
Carefully pull out that hot Dutch oven—be careful, it’s scorching! Score the top of your rested dough quickly with a sharp knife, then use the parchment paper sling to gently lower the dough into the pot. Pop the lid on right away and bake for 30 minutes at 425°F. After those 30 minutes, take the lid off, lower the oven temperature down to 400°F, and bake for another 15 to 20 minutes until the crust is deep golden brown. The internal temperature should hit about 200°F. Finally, the hardest part: take it out and let your Multiseed No-Knead Sourdough Bread cool completely on a rack for at least 2 hours before you even think about slicing it. Seriously, don’t cheat this part!
Why This Multiseed No-Knead Sourdough Bread Works For You
This recipe isn’t just another bread; it’s a guaranteed win for your weeknight schedule and your taste buds. The combination of the ease of the no-knead method paired with the texture from the seeds creates something truly special. I love pulling this loaf out of the oven and hearing that crust crackle!
- Hands-Off Flavor Development: The long, slow fermentation means your starter does all the heavy lifting, developing rich, complex sourdough flavor without you having to punch dough down every hour.
- Amazing Seed Crunch: The blend of four different seeds means every slice of your Multiseed No-Knead Sourdough Bread has a satisfying, wholesome chew and texture that store-bought bread just can’t match.
- Beginner Friendly: If you’ve been intimidated by sourdough, this is your entry point. One simple fold is all the structure work required!
- Sturdy Crumb: Perfect for thick slices of toast or holding up to heavy sandwiches.
Benefits of the No-Knead Sourdough Technique
Honestly, the best part of this technique is the minimal cleanup and the huge payoff. You mix it up in the morning or evening, leave it alone, and come back to a dough ready to shape. That overnight rest breaks down the starches beautifully, meaning you get amazing digestibility along with incredible taste, all without breaking a sweat.
Tips for Success with Your Multiseed No-Knead Sourdough Bread
Even though this is called “no-knead,” there are still a few little secrets I’ve picked up over the years that keep my Multiseed No-Knead Sourdough Bread from turning into a brick. Pay attention to your starter and your cooling rack, and you’ll be set! If you want to see more baking tips, check out my latest posts.
Managing Starter Activity and Water Temperature
If your kitchen is a little chilly, your bulk fermentation might take longer than the 3 to 4 hours I suggested. That’s fine! The dough will tell you when it’s ready—it needs to look puffy. Crucially, make sure your water is truly room temperature, not cold from the tap. Cold water slows down the starter activity way too much, and you’ll end up waiting all day long for that dough to wake up.
The Critical Cooling Period
I know, I know, the smell is intoxicating. You pull that beautiful loaf out, and you want to slice into it immediately. Don’t! You absolutely must let this bread cool completely on a wire rack for at least two hours. If you cut it hot, the steam escapes too fast, and the inside crumb will turn gummy and wet. Patience here ensures that perfect, slightly chewy texture we worked so hard for.
Storing and Reheating Your Homemade Multiseed Sourdough
Once you’ve managed to wait for it to cool, you want to keep that crust crisp for as long as possible! Storing your Multiseed No-Knead Sourdough Bread correctly makes a huge difference in its day-two texture. I always prefer keeping it simple.
Best Practices for Storage
Do not, I repeat, do not put this bread in the refrigerator! That actually makes it go stale faster. Keep the loaf cut-side down on a clean wooden cutting board, or wrap it loosely in a clean linen or cotton tea towel. If you have a lot left over after a couple of days, slice it up and freeze what you won’t eat right away. It freezes beautifully! For more quick meal ideas, check out this easy sheet pan lemon garlic salmon.
Reheating for a Fresh-Baked Experience
If you’ve frozen slices, just pop them straight into the toaster. For a larger piece or half a loaf, just spritz the crust lightly with a little water, wrap it loosely in foil, and put it back in a 350°F oven for about 8 to 10 minutes. It comes out tasting almost like it just came out of the Dutch oven!
Frequently Asked Questions About Multiseed No-Knead Sourdough Bread
I get asked the same few things about this recipe all the time, so let’s tackle them head-on. Most issues people run into just come down to starter health or temperature control, so keep those in mind!
Question Examples and Answers
Q1. Can I use different seeds, or should I stick to this mix?
You absolutely can switch up the seeds! Feel free to swap in some hemp seeds or poppy seeds. Just try to keep the total volume of seeds close to what I listed. If you add too many seeds, the dough structure might struggle during the bulk ferment because the seeds displace the flour.
Q2. What if my kitchen is cold, say below 70°F?
If your kitchen is cold, your bulk fermentation time will definitely be longer—maybe 6 or even 8 hours! That’s fine! The dough will tell you when it’s ready—it needs to look puffy. Don’t panic or add more starter. Just let it go until it looks visibly bubbly. You might need to start it earlier in the day or use slightly warmer water to give it a boost.
Q3. How do I know if my sourdough starter is active enough for this recipe?
Your starter should at least double in size within 4 to 6 hours after feeding. When you mix it with water for the recipe, it should look cloudy and pour easily. If it’s dense and struggling to rise, give it another feeding or two before trying to make this Multiseed No-Knead Sourdough Bread.
Nutritional Estimates for Multiseed No-Knead Sourdough Bread
Since we are packing this loaf with whole wheat flour and tons of seeds, it’s a much heartier slice than plain white bread, which is great for keeping you full! Please remember these numbers are estimates based on the ingredients I used; your exact figures might vary slightly depending on your flour brand and seed quantities.
Estimated Nutritional Data Table
| Nutrient | Estimate Per Slice (1/12th Loaf) |
|---|---|
| Calories | 165 |
| Protein | 6 g |
| Carbohydrates | 28 g |
| Fat | 3 g |
Share Your Multiseed No-Knead Sourdough Bread Success
I am so excited for you to try this loaf! When you finally pull that gorgeous, crackly, seedy loaf out of the oven, I want to see it! Please leave a comment below telling me how your bake went, or share a picture online. There is nothing better than seeing happy bakers enjoying their Multiseed No-Knead Sourdough Bread! You can also follow my Pinterest for more inspiration.
Why This Multiseed No-Knead Sourdough Bread Works For You
This recipe isn’t just another bread; it’s a guaranteed win for your weeknight schedule and your taste buds. The combination of the ease of the no-knead method paired with the texture from the seeds creates something truly special. I love pulling this loaf out of the oven and hearing that crust crackle!
- Hands-Off Flavor Development: The long, slow fermentation means your starter does all the heavy lifting, developing rich, complex sourdough flavor without you having to punch dough down every hour.
- Amazing Seed Crunch: The blend of four different seeds means every slice of your Multiseed No-Knead Sourdough Bread has a satisfying, wholesome chew and texture that store-bought bread just can’t match.
- Beginner Friendly: If you’ve been intimidated by sourdough, this is your entry point. One simple fold is all the structure work required!
- Sturdy Crumb: Perfect for thick slices of toast or holding up to heavy sandwiches.
Benefits of the No-Knead Sourdough Technique
Honestly, the best part of this technique is the minimal cleanup and the huge payoff. You mix it up in the morning or evening, leave it alone, and come back to a dough ready to shape. That overnight rest breaks down the starches beautifully, meaning you get amazing digestibility along with incredible taste, all without breaking a sweat.
Tips for Success with Your Multiseed No-Knead Sourdough Bread
Even though this is called “no-knead,” there are still a few little secrets I’ve picked up over the years that keep my Multiseed No-Knead Sourdough Bread from turning into a brick. Pay attention to your starter and your cooling rack, and you’ll be set!
Managing Starter Activity and Water Temperature
If your kitchen is a little chilly, your bulk fermentation might take longer than the 3 to 4 hours I suggested. That’s fine! The dough will tell you when it’s ready—it needs to look puffy. Crucially, make sure your water is truly room temperature, not cold from the tap. Cold water slows down the starter activity way too much, and you’ll end up waiting all day long for that dough to wake up.
The Critical Cooling Period
I know, I know, the smell is intoxicating. You pull that beautiful loaf out, and you want to slice into it immediately. Don’t! You absolutely must let this bread cool completely on a wire rack for at least two hours. If you cut it hot, the steam escapes too fast, and the inside crumb will turn gummy and wet. Patience here ensures that perfect, slightly chewy texture we worked so hard for.
Storing and Reheating Your Homemade Multiseed Sourdough
Once you’ve managed to wait for it to cool, you want to keep that crust crisp for as long as possible! Storing your Multiseed No-Knead Sourdough Bread correctly makes a huge difference in its day-two texture. I always prefer keeping it simple.
Best Practices for Storage
Do not, I repeat, do not put this bread in the refrigerator! That actually makes it go stale faster. Keep the loaf cut-side down on a clean wooden cutting board, or wrap it loosely in a clean linen or cotton tea towel. If you have a lot left over after a couple of days, slice it up and freeze what you won’t eat right away. It freezes beautifully! If you need a quick dinner idea to go with this bread, try this chicken noodle soup.
Reheating for a Fresh-Baked Experience
If you’ve frozen slices, just pop them straight into the toaster. For a larger piece or half a loaf, just spritz the crust lightly with a little water, wrap it loosely in foil, and put it back in a 350°F oven for about 8 to 10 minutes. It comes out tasting almost like it just came out of the Dutch oven!
Frequently Asked Questions About Multiseed No-Knead Sourdough Bread
I get asked the same few things about this recipe all the time, so let’s tackle them head-on. Most issues people run into just come down to starter health or temperature control, so keep those in mind! It’s easy to troubleshoot once you know what to look for.
Question Examples and Answers
Q1. Can I use different seeds, or should I stick to this mix?
You absolutely can switch up the seeds! Feel free to swap in some hemp seeds or poppy seeds. Just try to keep the total volume of seeds close to what I listed. If you add too many seeds, the dough structure might struggle during the bulk ferment because the seeds displace the flour. This Multiseed No-Knead Sourdough Bread is flexible, but don’t go overboard!
Q2. What if my kitchen is cold, say below 70°F?
If your kitchen is cold, your bulk fermentation time will definitely be longer—maybe 6 or even 8 hours! That’s fine! The dough will tell you when it’s ready—it needs to look puffy. Don’t panic or add more starter. Just let it go until it looks visibly bubbly. You might need to start it earlier in the day or use slightly warmer water to give it a boost.
Q3. How do I know if my sourdough starter is active enough for this recipe?
Your starter should at least double in size within 4 to 6 hours after feeding. When you mix it with water for the recipe, it should look cloudy and pour easily. If it’s dense and struggling to rise, give it another feeding or two before trying to make this Multiseed No-Knead Sourdough Bread. A sluggish starter means a sluggish loaf!
Q4. My dough is too sticky to shape, what went wrong?
It’s supposed to be sticky! That’s the beauty of no-knead bread. Before shaping, make sure you lightly flour your surface. Also, make sure you only did that single stretch and fold early on. If you handle it too much, it gets looser. Use a bench scraper to help guide it gently into a round shape. For more baking tips, see my Pinterest board.
Nutritional Estimates for Multiseed No-Knead Sourdough Bread
Since we are packing this loaf with whole wheat flour and tons of seeds, it’s a much heartier slice than plain white bread, which is great for keeping you full! Please remember these numbers are estimates based on the ingredients I used; your exact figures might vary slightly depending on your flour brand and seed quantities. I always look at this data just to get a general idea, but honestly, the flavor is the real reward here.
Estimated Nutritional Data Table
| Nutrient | Estimate Per Slice (1/12th Loaf) |
|---|---|
| Calories | 165 |
| Protein | 6 g |
| Carbohydrates | 28 g |
| Fat | 3 g |
Share Your Multiseed No-Knead Sourdough Bread Success
I am so excited for you to try this loaf! When you finally pull that gorgeous, crackly, seedy loaf out of the oven, I want to see it! Please leave a comment below telling me how your bake went, or share a picture online. There is nothing better than seeing happy bakers enjoying their Multiseed No-Knead Sourdough Bread!
Why This Multiseed No-Knead Sourdough Bread Works For You
This recipe isn’t just another bread; it’s a guaranteed win for your weeknight schedule and your taste buds. The combination of the ease of the no-knead method paired with the texture from the seeds creates something truly special. I love pulling this loaf out of the oven and hearing that crust crackle!
- Hands-Off Flavor Development: The long, slow fermentation means your starter does all the heavy lifting, developing rich, complex sourdough flavor without you having to punch dough down every hour.
- Amazing Seed Crunch: The blend of four different seeds means every slice of your Multiseed No-Knead Sourdough Bread has a satisfying, wholesome chew and texture that store-bought bread just can’t match.
- Beginner Friendly: If you’ve been intimidated by sourdough, this is your entry point. One simple fold is all the structure work required!
- Sturdy Crumb: Perfect for thick slices of toast or holding up to heavy sandwiches.
Benefits of the No-Knead Sourdough Technique
Honestly, the best part of this technique is the minimal cleanup and the huge payoff. You mix it up in the morning or evening, leave it alone, and come back to a dough ready to shape. That overnight rest breaks down the starches beautifully, meaning you get amazing digestibility along with incredible taste, all without breaking a sweat.
Tips for Success with Your Multiseed No-Knead Sourdough Bread
Even though this is called “no-knead,” there are still a few little secrets I’ve picked up over the years that keep my Multiseed No-Knead Sourdough Bread from turning into a brick. Pay attention to your starter and your cooling rack, and you’ll be set!
Managing Starter Activity and Water Temperature
If your kitchen is a little chilly, your bulk fermentation might take longer than the 3 to 4 hours I suggested. That’s fine! The dough will tell you when it’s ready—it needs to look puffy. Crucially, make sure your water is truly room temperature, not cold from the tap. Cold water slows down the starter activity way too much, and you’ll end up waiting all day long for that dough to wake up.
The Critical Cooling Period
I know, I know, the smell is intoxicating. You pull that beautiful loaf out, and you want to slice into it immediately. Don’t! You absolutely must let this bread cool completely on a wire rack for at least two hours. If you cut it hot, the steam escapes too fast, and the inside crumb will turn gummy and wet. Patience here ensures that perfect, slightly chewy texture we worked so hard for.
Storing and Reheating Your Homemade Multiseed Sourdough
Once you’ve managed to wait for it to cool, you want to keep that crust crisp for as long as possible! Storing your Multiseed No-Knead Sourdough Bread correctly makes a huge difference in its day-two texture. I always prefer keeping it simple.
Best Practices for Storage
Do not, I repeat, do not put this bread in the refrigerator! That actually makes it go stale faster. Keep the loaf cut-side down on a clean wooden cutting board, or wrap it loosely in a clean linen or cotton tea towel. If you have a lot left over after a couple of days, slice it up and freeze what you won’t eat right away. It freezes beautifully!
Reheating for a Fresh-Baked Experience
If you’ve frozen slices, just pop them straight into the toaster. For a larger piece or half a loaf, just spritz the crust lightly with a little water, wrap it loosely in foil, and put it back in a 350°F oven for about 8 to 10 minutes. It comes out tasting almost like it just came out of the Dutch oven!
Frequently Asked Questions About Multiseed No-Knead Sourdough Bread
I get asked the same few things about this recipe all the time, so let’s tackle them head-on. Most issues people run into just come down to starter health or temperature control, so keep those in mind! It’s easy to troubleshoot once you know what to look for.
Question Examples and Answers
Q1. Can I use different seeds, or should I stick to this mix?
You absolutely can switch up the seeds! Feel free to swap in some hemp seeds or poppy seeds. Just try to keep the total volume of seeds close to what I listed. If you add too many seeds, the dough structure might struggle during the bulk ferment because the seeds displace the flour. This Multiseed No-Knead Sourdough Bread is flexible, but don’t go overboard!
Q2. What if my kitchen is cold, say below 70°F?
If your kitchen is cold, your bulk fermentation time will definitely be longer—maybe 6 or even 8 hours! That’s fine! The dough will tell you when it’s ready—it needs to look puffy. Don’t panic or add more starter. Just let it go until it looks visibly bubbly. You might need to start it earlier in the day or use slightly warmer water to give it a boost.
Q3. How do I know if my sourdough starter is active enough for this recipe?
Your starter should at least double in size within 4 to 6 hours after feeding. When you mix it with water for the recipe, it should look cloudy and pour easily. If it’s dense and struggling to rise, give it another feeding or two before trying to make this Multiseed No-Knead Sourdough Bread. A sluggish starter means a sluggish loaf!
Q4. My dough is too sticky to shape, what went wrong?
It’s supposed to be sticky! That’s the beauty of no-knead bread. Before shaping, make sure you lightly flour your surface. Also, make sure you only did that single stretch and fold early on. If you handle it too much, it gets looser. Use a bench scraper to help guide it gently into a round shape.
Nutritional Estimates for Multiseed No-Knead Sourdough Bread
Since we are packing this loaf with whole wheat flour and tons of seeds, it’s a much heartier slice than plain white bread, which is great for keeping you full! Please remember these numbers are estimates based on the ingredients I used; your exact figures might vary slightly depending on your flour brand and seed quantities. I always look at this data just to get a general idea, but honestly, the flavor is the real reward here.
Estimated Nutritional Data Table
| Nutrient | Estimate Per Slice (1/12th Loaf) |
|---|---|
| Calories | 165 |
| Protein | 6 g |
| Carbohydrates | 28 g |
| Fat | 3 g |
Share Your Multiseed No-Knead Sourdough Bread Success
I am so excited for you to try this loaf! When you finally pull that gorgeous, crackly, seedy loaf out of the oven, I want to see it! Please leave a comment below telling me how your bake went, or share a picture online. There is nothing better than seeing happy bakers enjoying their Multiseed No-Knead Sourdough Bread!
Print
Amazing 1-Fold Multiseed No-Knead Sourdough Bread
- Total Time: 1 day
- Yield: 1 loaf, about 12 slices 1x
- Diet: Vegetarian
Description
Wholesome multiseed no-knead sourdough bread with a crisp crust and hearty crumb. Easy overnight fermentation with simple pantry seeds.
Ingredients
- 1/2 cup active sourdough starter
- 1 1/2 cups water, room temperature
- 2 1/2 cups bread flour
- 1/2 cup whole wheat flour
- 1/4 cup sunflower seeds
- 2 Tablespoons pumpkin seeds
- 2 Tablespoons flax seeds
- 1 Tablespoon sesame seeds
- 1 3/4 teaspoons fine salt
Instructions
- Whisk together sourdough starter and water in a large bowl until cloudy.
- Add bread flour, whole wheat flour, sunflower seeds, pumpkin seeds, flax seeds, sesame seeds, and salt. Stir until a thick, sticky dough forms with no dry flour remaining.
- Cover tightly and rest at room temperature for 30 minutes.
- Perform one round of stretch and folds by lifting and folding the dough over itself four times.
- Cover and let ferment at room temperature until puffed and bubbly, about 3 to 4 hours.
- Turn the dough onto a lightly floured surface and gently shape into a round loaf.
- Place seam-side down on parchment paper and cover loosely. Rest 30 minutes while the oven heats.
- Place a Dutch oven with lid in the oven and preheat to 450°F for at least 30 minutes.
- Score the top of the dough and carefully transfer it into the hot Dutch oven. Cover with the lid.
- Bake at 425°F for 30 minutes.
- Remove the lid, lower oven to 400°F, and bake 15 to 20 minutes more until deeply golden and the internal temperature reaches about 200°F.
- Remove bread and cool completely on a rack for at least 2 hours before slicing.
Notes
- This recipe involves long fermentation, plan for an overnight rest or extended bulk fermentation time.
- Use room temperature water for best starter activity.
- Cool the bread completely before slicing to set the crumb.
- Prep Time: 20 minutes
- Cook Time: 50 minutes
- Category: Bread
- Method: No-Knead
- Cuisine: American
Nutrition
- Serving Size: 1 slice
- Calories: 165
- Sugar: N/A
- Sodium: N/A
- Fat: 3 g
- Saturated Fat: N/A
- Unsaturated Fat: N/A
- Trans Fat: N/A
- Carbohydrates: 28 g
- Fiber: N/A
- Protein: 6 g
- Cholesterol: N/A