Are you tired of heavy, greasy fried dinners but still crave that satisfying, audible crunch? I totally get it! When I started my journey shedding eighty pounds and transitioning to cleaner eating here in Asheville, NC, I thought I had to give up my favorite Southern comfort foods forever. That’s why I started the Easy Detox Recipes blog—to prove that flavor doesn’t have to suffer when you clean up your plate. You deserve food that tastes incredible without weighing you down.
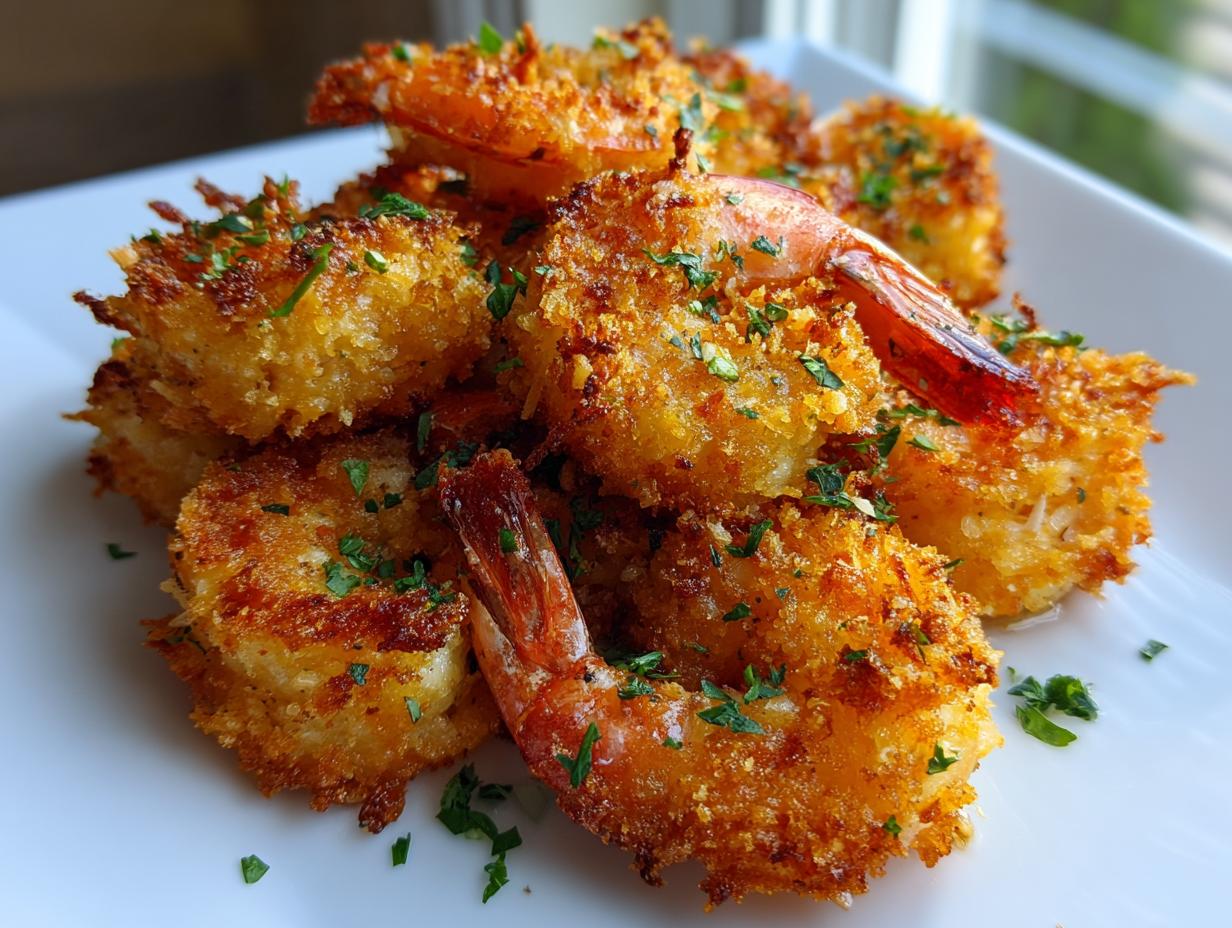
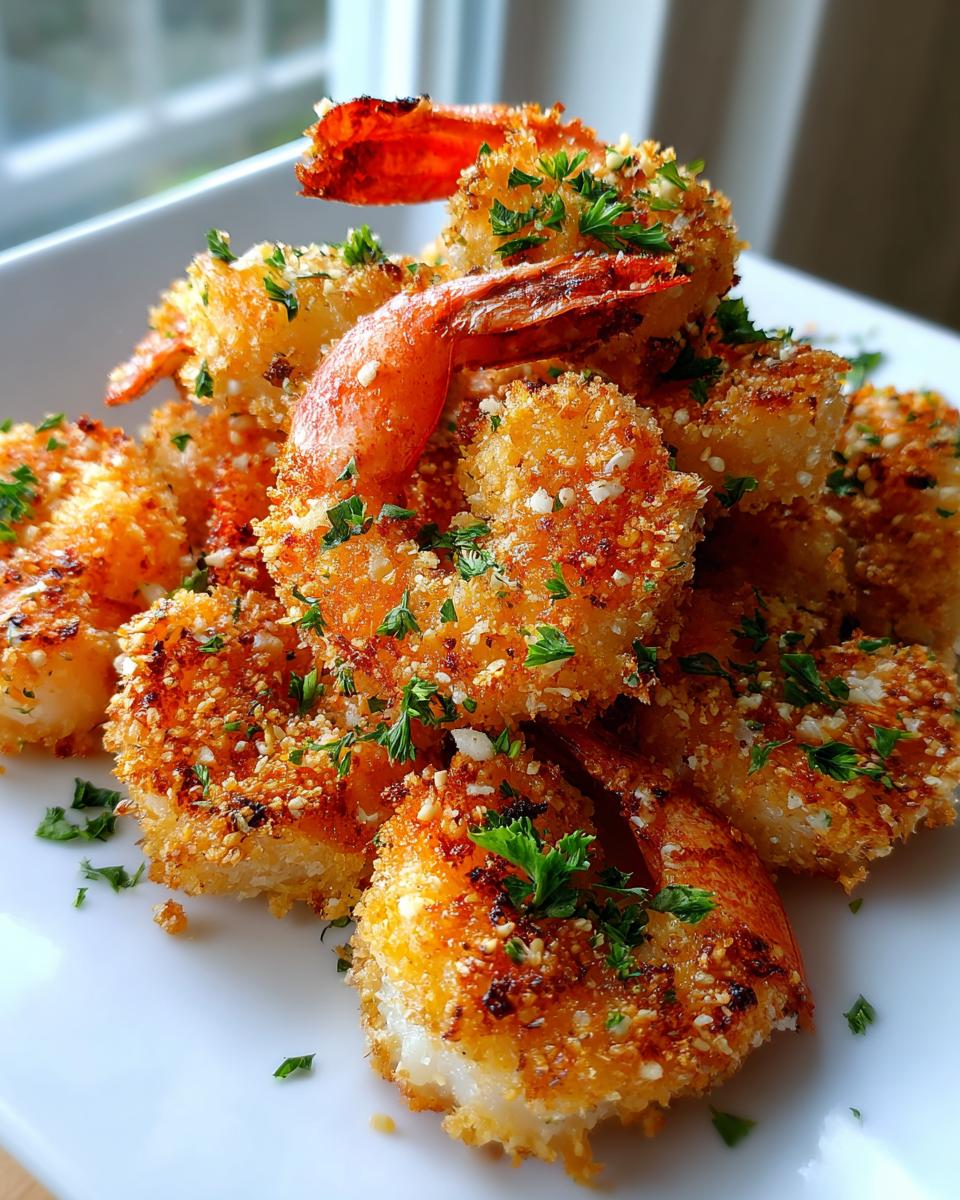
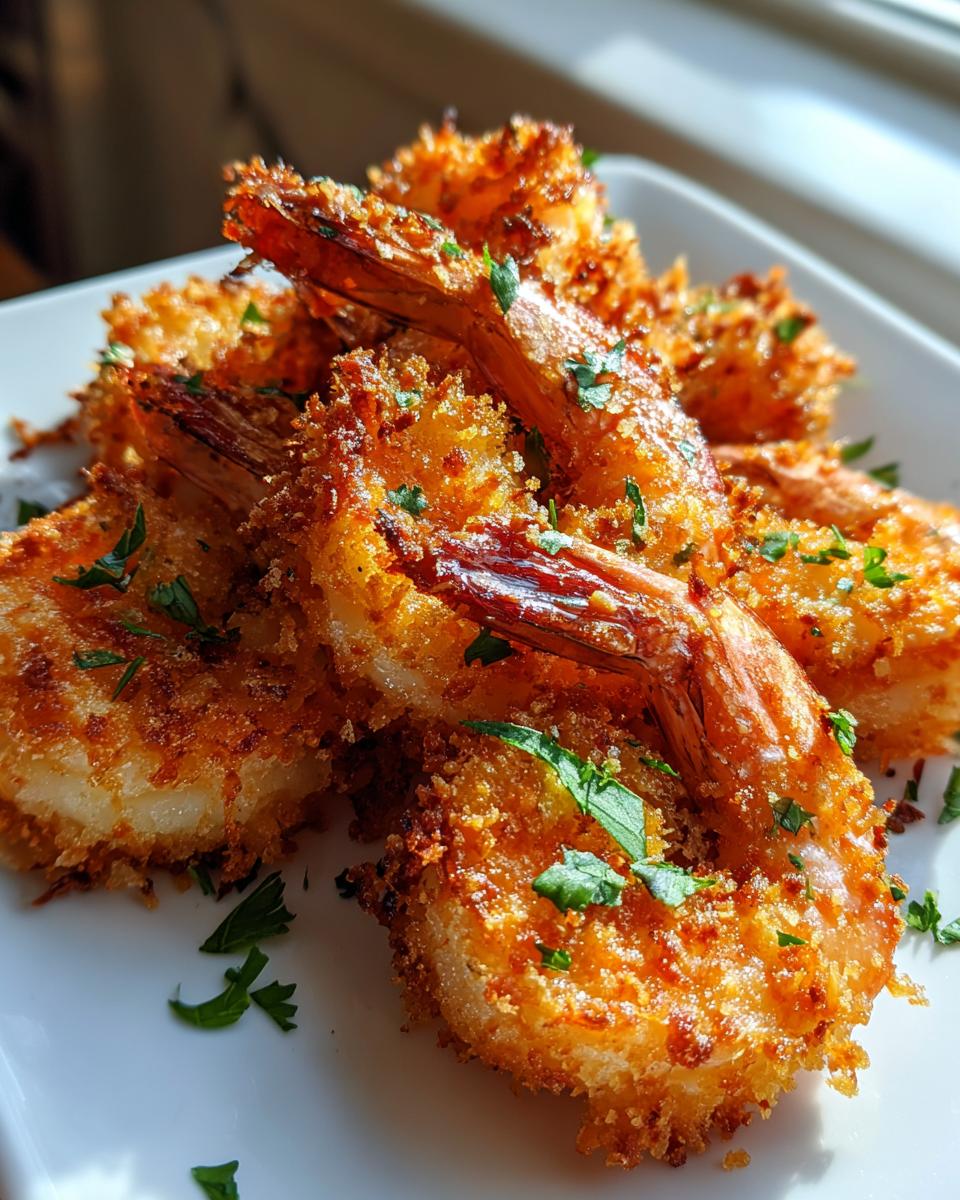
That’s exactly where this Magic Crispy Baked Shrimp comes in! Seriously, this recipe is a game-changer. It delivers that golden, savory crunch you usually only get from a deep fryer, but we achieve it all in the oven. We use jumbo shrimp tossed in a bright lemon-garlic bath, topped with a Parmesan-panko mixture that browns up perfectly. It’s fast, it’s clean, and it tastes like a celebration. You won’t believe how easy it is to make this crispy shrimp happen on a busy weeknight!
Why You Will Love This Magic Crispy Baked Shrimp
Honestly, this recipe is one of my go-to weeknight heroes. It’s proof that you don’t need hours or vats of oil to make something truly spectacular. When I’m craving something satisfying but need to keep things light, the Magic Crispy Baked Shrimp always delivers. It’s the perfect example of Southern comfort food made clean and quick!
- It is lightning fast! Prep takes barely fifteen minutes, and it’s on the table in under 30 minutes total.
- The crunch factor is unbelievable thanks to that little trick with preheating the pan.
- We’re using simple, clean ingredients—no heavy batters here, just bright lemon and garlic.
- That savory flavor profile from the Parmesan mixed into the panko is just irresistible.
Equipment Required for Perfect Magic Crispy Baked Shrimp
You don’t need a fancy setup for this, thankfully! Since we are baking and broiling, the key is having the right heat conductors ready to go. Trust me, having everything measured out before the oven gets hot makes the difference between a relaxed cook and a frantic scramble. For the best results with your Magic Crispy Baked Shrimp, grab these simple tools.
Essential Tools for Baking
- One 9×13-inch baking dish (metal is best for heat conduction!)
- Two small mixing bowls for prepping your shrimp and your topping
- Measuring spoons and cups (precision matters for that crust!)
- A sturdy whisk or fork for mixing
- A silicone spatula or tongs for arranging the shrimp
Ingredients for Magic Crispy Baked Shrimp
Okay, let’s talk about what makes this Magic Crispy Baked Shrimp sing! The ingredient list is short, which is another reason I love it so much for quick meals. But every single ingredient plays a role, especially when it comes to achieving that perfect crunchy coating without frying. When you look at the list below, you’ll notice we use butter twice—and that’s intentional! Don’t skimp on your shrimp size either; jumbo shrimp are the way to go here. They hold up beautifully to the high heat and the broiler blast we give them at the end.
Make sure you have everything measured out before you start marinating, because the process moves fast once the hot pan comes out of the oven. This recipe is all about timing that perfect combination of garlic, lemon, and savory Parmesan crust. If you want to see more of my favorite quick dinner ideas, check out my dinner recipes!
| Ingredient | Amount | Preparation |
|---|---|---|
| Jumbo shrimp | 1 lb | Peeled and deveined |
| Unsalted butter | 4 tablespoons (or ½ stick) | Melted, divided |
| Lemon juice | Juice from one lemon | Freshly squeezed |
| Garlic cloves | 3 | Minced |
| Salt | ½ teaspoon (for marinade) + ½ teaspoon (for crust) | Divided use |
| Black pepper | ¼ teaspoon | Freshly ground |
| Panko breadcrumbs | ¾ cup | — |
| Parmesan cheese | ¼ cup | Finely grated |
| Butter | 2 tablespoons | Melted (for crust) |
| Fresh parsley | As needed | Finely chopped (for garnish) |
Ingredient Notes and Substitutions
The breadcrumb choice here is non-negotiable if you want that “magic” crunch! You absolutely must use Panko breadcrumbs, not standard dry breadcrumbs. Panko flakes are larger and lighter, which is why they crisp up so beautifully in the oven. Regular breadcrumbs tend to absorb moisture and turn soggy under the broiler, and we definitely don’t want that!
See how I listed butter twice? That’s important. The first portion (2 tablespoons) goes into that hot pan to pre-sear the bottom of the shrimp slightly, which locks in crispness. The second portion (the extra 2 tablespoons) is mixed directly into the crumb topping to help bind the Parmesan and Panko together so it forms a cohesive, golden blanket over the shrimp.
Step-by-Step Instructions for Magic Crispy Baked Shrimp
This is where the magic happens! Because the total cook time is so fast—under 15 minutes total—you need to be organized. This recipe for Magic Crispy Baked Shrimp relies on high heat and quick finishes. If you try to rush the preheat, the bottom won’t get that initial crisp, and you’ll end up with sad, slightly wet shrimp on the bottom. Don’t let that happen!
Preparing the Oven and Shrimp Marinade
First things first, crank that oven up to 425°F (220°C). While it’s heating, get your 9×13-inch baking dish ready. This is the secret weapon! Melt 2 tablespoons of butter and pour it into that dish. Slide it into the hot oven for a full 10 minutes. That butter needs to be sizzling hot when the shrimp hits it. Don’t skip this step!
While that butter is getting happy in the oven, work on your shrimp. In a medium bowl, whisk together the remaining 2 tablespoons of melted butter, your minced garlic, the fresh lemon juice, salt, and pepper. Toss in your peeled and deveined jumbo shrimp until every piece is coated in that fragrant mixture. Set that bowl aside to let the flavors marry while the pan finishes preheating.
Creating the Savory Panko Crust
Now for the topping! In your second mixing bowl—use a dry one, please—combine your panko breadcrumbs, the finely grated Parmesan cheese, the second ½ teaspoon of salt, and the final 2 tablespoons of melted butter. Use a fork to mix this up really well. You aren’t trying to make a paste; you just want every panko flake to be lightly kissed with butter and cheese so it toasts evenly rather than burning in spots.
Baking and Achieving Maximum Crisp
Once your 10 minutes are up, carefully pull that hot dish out. Remember, that butter is scorching hot! Quickly arrange your marinated shrimp in a single layer across the bottom of the pan. Make sure they aren’t piled up; they need space to crisp! Pour any leftover garlic-lemon butter from the shrimp bowl right over the top of them. Then, take your Panko mixture and sprinkle it evenly over everything. Make sure the topping is spread out nicely.
Pop the whole thing back into the 425°F oven for about 12 minutes. The shrimp should be opaque, meaning they look pink and firm. Now comes the crucial finish for that ultimate crunch: switch your oven to the high broil setting. You only need 1 to 2 minutes here. I mean it—watch it like a hawk! I learned this the hard way once when I walked away for thirty seconds and came back to smoke alarms. The second that topping turns golden brown and looks perfectly toasted, pull it out immediately. Let it rest for just a couple of minutes, sprinkle with fresh parsley, and get it on the table while it’s screaming hot! You can find more quick dinner inspiration on my Medium page.
Tips for Guaranteed Crispy Shrimp Success
Getting that perfect, audible crunch with Magic Crispy Baked Shrimp is all about managing moisture and heat. If you follow the main steps, you are already 90 percent there, but these little secrets are what separate a good baked shrimp from an amazing one. The main goal is to keep the shrimp tender while ensuring the topping doesn’t turn into soggy sadness. It’s all about high heat and quick execution!
My biggest piece of advice, outside of preheating that pan, is to not overcrowd the dish. If the shrimp are touching, they steam instead of bake, and steam is the enemy of crispiness. Give them space so that hot air can circulate around every single piece. That way, you guarantee maximum surface area for that golden crust to develop.
Preventing Overcooking Your Shrimp
Shrimp cook incredibly fast, which is why they are one of my favorite quick meals. You must know what cooked shrimp looks like! They go from perfect to rubbery in about sixty seconds. You are looking for them to be opaque—meaning you can no longer see any gray transparency—and slightly curled into a C-shape. If they curl into a tight O-shape, you’ve gone too far. Trust the 12-minute bake time, and then rely on your eyes during that final 1-2 minute broil. Pull them the second they look done, because carryover heat will finish the job!
Serving Suggestions for Your Magic Crispy Baked Shrimp
This baked shrimp is so rich with garlic and lemon that it really shines when paired with something light and fresh to cut through that richness. Since this is a super quick main dish, I like pairing it with sides that require zero fuss—maybe something I can toss together while the shrimp is in the oven. It makes for a fantastic, balanced meal that feels indulgent but keeps things clean.
You can serve these beauties over a simple bed of rice or even some light angel hair pasta if you want to soak up any of that extra butter sauce left in the pan. But honestly, I prefer letting the shrimp be the star of the show with some bright vegetable sides. For another quick, clean main dish option, check out my recipe for Texas Roadhouse Style Baked Salmon.
Pairing with Fresh Vegetables
- A simple salad dressed with a light vinaigrette—nothing heavy or creamy.
- Blanched asparagus tossed quickly with a squeeze of fresh lemon juice.
- Steamed green beans sprinkled with flaky sea salt.
- Roasted broccoli florets, maybe tossed with a tiny bit of olive oil and garlic powder.
Storing and Reheating Leftover Magic Crispy Baked Shrimp
It’s rare that we have leftovers of the Magic Crispy Baked Shrimp because everyone devours it, but if you do manage to save some, you need to treat the crust gently! The biggest enemy of that beautiful crisp topping is condensation, so storage is key. Don’t just throw the leftovers in the fridge in a sealed container; that traps steam and softens the panko right away.
For the best chance of reviving that crunch, you need to go low and slow when reheating. The microwave will turn your beautiful topping into sad, wet mush, so we skip that entirely. An oven or toaster oven is your best friend here. We want to gently dry out that crust again without cooking the shrimp further. If you are looking for other ways to keep meals clean, you might enjoy my full recipe index.
| Storage Aspect | Details |
|---|---|
| Storage Container | A shallow, airtight container works best. Line the bottom with a paper towel to absorb any residual moisture. |
| Refrigerator Life | Eat within 2 days for the best texture. |
| Reheating Method | Oven or Toaster Oven (Preferred Method) |
| Reheating Temperature | 350°F (175°C) |
| Reheating Time | 5 to 8 minutes, or until heated through and the topping feels crisp again. |
Frequently Asked Questions About Crispy Baked Shrimp
I always get questions about this recipe because people are worried about achieving that oven-baked crispness—it seems too good to be true! Don’t worry, I’ve tested all the tricky scenarios so you don’t have to. Most folks are concerned about timing or ingredient swaps when making this easy baked shrimp dish.
Can I use different sized shrimp?
You certainly can, but you must adjust your timing! I specified jumbo shrimp because they are hearty and hold up well to the high heat and the broiler. If you use smaller cocktail shrimp, they will cook much faster—probably in about 8 minutes total. If you use massive prawn sizes, you might need an extra minute or two of baking time before you hit the broiler, otherwise, they might stay a little grey in the center.
What if I do not have panko breadcrumbs?
This is the one place I really advise against substitutes if you want the *crispy* result we are aiming for. Regular breadcrumbs just don’t crisp up the same way; they tend to get dense. If you are absolutely desperate and have no other choice, you can use crushed, lightly salted crackers (like saltines or Ritz), but you’ll need to reduce the amount of added butter in the crust mixture slightly, as crackers often contain more fat already.
How long does the crispy topping stay crunchy?
Realistically, the panko crust is at its absolute crunchiest right out of the oven, say for the first 15 minutes after it cools slightly. Once you cover leftovers or let them sit for several hours, the moisture from the shrimp underneath will start to soften it. That’s why reheating in the oven is so important! If you reheat them correctly, you can bring back about 80 percent of that initial glorious crunch. For more tips and visual guides, follow me on Pinterest.
Share Your Magic Crispy Baked Shrimp Experience
I put so much love into perfecting this recipe for you all, and I absolutely live to hear about your kitchen victories! Did you manage to nail that beautiful golden broiler finish? Did your family notice how much crunchier this is than fried versions? Please drop a comment below and tell me how your Magic Crispy Baked Shrimp turned out. I can’t wait to see your results!
Print
Best 12-Minute Magic Crispy Baked Shrimp
- Total Time: 29 minutes
- Yield: 4 servings 1x
- Diet: N/A
Description
Magic Crispy Baked Shrimp offers a simple way to enjoy crunchy shrimp without deep-frying. You get a flavorful garlic-lemon shrimp base topped with a golden, savory panko crust. This recipe is quick and delivers maximum crunch.
Ingredients
- 1 lb jumbo shrimp peeled and deveined
- 4 tablespoons ½ stick unsalted butter, melted and divided
- Juice from one lemon
- 3 garlic cloves minced
- ½ teaspoon salt
- ¼ teaspoon black pepper
- ¾ cup panko breadcrumbs
- ¼ cup Parmesan cheese finely grated
- ½ teaspoon salt
- 2 tablespoons butter melted
- Fresh parsley finely chopped (for garnish)
Instructions
- Preheat your oven to 425°F (220°C).
- Place 2 tablespoons of melted butter into a 9×13-inch baking dish. Place the dish in the oven for 10 minutes.
- While the butter heats, combine the remaining 2 tablespoons of melted butter with minced garlic, lemon juice, salt, and pepper in a mixing bowl. Add the shrimp and toss to coat thoroughly. Set aside.
- In a separate bowl, mix the panko breadcrumbs, grated Parmesan cheese, salt, and 2 tablespoons of melted butter. Stir until crumbs are evenly coated.
- Remove the preheated baking dish from the oven. Arrange the marinated shrimp in a single layer in the pan. Pour any remaining garlic lemon butter over the shrimp.
- Sprinkle the breadcrumb mixture evenly over the shrimp.
- Bake the shrimp for about 12 minutes, or until opaque. Switch your oven to broil on high for the last 1–2 minutes for an extra-crispy top, watching carefully.
- Remove from the oven, let rest for 2–3 minutes, sprinkle with parsley, and serve immediately.
Notes
- This method creates a very crisp topping due to the initial heating of the dish.
- Peeled and deveined shrimp speeds up the preparation time significantly.
- Watch the broiler closely, as the panko can burn quickly.
- Prep Time: 15 minutes
- Cook Time: 14 minutes
- Category: Dinner, Lunch, Main Course, Meal Prep
- Method: Baking and Broiling
- Cuisine: American
Nutrition
- Serving Size: 1 serving
- Calories: 250
- Sugar: Not specified
- Sodium: Not specified
- Fat: Not specified
- Saturated Fat: Not specified
- Unsaturated Fat: Not specified
- Trans Fat: Not specified
- Carbohydrates: Not specified
- Fiber: Not specified
- Protein: Not specified
- Cholesterol: Not specified