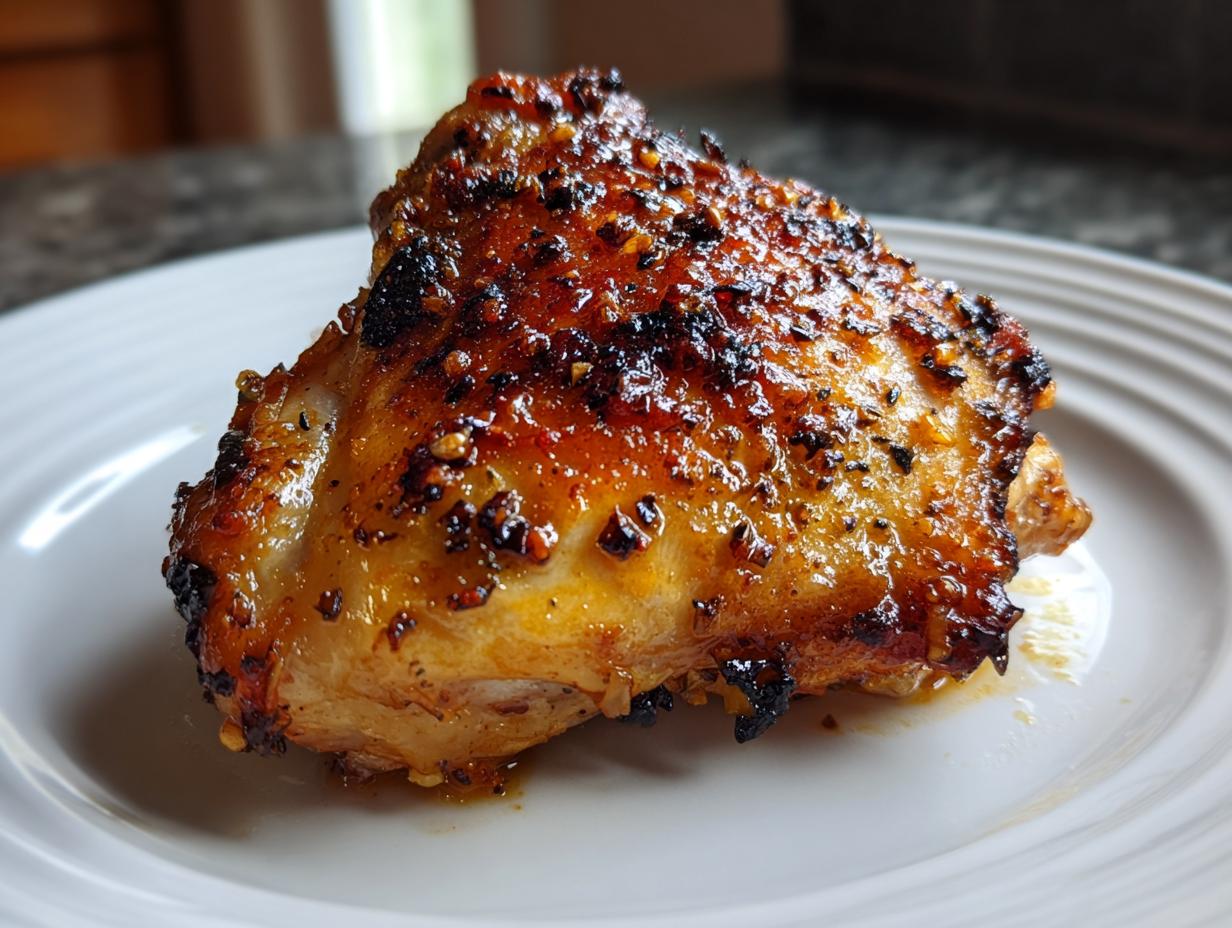
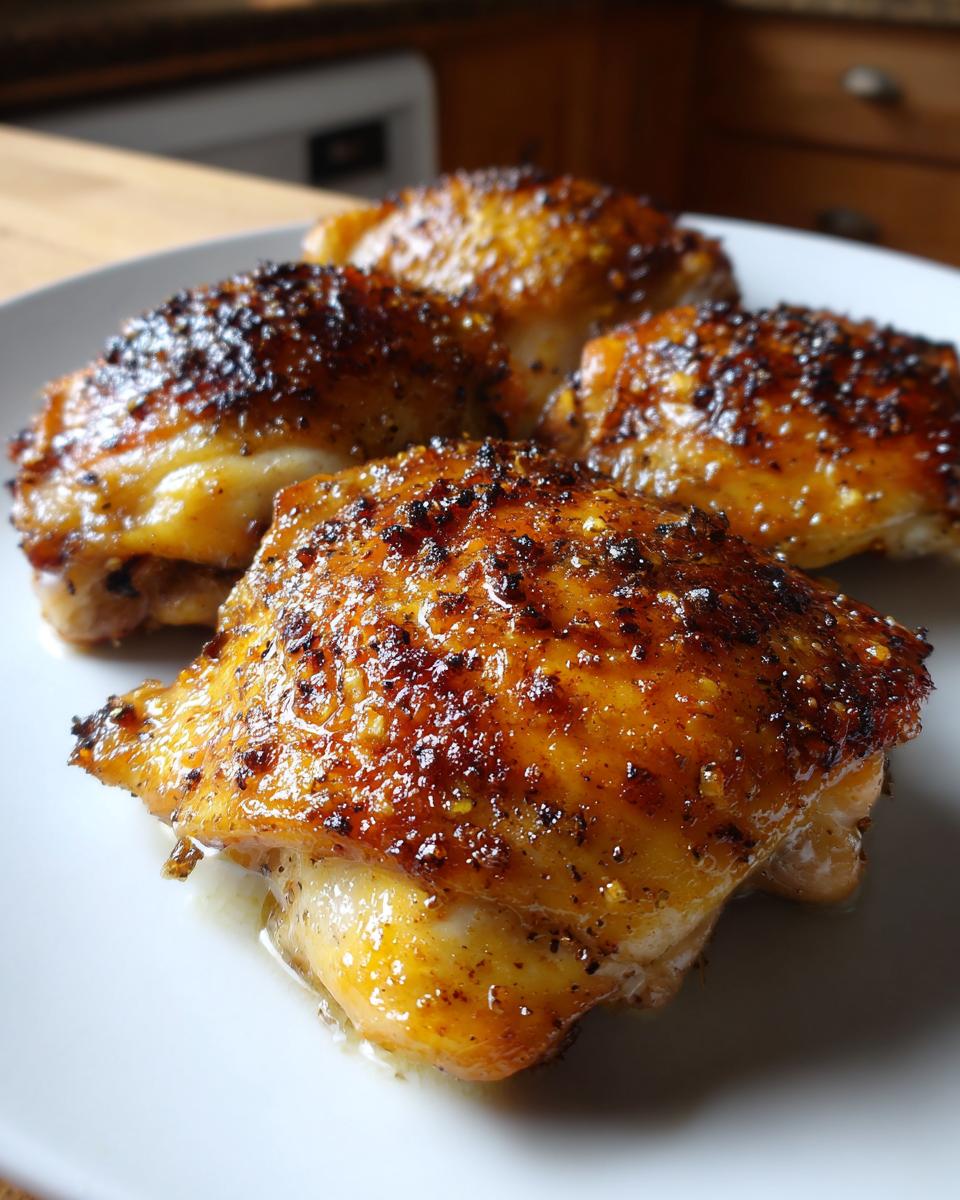
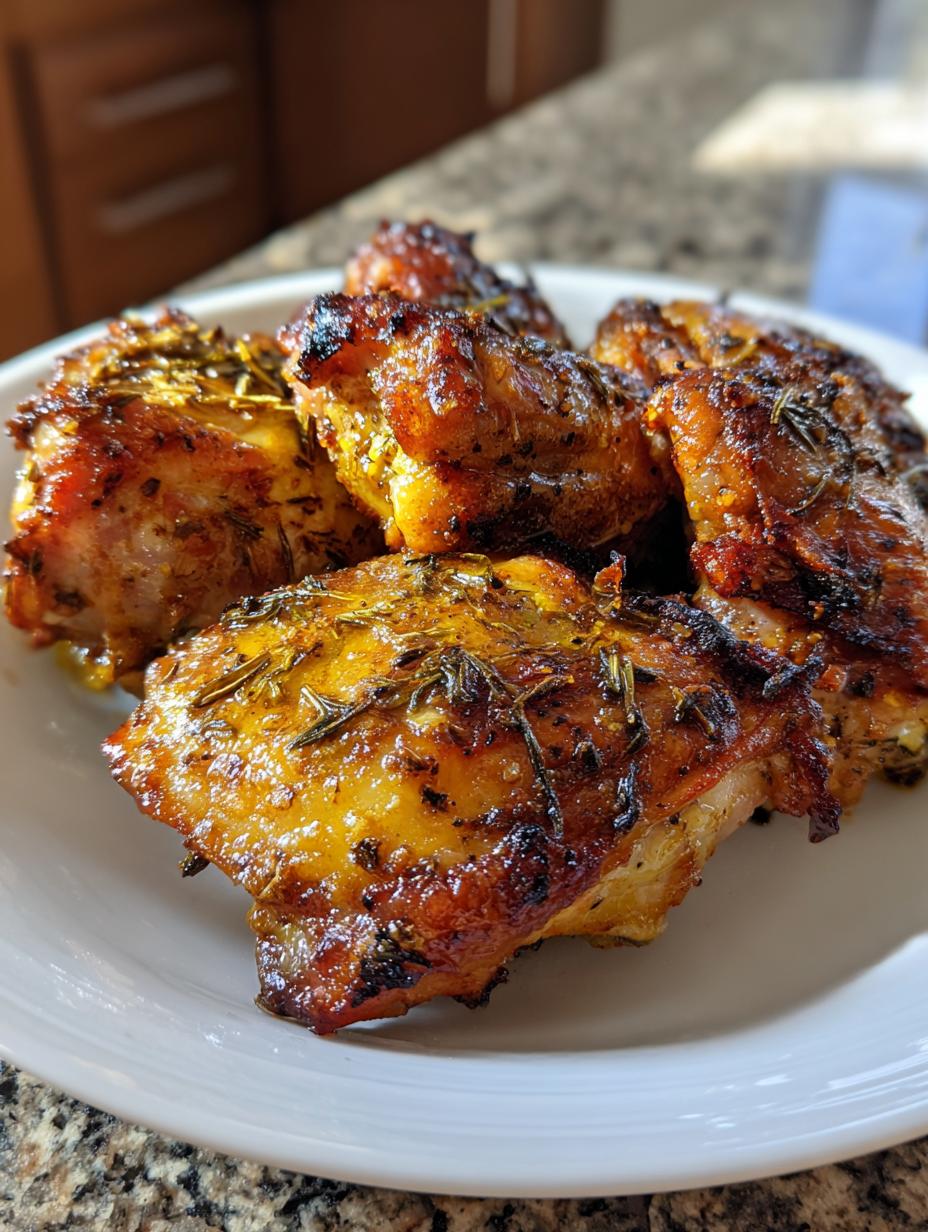
If your weeknights look anything like mine—a whirlwind of soccer practice, homework battles, and the desperate search for something actually tasty that doesn’t take forever—then you need this recipe in your life. Seriously, these lemon garlic chicken thighs are my secret weapon for feeling like a competent adult who still feeds her family well. Forget dried-out chicken! The magic here is hitting two different temperatures in the oven, which guarantees that melt-in-your-mouth tenderness inside while giving you that fantastic, crackly skin on the outside.
I know what you’re thinking: chicken thighs are tricky. But trust me, once you nail this simple two-stage roasting method, you’ll never look back. We’re talking about using real pantry staples to create a bright, herby coating that just clings to the meat. These oven baked chicken thighs are so flavorful, you barely need a side dish, though I usually pair them with some roasted broccoli while the oven is already hot!
Why You’ll Love This lemon garlic chicken thighs Recipe
Honestly, this recipe is a weeknight lifesaver. I’ve tried dozens of ways to get crispy skin without frying, and this two-step roasting process is the absolute best. It’s fast, it tastes like I spent way more time on it than I actually did, and cleanup is almost nonexistent since we’re using foil!
Quick Prep and Simple Ingredients
- Prep time is only about 10 minutes—I can usually get the seasoning mixed while the oven is still heating up.
- Everything you need is probably already in your spice cabinet. No weird trips to the store required!
- It’s such a straightforward mix of bright lemon and savory garlic. It hits all the right notes.
Perfect Texture Every Time
This is what sets our roasted chicken thighs apart. We start low to cook the meat through gently, and then we crank up the heat at the end. That high blast at the finish is what gives you that deeply browned, shatteringly crisp skin while the meat underneath stays incredibly juicy. It’s the best of both worlds!
Essential Equipment for Your lemon garlic chicken thighs
You don’t need a ton of fancy gear for this recipe, which is another reason I love it so much for busy evenings. Having the right tools ready means everything moves smoothly, especially when you’re juggling oven temps. These are the basics I always pull out when I make this batch of lemon garlic chicken thighs.
Necessary Baking Gear
- A large rimmed baking sheet. Make sure it’s big enough to hold all six thighs without crowding them—crowding equals steaming, and we want crisp skin!
- Aluminum foil. Don’t skip lining this, trust me on the cleanup front.
- An instant-read thermometer. This is non-negotiable for food safety, but honestly, it’s the only way to guarantee perfect doneness every time.
Tools for Mixing and Measuring
- A small bowl for mixing up that incredible marinade.
- Measuring spoons for getting the herbs and spices just right.
- A silicone pastry brush. This helps you paint that oil and herb mixture evenly over every inch of the chicken skin.
Gathering Your Ingredients for lemon garlic chicken thighs
Okay, let’s talk about what you need to pull this off. The beauty of these lemon garlic chicken thighs is that they rely on basic pantry spices, so you probably don’t need to run out to the store. But precision matters here! We need enough surface area to coat the chicken well, so make sure your olive oil is fresh, and your herbs aren’t ancient and dusty.
The most important thing to get right is the lemon component. You need both the zest and the juice, and they have different jobs! The zest holds all those bright, fragrant oils, while the juice adds the necessary acid to balance the fat. Don’t skimp on the salt, either; it helps draw moisture out of the skin so it can crisp up beautifully during that final blast of heat. I always lay everything out before I start mixing, just so I know I have enough for all six pieces! Check out more cooking tips here.
Ingredient List Table
Here is exactly what you need. You’ll want to make sure you have about six medium-to-large thighs so they fit nicely in a single layer on your baking sheet.
- 2 pounds bone in skin on chicken thighs (about 6 pieces)
- 1 tablespoon olive oil
- 1 teaspoon garlic powder
- 1 teaspoon dried oregano
- 1 teaspoon dried thyme
- 1 teaspoon lemon zest (from about 1 medium lemon)
- 2 tablespoons fresh lemon juice (about 1 medium lemon)
- 1 teaspoon salt
- 1 fourth teaspoon black pepper
Step-by-Step Instructions for Perfect lemon garlic chicken thighs
This is where the magic happens, but honestly, it’s so simple you’ll be shocked. The most important thing I need you to remember is that we are roasting in two stages. This is the secret to getting that beautifully rendered fat and crispy skin without turning the actual meat into shoe leather. Pay close attention to the temperatures, and you’ll nail these lemon garlic chicken thighs every single time.
Preparation and Preheating Steps
First things first: get your oven ready. We need it hot, so crank that dial up to 400°F right away. While it’s heating, grab your biggest rimmed baking sheet—and please, line it completely with foil. Future you will thank me later when cleanup takes ten seconds! Now, grab those chicken thighs. They might look clean, but they have moisture on the skin from the package. You absolutely must pat them bone dry with paper towels. Seriously, blot, blot, blot! Moisture is the enemy of crispiness, so don’t skip this step.
Creating the Flavorful Coating
Time to make the marinade paste! Grab a small bowl—no need to dirty a big one here. Pour in the olive oil first. Then, gently add all your dry seasonings: the garlic powder, oregano, thyme, salt, and pepper. Now for the star players: the lemon zest and the fresh lemon juice. Mix this all together until it forms a thick, fragrant paste. It should smell incredible already! Take your pastry brush and make sure you coat every single surface of those dried chicken thighs with this mixture. Don’t miss the sides or the skin. Place them on the foil-lined sheet, skin side up, making sure they aren’t touching. If you like lemon chicken, you might enjoy this orzo dish.
Roasting Stages for Crispy Skin
Into the oven they go! Slide that sheet in, and let them roast uncovered at 400°F for exactly 35 minutes. This is the cooking stage where the inside gets tender. Once those 35 minutes are up—don’t panic, they won’t look done yet—you need to immediately increase the oven temperature to 425°F. Keep them in there for another 10 to 15 minutes. This high-heat blast is what crisps up that gorgeous skin! Keep an eye out, though. The most reliable way to know they are done is by checking the internal temperature with your thermometer in the thickest part of the thigh—it needs to hit 165°F for safety. Seriously, use the thermometer!
Resting and Serving the lemon garlic chicken thighs
Once they hit that magic number, pull them out immediately. Don’t even think about cutting into them right away! Tent them loosely with some foil and let them rest for five minutes on the pan. This resting time is crucial; it lets all those delicious juices redistribute back into the meat instead of spilling all over your plate when you cut into them. After five minutes, they are ready to serve. Enjoy the best oven baked chicken you’ve ever made!
Quick Reference Instruction Table
For those times when you just need a quick reminder of the timing, here’s the short version of what we just did.
- Preheat to 400°F, Line Baking Sheet
- Pat Chicken Dry, Place Skin Side Up
- Mix Oil and Seasonings, Brush onto Chicken
- Roast at 400°F for 35 Minutes
- Increase Heat to 425°F, Roast 10-15 Minutes More
- Check Internal Temp (Must reach 165°F)
- Rest 5 Minutes Before Serving
Tips for Success with Oven Baked Chicken
Even though this recipe is straightforward, a couple of little tricks can take your roasted chicken thighs from great to absolutely unforgettable. I learned these through trial and error, so save yourself the time and just follow these pointers—especially if it’s your first time trying this two-temp method. See more recipe ideas on Pinterest.
Achieving Maximum Crispiness
The absolute number one rule here is drying the skin. If the skin is damp, it steams, and you end up with soft, rubbery skin instead of that satisfying crunch. Also, make sure your thighs are spaced out on the baking sheet. If they are touching, the heat can’t circulate around the sides properly, and you get soft spots where they meet their neighbors. Give them space to breathe!
Ensuring Even Cooking
Since bone-in thighs can vary slightly in size, using that instant-read thermometer is your best friend. Don’t just trust the clock! Stick the probe into the thickest part, avoiding the bone entirely, as the bone heats up faster and will give you a false high reading. If one thigh looks done before the others, you can carefully pull that one out and let the rest finish up. That’s the beauty of cooking them individually on a sheet pan.
Ingredient Notes and Substitutions for lemon garlic chicken thighs
Most of these ingredients are pretty set in stone because the balance of lemon and garlic is key to this specific flavor profile. If you run out of dried oregano, you could use a tiny bit of dried rosemary, but I wouldn’t recommend it for the first try. The flavor profile changes too much. Also, please use fresh lemon juice if you can—that bottled stuff is always way too metallic tasting for something this simple.
If you don’t have bone-in, skin-on thighs, you can use boneless, skinless, but you’ll need to adjust the cooking time significantly, probably cutting the initial roast way down and watching closely so they don’t dry out. The crispy skin won’t happen, obviously, but they will still be flavorful! If you need other quick dinner ideas, check out this sheet pan salmon recipe.
Frequently Asked Questions about lemon garlic chicken thighs
I get asked the same few things about this recipe all the time, usually from folks worried about getting that skin crispy or handling raw chicken safely. Here are the quick answers I always give!
Can I use boneless skinless chicken thighs instead?
You can, but you will lose the crispy skin element entirely, which is half the fun of these oven baked chicken thighs! Also, boneless thighs cook much faster, so you’ll need to reduce your cooking time quite a bit to prevent them from getting tough. Start checking them around the 25-minute mark at 400°F.
What is the safest way to check if the lemon garlic chicken thighs are done?
The safest and most accurate way is always using an instant-read thermometer. Stick it into the thickest part of the thigh without touching the bone. They are perfectly cooked and safe to eat when the thermometer reads 165°F. Don’t rely just on color!
How long does it take to cook these chicken thighs completely?
The total time from start to finish, including the two roasting stages, is about 50 minutes of active cooking time, plus that final five-minute rest. So, budget about an hour total, including the initial 10 minutes of prep and preheating time.
Storing and Reheating Your Leftover Chicken
If you manage to have any of these amazing lemon garlic chicken thighs left over—which I doubt!—storage is super easy. Make sure they are completely cooled before you put them away. Safety first! You want to get them into an airtight container within two hours of taking them out of the oven. They keep great in the fridge for about three to four days.
When you are ready for leftovers, skip the microwave if you can—it softens the skin right up! The best way to bring them back to life is in a toaster oven or a regular oven heated to about 350°F. Just heat them until they are warmed through, maybe 10 to 15 minutes. This lets the skin crisp back up nicely!
Storage Guidelines Table
- Storage Duration: 3-4 Days in Fridge
- Container: Airtight Container
- Best Reheating Method: Oven or Toaster Oven at 350°F
- Microwave Use: Avoid, as it softens the skin
Sharing Your Homemade lemon garlic chicken thighs
I really hope this recipe becomes a staple in your rotation like it is in mine. When you try them out, let me know how your skin turned out! I love hearing how everyone manages to get that perfect crisp. Drop a comment below and tell me what you served alongside your perfectly juicy chicken!
Tips for Success with Oven Baked Chicken
Even though this recipe is straightforward, a couple of little tricks can take your roasted chicken thighs from great to absolutely unforgettable. I learned these through trial and error, so save yourself the time and just follow these pointers—especially if it’s your first time trying this two-temp method.
Achieving Maximum Crispiness
The absolute number one rule here is drying the skin. If the skin is damp, it steams, and you end up with soft, rubbery skin instead of that satisfying crunch. Also, make sure your thighs are spaced out on the baking sheet. If they are touching, the heat can’t circulate around the sides properly, and you get soft spots where they meet their neighbors. Give them space to breathe!
Ensuring Even Cooking
Since bone-in thighs can vary slightly in size, using that instant-read thermometer is your best friend. Don’t just trust the clock! Stick the probe into the thickest part, avoiding the bone entirely, as the bone heats up faster and will give you a false high reading. If one thigh looks done before the others, you can carefully pull that one out and let the rest finish up. That’s the beauty of cooking them individually on a sheet pan.
Ingredient Notes and Substitutions for lemon garlic chicken thighs
Most of these ingredients are pretty set in stone because the balance of lemon and garlic is key to this specific flavor profile. If you run out of dried oregano, you could use a tiny bit of dried rosemary, but I wouldn’t recommend it for the first try. The flavor profile changes too much. Also, please use fresh lemon juice if you can—that bottled stuff is always way too metallic tasting for something this simple.
If you don’t have bone-in, skin-on thighs, you can use boneless, skinless, but you’ll need to adjust the cooking time significantly, probably cutting the initial roast way down and watching closely so they don’t dry out. The crispy skin won’t happen, obviously, but they will still be flavorful!
Frequently Asked Questions about lemon garlic chicken thighs
I get asked the same few things about this recipe all the time, usually from folks worried about getting that skin crispy or handling raw chicken safely. Here are the quick answers I always give!
Can I use boneless skinless chicken thighs instead?
You can, but you will lose the crispy skin element entirely, which is half the fun of these oven baked chicken thighs! Also, boneless thighs cook much faster, so you’ll need to reduce your cooking time quite a bit to prevent them from getting tough. Start checking them around the 25-minute mark at 400°F.
What is the safest way to check if the lemon garlic chicken thighs are done?
The safest and most accurate way is always using an instant-read thermometer. Stick it into the thickest part of the thigh without touching the bone. They are perfectly cooked and safe to eat when the thermometer reads 165°F. Don’t rely just on color!
How long does it take to cook these chicken thighs completely?
The total time from start to finish, including the two roasting stages, is about 50 minutes of active cooking time, plus that final five-minute rest. So, budget about an hour total, including the initial 10 minutes of prep and preheating time.
Storing and Reheating Your Leftover Chicken
If you manage to have any of these amazing lemon garlic chicken thighs left over—which I doubt!—storage is super easy. Make sure they are completely cooled before you put them away. Safety first! You want to get them into an airtight container within two hours of taking them out of the oven. They keep great in the fridge for about three to four days.
When you are ready for leftovers, skip the microwave if you can—it softens the skin right up! The best way to bring them back to life is in a toaster oven or a regular oven heated to about 350°F. Just heat them until they are warmed through, maybe 10 to 15 minutes. This lets the skin crisp back up nicely!
Storage Guidelines Table
- Storage Duration: 3-4 Days in Fridge
- Container: Airtight Container
- Best Reheating Method: Oven or Toaster Oven at 350°F
- Microwave Use: Avoid, as it softens the skin
Sharing Your Homemade lemon garlic chicken thighs
I really hope this recipe becomes a staple in your rotation like it is in mine. When you try them out, let me know how your skin turned out! I love hearing how everyone manages to get that perfect crisp. Drop a comment below and tell me what you served alongside your perfectly juicy chicken!
Print
Juicy lemon garlic chicken thighs: 1 trick
- Total Time: 60 minutes
- Yield: 4 servings 1x
- Diet: N/A
Description
These oven baked lemon garlic chicken thighs are juicy, flavorful, and easy to make. A healthy dinner option with simple pantry ingredients. These chicken thighs are tender on the inside with perfectly roasted edges.
Ingredients
- 2 pounds bone in skin on chicken thighs about 6 pieces
- 1 tablespoon olive oil
- 1 teaspoon garlic powder
- 1 teaspoon dried oregano
- 1 teaspoon dried thyme
- 1 teaspoon lemon zest
- 2 tablespoons fresh lemon juice
- 1 teaspoon salt
- 1 fourth teaspoon black pepper
Instructions
- Heat oven to 400°F and line a large rimmed baking sheet with foil.
- Pat chicken thighs dry with paper towels and place on the baking sheet skin side up.
- In a small bowl mix olive oil, garlic powder, oregano, thyme, lemon zest, lemon juice, salt, and black pepper.
- Brush the mixture evenly over the chicken thighs.
- Roast uncovered for 35 minutes.
- Increase oven temperature to 425°F and continue roasting 10 to 15 minutes until skin is crisp.
- Remove from oven when chicken reaches 165°F internally at the thickest part.
- Rest 5 minutes before serving.
Notes
- For food safety, cook chicken to an internal temperature of 165°F.
- Refrigerate leftovers within two hours.
- Prep Time: 10 minutes
- Cook Time: 50 minutes
- Category: Main Course
- Method: Oven Baked
- Cuisine: American
Nutrition
- Serving Size: 1 serving
- Calories: 420
- Sugar: N/A
- Sodium: N/A
- Fat: 30 g
- Saturated Fat: N/A
- Unsaturated Fat: N/A
- Trans Fat: N/A
- Carbohydrates: 2 g
- Fiber: N/A
- Protein: 34 g
- Cholesterol: N/A