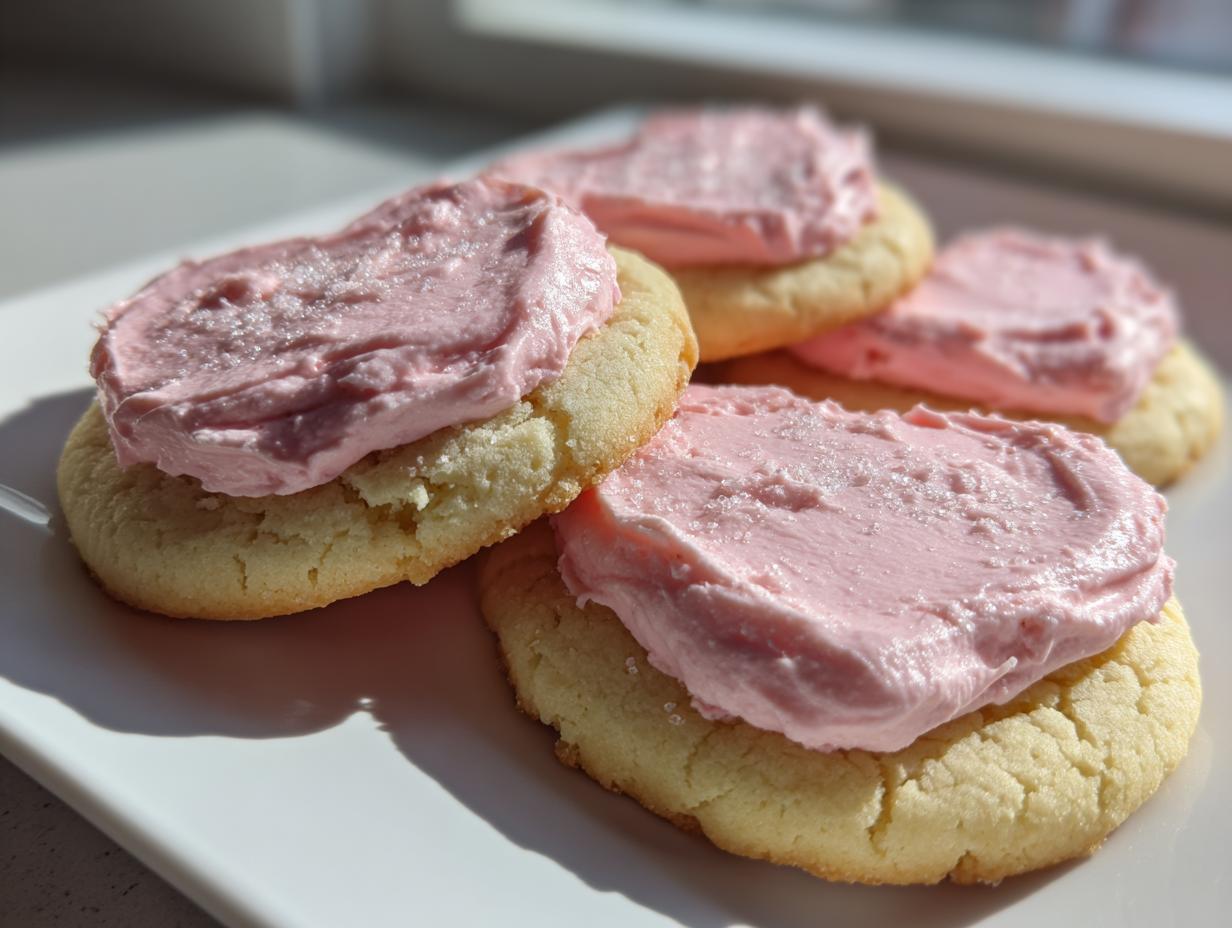
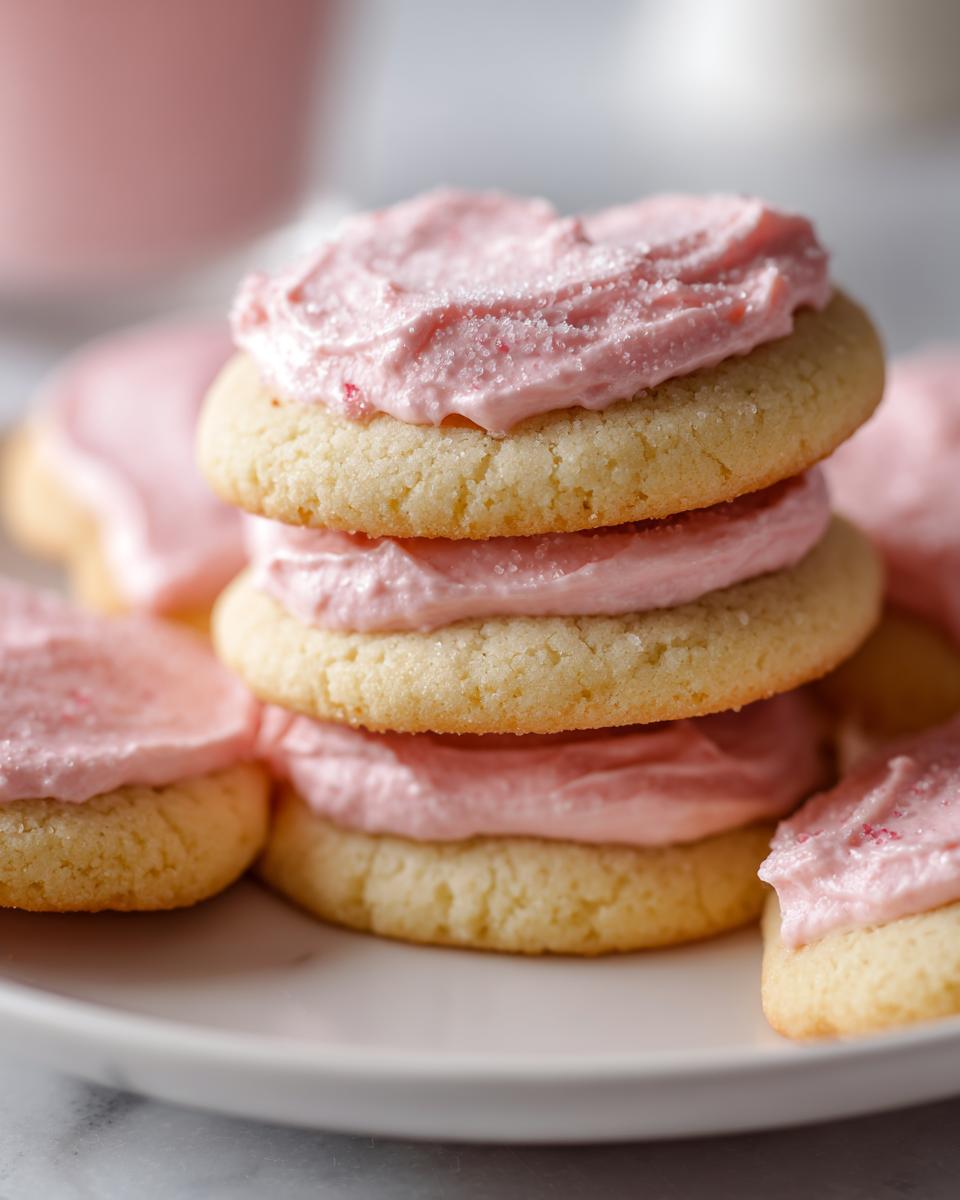
I am obsessed with cutout cookies, but honestly, most of them end up tasting like crunchy sugar discs, right? Not these! We are making the absolute best **lemon cutout cookies** you’ve ever had. They are tender, unbelievably soft, and packed with that bright, sunny lemon flavor that just screams spring and celebration.
My biggest struggle used to be getting that perfect texture without the cookies spreading into sad, flat puddles on the baking sheet. It used to drive me crazy! But I cracked the code on this recipe by focusing on temperature and a little trick with the lemon zest that just changes everything. Trust me, once you try these, you won’t look back.
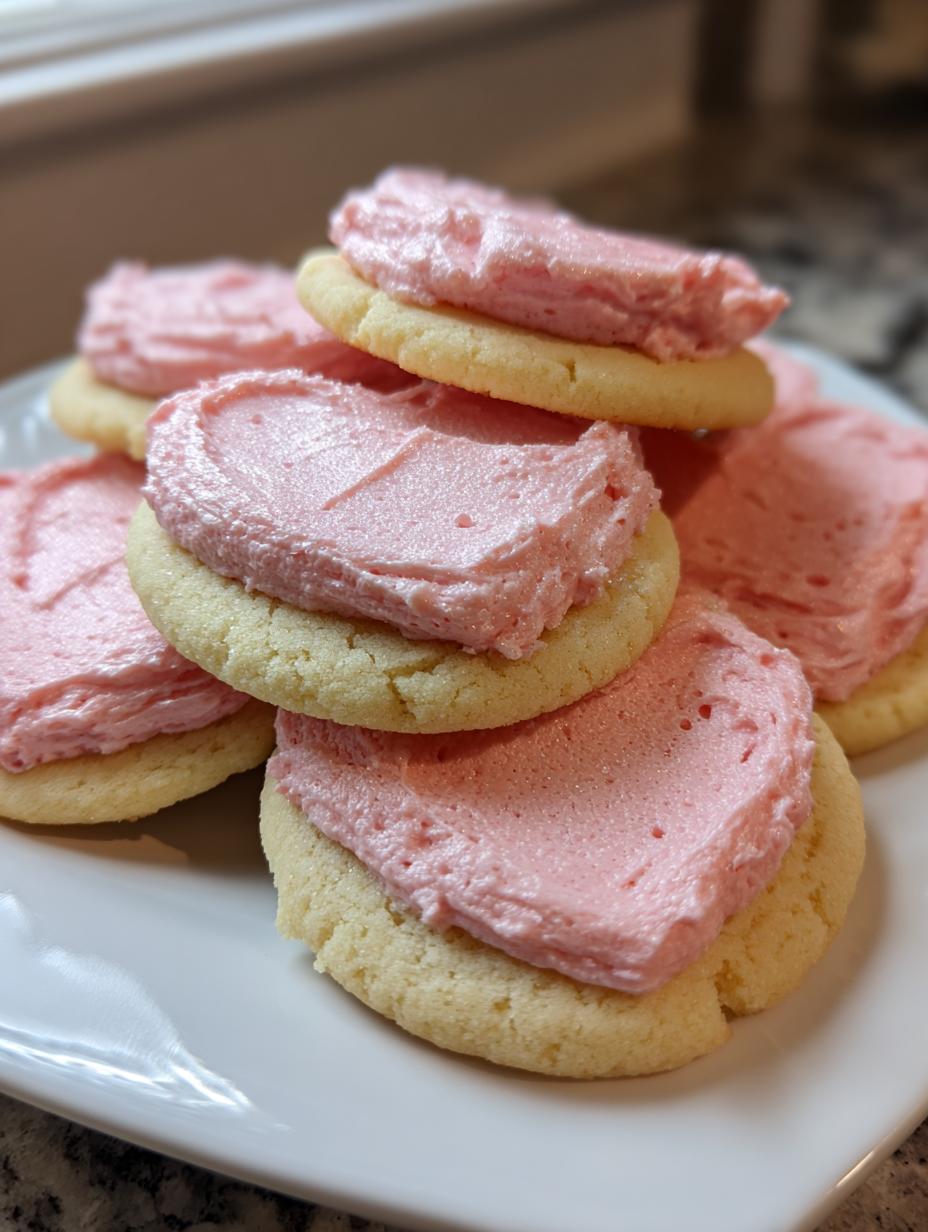
The best part is the topping—a vibrant raspberry cream cheese frosting that gets its gorgeous pink hue naturally. No weird food coloring needed here! This recipe yields about two dozen perfect, festive cookies that hold their shape beautifully, making them ideal for gifting or just keeping all to yourself. Let’s get this dough chilling!
Essential Ingredients for Perfect lemon cutout cookies
Okay, listen up, because the difference between a mediocre cookie and an *amazing* cookie is always the ingredients. For these beautiful **lemon cutout cookies**, we need ingredients that work together to stay soft and deliver that sharp citrus punch. Don’t skimp here; quality really matters, especially when it comes to the butter and the lemon zest!
I’ve broken down the list below. Notice we have two separate butter measurements—that’s because the cookie base needs room-temperature butter for creaming, but the frosting needs that cream cheese and butter to be cold for structure. It seems fussy, but it’s the secret to getting that perfect texture top and bottom!
Ingredients for the Soft, Zesty Cookie Base
For the base, we rely on a mix of sugars—brown sugar for chewiness and white sugar to help the texture—plus plenty of flour to keep things sturdy. I made a simple list for you so you can check your pantry. If you want to see the exact amounts I use for about 24 cookies, check out the full ingredient breakdown. Seriously, grab everything now before we start mixing!
Crafting the Tangy Raspberry Cream Cheese Frosting
Now for the fun part: the frosting! This isn’t your standard sugary topping. We’re using cold cream cheese and butter to keep it stiff enough for decorating these **lemon cutout cookies**. The real star, though, is the freeze-dried raspberry powder. It gives us that natural pink color and an intense, tart berry flavor that cuts through the lemon perfectly. You won’t want to skip that step!
Equipment Needed for Making lemon cutout cookies
You don’t need a million fancy gadgets for these **lemon cutout cookies**, but a few things really make the process smooth. Having an electric mixer is a huge help when creaming all that sugar and butter together—it saves your arm!
Beyond that, you absolutely need parchment paper. I use it for rolling *and* baking. Also, make sure you have some sturdy 3-inch cookie cutters handy, like hearts or simple rounds. And grab a couple of baking sheets that can handle a trip to the freezer. That chilling step is key, so having freezer space ready is important!
Step-by-Step Instructions for Your lemon cutout cookies
Alright, here is where the magic happens! Follow these steps closely, and you’ll have the softest, best-shaped **lemon cutout cookies** ever. Don’t rush the chilling—it’s the difference between a perfect cookie and a melted mess!
Preparing the Flavorful Cookie Dough
First things first: we need to wake up that lemon zest! Take your zest and rub it right into the granulated sugar using just your fingertips. You want to press and grind it together until the sugar looks damp and you can seriously smell that bright lemon oil popping out. This simple action releases so much more flavor than just dumping it in later. Set that aside, it’s our secret weapon.
Next, grab your softened butter—and I mean *softened*, not melted—and beat it until it’s smooth. Now toss in your lemon sugar mixture and the brown sugar. Whip this on high speed for a full minute until it looks light and fluffy, like pale sunshine. Be careful not to overmix here, but you need that air incorporated!
Now add your room-temperature eggs one at a time, followed by the vanilla and the fresh lemon juice. Beat until it’s just combined. In a separate bowl, whisk your flour, baking soda, and salt together—this ensures everything is perfectly distributed. Finally, add the dry stuff to the wet stuff, mixing only on low speed until you see no more white streaks of flour. Stop the mixer immediately when you see that! Overmixing the flour is what makes cookies tough.
Chilling and Cutting your lemon cutout cookies
This next part is non-negotiable if you want sharp shapes. Divide your gorgeous dough into two equal pieces. Roll each piece between two sheets of parchment paper until it’s exactly half an inch thick. Seriously, measure it! If you roll too thin, they’ll crisp up; too thick, and they won’t bake evenly. Stack those two parchment-wrapped dough discs on a baking sheet and pop them into the freezer for 30 minutes. Yes, the freezer! This hardens the fat perfectly so your **lemon cutout cookies** won’t spread at all.
Once they are firm—you should be able to press a finger in and have it leave a mark but not sink—you’re ready to cut. Preheat your oven to 350°F and line your baking sheets. Peel off the top layer of parchment and use your 3-inch cutter to punch out shapes, arranging them about two inches apart on the lined sheets.
Baking and Cooling the Cookies
Bake them for 9 to 11 minutes. You are looking for the edges to just appear set, and the bottoms should be *very* lightly golden—not dark brown! These cookies are meant to be soft, so don’t bake them until they look hard. Let them cool right there on the pan for a full 10 minutes. They are too fragile to move right away. After that, gently transfer them to a wire rack to cool completely before you dare touch them with frosting.
Mixing the Natural Pink Raspberry Frosting
While those cool, we make the best raspberry cream cheese frosting. Beat your room-temperature butter and powdered sugar until smooth, adding milk just a tablespoon at a time until you get a nice, spreadable consistency. Mix in the vanilla, salt, and lemon juice.
Now, add the cold cream cheese—make sure it’s cold—and beat until it’s smooth, not lumpy! Stir in the raspberry preserves and about half of your ground freeze-dried raspberry powder. This will turn the whole batch a lovely pale pink. For that extra pop, divide the frosting into three bowls. Add more raspberry powder to two of the bowls so you have a light, medium, and dark pink option for decorating your **lemon cutout cookies**!
Pro Tips for Success with Your lemon cutout cookies
I’ve made hundreds of batches of these **lemon cutout cookies**, and I’ve learned a few things to guarantee success. The number one reason cookies spread is warm dough meeting a hot oven, so don’t skip that freezer time! If you are worried about spreading even after chilling, try popping the cut-out shapes back in the freezer for 10 minutes right before they go into the oven.
Also, when you roll the dough, if you find yourself needing to add extra flour to stop sticking, you’ve already lost. That extra flour will dry out the dough and make your cookies less soft. Stick to the parchment paper method, and they won’t stick and they won’t spread. Remember, these are supposed to be *soft* cookies, so pulling them out early is better than leaving them in too long!
Ingredient Notes and Substitutions for Citrus Desserts
When it comes to the lemon flavor in these **lemon cutout cookies**, you cannot compromise on the zest. That rubbing technique is essential for maximum flavor extraction. If you use bottled lemon juice instead of fresh, you’ll lose that bright zing we are aiming for. For more dessert inspiration, check out these dessert recipes.
For the frosting, using cold cream cheese is vital. If it gets too warm before you add it, the frosting will be runny and impossible to spread neatly. Room temperature eggs are important for the cookie base because they incorporate better into the creamed butter, giving you a smoother batter. Stick to fresh lemon in both parts!
Storing and Keeping Your Soft Cookies Fresh
The best part about these **lemon cutout cookies** is that they stay soft for days, provided you store them correctly. Once that frosting is completely set—give it at least an hour at room temperature—you can stack them, but you need a barrier between the layers. I use squares of wax paper between each cookie or layer. This stops the frosting from smearing, which is just a nightmare! You can find more baking tips on my Medium page.
Keep them in an airtight container at room temperature. They are great for about four days this way. If you need to store them longer, they freeze beautifully unfrosted, or even fully frosted! If you freeze them frosted, just place a square of parchment between the layers before sealing the container tightly. They thaw out perfectly overnight on the counter. We want to keep that soft texture, so avoid the fridge if you can, as it tends to dry things out!
Frequently Asked Questions About lemon cutout cookies
I get so many questions about these cookies because everyone wants that perfect balance of soft texture and bright flavor. Here are a few things folks ask me all the time about making these **lemon cutout cookies**!
Can I make the dough ahead of time?
Yes, you totally can! I actually prefer it. After you mix the dough (before splitting and chilling), wrap both halves tightly in plastic wrap and stick them in the fridge for up to three days. When you’re ready to bake, let the dough sit on the counter for about 15 minutes so it softens just enough to roll. It makes the whole process feel less rushed! If you are looking for other great baking projects, check out these banana oatmeal bars.
Why did my cookies spread while baking?
This is the most common panic moment! It almost always comes down to the dough being too warm when it hits the oven, or maybe you added too much flour while rolling. Remember, we are aiming for soft cookies, so they need to be rock hard from the freezer before they go in at 350°F. If they look like they are starting to melt before they set, pull them out immediately!
How do I get the brightest lemon flavor in my lemon cutout cookies?
It’s all about Step One, seriously! You must rub the lemon zest directly into the granulated sugar with your fingers until the sugar smells like a lemon grove. That friction releases the essential oils right into the sugar. If you just dump the zest in with the wet ingredients, you lose half that incredible punch. That little step is the key to truly vibrant **lemon cutout cookies**. For more visual inspiration, see my Pinterest board.
Nutritional Estimates for This Dessert
I always promise myself I won’t look at the nutrition facts when I bake, but here are the general estimates for one of these beautiful **lemon cutout cookies** so you know what you’re getting into. Remember, these are estimates based on my recipe proportions!
| Nutrient | Amount Per Serving |
|---|---|
| Calories | 285 |
| Fat | 12g |
| Carbohydrates | 42g |
| Protein | 3g |
Pro Tips for Success with Your lemon cutout cookies
I’ve made hundreds of batches of these **lemon cutout cookies**, and I’ve learned a few things to guarantee success. The number one reason cookies spread is warm dough meeting a hot oven, so don’t skip that freezer time! If you are worried about spreading even after chilling, try popping the cut-out shapes back in the freezer for 10 minutes right before they go into the oven.
Also, when you roll the dough, if you find yourself needing to add extra flour to stop sticking, you’ve already lost. That extra flour will dry out the dough and make your cookies less soft. Stick to the parchment paper method, and they won’t stick and they won’t spread. Remember, these are supposed to be *soft* cookies, so pulling them out early is better than leaving them in too long!
Ingredient Notes and Substitutions for Citrus Desserts
When it comes to the lemon flavor in these **lemon cutout cookies**, you cannot compromise on the zest. That rubbing technique is essential for maximum flavor extraction. If you use bottled lemon juice instead of fresh, you’ll lose that bright zing we are aiming for. If you need a savory contrast to all this sweetness, try this one pot lemon chicken orzo.
For the frosting, using cold cream cheese is vital. If it gets too warm before you add it, the frosting will be runny and impossible to spread neatly. Room temperature eggs are important for the cookie base because they incorporate better into the creamed butter, giving you a smoother batter. Stick to fresh lemon in both parts!
Storing and Keeping Your Soft Cookies Fresh
The best part about these **lemon cutout cookies** is that they stay soft for days, provided you store them correctly. Once that frosting is completely set—give it at least an hour at room temperature—you can stack them, but you need a barrier between the layers. I use squares of wax paper between each cookie or layer. This stops the frosting from smearing, which is just a nightmare!
Keep them in an airtight container at room temperature. They are great for about four days this way. If you need to store them longer, they freeze beautifully unfrosted, or even fully frosted! If you freeze them frosted, just place a square of parchment between the layers before sealing the container tightly. They thaw out perfectly overnight on the counter. We want to keep that soft texture, so avoid the fridge if you can, as it tends to dry things out!
Frequently Asked Questions About lemon cutout cookies
I get so many questions about these cookies because everyone wants that perfect balance of soft texture and bright flavor. Here are a few things folks ask me all the time about making these **lemon cutout cookies**!
Can I make the dough ahead of time?
Yes, you totally can! I actually prefer it. After you mix the dough (before splitting and chilling), wrap both halves tightly in plastic wrap and stick them in the fridge for up to three days. When you’re ready to bake, let the dough sit on the counter for about 15 minutes so it softens just enough to roll. It makes the whole process feel less rushed!
Why did my cookies spread while baking?
This is the most common panic moment! It almost always comes down to the dough being too warm when it hits the oven, or maybe you added too much flour while rolling. Remember, we are aiming for soft cookies, so they need to be rock hard from the freezer before they go in at 350°F. If they look like they are starting to melt before they set, pull them out immediately!
How do I get the brightest lemon flavor in my lemon cutout cookies?
It’s all about Step One, seriously! You must rub the lemon zest directly into the granulated sugar with your fingers until the sugar smells like a lemon grove. That friction releases the essential oils right into the sugar. If you just dump the zest in with the wet ingredients, you lose half that incredible punch. That little step is the key to truly vibrant **lemon cutout cookies**.
Nutritional Estimates for This Dessert
I always promise myself I won’t look at the nutrition facts when I bake, but here are the general estimates for one of these beautiful **lemon cutout cookies** so you know what you’re getting into. Remember, these are estimates based on my recipe proportions!
| Nutrient | Amount Per Serving |
|---|---|
| Calories | 285 |
| Fat | 12g |
| Carbohydrates | 42g |
| Protein | 3g |

Best lemon cutout cookies: 1 secret method
- Total Time: 60 minutes
- Yield: 20 to 24 cookies 1x
- Diet: Vegetarian
Description
Soft lemon cutout cookies with tangy raspberry cream cheese frosting. Naturally pink from freeze-dried raspberries, these tender cookies are perfect for any celebration.
Ingredients
- 1 cup unsalted butter, softened (Cookies)
- Zest of 2 large lemons (Cookies)
- 1 cup granulated sugar (Cookies)
- 1 cup packed light brown sugar (Cookies)
- 2 large eggs, room temperature (Cookies)
- 2 teaspoons vanilla extract (Cookies)
- 3 tablespoons fresh lemon juice (Cookies)
- 4 and 3/4 cups all-purpose flour (Cookies)
- 1 teaspoon baking soda (Cookies)
- 1/2 teaspoon salt (Cookies)
- 6 tablespoons unsalted butter, softened (Frosting)
- 4 ounces cream cheese, cold (Frosting)
- 2 cups plus 3 tablespoons powdered sugar (Frosting)
- 2 teaspoons fresh lemon juice (Frosting)
- 1 teaspoon vanilla extract (Frosting)
- 1/8 teaspoon salt (Frosting)
- 2 tablespoons seedless raspberry preserves (Frosting)
- 1.25 ounce package freeze-dried raspberries, ground to powder (Frosting)
- 1 to 2 tablespoons milk (Frosting)
Instructions
- Rub lemon zest into granulated sugar with your fingers until the mixture resembles damp sand and smells fragrant, then set aside.
- Beat softened butter in a large bowl with an electric mixer on medium speed for 30 seconds until smooth, then add the lemon sugar and brown sugar and beat on high for 1 minute until fluffy.
- Add eggs, vanilla extract, and lemon juice to the butter mixture and beat on medium-high speed until fully combined and smooth.
- Whisk together flour, baking soda, and salt in a separate bowl, then add to the wet ingredients and mix on low speed just until no flour streaks remain.
- Divide dough in half and roll each portion between two sheets of parchment paper to 1/2 inch thickness without adding extra flour.
- Stack both parchment-wrapped dough sheets on a baking sheet and freeze for 30 minutes until firm enough to cut cleanly.
- Preheat oven to 350°F and line two baking sheets with parchment paper.
- Peel back top parchment from chilled dough and cut shapes using 3-inch heart or round cookie cutters, then arrange cut cookies 2 inches apart on prepared baking sheets.
- Bake 9 to 11 minutes until edges appear just set and bottoms are very lightly golden, then cool on the pan for 10 minutes before transferring to a wire rack.
- Beat butter and powdered sugar together for the frosting, adding milk 1 tablespoon at a time until smooth, then mix in lemon juice, vanilla extract, and salt.
- Add cold cream cheese and beat just until smooth, then stir in raspberry preserves and half of the ground freeze-dried raspberry powder until the frosting turns pale pink.
- Divide frosting into three bowls and add more raspberry powder to two portions to create light, medium, and darker pink shades, then spread onto completely cooled cookies with an offset spatula.
Notes
- The dough chills quickly in the freezer, simplifying the cutting process.
- Freeze-dried raspberries naturally color the frosting pink.
- Prep Time: 20 minutes
- Cook Time: 10 minutes
- Category: Dessert
- Method: Baking
- Cuisine: American
Nutrition
- Serving Size: 1 cookie
- Calories: 285
- Sugar: N/A
- Sodium: N/A
- Fat: 12g
- Saturated Fat: N/A
- Unsaturated Fat: N/A
- Trans Fat: N/A
- Carbohydrates: 42g
- Fiber: N/A
- Protein: 3g
- Cholesterol: N/A