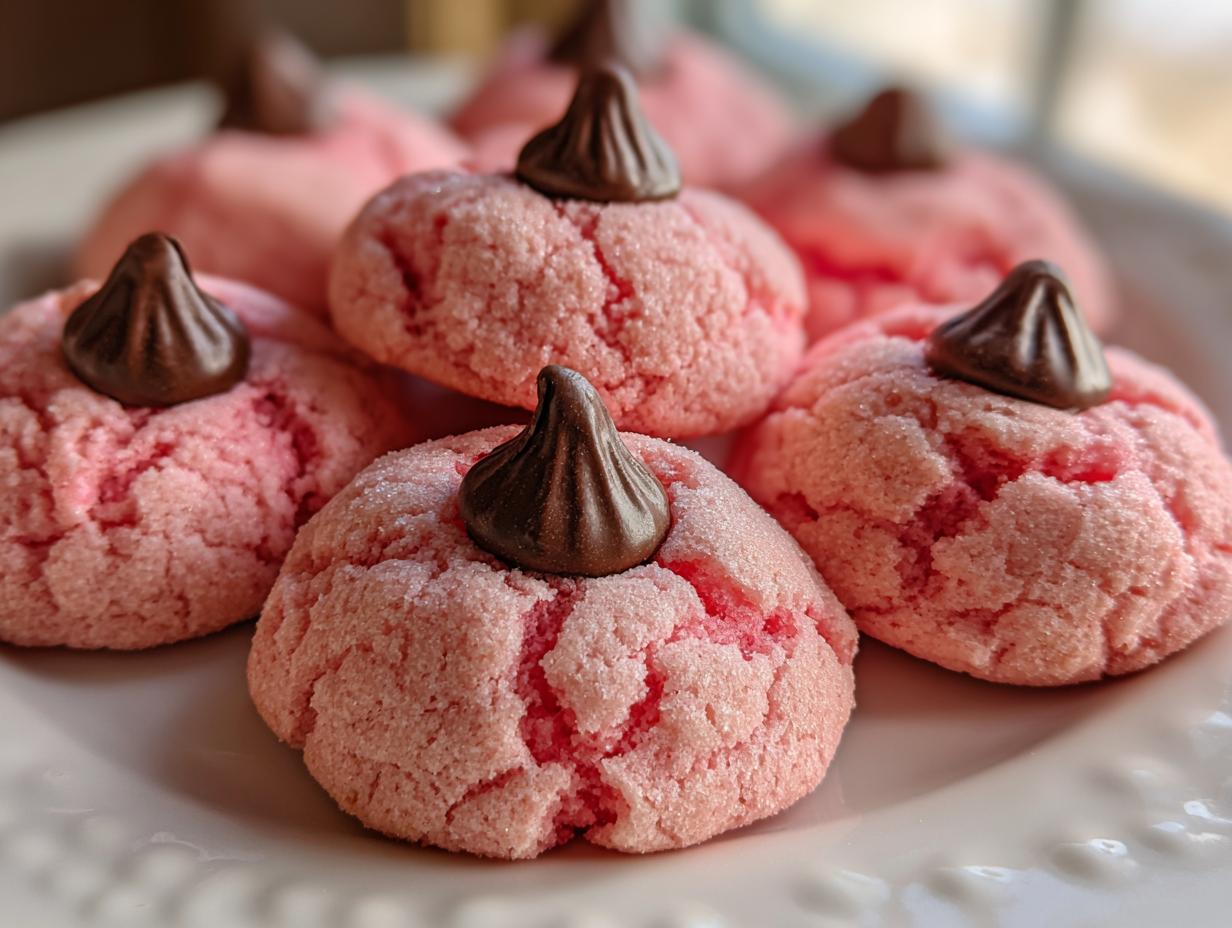
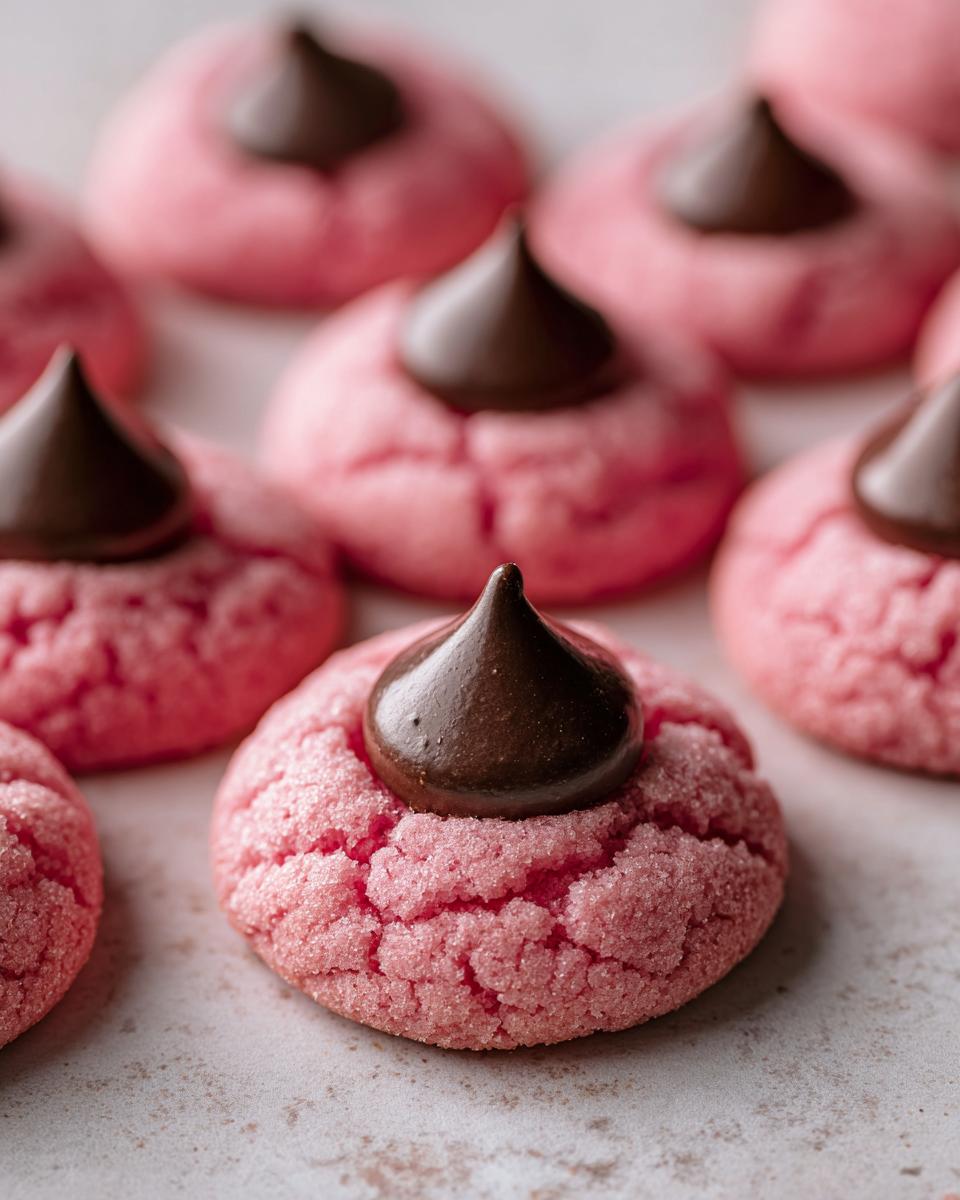
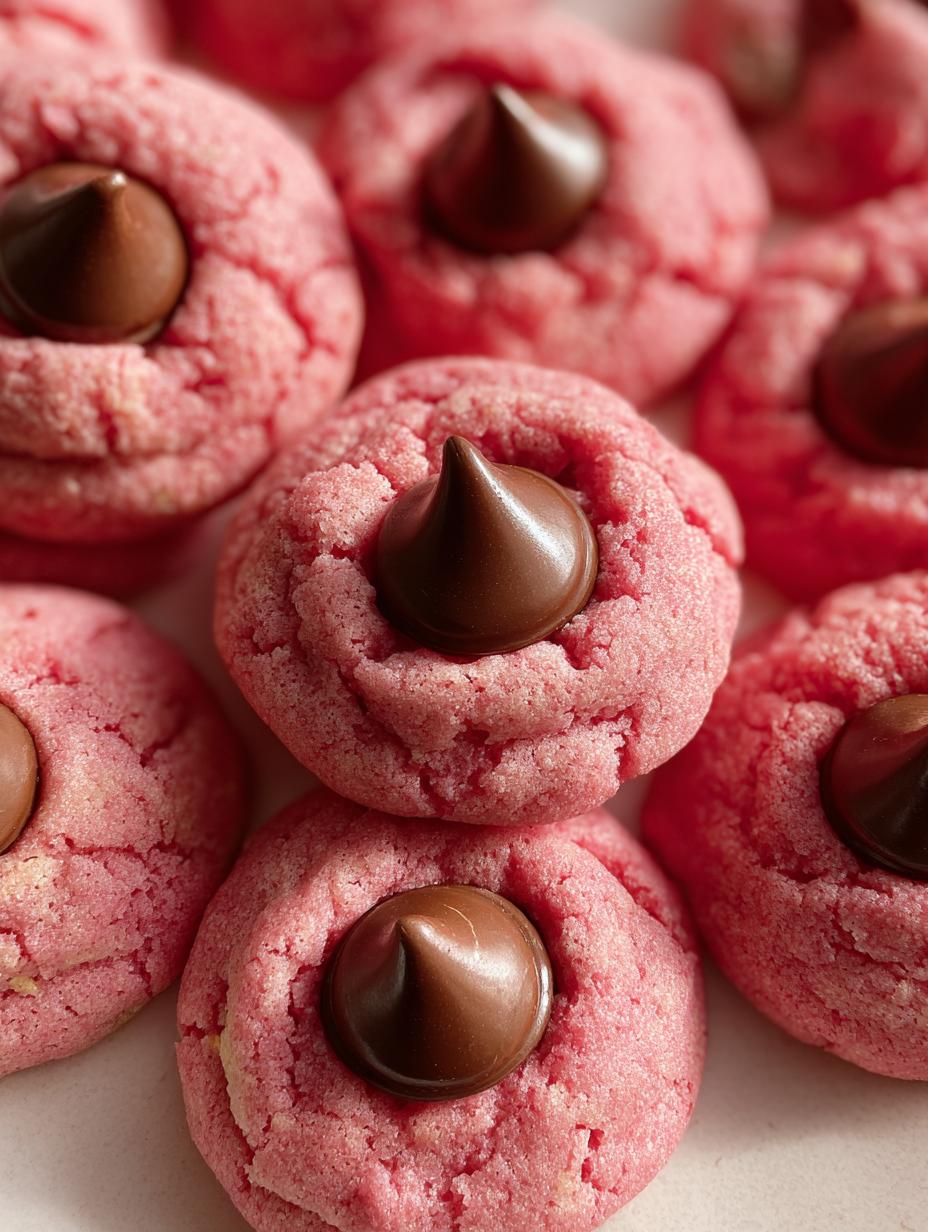
If you’re looking for a cookie that screams “holiday joy” but takes almost no time at all, you’ve found it! My go-to recipe for **Kiss Cookies** is absolutely foolproof. I’ve made these dozens of times, especially when I need a beautiful spread fast. The dough itself is this gorgeous, soft pink, which is just so charming, right?
What truly sets these apart is the texture: crisp edges that give way to a wonderfully gooey center, all topped with that perfect little melted chocolate kiss. Seriously, these drop cookies bake evenly and look festive without any fussy decorating. Trust me, once you try this simple method, it’ll become your secret weapon for any party.
Gather Your Ingredients for Perfect Kiss Cookies
Getting ready for these Kiss Cookies is half the fun, honestly! Since this is a drop cookie recipe, we don’t need any fancy chilling time, which is why they are my absolute favorite for last-minute baking needs. Make sure you pull out everything before you even think about turning on the mixer, because the process moves quickly once you start creaming the butter.
I always lay everything out on the counter so I can see exactly what I have. Precision matters for getting that perfect texture—you want them soft inside but sturdy enough to hold that chocolate cap!
Dry Components for Your Kiss Cookies
For the dry stuff, we are keeping it simple, but you have to measure accurately here. You’ll need exactly three and a half cups of all-purpose flour. Don’t pack that flour down into the cup, though! Spoon it in lightly and then level it off—otherwise, your cookies will turn out tough, and we want tender Kiss Cookies!
Then, whisk in two teaspoons of baking powder for the lift we need, and just one teaspoon of salt to balance all that sugar we’re about to add.
Wet Ingredients and Flavorings for Kiss Cookies
This is where the magic for these pink cookies starts! You absolutely must use one and one-third cups of unsalted butter, and it has to be softened. Not melted, mind you, just soft enough that your finger leaves a gentle dent. We’re beating air into that butter with the sugar, so room temperature is key!
We need two large eggs, one teaspoon of vanilla extract, and here’s the fun part: half a teaspoon of red gel food coloring. I insist on gel coloring for these Kiss Cookies. The liquid drops water down the batter too much, and we want that intense, cheerful pink color!
The Chocolate Component
Now for the star of the show! You need exactly 36 chocolate kiss candies. That’s right, 36! Since we are pressing them in immediately after they come out of the oven, you need to unwrap all 36 of those little beauties beforehand. Trust me, trying to peel foil off a hot, gooey cookie is a recipe for disaster and burned fingertips!
Essential Equipment for Making Kiss Cookies
You don’t need a fancy stand mixer for these, but you do need the right tools to manage the dough. Grab your large mixing bowl for creaming the butter, and a medium bowl for your dry ingredients. I always use my electric hand mixer because it makes creaming the butter so much faster and fluffier.
The most important thing is having at least two good baking sheets. We bake these one sheet at a time, so having the second ready to go is key for quick workflow. And please, don’t skip the parchment paper! It saves cleanup time and guarantees those crisp bottoms don’t stick.
Step-by-Step Instructions for Delicious Kiss Cookies
Okay, let’s get these pink beauties in the oven! Remember, we decided on 350 degrees Fahrenheit, so make sure your oven is fully preheated. I always line two baking sheets with parchment paper right at the start. This keeps our workflow smooth because these Kiss Cookies bake so fast.
Preparing the Dough Base for Your Kiss Cookies
First, grab that medium bowl and whisk your dry ingredients—the flour, baking powder, and salt—together really well. We want everything distributed evenly so we don’t get those weird salty pockets later. Set that bowl aside for a minute.
Now for the main event in the big bowl! Beat your softened butter and granulated sugar together using your electric mixer on medium speed. You need to beat this mixture until it gets light and fluffy. Don’t rush this part! It should take about two full minutes of good mixing. This creaming step is what traps all that air, giving our Kiss Cookies that lovely texture.
Adding Color and Finishing the Kiss Cookies Dough
Once the butter and sugar look pale and fluffy, it’s time for the color! Add your two eggs, the vanilla extract, and that vibrant red gel food coloring all at once. Beat it until everything is totally combined and you have a uniform, lovely pink color throughout. Honestly, seeing that pink dough always makes me smile!
Next, we add the dry mixture back in, but you have to do it gradually. I usually add about a third of the dry mix, mix on low until it just disappears, and then repeat that process two more times. Stop mixing the second you see the last streaks of flour disappear. If you overmix once the flour is in, you deflate all that beautiful air we just beat in, and your Kiss Cookies will be flat!
Baking and Applying the Chocolate Kisses
Now we scoop! Use a tablespoon measure for consistency—you want about 1-tablespoon portions of dough. Roll each portion gently into a nice, neat ball between your palms. Place these dough balls about two inches apart on your prepared sheets. They spread a tiny bit, so give them some breathing room!
Here’s a critical timing tip: Bake only one sheet at a time. This ensures the oven temperature stays stable. Bake them for 10 to 12 minutes. You are looking for the edges to look set and just barely golden. They won’t look fully done in the center, and that’s exactly what we want!
The moment they come out of the oven—and I mean *immediately*—you take one of those unwrapped chocolate kisses and press it right into the center of each warm cookie. Gently but firmly! The residual heat melts the bottom of the kiss perfectly into the cookie. If you wait even 30 seconds too long, the cookie sets up, and the kiss won’t sink in right. Let them cool on the baking sheet for about five minutes before carefully moving them to a wire rack to cool completely. If you try to move them too soon, they might crack!
Tips for Success with Kiss Cookies
I see so many people struggle with these cookies, usually because they rush the timing or they try to substitute ingredients. Don’t mess with the butter temperature! If it’s too cold, it won’t cream properly, and your cookies will be dense and crumbly instead of light. If it’s too warm, it melts right into the sugar, and you lose all that necessary air structure.
The biggest rookie mistake, though, happens right after they come out of the oven. You absolutely cannot wait to put that chocolate kiss on top. I mean it! If you let them sit for even a minute while you unwrap the next batch, the cookie surface hardens. When you press the kiss down, the cookie will crack right around the edges, or worse, the whole cookie might snap when you try to move it.
Also, remember the dough balls need to be uniform. If you have some big and some small, they won’t bake evenly. Use your tablespoon measure every time. Consistency in size equals consistency in texture, and that’s the secret to getting 36 perfect little pink treats every single time.
Storing and Reheating Your Kiss Cookies
These cookies are so soft and delicious that they rarely last long enough in my house to need serious storage advice! But when I do manage to hide a few away, I want to make sure they taste just as fresh a few days later. Because they have that soft center and the chocolate on top, proper storage is key to keeping their texture intact.
The good news is that these drop cookies are pretty sturdy, but we have to protect the delicate chocolate topping from getting smudged or melting if the kitchen gets warm.
Storage Guidelines for Kiss Cookies
Keep these cookies at room temperature, never in the fridge. Cold air tends to dry out cookies like these, and we want to keep that gooey center soft. Layer them carefully between sheets of wax paper inside a truly airtight container. If you stack them too tightly without the paper barrier, the chocolate kisses will stick to each other, and you’ll end up with a messy pile of pink dough!
Honestly, they are best eaten within three days, but they usually survive about a week if you keep the container sealed tight. You can find more baking tips on our Medium page.
Storage and Reheating Quick Reference
- Shelf Life (Room Temp): Up to 7 days
- Best Practice: Airtight container with wax paper dividers
- Reheating: Not recommended, but brief warming is possible
If you absolutely must soften one that’s gotten a little firm, I wouldn’t use the microwave because it melts the chocolate too fast. Pop one on a baking sheet for just 3 to 5 minutes at 300 degrees Fahrenheit. That gentle heat warms the cookie through without turning the kiss into a puddle!
Frequently Asked Questions About Kiss Cookies
I get so many questions whenever I post pictures of these beauties online! They are deceptively simple, but a few little things can throw them off. Here are the answers to the ones I hear most often about my favorite Kiss Cookies. Check out our Pinterest board for more visual inspiration.
Q1. Why are my pink cookies coming out cakey instead of soft?
Usually, that means you either over-mixed the flour into the wet ingredients, or your butter wasn’t softened enough when you started creaming. When you add the flour, mix just until it disappears! If you keep going, you develop too much gluten, and you end up with a stiff, cakey texture instead of the perfectly soft drop cookies we are aiming for. If you are looking for other soft baked goods, check out this recipe for banana oatmeal bars.
Q2. Can I skip the red food coloring? I don’t like pink cookies.
You totally can skip the color if you prefer a standard vanilla cookie, but you’ll miss out on half the fun! The recipe is designed around those cheerful pink cookies. If you skip the color, you should probably use white chocolate kisses just to keep the aesthetic consistent, though milk chocolate still works fine!
Q3. What can I use instead of chocolate kisses?
The chocolate kiss defines this cookie, of course! But if you are in a pinch, you can press a Hershey’s Hug or even a small peanut butter cup into the center right when the cookie comes out. Just make sure whatever you use is unwrapped and ready to go the second the hot cookies land on the counter! For other quick treats, consider these cucumber cream cheese bites.
Q4. Why do my cookies spread too much?
This usually happens for two reasons: you either used melted or overly warm butter, or you didn’t measure the flour correctly. If the butter is too soft, the dough can’t hold its shape during that initial bake time. Make sure your butter is only softened, and always spoon and level your flour when measuring! For more baking tips, see our guide on low calorie charcuterie chips.
Print
Perfect 36 Kiss Cookies for Joyful Baking
- Total Time: 45 minutes
- Yield: 36 cookies 1x
- Diet: N/A
Description
Bake soft pink kiss cookies topped with chocolate for delightful treats. Simple drop dough bakes evenly with crisp edges and gooey centers. Perfect for family baking sessions.
Ingredients
- 3 1/2 cups all-purpose flour
- 2 teaspoons baking powder
- 1 teaspoon salt
- 1 1/3 cups unsalted butter, softened
- 1 1/2 cups granulated sugar
- 2 large eggs
- 1 teaspoon vanilla extract
- 1/2 teaspoon red gel food coloring
- 36 chocolate kiss candies, unwrapped
Instructions
- Preheat oven to 350°F. Line two baking sheets with parchment paper.
- Whisk flour, baking powder, and salt in a medium bowl. Set aside.
- Beat butter and sugar in a large bowl with electric mixer on medium until light and fluffy, about 2 minutes.
- Add eggs, vanilla, and food coloring. Beat until fully combined.
- Gradually mix in dry ingredients until dough forms.
- Scoop 1-tablespoon portions of dough. Roll each into a ball.
- Place balls 2 inches apart on prepared sheets.
- Bake one sheet at a time for 10 to 12 minutes until edges are set and lightly golden.
- Remove from oven. Immediately press one chocolate kiss into center of each cookie.
- Cool on sheet 5 minutes. Transfer to wire rack to cool completely.
Notes
- Pink dough adds charm while chocolate kisses melt in for indulgence.
- Reliable recipe yields consistent results every time.
- Prep Time: 20 minutes
- Cook Time: 25 minutes
- Category: Dessert
- Method: Baking
- Cuisine: American
Nutrition
- Serving Size: 1 cookie
- Calories: 160
- Sugar: Unknown
- Sodium: Unknown
- Fat: 8g
- Saturated Fat: Unknown
- Unsaturated Fat: Unknown
- Trans Fat: Unknown
- Carbohydrates: 20g
- Fiber: Unknown
- Protein: 2g
- Cholesterol: Unknown