If there’s one thing I’ve learned after years of Thanksgiving disasters and triumphs, it’s that roasting a turkey doesn’t have to be scary! We’re talking about that dream scenario: skin so golden and shatteringly crisp you can hear it crunch, and meat so unbelievably juicy it practically melts. That’s the magic of this Garlic Herb Butter Roast Turkey recipe.
I’ve spent ages tweaking this method—trust me, I’ve had my share of dry birds—but the heavy hand with the herb butter under the skin is the secret sauce. It’s more than just a recipe; it’s my go-to method for serving a showstopper every single time. You’re going to love how simple it is!
Essential Ingredients for Your Garlic Herb Butter Roast Turkey
Okay, listen up! The success of this Garlic Herb Butter Roast Turkey hinges entirely on what you bring to the party. We aren’t using complicated brines or injections here. We are relying on good quality butter, fresh herbs, and a perfectly sized bird. Don’t skimp on the butter; that’s what gives us that amazing crispy skin and keeps everything moist underneath.
When you see the list, it might look like a lot of chopping, but it comes together so fast, I promise. We separate the ingredients for the butter rub from the things we stuff right into the cavity. They work together, but we treat them slightly differently during preparation.
Gathering Components for the Herb Butter Rub
This is where the flavor really develops! You need one full cup of butter—and it has to be softened, not melted. If it’s melted, it just runs off. You want it creamy so it holds onto all those gorgeous aromatics. We’re mincing up fresh garlic and chopping the herbs very finely. This fine chop helps the butter adhere beautifully and melt evenly as the turkey cooks.
Turkey Specifications and Aromatics
For the turkey itself, I always aim for a 14 to 16-pound bird. That size cooks reliably and gives you enough leftovers for a decent sandwich the next day! We aren’t stuffing the cavity with bread stuffing; we are filling it with pure flavor bombs. Grab one whole lemon, cut in half, and a whole head of garlic—yes, the whole thing, separated but unpeeled cloves work great too, but peeling them makes the drippings taste better later!
Ingredient Table
Here is exactly what you need for this showstopper. Measure these out before you even take the turkey out of the fridge!
| Ingredient | Amount |
|---|---|
| Whole Turkey (14–16 pounds) | 1 |
| Unsalted Butter, softened | 1 cup |
| Minced Garlic (for butter) | 4 cloves |
| Finely Chopped Fresh Rosemary (for butter) | 1 tablespoon |
| Finely Chopped Fresh Thyme (for butter) | 1 tablespoon |
| Finely Chopped Fresh Sage (for butter) | 1 tablespoon |
| Salt (for butter) | 1 teaspoon |
| Black Pepper (for butter) | ½ teaspoon |
| Lemon (halved, for cavity) | 1 |
| Whole Garlic Cloves (peeled, for cavity) | 1 head |
| Fresh Herb Sprigs (rosemary, thyme, sage, for cavity) | 3 sprigs each |
Preparing Your Kitchen for the Garlic Herb Butter Roast Turkey
Before we even think about mixing that glorious butter, we need to get our station set up. Think of this like setting the stage for a fantastic show! Having everything ready upfront means you aren’t scrambling later when the turkey is waiting. For this Garlic Herb Butter Roast Turkey, you need a few specialized tools to make sure everything cooks evenly and safely.
Don’t worry if you don’t have every single gadget. Most of this is pretty standard kitchen gear, but a couple of things—like that meat thermometer—are non-negotiable if you want truly juicy meat.
Necessary Equipment List
Make sure you pull these items out now while the turkey is still chilling:
- A large roasting pan (you need space for the bird to breathe!)
- A sturdy roasting rack that fits inside your pan.
- Kitchen twine for trussing those legs together.
- A good instant-read meat thermometer—this is your best friend!
- Mixing bowls and a rubber spatula for the herb butter.
- Plenty of paper towels for drying.
Initial Turkey Preparation Steps
The first steps are all about temperature and moisture control. If you’re starting from frozen, make sure that bird is completely thawed—I usually give it a day per four pounds in the fridge, just to be safe. Once thawed, take it out of the fridge about an hour before you start prepping. Letting the turkey come up closer to room temperature helps it cook more evenly.
Next, the most important physical step before seasoning: drying! Take all those paper towels and pat the turkey bone-dry, inside and out. Seriously, get rid of every drop of moisture you can. Moisture steams; dryness crisps. We want crisp skin for this Garlic Herb Butter Roast Turkey, right?
Mixing the Flavor Base: Herb Butter for Your Garlic Herb Butter Roast Turkey
Alright, here comes the fun part! This herb butter is the absolute cornerstone of why this Garlic Herb Butter Roast Turkey tastes so incredibly savory and stays so moist. Grab that cup of softened butter—it should yield easily when you press it, but not look oily.
In a medium bowl, we’re combining that butter with our minced garlic, the finely chopped rosemary, thyme, and sage. Don’t be shy with the fresh herbs; they truly make the difference here. Add your teaspoon of salt and half teaspoon of pepper. Mix it all up with a spatula until it’s a beautiful, uniform paste. It should smell incredible already! This mixture is what we use to season both the inside and outside of the bird.
Applying Butter and Stuffing the Garlic Herb Butter Roast Turkey
Now that we have our gorgeous, fragrant herb butter ready, it’s time to get hands-on with the turkey. This step requires a little bit of gentle persuasion. Remember how we patted the skin dry? Great! Now, we need to get that butter under the skin over the breast meat. Gently slide your fingers between the skin and the meat, being careful not to tear the skin away from the breast entirely—we want to create pockets, not separate flaps.
Scoop up big dollops of that herb butter and push it right under the skin, spreading it as evenly as you can over the breast. Once the skin is coated underneath, take any remaining butter and rub it generously all over the outside surfaces of the turkey. Don’t forget the legs and the areas around the joints! This butter bastes the bird from the inside out and crisps up the outside beautifully.
Next, we turn our attention to the cavity. Even though we put butter outside, we want intense aroma inside. Take your lemon halves, the whole peeled garlic cloves, and those big sprigs of fresh rosemary, thyme, and sage, and just pack them right into the cavity. Don’t overstuff it; we need space for the heat to circulate for this Garlic Herb Butter Roast Turkey.
Finally, we need to tidy up the bird for even roasting. Tuck the wing tips under the body so they don’t burn. Then, grab your kitchen twine and tie the legs together—this is called trussing. It keeps the shape neat and helps the turkey cook more uniformly. It might seem fussy, but trust me, a tightly trussed bird looks much more professional when it hits the table!
Roasting Technique for the Best Garlic Herb Butter Roast Turkey
This is where the patience pays off! Getting the oven management right is crucial for that perfect balance of crispy skin and tender meat in our Garlic Herb Butter Roast Turkey. We are starting hot and then backing off; this forces the skin to set up quickly before the interior overcooks.
Make sure your oven rack is positioned in the lower middle section of the oven—you want good airflow around the whole bird. Place the turkey breast-side up on that rack in your prepared roasting pan. Now, preheat that oven all the way up to 450 degrees Fahrenheit. This high blast of heat is what starts rendering that herb butter and making the skin golden brown right away.
Oven Temperature Management
Once the turkey is safely inside the hot oven, you need to act fast! Do not let it sit at 450°F for long. As soon as you get the door shut, immediately reduce the temperature down to 350°F. This initial high heat sets the stage, but the steady 350°F is what cooks the bird through properly. For a 15-pound bird, you’re generally looking at about 13 minutes per pound at this lower temperature, but always rely on your thermometer, not the clock!
I always keep an eye on the skin, especially around the two-hour mark. If you notice those beautiful herbs starting to look potentially burnt or the skin is achieving a deep mahogany color faster than you expected, it’s time to intervene before you lose that gorgeous color. If you are looking for more ways to use up leftover herbs, check out our ideas on Medium.
Monitoring Doneness and Skin Protection
The only way to guarantee a juicy Garlic Herb Butter Roast Turkey is by checking the temperature. Forget poking around with a fork! You need an instant-read thermometer. Insert it deep into the thickest part of the thigh, making sure you are not touching bone. If it reads 165°F, you are done! That’s the magic number for safe poultry.
If you find that the skin is getting too dark—maybe an hour before you expect it to be done—take a large piece of aluminum foil and loosely tent it over the breast area. This shields the skin from direct heat while allowing the thighs and legs to finish cooking. Remember, even after you pull it out, the internal temperature will continue to rise a few degrees as it rests. That resting period is mandatory!
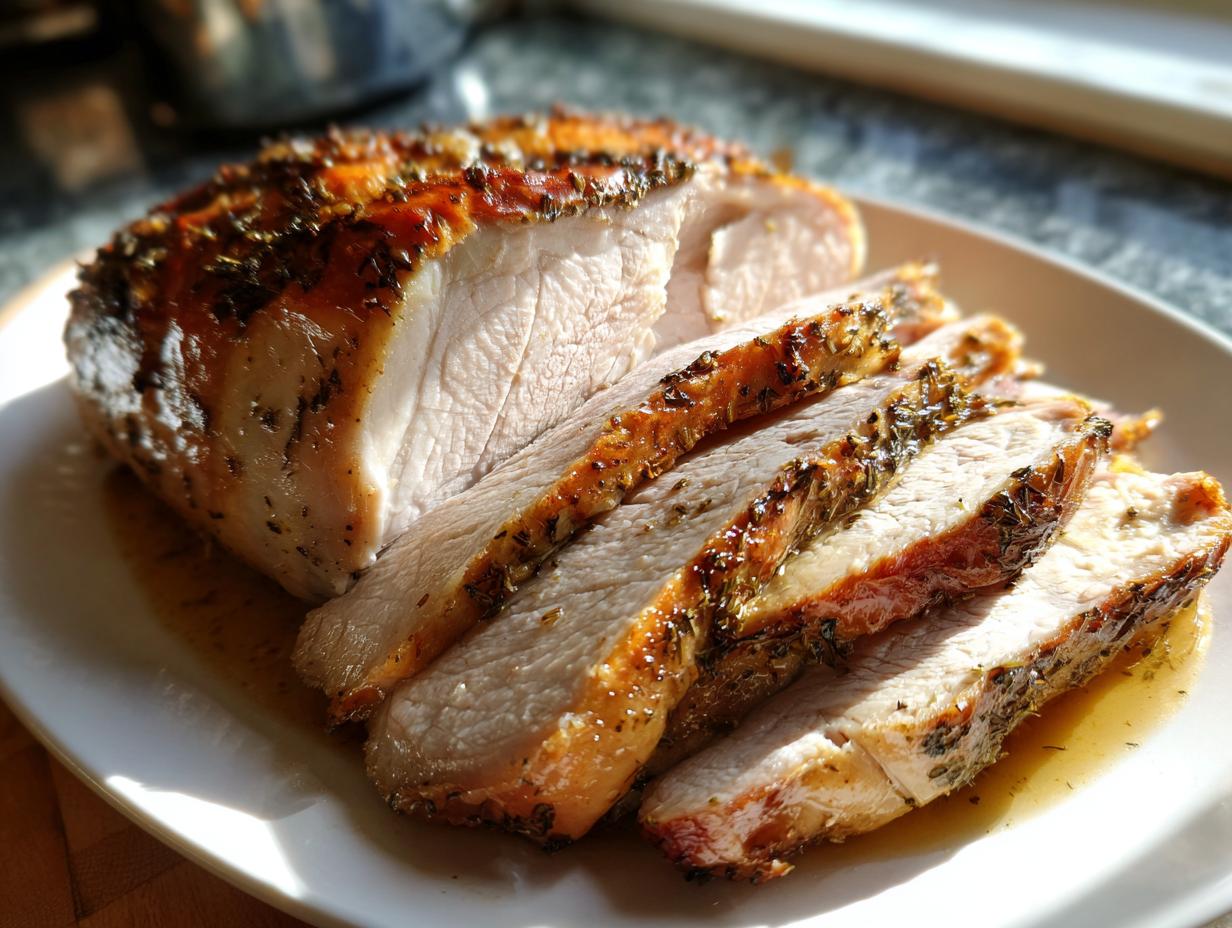
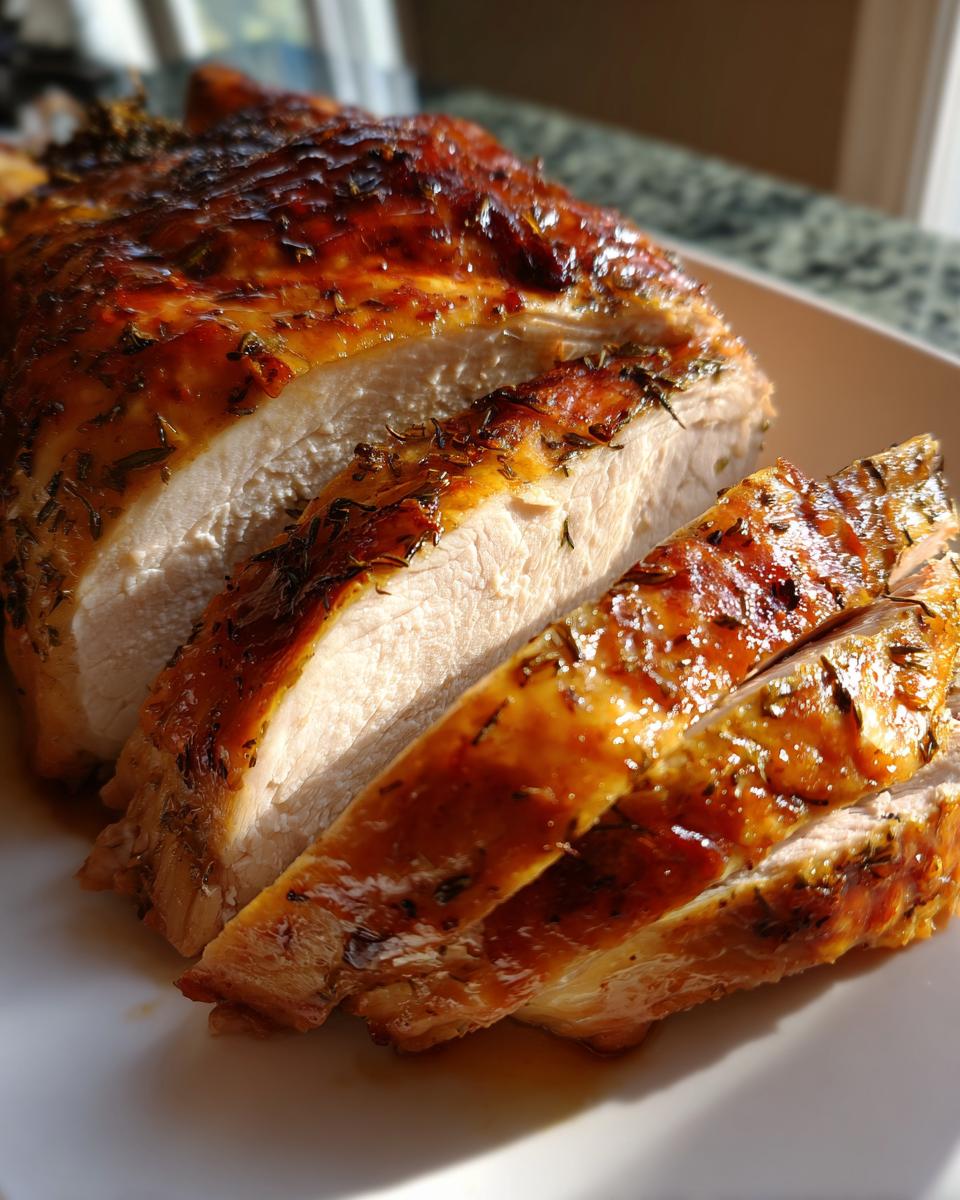
Resting and Serving the Garlic Herb Butter Roast Turkey
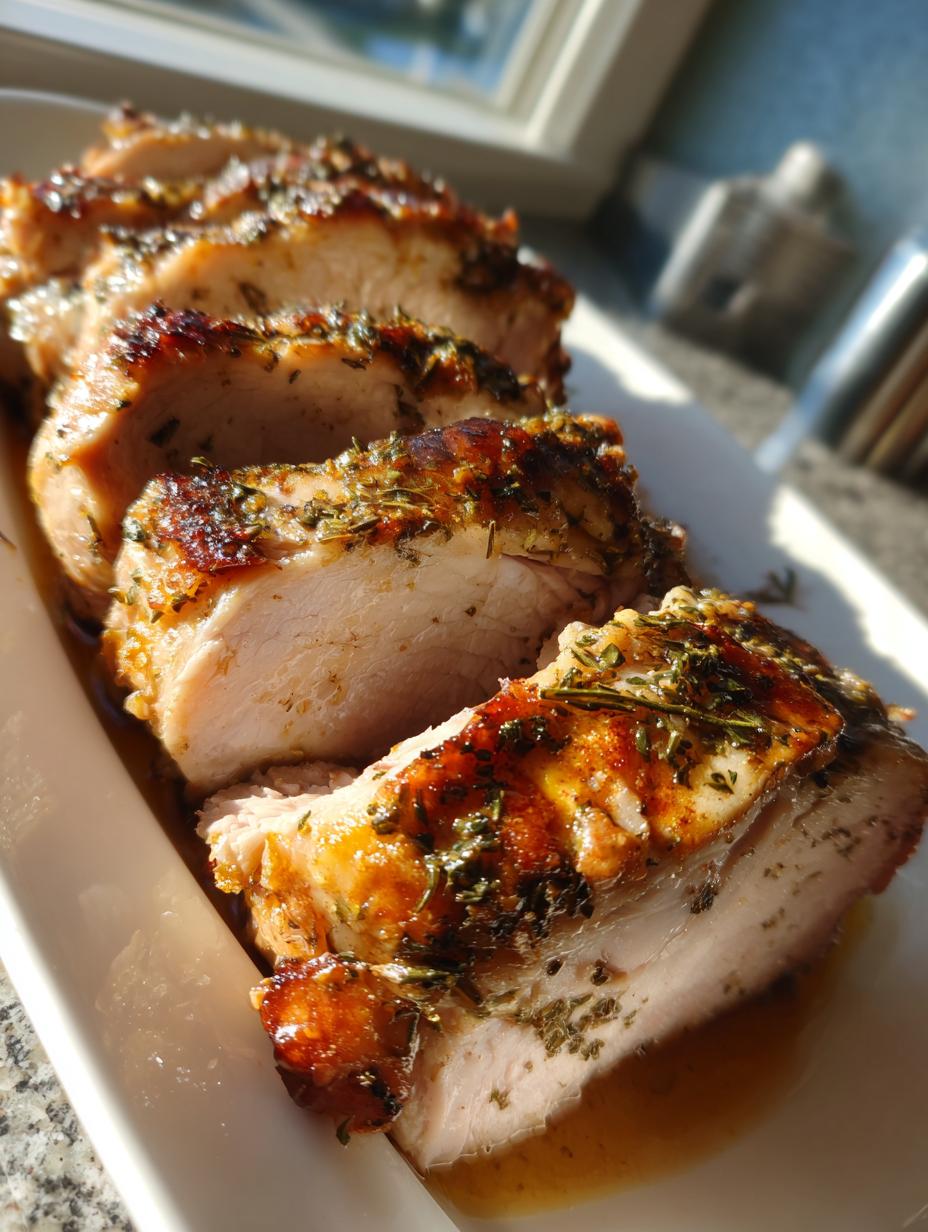
Don’t you dare touch that turkey right when it comes out of the oven! I know you’re starving, and it smells heavenly, but resisting that urge to carve immediately is the final, non-negotiable step for a truly juicy Garlic Herb Butter Roast Turkey. If you cut into it right away, all those beautiful juices we worked so hard to keep inside will just run all over your cutting board.
Let that bird rest uncovered for a full 20 minutes. Seriously, set a timer! This allows the muscle fibers to relax and reabsorb all the moisture. Once it’s rested, it’s time to carve. Just tuck the legs in, remove the twine, and slice it up. The meat near the bone will be packed with flavor from the herbs we stuffed inside. Serve it up with those amazing pan drippings—that’s pure gold! For more holiday inspiration, see what we are pinning on Pinterest.
Troubleshooting Common Garlic Herb Butter Roast Turkey Questions
Even with the best recipe, sometimes things don’t go exactly to plan, right? Don’t panic if your Roast Turkey Recipe isn’t looking exactly like a magazine cover right away. Most issues with achieving that Juicy Turkey are simple fixes. Here are the things I hear most often when people try this method for the first time. If you are looking for a lighter side dish, check out our recipe for Roasted Broccoli and White Beans.
Why is my Garlic Herb Butter Roast Turkey skin not crispy?
If your skin is looking a bit sad instead of shatteringly crisp, ninety-nine percent of the time it’s one of two things: either you didn’t pat the bird dry enough before you started, or you covered it with foil too soon. Remember, moisture is the enemy of crispness! If the skin starts browning too fast, tent it loosely—don’t wrap it tightly like a mummy. That traps steam, and steam softens skin. A little exposure to the high heat at the beginning is key for that perfect skin.
Can I prepare the herb butter ahead of time?
Oh, absolutely! Getting the Herb Butter made ahead of time is one of my favorite tricks for making Thanksgiving morning less stressful. You can mix up the butter, herbs, and spices up to two days in advance. Just keep it tightly covered in the fridge. You’ll need to take it out about an hour before you plan to apply it so it softens up enough to spread easily under the skin. It makes the actual prep for the Garlic Herb Butter Roast Turkey so much faster!
How do I check the internal temperature accurately?
This is vital for avoiding dry meat! When checking the temperature, you must avoid touching the bone, as the bone heats up faster and will give you a false high reading. Insert your instant-read thermometer into the deepest part of the thigh, aiming toward the center of the bird. You want to feel for the thickest muscle there. If that spot hits 165°F, you’re safe and done cooking! For another great poultry option, consider our Lemon Chicken Orzo Dinner.
Storing Leftovers of Your Garlic Herb Butter Roast Turkey
We always end up with tons of leftovers, and honestly, leftover turkey is the best part! You need to handle cooked poultry quickly to keep it safe. Don’t leave that bird out on the counter for more than two hours, or you risk inviting trouble. Once it cools down a bit, get it into airtight containers right away so you can enjoy that Juicy Turkey later in the week! If you need ideas for using up leftovers, check out our Cranberry Turkey Sliders.
Storage and Reheating Guidelines
Here’s my quick guide for keeping those delicious bits safe and making sure they reheat beautifully. Don’t forget to use the drippings if you saved them—they are amazing over mashed potatoes!
| Storage Method | Duration | Reheating Tip |
|---|---|---|
| Airtight Container (Refrigerated) | 3 to 4 days | Reheat gently in broth or gravy to maintain moisture. |
| Freezer (Wrapped Tightly) | Up to 3 months | Thaw overnight in the fridge before reheating slowly in the oven. |
Amazing 1 Recipe Garlic Herb Butter Roast Turkey
- Total Time: 3 hours 20 minutes
- Yield: 10–12 servings 1x
- Diet: N/A
Description
This garlic herb butter roast turkey features crispy golden skin and deeply savory, tender meat. A simple recipe using fragrant herb butter for moist results.
Ingredients
- 1 whole turkey (14–16 pounds), thawed if frozen
- Salt and black pepper to taste
- 1 lemon, halved
- 1 head garlic, cloves separated and peeled
- 3 sprigs fresh rosemary
- 3 sprigs fresh thyme
- 3 sprigs fresh sage
- 1 cup unsalted butter, softened
- 4 cloves garlic, minced
- 1 tablespoon finely chopped fresh rosemary
- 1 tablespoon finely chopped fresh thyme
- 1 tablespoon finely chopped fresh sage
- 1 teaspoon salt
- ½ teaspoon black pepper
Instructions
- Take the turkey out of the refrigerator and let it sit at room temperature for 1 hour. Remove the neck and giblets from the cavity. Pat the turkey dry inside and out with paper towels.
- Mix softened butter, minced garlic, chopped rosemary, chopped thyme, chopped sage, salt, and pepper in a small bowl until well combined. This is your herb butter.
- Rub the herb butter all over the turkey, getting some under the skin if possible. Season the cavity with salt and pepper. Stuff the cavity with lemon halves, whole garlic cloves, and fresh herb sprigs. Tuck the wings under and tie the legs together with kitchen twine.
- Preheat your oven to 450°F. Place the turkey breast-side up on a rack in a large roasting pan. Immediately reduce the heat to 350°F once the turkey is in the oven.
- Roast for about 13 minutes per pound, or until an instant-read thermometer in the thickest part of the thigh reads 165°F.
- Loosely cover the turkey with foil during the final hour of cooking if the skin browns too fast.
- Remove the turkey from the oven and let it rest uncovered for 20 minutes before you carve it.
- Carve the turkey and serve it with pan drippings or gravy.
Notes
- Always cook turkey until the thickest part of the thigh reaches an internal temperature of 165°F.
- Resting the turkey before carving keeps the meat juicy.
- Prep Time: 20 minutes
- Cook Time: 3 hours
- Category: Poultry
- Method: Roasting
- Cuisine: American
Nutrition
- Serving Size: 1/12 of turkey
- Calories: 420
- Sugar: N/A
- Sodium: N/A
- Fat: 24g
- Saturated Fat: N/A
- Unsaturated Fat: N/A
- Trans Fat: N/A
- Carbohydrates: 1g
- Fiber: N/A
- Protein: 46g
- Cholesterol: N/A