
Welcome, friend! If you’re anything like me, you need dinner on the table *fast* but you refuse to eat something boring just because it’s quick. That’s why this Garlic Butter Chicken Skillet recipe is my absolute go-to. Seriously, in about 30 minutes, you get this unbelievably juicy, steakhouse-quality chicken bathed in the most heavenly garlic butter sauce.
I’ve tested this method dozens of times, so I know it delivers reliable, restaurant-worthy results every single time we make this Garlic Butter Chicken Skillet. We’re talking about searing the chicken perfectly, then building that sauce right in the same pan—no extra dishes, which is a huge win in my book!
The secret here isn’t complicated; it’s just about getting the heat right and using good quality butter. You don’t need fancy ingredients to make this Garlic Butter Chicken Skillet taste like you spent hours cooking. Trust me, once you smell that garlic hit the melted butter, you’ll know you’ve made the right choice for dinner tonight!
Essential Ingredients for Your Garlic Butter Chicken Skillet
When making any quick meal, the quality of your ingredients really shines through, and that’s especially true for the Garlic Butter Chicken Skillet. Since the sauce is so simple, every single component matters. Don’t try to skimp here; a few high-impact items turn plain chicken into something spectacular!
We are focusing on flavor concentration, so fresh garlic and real butter are non-negotiable. The lemon juice at the end is just as important because it cuts through the richness perfectly. It’s a short list, so make sure what you buy is the best you can get!
Selecting High-Quality Chicken
You absolutely must start with boneless, skinless chicken breasts. I always buy chicken that looks plump and pale pink. Now, here’s the crucial part: evenness! If your chicken breasts are thick on one end and super thin on the other, they won’t cook at the same rate. You’ll end up with dry chicken where it’s thin and raw in the middle. Take a few minutes to gently pound the thicker parts with a meat mallet or even the bottom of a heavy pan until they are all roughly the same thickness. It makes a massive difference in the final texture.
Building the Flavor Base for Garlic Butter Chicken Skillet
This is where the steakhouse flavor comes from! You need five whole cloves of garlic, minced very fine. Don’t even think about using the jarred stuff here; fresh garlic sings when it hits hot butter. For the dry rub, we are using smoked paprika—that’s key for that deep, savory color—along with onion powder, dried parsley, salt, pepper, and just a tiny pinch of red pepper flakes. That little bit of heat balances out the richness of the butter in this famous Garlic Butter Chicken Skillet.
Equipment Needed for a Successful One-Pan Meal
Since this is such a quick recipe, you don’t need a giant arsenal of tools. Keeping it simple means less cleanup later, which is always a bonus after a busy weeknight!
- A large, heavy-bottomed skillet (cast iron or stainless steel works best for a good sear)
- Tongs for flipping
- A small bowl for mixing the spice rub
- A meat thermometer (highly recommended for safety!)
Step-by-Step Instructions for Your Garlic Butter Chicken Skillet
Okay, let’s get cooking! This recipe moves fast once you start, so have everything ready to go before you turn on the stove. We’re going from raw chicken to plated perfection in under 25 minutes. Follow these steps closely, and you’ll nail that perfect sear and that amazing sauce every time you make your Garlic Butter Chicken Skillet.
Preparing and Seasoning the Chicken
First things first: pat those chicken breasts bone dry with paper towels. Seriously, don’t skip this! Wet chicken steams instead of searing, and we want that gorgeous golden crust. While you’re patting them dry, get your spice mix ready. In a little bowl, mix up your paprika, onion powder, dried parsley, salt, pepper, and those little red pepper flakes. Now, take your time coating both sides of the chicken evenly with this mixture. You want a nice, even layer of seasoning—don’t be shy! If you pounded them to an even thickness like we talked about, they are ready for the heat.
Searing the Chicken Perfectly
Time for the skillet! Heat up your biggest pan over medium-high heat and add your two tablespoons of olive oil. You know the oil is hot enough when you flick a tiny bit of water in and it sizzles immediately. Carefully lay the seasoned chicken breasts in the hot oil in a single layer. Don’t crowd the pan; if you have to do this in two batches, please do! Crowding drops the pan temperature too fast. Let them sear undisturbed for 5 to 6 minutes until they are deeply golden brown on the bottom. Flip them gently with tongs and cook the other side for another 5 to 6 minutes. You absolutely must check the temperature here—it needs to hit 165 degrees Fahrenheit internally for safety. Once they’re done, pull them out onto a clean plate and tent them loosely with foil so they stay warm while you make the magic part of the Garlic Butter Chicken Skillet.
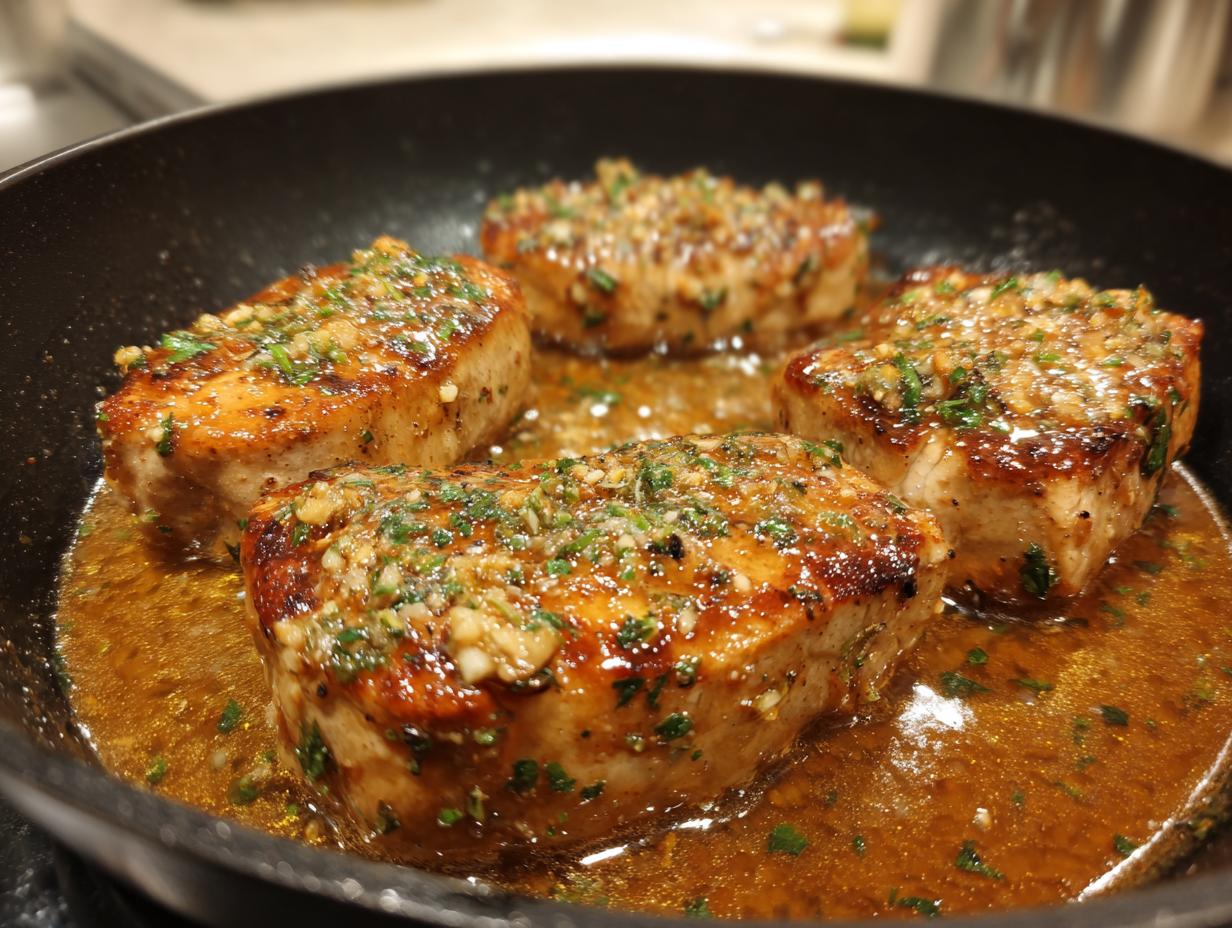
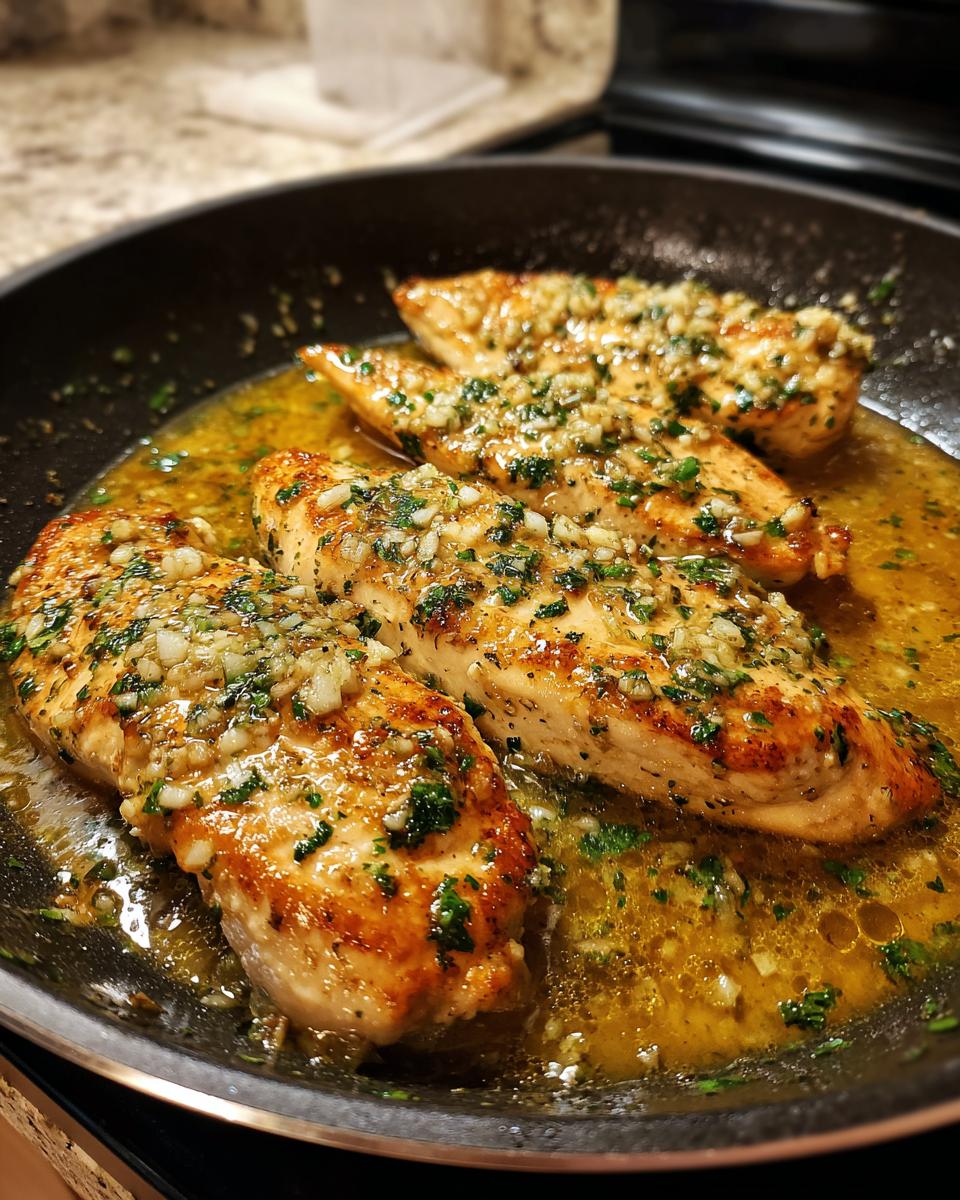
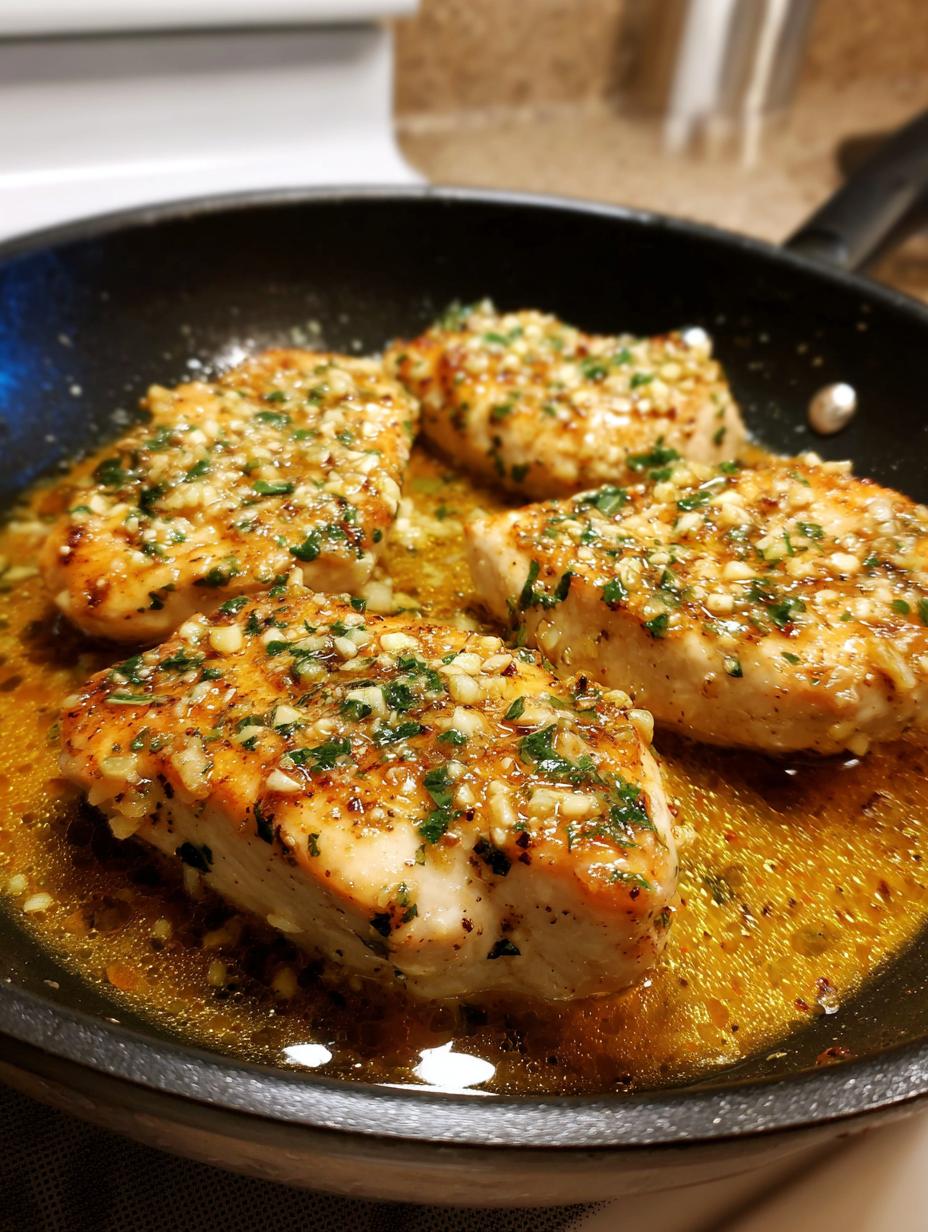
Creating the Rich Garlic Butter Sauce in the Skillet
Now we turn the heat down just a little bit to medium; we don’t want to burn that garlic! See all those yummy brown bits stuck to the bottom of the pan? That’s flavor gold, my friend! Add your three tablespoons of butter right into the skillet. Let it melt down, scraping up those browned bits with your spoon—that’s called fond, and it’s the base of our sauce. Once the butter is melted, toss in your five cloves of minced fresh garlic. You only want to cook this for about 1 to 2 minutes until you can really smell that strong, sweet garlic aroma. Be careful not to let the garlic brown or turn dark brown, or it’ll taste bitter!
Finishing the Garlic Butter Chicken Skillet
This is the grand finale! Once the garlic is fragrant, return those warm chicken breasts right back into the skillet, nestling them into the garlic butter bath. Now, pour in your tablespoon of fresh lemon juice over everything. Let this simmer gently for about 2 to 3 minutes. This step lets the chicken soak up all that incredible garlic butter sauce and lets the flavors truly meld together. Spoon that beautiful sauce right over the tops of the chicken a few times while it simmers. When it’s done, take it off the heat, sprinkle generously with that fresh chopped parsley, and serve immediately. That pan sauce is for drizzling over everything!
Tips for Perfect Garlic Butter Chicken Skillet Results
I’ve learned a few things the hard way over the years, so let me save you some trouble! The biggest killer for this dish is overcooking the chicken. Remember, it keeps cooking slightly even after you take it off the heat, so pulling it off the stove right at 165°F is crucial for keeping it juicy in your Garlic Butter Chicken Skillet. If you wait until it’s 170°F, it’ll be tough!
Another thing: don’t rush the sear! You need that hard, hot sear to build the crust and the fond for your sauce. If your pan is smoking furiously, turn the heat down a touch. Also, invest in a little jar of smoked paprika—it adds depth that regular paprika just can’t touch. If you follow these little tricks, your Garlic Butter Chicken Skillet will be fork-tender and packed with flavor every single time. For more quick dinner ideas, check out this simple healthy orzo weeknight meal.
Serving Suggestions for Your One-Pan Meal
This dish is so flavorful and rich with that garlic butter sauce, it really shines when paired with something simple to soak up all the goodness. My favorite thing to do is whip up a batch of creamy mashed potatoes right before I start the chicken. The potatoes act like sponges for that sauce!
If you’re looking for something lighter, steamed green beans or roasted asparagus are fantastic side dishes. A simple side of fluffy white rice also works perfectly to stretch this meal out for four hungry people. Honestly, though, you could just eat the chicken with a piece of crusty bread to mop up the skillet! If you enjoy one-pan meals, you might also like this healthy chicken orzo skillet.
Storing and Reheating Leftovers of Garlic Butter Chicken Skillet
If you’re lucky enough to have leftovers of this amazing Garlic Butter Chicken Skillet—which usually doesn’t happen in my house—storage is easy, but reheating needs a little care to keep that chicken from drying out. The biggest mistake people make is nuking it too long! You want to gently warm the chicken and the sauce together.
Always store leftovers in an airtight container in the fridge. That sauce helps protect the chicken from drying out in the cold air. When you reheat, don’t just throw the chicken in the microwave alone. Put the chicken and a spoonful of extra butter or a splash of broth/water in a small pan over medium-low heat, cover it, and let it warm through slowly. This keeps the chicken tender, just like when you first made this perfect Garlic Butter Chicken Skillet. You can find more great recipes on our Medium page.
Storage Table
| Item | Storage Time | Reheating Method |
|---|---|---|
| Garlic Butter Chicken | 3 to 4 days | Stovetop, low heat |
| Sauce (Separated) | Up to 1 week | Gently melt on stove |
Frequently Asked Questions About Your Garlic Butter Chicken Skillet
I get so many questions about this recipe because people want to make sure their Garlic Butter Chicken Skillet comes out perfectly juicy! Here are some of the most common things folks ask me.
Q1. Can I use chicken thighs instead of breasts?
You totally can! Thighs are more forgiving and have more fat, so they are harder to overcook. If you use thighs, just make sure they are skinless and boneless, and increase the searing time slightly, maybe by a minute or two per side, until they hit that safe internal temperature.
Q2. Is this recipe really high protein chicken?
Yes, it is! Since we are using lean chicken breast and hardly any carbs, this makes a fantastic high protein chicken meal. It’s great for post-workout dinners!
Q3. Can I add vegetables to make this a true one pan chicken meal?
Absolutely! You just need to adjust the timing. If you add something like broccoli or sliced mushrooms, toss them into the skillet right after you remove the chicken. Let them cook for a few minutes, then add the butter and garlic around them. Then, put the chicken back in to finish simmering with the veggies. For more one-pan ideas, see this one pot orzo and vegetable dinner.
Q4. My garlic burned! What did I do wrong?
This is the most common mistake in any garlic butter recipe! You must reduce the heat to medium or medium-low before adding the butter and garlic. Garlic cooks way faster than chicken, and if the pan is too hot, it scorches instantly. Wait until the butter has melted and cooled slightly before adding the minced garlic.
Understanding the Nutrition in This Garlic Butter Chicken Skillet
One of the best things about this Garlic Butter Chicken Skillet is how satisfying it is without being heavy. It’s a fantastic main dish for anyone watching their macros. Because we aren’t adding flour or extra sugar to the sauce, we keep the carbs super low while packing in the protein!
It serves four people, and while the fat content is higher due to the butter, it’s balanced out by the lean protein. It’s a truly balanced meal when served with a vegetable side. Check out our Pinterest page for visual inspiration.
Estimated Nutritional Breakdown
| Nutrient | Amount Per Serving |
|---|---|
| Calories | 320 |
| Fat | 19 grams |
| Protein | 32 grams |
| Carbohydrates | 3 grams |
Tips for Perfect Garlic Butter Chicken Skillet Results
I’ve learned a few things the hard way over the years, so let me save you some trouble! The biggest killer for this dish is overcooking the chicken. Remember, it keeps cooking slightly even after you take it off the stove right at 165°F is crucial for keeping it juicy in your Garlic Butter Chicken Skillet. If you wait until it’s 170°F, it’ll be tough!
Another thing: don’t rush the sear! You need that hard, hot sear to build the crust and the fond for your sauce. If your pan is smoking furiously, turn the heat down a touch. Also, invest in a little jar of smoked paprika—it adds depth that regular paprika just can’t touch. If you follow these little tricks, your Garlic Butter Chicken Skillet will be fork-tender and packed with flavor every single time.
Serving Suggestions for Your One-Pan Meal
This dish is so flavorful and rich with that garlic butter sauce, it really shines when paired with something simple to soak up all the goodness. My favorite thing to do is whip up a batch of creamy mashed potatoes right before I start the chicken. The potatoes act like sponges for that sauce!
If you’re looking for something lighter, steamed green beans or roasted asparagus are fantastic side dishes. A simple side of fluffy white rice also works perfectly to stretch this meal out for four hungry people. Honestly, though, you could just eat the chicken with a piece of crusty bread to mop up the skillet!
Storing and Reheating Leftovers of Garlic Butter Chicken Skillet
If you’re lucky enough to have leftovers of this amazing Garlic Butter Chicken Skillet—which usually doesn’t happen in my house—storage is easy, but reheating needs a little care to keep that chicken from drying out. The biggest mistake people make is nuking it too long! You want to gently warm the chicken and the sauce together.
Always store leftovers in an airtight container in the fridge. That sauce helps protect the chicken from drying out in the cold air. When you reheat, don’t just throw the chicken in the microwave alone. Put the chicken and a spoonful of extra butter or a splash of broth/water in a small pan over medium-low heat, cover it, and let it warm through slowly. This keeps the chicken tender, just like when you first made this perfect Garlic Butter Chicken Skillet.
Storage Table
| Item | Storage Time | Reheating Method |
|---|---|---|
| Garlic Butter Chicken | 3 to 4 days | Stovetop, low heat |
| Sauce (Separated) | Up to 1 week | Gently melt on stove |
Frequently Asked Questions About Your Garlic Butter Chicken Skillet
I get so many questions about this recipe because people want to make sure their Garlic Butter Chicken Skillet comes out perfectly juicy! Here are some of the most common things folks ask me.
Q1. Can I use chicken thighs instead of breasts?
You totally can! Thighs are more forgiving and have more fat, so they are harder to overcook. If you use thighs, just make sure they are skinless and boneless, and increase the searing time slightly, maybe by a minute or two per side, until they hit that safe internal temperature.
Q2. Is this recipe really high protein chicken?
Yes, it is! Since we are using lean chicken breast and hardly any carbs, this makes a fantastic high protein chicken meal. It’s great for post-workout dinners!
Q3. Can I add vegetables to make this a true one pan chicken meal?
Absolutely! You just need to adjust the timing. If you add something like broccoli or sliced mushrooms, toss them into the skillet right after you remove the chicken. Let them cook for a few minutes, then add the butter and garlic around them. Then, put the chicken back in to finish simmering with the veggies.
Q4. My garlic burned! What did I do wrong?
This is the most common mistake in any garlic butter recipe! You must reduce the heat to medium or medium-low before adding the butter and garlic. Garlic cooks way faster than chicken, and if the pan is too hot, it scorches instantly. Wait until the butter has melted and cooled slightly before adding the minced garlic.
Understanding the Nutrition in This Garlic Butter Chicken Skillet
One of the best things about this Garlic Butter Chicken Skillet is how satisfying it is without being heavy. It’s a fantastic main dish for anyone watching their macros. Because we aren’t adding flour or extra sugar to the sauce, we keep the carbs super low while packing in the protein!
It serves four people, and while the fat content is higher due to the butter, it’s balanced out by the lean protein. It’s a truly balanced meal when served with a vegetable side.
Estimated Nutritional Breakdown
| Nutrient | Amount Per Serving |
|---|---|
| Calories | 320 |
| Fat | 19 grams |
| Protein | 32 grams |
| Carbohydrates | 3 grams |

Amazing 30-min Garlic Butter Chicken Skillet
- Total Time: 30 minutes
- Yield: 4 servings 1x
- Diet: Low Fat
Description
Juicy seared chicken breasts coated in a rich garlic butter sauce with a hint of lemon. This is a high protein, one-pan dinner ready in about 30 minutes, delivering bold steakhouse flavor.
Ingredients
- 4 boneless, skinless chicken breasts
- 2 tablespoons olive oil
- 3 tablespoons unsalted butter
- 5 garlic cloves, minced
- 1 teaspoon smoked paprika
- 1 teaspoon onion powder
- 1 teaspoon dried parsley
- 1/2 teaspoon sea salt
- 1/2 teaspoon black pepper
- 1/4 teaspoon crushed red pepper flakes
- 1 tablespoon fresh lemon juice
- 1 tablespoon chopped fresh parsley
Instructions
- Pat the chicken breasts dry. Pound to even thickness if needed.
- Combine paprika, onion powder, dried parsley, salt, black pepper, and red pepper flakes in a bowl. Season chicken evenly on both sides.
- Heat olive oil in a large skillet over medium high heat. Add chicken in a single layer. Sear 5 to 6 minutes per side until golden brown and cooked through (165°F internal temperature). Transfer chicken to a plate and tent with foil.
- Reduce heat to medium. Add butter to the skillet. Melt, then stir in minced garlic. Cook 1 to 2 minutes until fragrant, stirring constantly.
- Return chicken to the skillet. Spoon garlic butter over the chicken and add lemon juice. Simmer 2 to 3 minutes for flavors to blend.
- Sprinkle with fresh parsley and serve immediately with the pan sauce.
Notes
- This meal pairs well with mashed potatoes, rice, or roasted vegetables.
- Ensure chicken reaches 165°F for safe consumption.
- Prep Time: 10 minutes
- Cook Time: 20 minutes
- Category: Main Dish
- Method: Skillet
- Cuisine: American
Nutrition
- Serving Size: 1 serving
- Calories: 320
- Sugar: 0 grams
- Sodium: N/A
- Fat: 19 grams
- Saturated Fat: N/A
- Unsaturated Fat: N/A
- Trans Fat: N/A
- Carbohydrates: 3 grams
- Fiber: 0 grams
- Protein: 32 grams
- Cholesterol: N/A
